
It’s common to see Web Components directly compared to framework components. But most examples are actually specific to Custom Elements, which is one piece of the Web Components picture. It’s easy to forget Web Components are actually a set of individual Web Platform APIs that can be used on their own:
In other words, it’s possible to create a Custom Element without using Shadow DOM or HTML Templates, but combining these features opens up enhanced stability, reusability, maintainability, and security. They’re all parts of the same feature set that can be used separately or together.
With that being said, I want to pay particular attention to Shadow DOM and where it fits into this picture. Working with Shadow DOM allows us to define clear boundaries between the various parts of our web applications — encapsulating related HTML and CSS inside a DocumentFragment to isolate components, prevent conflicts, and maintain clean separation of concerns.
How you take advantage of that encapsulation involves trade-offs and a variety of approaches. In this article, we’ll explore those nuances in depth, and in a follow-up piece, we’ll dive into how to work effectively with encapsulated styles.
Why Shadow DOM Exists
Most modern web applications are built from an assortment of libraries and components from a variety of providers. With the traditional (or “light”) DOM, it’s easy for styles and scripts to leak into or collide with each other. If you are using a framework, you might be able to trust that everything has been written to work seamlessly together, but effort must still be made to ensure that all elements have a unique ID and that CSS rules are scoped as specifically as possible. This can lead to overly verbose code that both increases app load time and reduces maintainability.
<!-- div soup -->
<div id="my-custom-app-framework-landingpage-header" class="my-custom-app-framework-foo">
  <div><div><div><div><div><div>etc...</div></div></div></div></div></div>
</div>
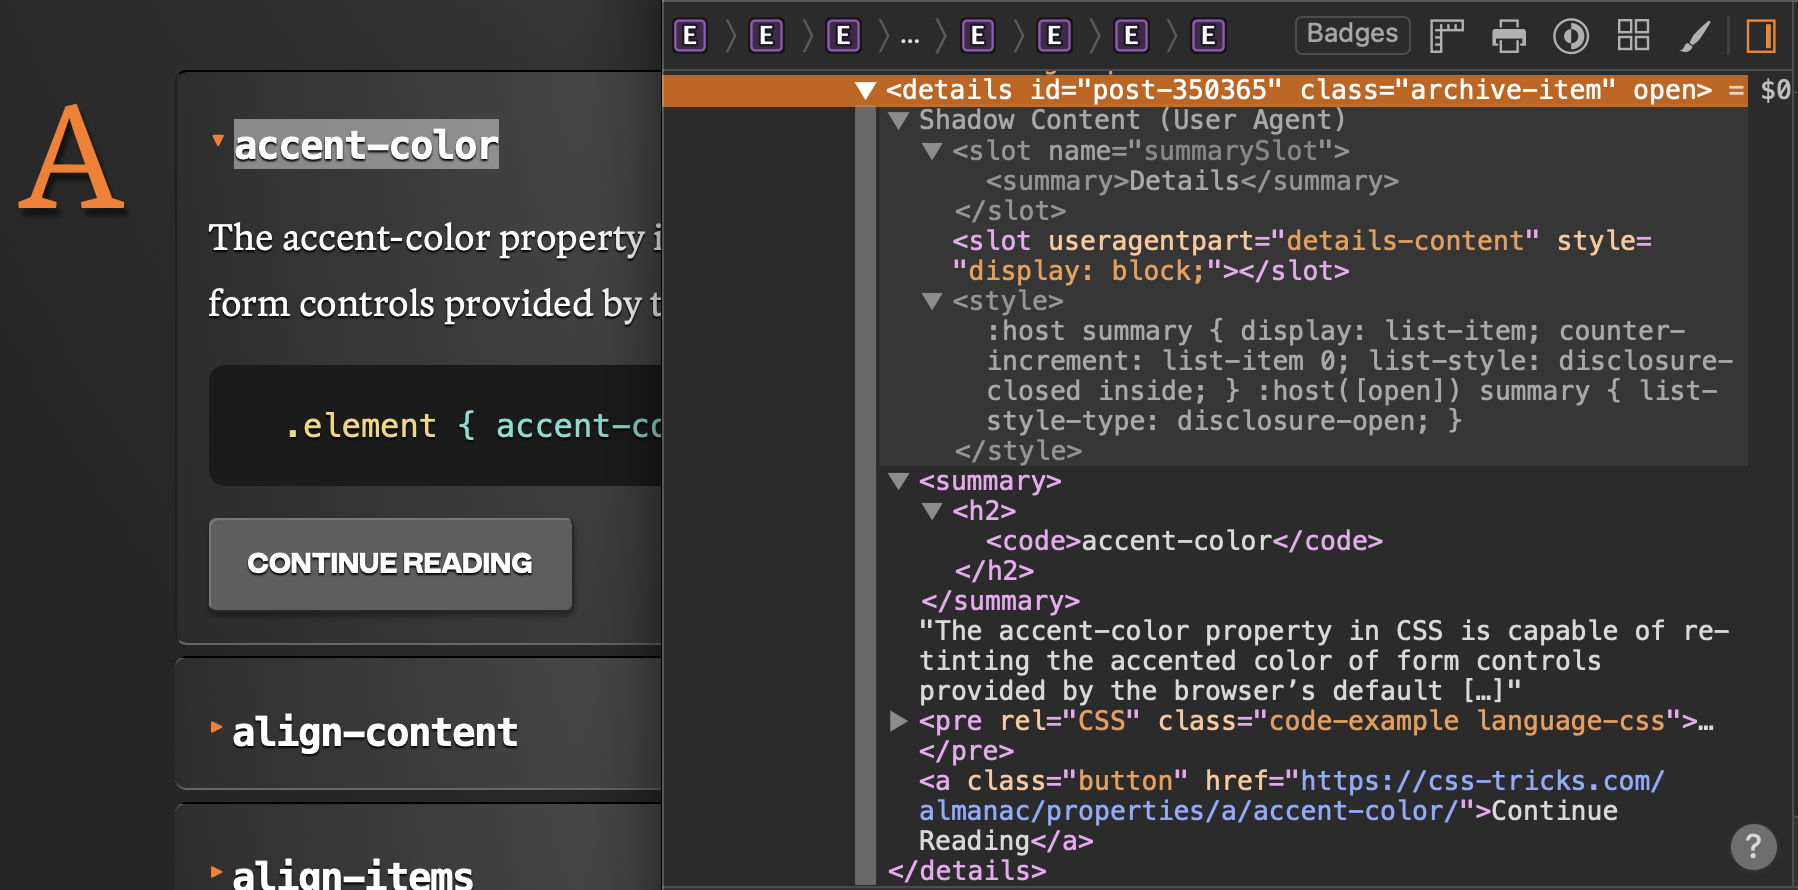
Shadow DOM was introduced to solve these problems by providing a way to isolate each component. The <video> and <details> elements are good examples of native HTML elements that use Shadow DOM internally by default to prevent interference from global styles or scripts. Harnessing this hidden power that drives native browser components is what really sets Web Components apart from their framework counterparts.
Elements That Can Host A Shadow Root
Most often, you will see shadow roots associated with Custom Elements. However, they can also be used with any HTMLUnknownElement, and many standard elements support them as well, including:
<aside><blockquote><body><div><footer><h1>to<h6><header><main><nav><p><section><span>
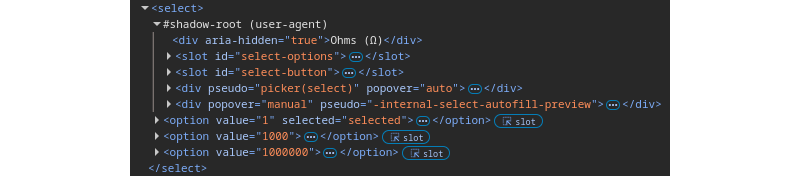
Each element can only have one shadow root. Some elements, including <input> and <select>, already have a built-in shadow root that is not accessible through scripting. You can inspect them with your Developer Tools by enabling the Show User Agent Shadow DOM setting, which is “off” by default.

Creating A Shadow Root
Before leveraging the benefits of Shadow DOM, you first need to establish a shadow root on an element. This can be instantiated imperatively or declaratively.
Imperative Instantiation
To create a shadow root using JavaScript, use attachShadow({ mode }) on an element. The mode can be open (allowing access via element.shadowRoot) or closed (hiding the shadow root from outside scripts).
const host = document.createElement('div');
const shadow = host.attachShadow({ mode: 'open' });
shadow.innerHTML = '<p>Hello from the Shadow DOM!</p>';
document.body.appendChild(host);
In this example, we’ve established an open shadow root. This means that the element’s content is accessible from the outside, and we can query it like any other DOM node:
host.shadowRoot.querySelector('p'); // selects the paragraph element
If we want to prevent external scripts from accessing our internal structure entirely, we can set the mode to closed instead. This causes the element’s shadowRoot property to return null. We can still access it from our shadow reference in the scope where we created it.
shadow.querySelector('p');
This is a crucial security feature. With a closed shadow root, we can be confident that malicious actors cannot extract private user data from our components. For example, consider a widget that shows banking information. Perhaps it contains the user’s account number. With an open shadow root, any script on the page can drill into our component and parse its contents. In closed mode, only the user can perform this kind of action with manual copy-pasting or by inspecting the element.
I suggest a closed-first approach when working with Shadow DOM. Make a habit of using closed mode unless you are debugging, or only when absolutely necessary to get around a real-world limitation that cannot be avoided. If you follow this approach, you will find that the instances where open mode is actually required are few and far between.
Declarative Instantiation
We don’t have to use JavaScript to take advantage of Shadow DOM. Registering a shadow root can be done declaratively. Nesting a <template> with a shadowrootmode attribute inside any supported element will cause the browser to automatically upgrade that element with a shadow root. Attaching a shadow root in this manner can even be done with JavaScript disabled.
<my-widget>
  <template shadowrootmode="closed">
    <p> Declarative Shadow DOM content </p>
  </template>
</my-widget>
Again, this can be either open or closed. Consider the security implications before using open mode, but note that you cannot access the closed mode content through any scripts unless this method is used with a registered Custom Element, in which case, you can use ElementInternals to access the automatically attached shadow root:
class MyWidget extends HTMLElement {
  #internals;
  #shadowRoot;
  constructor() {
    super();
    this.#internals = this.attachInternals();
    this.#shadowRoot = this.#internals.shadowRoot;
  }
  connectedCallback() {
    const p = this.#shadowRoot.querySelector('p')
    console.log(p.textContent); // this works
  }
};
customElements.define('my-widget', MyWidget);
export { MyWidget };
Shadow DOM Configuration
There are three other options besides mode that we can pass to Element.attachShadow().
Option 1: clonable:true
Until recently, if a standard element had a shadow root attached and you tried to clone it using Node.cloneNode(true) or document.importNode(node,true), you would only get a shallow copy of the host element without the shadow root content. The examples we just looked at would actually return an empty <div>. This was never an issue with Custom Elements that built their own shadow root internally.
But for a declarative Shadow DOM, this means that each element needs its own template, and they cannot be reused. With this newly-added feature, we can selectively clone components when it’s desirable:
<div id="original">
  <template shadowrootmode="closed" shadowrootclonable>
    <p> This is a test  </p>
  </template>
</div>

<script>
  const original = document.getElementById('original');
  const copy = original.cloneNode(true); copy.id = 'copy';
  document.body.append(copy); // includes the shadow root content
</script>
Option 2: serializable:true
Enabling this option allows you to save a string representation of the content inside an element’s shadow root. Calling Element.getHTML() on a host element will return a template copy of the Shadow DOM’s current state, including all nested instances of shadowrootserializable. This can be used to inject a copy of your shadow root into another host, or cache it for later use.
In Chrome, this actually works through a closed shadow root, so be careful of accidentally leaking user data with this feature. A safer alternative would be to use a closed wrapper to shield the inner contents from external influences while still keeping things open internally:
<wrapper-element></wrapper-element> <script> class WrapperElement extends HTMLElement { #shadow; constructor() { super(); this.#shadow = this.attachShadow({ mode:'closed' }); this.#shadow.setHTMLUnsafe(<nested-element> <template shadowrootmode="open" shadowrootserializable> <div id="test"> <template shadowrootmode="open" shadowrootserializable> <p> Deep Shadow DOM Content </p> </template> </div> </template> </nested-element>); this.cloneContent(); } cloneContent() { const nested = this.#shadow.querySelector('nested-element'); const snapshot = nested.getHTML({ serializableShadowRoots: true }); const temp = document.createElement('div'); temp.setHTMLUnsafe(<another-element>${snapshot}</another-element>); const copy = temp.querySelector('another-element'); copy.shadowRoot.querySelector('#test').shadowRoot.querySelector('p').textContent = 'Changed Content!'; this.#shadow.append(copy); } } customElements.define('wrapper-element', WrapperElement); const wrapper = document.querySelector('wrapper-element'); const test = wrapper.getHTML({ serializableShadowRoots: true }); console.log(test); // empty string due to closed shadow root </script>
Notice setHTMLUnsafe(). That’s there because the content contains <template> elements. This method must be called when injecting trusted content of this nature. Inserting the template using innerHTML would not trigger the automatic initialization into a shadow root.
Option 3: delegatesFocus:true
This option essentially makes our host element act as a <label> for its internal content. When enabled, clicking anywhere on the host or calling .focus() on it will move the cursor to the first focusable element in the shadow root. This will also apply the :focus pseudo-class to the host, which is especially useful when creating components that are intended to participate in forms.
<custom-input>
  <template shadowrootmode="closed" shadowrootdelegatesfocus>
    <fieldset>
      <legend> Custom Input </legend>
      <p> Click anywhere on this element to focus the input </p>
      <input type="text" placeholder="Enter some text...">
    </fieldset>
  </template>
</custom-input>
This example only demonstrates focus delegation. One of the oddities of encapsulation is that form submissions are not automatically connected. That means an input’s value will not be in the form submission by default. Form validation and states are also not communicated out of the Shadow DOM. There are similar connectivity issues with accessibility, where the shadow root boundary can interfere with ARIA. These are all considerations specific to forms that we can address with ElementInternals, which is a topic for another article, and is cause to question whether you can rely on a light DOM form instead.
Slotted Content
So far, we have only looked at fully encapsulated components. A key Shadow DOM feature is using slots to selectively inject content into the component’s internal structure. Each shadow root can have one default (unnamed) <slot>; all others must be named. Naming a slot allows us to provide content to fill specific parts of our component as well as fallback content to fill any slots that are omitted by the user:
<my-widget>
  <template shadowrootmode="closed">
    <h2><slot name="title"><span>Fallback Title</span></slot></h2>
    <slot name="description"><p>A placeholder description.</p></slot>
    <ol><slot></slot></ol>
  </template>
  <span slot="title"> A Slotted Title</span>
  <p slot="description">An example of using slots to fill parts of a component.</p>
  <li>Foo</li>
  <li>Bar</li>
  <li>Baz</li>
</my-widget>
Default slots also support fallback content, but any stray text nodes will fill them. As a result, this only works if you collapse all whitespace in the host element’s markup:
<my-widget><template shadowrootmode="closed">
  <slot><span>Fallback Content</span></slot>
</template></my-widget>
Slot elements emit slotchange events when their assignedNodes() are added or removed. These events do not contain a reference to the slot or the nodes, so you will need to pass those into your event handler:
class SlottedWidget extends HTMLElement {
  #internals;
  #shadow;
  constructor() {
    super();
    this.#internals = this.attachInternals();
    this.#shadow = this.#internals.shadowRoot;
    this.configureSlots();
  }
  configureSlots() {
    const slots = this.#shadow.querySelectorAll('slot');
    console.log({ slots });
    slots.forEach(slot => {
      slot.addEventListener('slotchange', () => {
        console.log({
          changedSlot: slot.name || 'default',
          assignedNodes: slot.assignedNodes()
        });
      });
    });
  }
}
customElements.define('slotted-widget', SlottedWidget);
Multiple elements can be assigned to a single slot, either declaratively with the slot attribute or through scripting:
const widget = document.querySelector('slotted-widget');
const added = document.createElement('p');
added.textContent = 'A secondary paragraph added using a named slot.';
added.slot = 'description';
widget.append(added);
Notice that the paragraph in this example is appended to the host element. Slotted content actually belongs to the “light” DOM, not the Shadow DOM. Unlike the examples we’ve covered so far, these elements can be queried directly from the document object:
const widgetTitle = document.querySelector('my-widget [slot=title]');
widgetTitle.textContent = 'A Different Title';
If you want to access these elements internally from your class definition, use this.children or this.querySelector. Only the <slot> elements themselves can be queried through the Shadow DOM, not their content.
From Mystery To Mastery
Now you know why you would want to use Shadow DOM, when you should incorporate it into your work, and how you can use it right now.
But your Web Components journey can’t end here. We’ve only covered markup and scripting in this article. We have not even touched on another major aspect of Web Components: Style encapsulation. That will be our topic in another article.
Source: Read MoreÂ