Close Menu
    DevStackTipsDevStackTips
    • Home
    • News & Updates
      1. Tech & Work
      2. View All

      Sunshine And March Vibes (2025 Wallpapers Edition)

      May 31, 2025

      The Case For Minimal WordPress Setups: A Contrarian View On Theme Frameworks

      May 31, 2025

      How To Fix Largest Contentful Paint Issues With Subpart Analysis

      May 31, 2025

      How To Prevent WordPress SQL Injection Attacks

      May 31, 2025

      Windows 11 version 25H2: Everything you need to know about Microsoft’s next OS release

      May 31, 2025

      Elden Ring Nightreign already has a duos Seamless Co-op mod from the creator of the beloved original, and it’ll be “expanded on in the future”

      May 31, 2025

      I love Elden Ring Nightreign’s weirdest boss — he bargains with you, heals you, and throws tantrums if you ruin his meditation

      May 31, 2025

      How to install SteamOS on ROG Ally and Legion Go Windows gaming handhelds

      May 31, 2025
    • Development
      1. Algorithms & Data Structures
      2. Artificial Intelligence
      3. Back-End Development
      4. Databases
      5. Front-End Development
      6. Libraries & Frameworks
      7. Machine Learning
      8. Security
      9. Software Engineering
      10. Tools & IDEs
      11. Web Design
      12. Web Development
      13. Web Security
      14. Programming Languages
        • PHP
        • JavaScript
      Featured

      Oracle Fusion new Product Management Landing Page and AI (25B)

      May 31, 2025
      Recent

      Oracle Fusion new Product Management Landing Page and AI (25B)

      May 31, 2025

      Filament Is Now Running Natively on Mobile

      May 31, 2025

      How Remix is shaking things up

      May 30, 2025
    • Operating Systems
      1. Windows
      2. Linux
      3. macOS
      Featured

      Windows 11 version 25H2: Everything you need to know about Microsoft’s next OS release

      May 31, 2025
      Recent

      Windows 11 version 25H2: Everything you need to know about Microsoft’s next OS release

      May 31, 2025

      Elden Ring Nightreign already has a duos Seamless Co-op mod from the creator of the beloved original, and it’ll be “expanded on in the future”

      May 31, 2025

      I love Elden Ring Nightreign’s weirdest boss — he bargains with you, heals you, and throws tantrums if you ruin his meditation

      May 31, 2025
    • Learning Resources
      • Books
      • Cheatsheets
      • Tutorials & Guides
    Home»Operating Systems»Linux»Adding Grouped Items in Waybar

    Adding Grouped Items in Waybar

    January 16, 2025

    Adding Grouped Items in Waybar

    Waybar is the perfect top panel program for Wayland systems like Hyprland, Sway, etc.

    It offers many built-in modules and also allows the user to create custom modules to fill the panel.

    We have already discussed how to configure Waybar in a previous tutorial.

    📋
    I recommend you to go through the article first. It should make things easy to understand as you read on.

    In this article, let’s learn some eye-candy tricks to make your Hyprland user experience even better.


    0:00
    /0:11


    Hardware Groups with Waybar with group module.

    Grouping modules in Waybar

    Those who went through the wiki pages of Waybar, may have seen a module called group. Unlike other modules (memory, cpu, etc.), this group module allows you to embed more pre-built modules inside it.

    This is shown in the above video.

    So, what we are doing here is grouping related (or even unrelated, as you like) modules inside a group.

    Writing a sample group module

    Usually, all modules should be defined and then called in the top bar on respective places as you require.

    This is applicable to the group as well. Let’s make one:

    Step 1: Start with framework

    First, define the group with a name and the structure:

    "group/<groupname>": {
    	----,
    	----
    }
    

    The group module definition should be wrapped between the parentheses.

    For example, I am creating a group called hardware to place CPU, RAM (memory), and Temperature modules.

    🚧
    The modules like cpu, memory, etc., that we need to add to a group should be defined separately outside the group definition. These definitions are explained in the Waybar article.

    So, I will start the group definition at the end of my ~/.config/waybar/config.jsonc file:

    "group/hardware": {
    	----,
    	----
    }
    
    🚧
    In the JSONC files, never forget to add a comma to the end of previous module (},), if it is not the last item.

    Step 2: Add an orientation

    You already know that Waybar allows you to place the bar on the top, bottom, left, or right of the screen. This means, you can place your bar either vertically (left/right) or horizontally (top/bottom).

    Therefore, you may need to specify an orientation for the group items using the key orientation.

    "group/hardware": {
    	"oreintation": "horizontal",
    }
    

    I am using a bar configured to appear at the top of the screen. Therefore, I chose “horizontal” orientation. The value for orientation can be horizontal, vertical, orthogonal, or inherit.

    Step 3: Add a drawer effect

    With orientation set, let’s make the groups a bit neat by hiding all items except one.

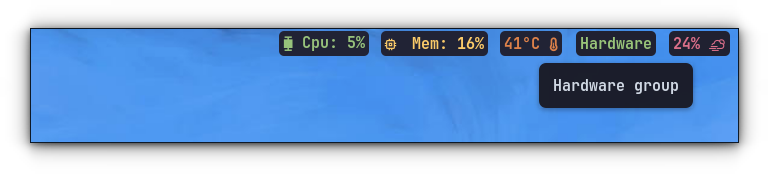
    The interesting part is, when you hover over this unhidden item, the rest of the modules inside the group will come out with a nice effect. It is like collapsing the items at once under one of the items, and then expanding.

    The keyword we use in the configuration here is “drawer”.

    "group/hardware": {
    	"oreintation": "horizontal",
    	"drawer": {
    		---
    	},
    }
    

    Inside the drawer, we can set the transition duration, motion, etc. Let’s go minimal, with only setting the transition duration and transition motion.

    "group/hardware": {
    	"oreintation": "horizontal"
    	"drawer": {
    		"transition-duration": 500,
    		"transition-left-to-right": false
    	},
    }
    

    If we set the transition-left-to-right key to false, the first item in the list of modules (that we will add in the next section) will stay there, and the rest is expanded.

    Likewise, if left to default (true), the first item and the rest will all draw out.

    Step 4: Add the modules

    It’s time to add the modules that we want to appear inside the group.

    "group/hardware": {
    	"oreintation": "horizontal",
    	"drawer": {
    		"transition-duration": 500,
    		"transition-left-to-right": false
    	},
    	"modules": [
    		"custom/hardware-wrap",
    		"cpu",
    		"memory"
    		"temperature"
    	]
    }
    

    Here, in the above snippet, we have created four modules to appear inside the group hardware.

    📋
    The first item inside the module key will be the one visible. The subsequent items will be hidden and will only appear when hovered over the first item.

    As said earlier, we need to define all the modules appearing inside the group as regular Waybar modules.

    Here, we will define a custom module called custom/hardware-wrap, just to hold a place for the Hardware section.

    So, outside the group module definition parenthesis, use the following code:

    "custom/hardware-wrap": {
    	"format": Hardware
    	"tooltip-format": "Hardware group"
    } 
    

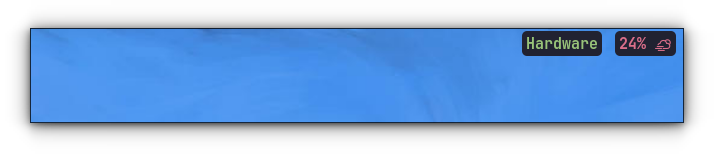
    So, when “custom/hardware-wrap” is placed inside the group module as the first item, only that will be visible, hiding the rest (cpu, memory, and temperature in this case.).

    Step 5: Simple CSS for the custom module

    Let’s add a CSS for the custom module that we have added. Go inside the ~/.conf/waybar/style.css file and add the lines:

    #custom-hardware-wrap {
         box-shadow: none;
         background: #202131;
             text-shadow: none;
         padding: 0px;
         border-radius: 5px;
         margin-top: 3px;
         margin-bottom: 3px;
         margin-right: 6px;
         margin-left: 6px;
         padding-right: 4px;
         padding-left: 4px;
         color: #98C379;
    }
    

    Step 6: Add it to the panel

    Now that we have designed and styled the group, let’s add it to the panel.

    We know that in Waybar, we have modules-left, modules-center, and modules-right to align elements in the panel.

    Let’s place the new Hardware group to the right side of the panel.

    "modules-right": ["group/hardware", "pulseaudio", "tray"],
    

    In the above code inside the ~/.config/waybar/config.jsonc, you can see that, I have placed the group/hardware on the right along with PulseAudio and system tray.

    Adding Grouped Items in Waybar
    Hardware Group Collapsed
    Adding Grouped Items in Waybar
    Hardware Group Expanded

    Wrapping Up

    Grouping items is a handy trick, since it can create some space to place other items and make the top bar organized.

    If you are curious, you can take a look at the drawer snippet given in the group page of Waybar wiki. You can explore some more customizations like adding a power menu button.

    Source: Read More

    Facebook Twitter Reddit Email Copy Link
    Previous ArticlePlayStation just reportedly canceled two live service games that likely would’ve launched on Windows PC
    Next Article Error’d: Secret Horror

    Related Posts

    News & Updates

    Windows 11 version 25H2: Everything you need to know about Microsoft’s next OS release

    May 31, 2025
    News & Updates

    Elden Ring Nightreign already has a duos Seamless Co-op mod from the creator of the beloved original, and it’ll be “expanded on in the future”

    May 31, 2025
    Leave A Reply Cancel Reply

    Continue Reading

    Achieve near real-time analytics with Amazon DynamoDB and zero-ETL for Amazon OpenSearch Service

    Databases

    I test robot vacuums for a living – the Narwal Freo X Plus is the best you can get for $400

    Development

    TigerOS – Portuguese Fedora remix

    Linux

    Yikes: Jailbroken Grok 3 can be made to say and reveal just about anything

    News & Updates

    Highlights

    Development

    From Compliance to Competitive Advantage: How SaaS Application Security Testing Boosts Market Position 

    November 4, 2024

    Data breaches can cost organizations millions in direct damages, lost business and legal fees. But beyond those immediate costs, breaches damage trust, leading to long-term revenue losses. An effective SaaS application security testing mitigates these risks, increasing the bottom line. Read to know more!
    The post From Compliance to Competitive Advantage: How SaaS Application Security Testing Boosts Market Position  first appeared on TestingXperts.

    Microsoft takes big step towards agentic Windows AI experiences with native Model Context Protocol support

    May 19, 2025

    AI for Beginners: Definition, Tools & Real-World Examples

    April 21, 2025

    CVE-2025-20966 – Samsung Gallery Access Control Vulnerability

    May 7, 2025
    © DevStackTips 2025. All rights reserved.
    • Contact
    • Privacy Policy

    Type above and press Enter to search. Press Esc to cancel.