Welcome back to GitHub for Beginners, a series designed to help you navigate GitHub with ease.
So far in this series, we’ve covered the top Git commands every developer should know, how to create repositories, how to upload files and folders to your repository, and how to add code to your repository. In our most recent entry, we talked briefly about pull requests, but now we’re going to dive into them at depth. This entry is dedicated to showing you how to create a pull request so you can suggest changes to a repository and have others review those changes before committing them.
Let’s get started!
What is a pull request?
A pull request (often referred to as “PRâ€) is a proposal to merge a set of changes from one branch into another. By creating a pull request, you can review a set of changes with others before they are incorporated into the main code base. Before getting to that, it’s helpful to define a couple of terms.
Source branch: the branch containing your changes.
Target branch: the branch you are trying to merge your changes into.
Pull requests provide a visual representation of the differences in the content between the source branch and the target branch. This is what enables you to review the changes before accepting them and pulling them into the target branch.
Creating your pull request
You can create a pull request on GitHub.com with GitHub Desktop, GitHub Codespaces, on GitHub Mobile, and when using the GitHub CLI. You can also create a pull request from the terminal using git, which is what we’ll do here.
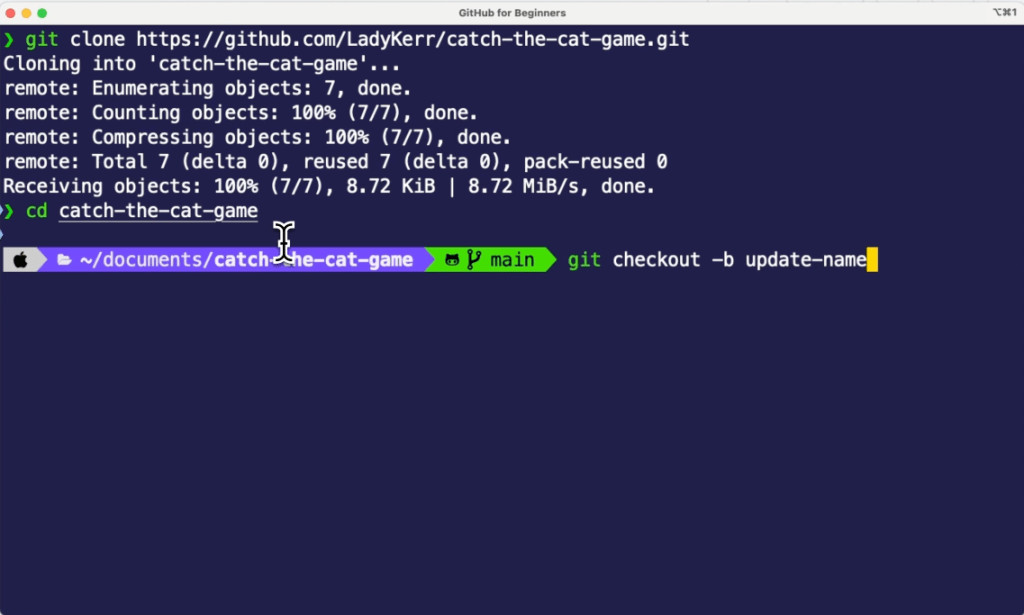
On GitHub, navigate to your repository, clone it, and create a new branch. If you need a refresher for any of these steps, refer to the earlier GitHub for Beginners entries. For the purposes of this walkthrough, we created a new branch in our repository called update-name. After creating this branch, open your terminal and run git checkout -b update-name to navigate to the update-name branch.
Open a file in the repository in your editor, and make a change. In our case, we made a change to the index.html file. Don’t forget to save the file!
Stage and then commit your changes by running the following commands in the terminal:
git add .
git commit -m “update game name”
Once these commands are complete, run git status to ensure that the changes were successfully committed. If they were, you should see a message indicating that there is nothing to commit and your working tree is clean. Awesome!
Now you will need to push your changes to the repository on GitHub. You do this by running git push origin update-name in the terminal. Remember that if you used a different name for your branch, you will need to replace update-name with the name of your branch: git push origin your-branch-name.
Navigate to GitHub, and you should see a message indicating that your branch had recent pushes a short while ago. Click the green button that says “Compare & pull request.†This will take you to the pull request page, where you can enter the information for your pull request.
In the top left of the page is a dropdown button that says “base:†followed by a branch name. Most likely, this will say “base: main.†This indicates the branch that you want to merge the changes into, otherwise known as the target branch. Click the button and select “main†if it isn’t already selected.
The dropdown box to the immediate right of the “base:†box is the “compare:†box. This indicates the branch that you are merging from, otherwise known as the source branch. Click this box and select the branch where you made your changes.
After making sure the target and source branches are set correctly, add a title and a description for the pull request. The description should explain the changes that you made. If you are not ready for your changes to be reviewed, you can create a draft pull request. Or you can create a pull request for review by pressing the green “Create pull request†button. Do that now.
Congratulations! You’ve created your pull request! Now, you can have someone else on the team review your changes. Once they have provided a review, you can merge your changes into the target branch by clicking the green “Merge pull request†button at the bottom of the page.
Things to keep in mind
When you create pull requests going forward, here are a few best practices you should keep in mind.
Write small pull requests. Smaller pull requests are easier and faster to review and merge, provide less room to introduce bugs, and provide a clearer history of changes.
Review your own pull request first. Review, build, and test your own pull request before submitting it. This will allow you to catch errors or typos that you may have missed before others start reviewing it.
Provide context and guidance. Write clear titles and descriptions for your pull requests so reviewers can quickly understand what the pull request does. You should include the following in the body of your pull request:
The purpose of the pull request
An overview of what changed
Links to any additional context such as tracking issues, tickets, or previous conversations
Your next steps
Now that you can create pull requests, you can use this repository to practice creating them. Once you feel comfortable creating pull requests, you have the power to suggest changes to existing repositories and offer your own contributions for consideration. It’s an excellent way to collaborate, so give it a shot!
If you have any questions, pop them in the GitHub Community thread and we’ll be sure to respond.
Here are some more resources to help you on your GitHub journey:
GitHub Foundations Certificate
About pull requests
Creating a pull request
Merging a pull request
Requesting a pull request review
The post Beginner’s guide to GitHub: Creating a pull request appeared first on The GitHub Blog.
Source: Read MoreÂ

