Welcome back to GitHub for Beginners, a series designed to help you navigate GitHub with ease.
Our last post covered the top Git commands every developer should know. Today, we’re diving right into the heart of GitHub: repositories! What they are, how to create one, all of their different features and settings, and more.
Whether you’re a developer, a writer, or just curious about version control, understanding repositories is your first step into the world of GitHub.
So, let’s say you created your GitHub account. Now what? Let’s Git right into it and start from the beginning.
What is a repository?
A repository, or repo, is a fundamental element of GitHub and Git. It’s a space where project files live, allowing for version control and collaboration.
You can think of a repository as a project folder that tracks changes, stores history, and lets multiple people work together seamlessly.
How do I create a repository?
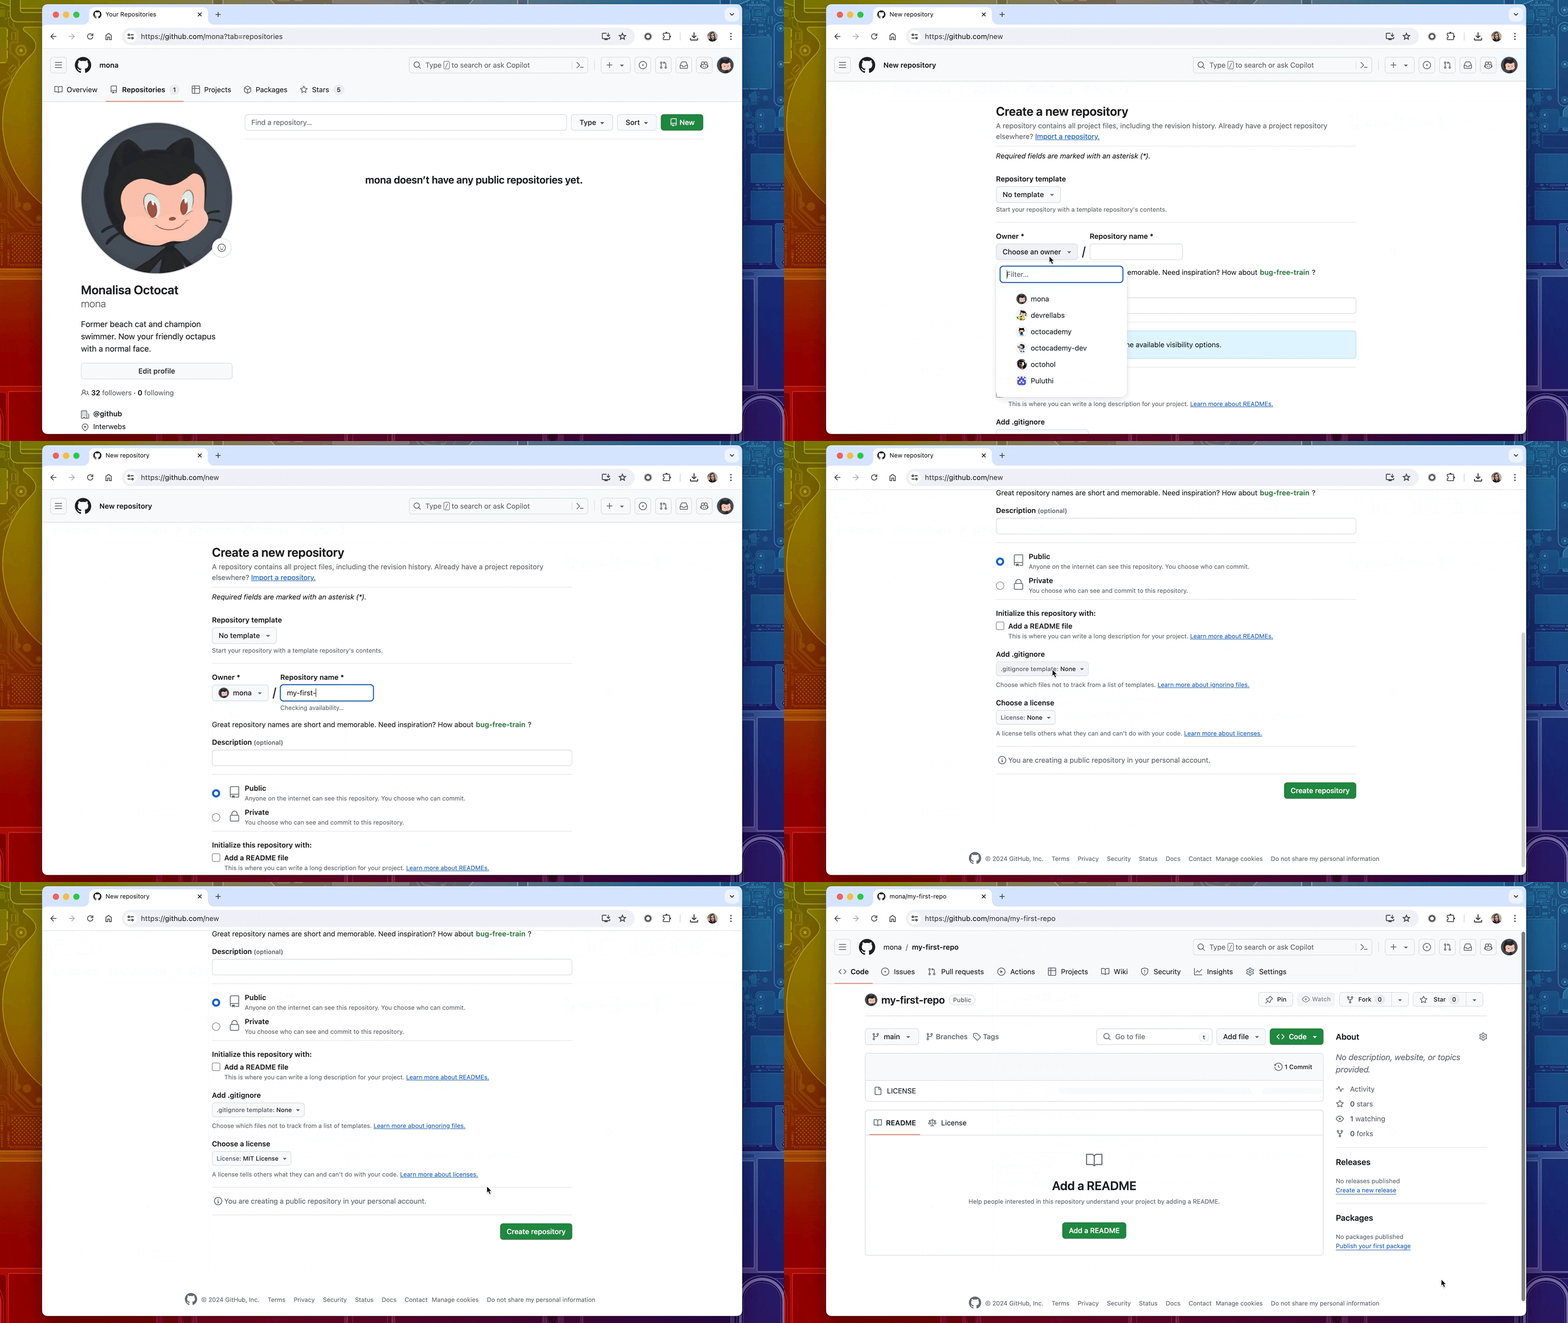
After you create an account on GitHub, you’ll be taken to your new GitHub dashboard. You should see a green button that says, “Create repository.â€
When you click on this green button, it will take you to the “New repository page†which allows you to enter a repository name, select an owner of that repository (you, in this case), add a description for your repository on what your project is about, and choose whether to make the project public or private.
From here, you can initialize your project with a README.
What’s a README?
A README file in a GitHub repository provides essential information about the project, including its purpose, usage instructions, how to get started, where to find help, and details on contributors. It serves as an introductory guide for visitors, helping them understand and utilize the project effectively. For now, let’s check the box to add a README.
You likely don’t need a .gitignore file for this project (more to come on that later), so select “None.†Then, underneath “Choose a license†you can select the MIT License from the list.
Once you’re finished with those, click on the green “Create repository†button. You’ve just created your first repository on GitHub!
How do I choose a license for my repository?
A license tells others what they can and can’t do with your source code. It’s typically used to share code with others—also known as open source software. This means, based on the license that you choose, anyone on the internet can take your code and use it.
For example, you selected an MIT License for the repository you just created. This is known as a “permissive license,†which gives anyone the ability to use your code how they would want.
Choosing the right license is essential for setting the terms under which others can use, modify, and share your project. Take your time choosing the right one.
You can learn more about licenses and how to choose the right one by going to choosealicense.com.
How do I fork a repository?
Forking is actually another way to create a repository, but this time, you’re not starting from scratch. A fork essentially creates a copy of an existing repository, so that you have your own version of it to work on and modify to your liking.
For example, when you want to contribute to an open source project, you’ll first need to fork the repository and then go from there.
This is why it’s super important to choose the correct license, so that others know the limitations of what they can do with your code.
What is .gitignore?
Finally, we have the “add .gitignore†option on the new repository page. gitignore.io is a file used in certain projects if you want Git to ignore or not track certain files in your repository.
File exclusion can sometimes be based on the languages, frameworks, and other technologies that you’re using.
You can visit gitignore.io to generate a .gitignore file for you based on your project needs.
What are the main features of a GitHub repository?
Now that you’ve created your first repository, it’s time to get acquainted with some of its main features.
GitHub repositories are packed with features to enhance collaboration and project management, including:
Issues: track bugs or tasks.
Projects: organize tasks in Kanban-style boards.
Pull requests: merge changes from different branches or forks.
Wikis: create detailed documentation.
Repository settings
In the repository settings, you can manage:
Collaborators: add team members to your project.
Automation: set up actions for continuous integration or deployment.
Security: configure security settings and access controls.
This is also where you can enable and disable repository features.
Your next steps with GitHub repositories
Now, you understand the basics of creating and managing a repository on GitHub. With your first repository set up, you’re now ready to explore its features and start collaborating on your projects!
If you have any questions, pop them in the GitHub Community thread and we’ll be sure to respond.
Here are some more resources to help you on your GitHub journey:
GitHub Foundations Certificate
Best practices for repositories
Forking a repository
Creating a new repository
The post Beginner’s guide to GitHub repositories: How to create your first repo appeared first on The GitHub Blog.
Source: Read MoreÂ

