
Machine Learning (ML) is no longer limited to research labs — it’s actively driving decisions in real estate, finance, healthcare, and more. But deploying and managing ML models in production is a different ballgame. That’s where MLOps comes in.
In this blog, we’ll walk through a practical MLOps learning project — building a House Price Predictor using Azure DevOps as the CI/CD backbone. We’ll explore the evolution from DevOps to MLOps, understand the model development lifecycle, and see how to automate and manage it effectively.
What is MLOps?
MLOps (Machine Learning Operations) is the discipline of combining Machine Learning, DevOps, and Data Engineering to streamline the end-to-end ML lifecycle.
It aims to:
- Automate training, testing, and deployment of models
- Enable reproducibility and version control for data and models
- Support continuous integration and delivery (CI/CD) for ML workflows
- Monitor model performance in production
MLOps ensures that your model doesn’t just work in Jupyter notebooks but continues to deliver accurate predictions in production environments over time.
From DevOps to MLOps: The Evolution
DevOps revolutionized software engineering by integrating development and operations through automation, CI/CD, and infrastructure as code (IaC). However, ML projects add new complexity:
| Aspect | Traditional DevOps | MLOps |
| Artifact | Source code | Code + data + models |
| Version Control | Git | Git + Data Versioning (e.g., DVC) |
| Testing | Unit & integration tests | Data validation + model validation |
| Deployment | Web services, APIs | ML models, pipelines, batch jobs |
| Monitoring | Logs, uptime, errors | Model drift, data drift, accuracy decay |
So, MLOps builds on DevOps but extends it with data-centric workflows, experimentation tracking, and model governance.
House Price Prediction: Project Overview
Our goal is to build an ML model that predicts house prices based on input features like square footage, number of bedrooms, location, etc. This learning project is structured to follow MLOps best practices, using Azure DevOps pipelines for automation.
Project Structure
house-price-predictor/

├── configs/               # Model configurations stored in YAML format

├── data/                  # Contains both raw and processed data files

├── deployment/

│    └── mlflow/           # Docker Compose files to set up MLflow tracking

├── models/                # Saved model artifacts and preprocessing objects

├── notebooks/             # Jupyter notebooks for exploratory analysis and prototyping

├── src/

│    ├── data/             # Scripts for data preparation and transformation

│    ├── features/         # Logic for generating and engineering features

│    ├── models/           # Code for model building, training, and validation

├── k8s/

│    ├── deployment.yaml        # Kubernetes specs to deploy the Streamlit frontend

│    └── fast_model.yaml        # Kubernetes specs to deploy the FastAPI model service

├── requirements.txt       # List of required Python packages
Setting Up Your Development Environment
Before getting started, make sure the following tools are installed on your machine:
- Python 3.11
- Git
- Visual Studio Code (or any other code editor you prefer)
- UV– A modern Python package and environment manager
- Docker Desktop or Podman Desktop
Preparing Your Environment
- Fork this repo on GitHub to your personal or organization account.
- Clone your forked repository
# Replace 'xxxxxx' with your GitHub username or organization
git clone https://github.com/xxxxxx/house-price-predictor.git
cd house-price-predictor
- Create a virtual environment using UV:
uv venv --python python3.11
source .venv/bin/activate
- Install the required Python packages:
uv pip install -r requirements.txt
Configure MLflow for Experiment Tracking
To enable experiment and model run tracking with MLflow:
cd deployment/mlflow
docker compose -f mlflow-docker-compose.yml up -d
docker compose ps
Using Podman Instead of Docker?
podman compose -f mlflow-docker-compose.yml up -d
podman compose ps
Access the MLflow UI. Once running, open your browser and navigate to http://localhost:5555
Model Workflow
Step 1: Data Processing
Perform cleaning and preprocessing on the raw housing dataset:
python src/data/run_processing.py --input data/raw/house_data.csv --output data/processed/cleaned_house_data.csv
Step 2: Feature Engineering
Perform data transformations and feature generation:
python src/features/engineer.py --input data/processed/cleaned_house_data.csv --output data/processed/featured_house_data.csv --preprocessor models/trained/preprocessor.pkl
Step 3: Modeling & Experimentation
Train the model and track all metrics using MLflow:
python src/models/train_model.py --config configs/model_config.yaml --data data/processed/featured_house_data.csv --models-dir models --mlflow-tracking-uri http://localhost:5555
Step 4: Building FastAPI and Streamlit
The source code for both applications — the FastAPI backend and the Streamlit frontend — is already available in the src/api and streamlit_app directories, respectively. To build and launch these applications:
- Add a Dockerfile in the src/api directory to containerize the FastAPI service.
- Add a Dockerfile inside streamlit_app/ to package the Streamlit interface.
- Create a docker-compose.yaml file at the project root to orchestrate both containers.
Make sure to set the environment variable API_URL=http://fastapi:8000 for the Streamlit app to connect to the FastAPI backend.
Once both services are up and running, you can access the Streamlit web UI in your browser to make predictions.
You can also test the prediction API directly by sending requests to the FastAPI endpoint.
curl -X POST "http://localhost:8000/predict"

-H "Content-Type: application/json"

-d '{

  "sqft": 1500,

  "bedrooms": 3,

  "bathrooms": 2,

  "location": "suburban",

  "year_built": 2000,

  "condition": fair

}'
Be sure to replace http://localhost:8000/predict with the actual endpoint based on where it’s running.
At this stage, your project is running locally. Now it’s time to implement the same workflow using Azure DevOps.
Prerequisites for Implementing This Approach in Azure DevOps.
To implement a similar MLOps pipeline using Azure DevOps, the following prerequisites must be in place:
- Azure Service Connection (Workload Identity-based)
- Create a Workload Identity Service Connection in Azure DevOps.
- Assign it Contributor access to the target Azure subscription or resource group.
- This enables secure and passwordless access to Azure resources from the pipeline.
- Azure Kubernetes Service (AKS) Cluster
- Provision an AKS cluster to serve as the deployment environment for your ML application.
- Ensure the service connection has sufficient permissions (e.g., Azure Kubernetes Service Cluster User RBAC role) to interact with the cluster.
Start by cloning the existing GitHub repository into your Azure Repos. Inside the repository, you’ll find the azure-pipeline.yaml file, which defines the Azure DevOps CI/CD pipeline consisting of the following four stages:
- Data Processing Stage – Handles data cleaning and preparation.
- Model Training Stage – Trains the machine learning model and logs experiments.
- Build and Publish Stage – Builds Docker images and publishes them to the container registry.
- Deploy to AKS Stage – Deploys the application components to Azure Kubernetes Service (AKS).
This pipeline automates the end-to-end ML workflow from raw data to production deployment.
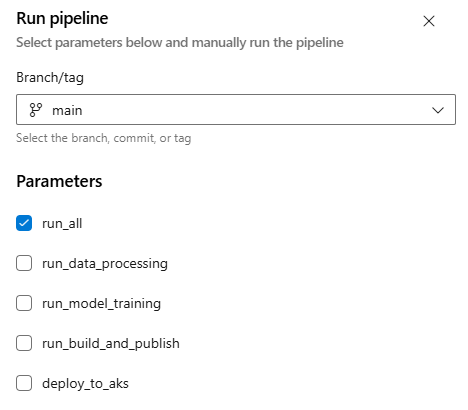
The CI/CD pipeline is already defined in the existing YAML file and is configured to run manually based on the parameters specified at runtime.
This pipeline is manually triggered (no automatic trigger on commits or pull requests) and supports the conditional execution of specific stages using parameters.
It consists of four stages, each representing a step in the MLOps lifecycle:
-
Data Processing Stage
Condition: Runs if run_all or run_data_processing is set to true.
What it does:
- Check out the code.
- Sets up Python 3.11.13 and installs dependencies.
- Runs scripts to:
- Clean and preprocess the raw dataset.
- Perform feature engineering.
- Publishes the processed data and the trained preprocessor as pipeline artifacts
-
Model Training Stage
Depends on: DataProcessing
Condition: Runs if run_all or run_model_training is set to true.
What it does:
- Downloads the processed data artifact.
- Spins up an MLflow server using Docker.
- Waits for MLflow to be ready.
- Trains the machine learning model using the processed data.
- Logs the training results to MLflow.
- Publishes the trained model as a pipeline artifact.
- Stops and removes the temporary MLflow container.
-
Build and Publish Stage
Depends on: ModelTraining
Condition: Runs if run_all or run_build_and_publish is set to true.
What it does:
- Downloads trained model and preprocessor artifacts.
- Builds Docker images for:
- FastAPI (model API)
- Streamlit (frontend)
- Tag both images using the current commit hash and the latest.
- Runs and tests both containers locally (verifies /health and web access).
- Pushes the tested Docker images to Docker Hub using credentials stored in the pipeline.
-
Deploy to AKS Stage
Depends on: BuildAndPublish
Condition: Runs only if the previous stages succeed.
What it does:
- Uses the Azure CLI to:
- Set the AKS cluster context. #Make sure to update the cluster name
- Update Kubernetes deployment YAML files with the new Docker image tags.
- Apply the updated deployment configurations to the AKS cluster using kubectl.
Now, the next step is to set up the Kubernetes deployment and service configuration for both components of the application:
- Streamlit App: This serves as the frontend interface for users.
- FastAPI App: This functions as the backend, handling API requests from the Streamlit frontend and returning model predictions.
Both deployment and service YAML files for these components are already present in the k8s/ folder and will be used for deploying to Azure Kubernetes Service (AKS).
This k8s/deployment.yaml file sets up a Streamlit app on Kubernetes with two key components:
- Deployment: Runs 2 replicas of the Streamlit app using a Docker image. It exposes port 8501 and sets the API_URL environment variable to connect with the FastAPI backend.
- Service: Creates a LoadBalancer service that exposes the app on port 80, making it accessible externally.
In short, it deploys the Streamlit frontend and makes it publicly accessible while connecting it to the FastAPI backend for predictions.
This k8s/fastapi_model.yaml file deploys the FastAPI backend for the house price prediction app:
- It creates a Deployment named house-price-api with 2 replicas running the FastAPI app on port 8000.
- A LoadBalancer Service named house-price-api-service exposes the app externally on port 8000, allowing other services (like Streamlit) or users to access the API.
In short, it runs the backend API in Kubernetes and makes it accessible for predictions.
Now it’s time for the final run to verify the deployment on the AKS cluster. Trigger the pipeline by selecting the run_all parameter.
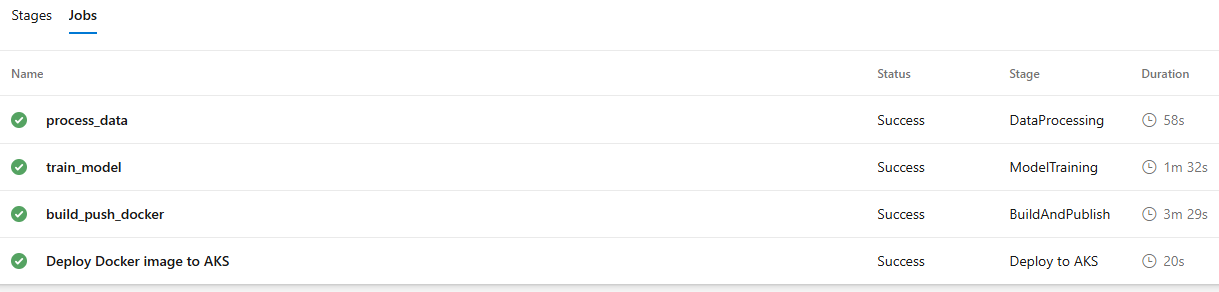
After the pipeline completes successfully, all four stages and their corresponding jobs will be executed, confirming that the application has been successfully deployed to the AKS cluster.

Now, log in to the Azure portal and retrieve the external IP address of the Streamlit app service. Once accessed in your browser, you’ll see the House Price Prediction Streamlit application up and running.


Now, go ahead and perform model inference by selecting the appropriate parameter values and clicking on “Predict Price” to see how the model generates the prediction.

Conclusion
In this blog, we explored the fundamentals of MLOps and how it bridges the gap between machine learning development and scalable, production-ready deployment. We walked through a complete MLOps workflow—from data processing and feature engineering to model training, packaging, and deployment—using modern tools like FastAPI, Streamlit, and MLflow.
Using Azure DevOps, we implemented a robust CI/CD pipeline to automate each step of the ML lifecycle. Finally, we deployed the complete House Price Predictor application on an Azure Kubernetes Service (AKS) cluster, enabling a user-friendly frontend (Streamlit) to interact seamlessly with a predictive backend (FastAPI).
This end-to-end project not only showcases how MLOps principles can be applied in real-world scenarios but also provides a strong foundation for deploying scalable and maintainable ML solutions in production.
Source: Read MoreÂ
