
AI is evolving rapidly, and the ability to install Ollama local models on your machine opens up powerful new possibilities for developers, hobbyists, and builders. Whether you’re working on automation, development tools, or privacy-sensitive applications, cloud-based models aren’t always ideal.
That’s where Ollama comes in.
Ollama makes it easy to run, customize, and serve LLMs directly from your machine — no GPU setup or Docker needed. You can run models like LLaMA2, Mistral, or Gemma, or even build your own using a simple Modelfile.
To take it further, you can integrate Ollama with Power Automate to trigger real-time, AI-powered workflows — all while keeping your data local and secure. This integration lets you automate tasks like generating email replies, summarizing content, or logging AI responses to SharePoint or Teams — without relying on cloud APIs.
In this blog, I’ll walk you through everything you need to get started with Ollama — from downloading and interacting with models in VS Code to integrating responses into Power Automate flows.
What is Ollama?
Ollama is a local LLM (Large Language Model) runtime that can be installed directly on your PC, making it completely cloud independent. You can use it as your personal AI assistant with the added benefit of enhanced security and privacy since everything runs locally.
Why Do We Need Ollama?
- Works without internet — ideal for offline or network-restricted environments
- No cloud dependency — full control over your data and usage
- Acts like a custom assistant tailored to your tasks
- Allows you to build your own models using a simple Modelfile
Steps to Download and Install Ollama
- Visit the official site: https://ollama.com/download
- You can install Ollama local models on Windows, macOS, or Linux, depending on your OS.
- Run the downloaded installer (.exe or .dmg)
- Once you install Ollama local models, you can run them directly in your command prompt but first check whether it was installed or not with:
ollama --versionor
ollama - Explore the available commands using:
ollama --help

<img loading="lazy" class="aligncenter wp-image-384931 size-full" src="https://blogs.perficient.com/files/blog-3-.png" alt="Command prompt " width="1717" height="682" />
Ollama Command Reference (Terminal Commands)
| Command | Context | Description | Example |
|---|---|---|---|
| ollama run | Terminal | Runs the specified model for chat interaction. | ollama run mistral |
| ollama pull | Terminal | Downloads the model to your machine. | ollama pull llama2 |
| ollama list | Terminal | Shows all downloaded models locally. | ollama list |
| ollama create -f Modelfile | Terminal | Creates a new model from a custom Modelfile. | ollama create mistral_assistant -f Modelfile |
| ollama serve | Terminal | Starts the Ollama API server for integrations. | ollama serve |
Downloading a Model / Choosing a Model
- Visit the model library: https://ollama.com/library — here, you can explore model usage, specialties, and space requirements.
- Choose a model (e.g.,
mistral) - Pull the model by running:
ollama pull mistralor
ollama pull <model_name> - Confirm the download with:
ollama list - To interact with the model, use:
ollama run mistralorollama run <model_name>
- When you’re done, type
/byeto end the session — otherwise, it will keep running in the background.
Inside the model session, use /help or /? to see available commands.
In-Model Commands
When you’re interacting inside a model session (after running ollama run <model>), the following shortcuts and commands are available:
| Command | Description | Example |
|---|---|---|
| /? or /help | Lists all available chat commands. | /? |
| /bye | Ends the current model session. | /bye |
| /system | Sets a system prompt to guide the model’s behavior. | /system You are a polite assistant. |
| /reset | Clears the current conversation history. | /reset |
Using Ollama in VS Code
- Install the Python package:
pip install ollama - Ensure Ollama is running in the background by either:
- Running
ollama servein the terminal, or - Searching for “Ollama” and clicking on its icon.
- Running
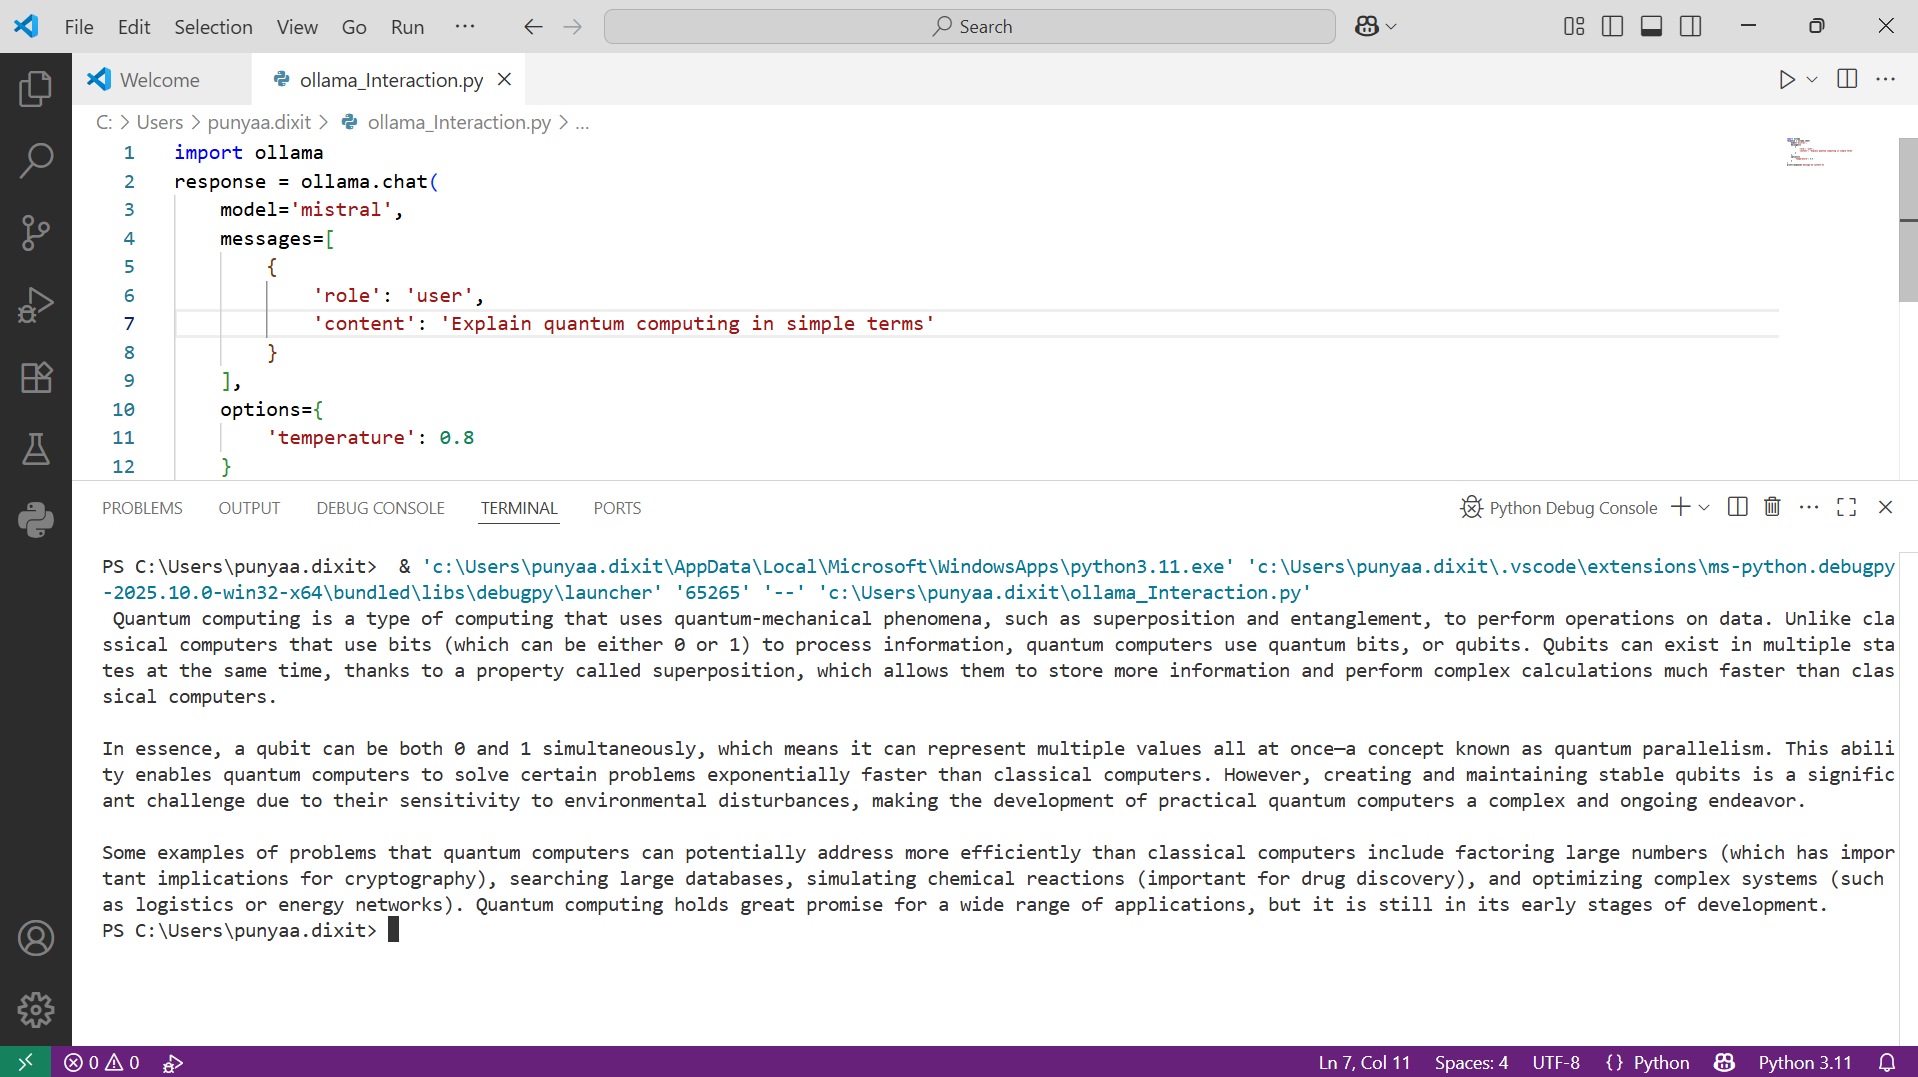
- Use this sample Python script to interact with a model:
| Code Line | Explanation |
|---|---|
| import ollama | Imports the Ollama Python library to interact with local language models. |
| model=’mistral’, options={‘temperature’: 0.8} | Specifies the model to use (mistral) and sets the temperature option.
temperature = 0.8 means the output will be more creative and diverse. |
| messages=[{‘role’: ‘user’, ‘content’: ‘Explain quantum computing in simple terms’}] | Defines the user message you want to send to the model.
You can add multiple messages in a list to maintain chat context. |
| print(response[‘message’][‘content’]) | Displays only the model’s reply (text content) in the console. |
As you can see, we’ve received a valid response from Ollama.
4. You can also adjust parameters like temperature, top_p, and repeat_penalty for more control.
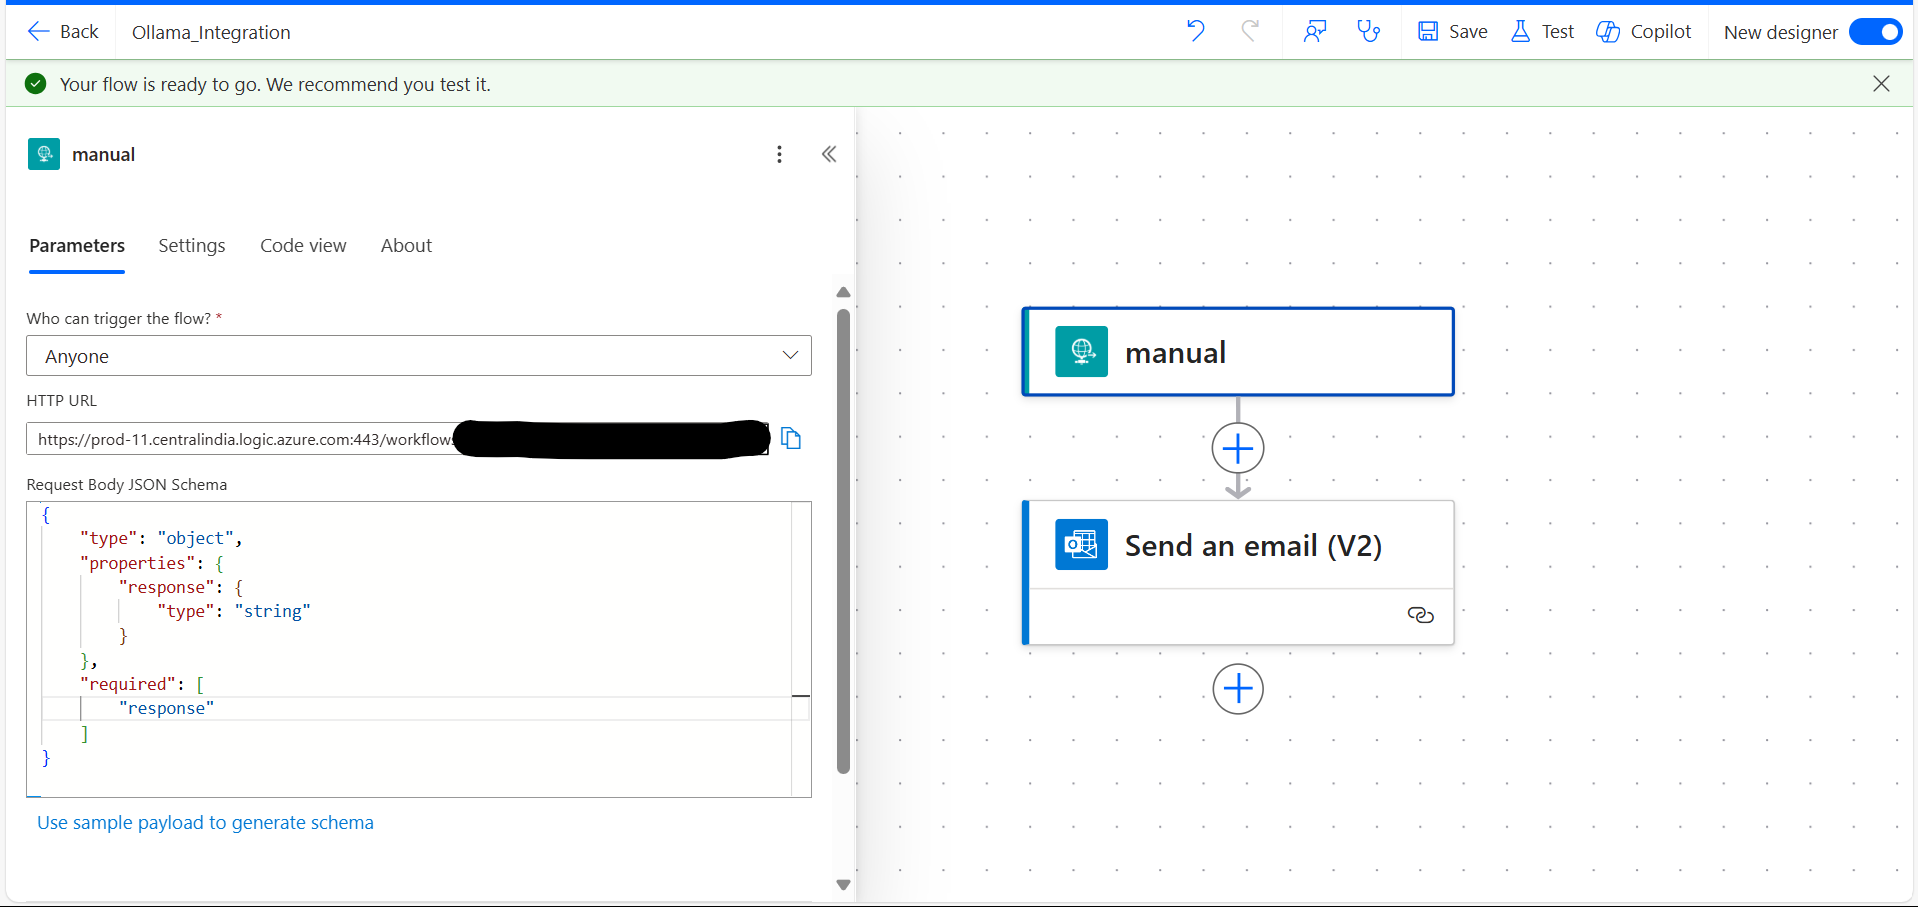
Integrate Ollama with Power Automate
You can connect Ollama to Power Automate by triggering HTTP flows using Python or any backend script. For example, after getting a response from Ollama, you can forward it to Power Automate using a simple POST request. Alternatively, you can use this code and replace the URL with your own to utilize it.
Make sure you have already created a flow in Power Automate with a “When an HTTP request is received” trigger.
As you can see, the Python script successfully triggers the Power Automate flow.
and as you can see the python script is triggering the flow successfully. 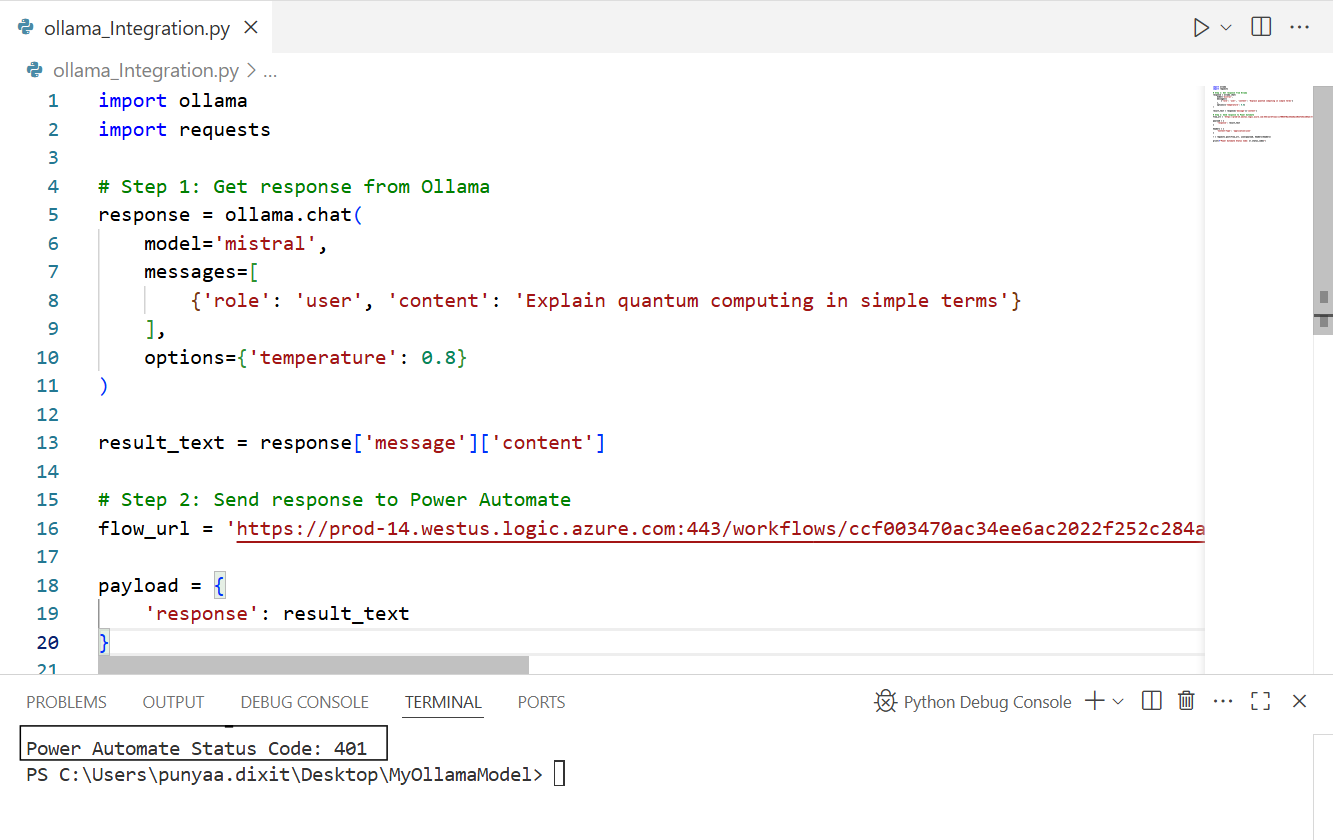
Here’s the code.
import ollama
import requests

# Step 1: Get response from Ollama
response = ollama.chat(
    model='mistral',
    messages=[
        {'role': 'user', 'content': 'Explain quantum computing in simple terms'}
    ],
    options={'temperature': 0.8}
)

result_text = response['message']['content']

# Step 2: Send response to Power Automate
flow_url = 'https://prod-xxx.westus.logic.azure.com:443/workflows/xyz/triggers/manual/paths/invoke?...'  # Replace with your real URL

payload = {
    'response': result_text
}

headers = {
    'Content-Type': 'application/json'
}

r = requests.post(flow_url, json=payload, headers=headers)

print(f"Power Automate Status Code: {r.status_code}")
For step-by-step integration, refer to my other blog:
Python Meets Power Automate: Trigger via URL / Blogs / Perficient
Conclusion
Now you know how to:
- Install and run Ollama locally
- Download and interact with models
- Use Ollama in VS Code
- Integrate Ollama with Power Automate
Coming Up Next
In the next part of this series, we’ll explore how to create your own model using Ollama and run it using a Modelfile.
Stay tuned!
Source: Read MoreÂ
