
Introduction
Next.js’s caching mechanism tends to be quite complicated. It may cause some bugs in your code that can be tough to track down and resolve. This article tries to thoroughly explain the various components of Next.js’s caching system, enabling readers to utilize it effectively and harness its significant performance benefits.
Caching stores data temporarily to reduce processing time. In Next.js, caching improves performance, reduces server load, enhances user experience, and lowers costs in serverless environments. The App Router Leverages React Server Components (RSC) and combines server-side and client-side caching for optimal performance.
Caching Layers in Next.js
There are four main caching layers in the App Router:
- Request Memoization
- Data Cache
- Full Route Cache
- Router Cache
We are going to learn about each of the above caching layers in great details, so that we can use & manage them effectively in our web application to optimize performance.
Request Memoization
When we need the same data in multiple components of app, we do not have to fetch data at the top of the tree, and forward props between components. Because with server components, React has override the browser fetch function with its own fetch function which is memoized.
Now we can make the fetch request in each component that needs the same data while only executing it once and duplicate requests are skipped, so users don’t have to worry about optimizing the network requests.
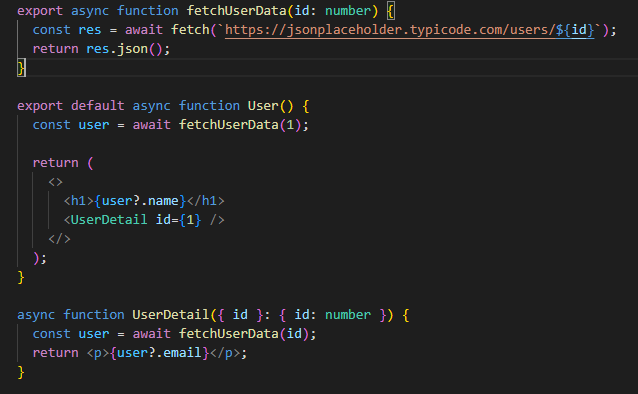
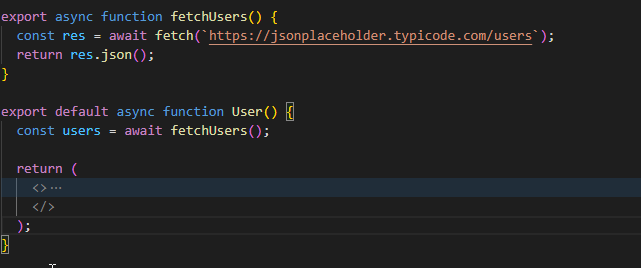
In the code above, we have two components: User and UserDetail. The first call to the fetchUserData function in User makes a fetch request just like normal, but the return value of that fetch request is stored in the Request Memoization cache.
The second time fetchUserData is called by the UserDetail component, does not actually make a new fetch request. Instead, it uses the memoized value from the first time this fetch request was made.
This optimization increases the performance of your application by removing duplicated request & reducing the number of requests made to server.
The diagram below serves as a visual overview illustrating the process of Request Memoization, making it easier for readers to grasp how this concept functions.

- When a route is rendered for the first time, the server doesn’t have the result stored yet — so it’s a cache miss. That means the function runs, fetches the data from the external source, and then stores the result in memory.
- If the same request is made again during that same render pass, it’s now a cache hit — the function won’t run again because the data is already in memory, so it just reuses the stored result.
- But once the render is done, the memory is cleared. This means all the temporary cached results (also called request memoization) are wiped out, and the process starts fresh the next time the route is rendered.
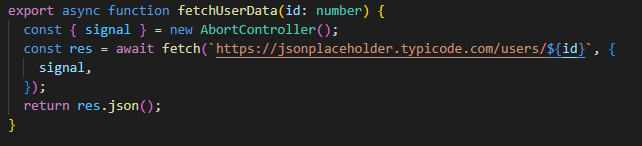
Opting out
For opting out of this cache, we can pass in a AbortController signal as a parameter to the fetch request. This will not allow to cache the fetch request in the Request Memoization Cache. But this is not recommended as the Request Memoization cache clears as the component unmounts or the revalidation happen.
Note:
- Request Memoization is built in feature of React Server Components (RSC).
- The fetch should have same URL and same options to be memoized & it only applies to the GET method in fetch requests.
- Request Memoization typically resets after a component unmounts or during revalidation, ensuring fresh data when necessary.
Data Cache
Request Memoization helps in skipping the duplicate fetch requests, but when it comes to storing the results of fetch requests on the server, across multiple user requests & even across deployments it is not useful.
That’s where the data cache comes into play. It’s the final checkpoint Next.js touches before pulling data from your API or database, and it keeps the info available across multiple requests and users, making everything smoother and more efficient.
When you fetch data in a component, Next.js checks if that data is already in the Data Cache. If it is, it uses the cached data instead of making a new request to your data source. This makes your application faster and reduces load on your databases or APIs.
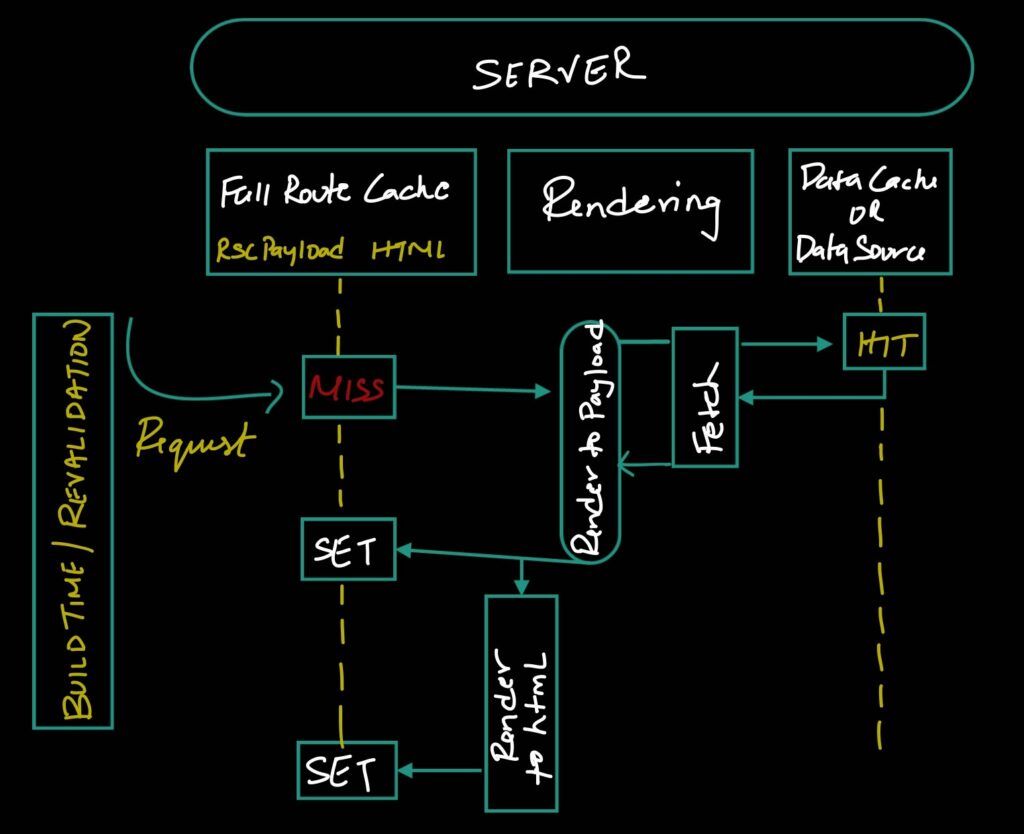
The diagram below serves as a visual overview illustrating the process of Data Cache, making it easier for readers to grasp how this concept functions
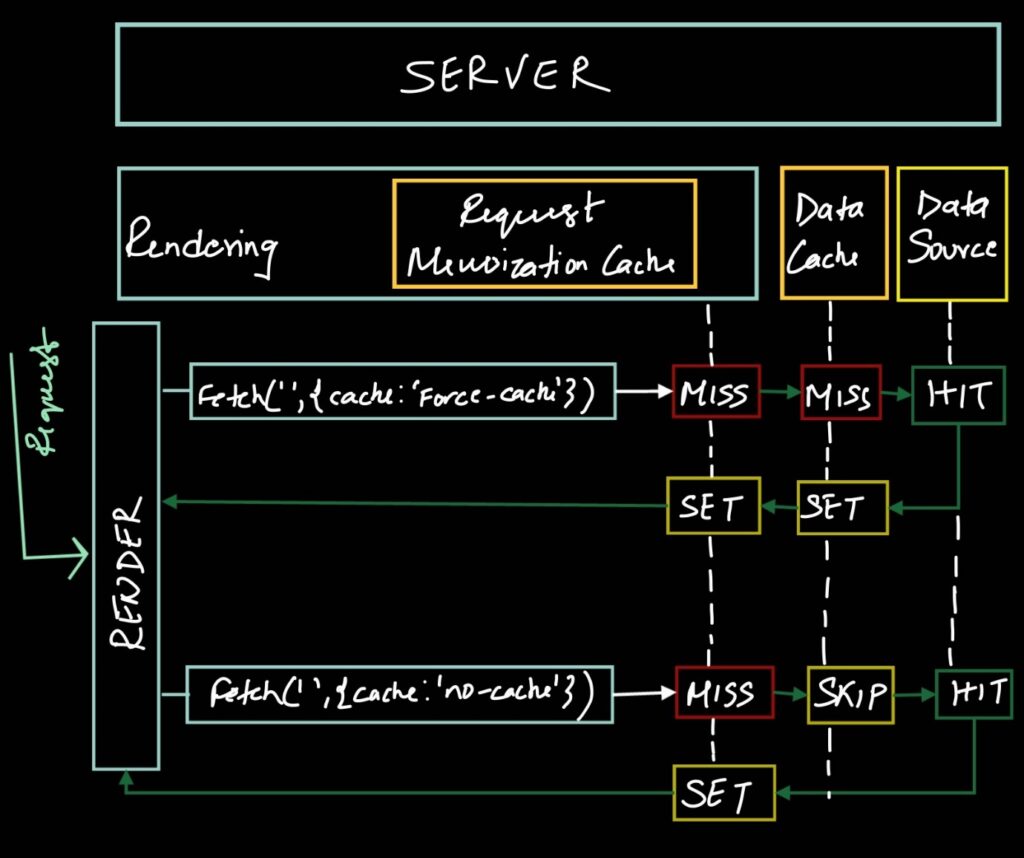
When a fetch request uses the force-cache option, Next.js first checks if there’s already a saved response in the Data Cache.
- If it finds one, it returns that cached response right away and remembers it (this is called memoization).
- If there’s no cached response, it fetches the data from the original source, stores it in the cache, and also memoizes it.
For requests without caching — like when no cache option is set or when using { cache: ‘no-store’ } — Next.js always fetches fresh data from the source. But even then, it still memoizes the result.
In short, whether the data is cached or not, Next.js avoids making the same request multiple times during a single render by remembering (memoizing) the result.
By default, Data Cache is persistent, across incoming requests, so there are two ways we can clear this cache:
Time-based Revalidation
Time-based Revalidation is all about setting up how frequently the data in the cache gets cleared & there are two ways to do it.
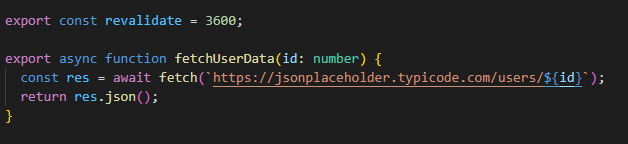
- The first way is to pass the next revalidate option to your fetch request. This will tell Next.js how long the response of this request will remain cached in the Data cache. In the below example, we are asking Next.js to revalidate the cache every hour.

- The second option is to use the revalidate segment config option. This acts at the page level & make all fetch requests for this page revalidate every hour unless they have their own more specific revalidation time set.


On-demand Revalidation
If the data is not updated on a regular schedule, we can choose to refresh the cached value whenever there’s a change. Like, if we run a blog, it can keep using the cache until something new is posted, like a fresh new article or blog entry!
This can be done in two ways:
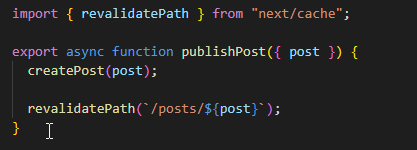
- By using revalidatePath function that takes a string path and will clear the cache of all fetch request on that route.

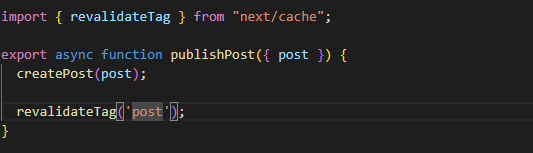
- More specifically we can use the revalidateTag function. Just start by adding a specific tag to the fetch request options so that we can target it with revalidateTag function.

Now by calling revalidateTag with that string will clear the cache of all fetch request which are having the same tag.


Opting Out
There are normally 3 simple ways with which we can opt out of a data cache.
- no-store: By passing cache: no-store as an option in the fetch request, we are telling Next.js no to store fetch request data in Data Cache. This is useful in place where data is constantly changing & we have to show the fresh data every time.

- force-dynamic: We can also mark the whole page to opt out of the cache by setting it on the page level itself. Or by also adding the revalidate segment config option at the beginning of the page, setting it equal to 0.


Full Route Cache
Full Route Cache allows static pages to be cached right when they’re built, so there’s no need to rebuild them each time someone makes a request. Next.js by default, tries to pre-render and store all the routes when you’re building the project, which helps speed up the HTML loading when someone visits a page.
With the Full Route Cache, the HTML and RSCP(React Server Component Payload) are stored during the build, making it easier to serve static pages smoothly.
The diagram below serves as a visual overview illustrating the process of Full Route Cache, making it easier for readers to grasp how this concept functions.
The above page will be rendered at build time, fetching all the users data and each route will be stored in Full Route cache ( HTML + RSCP) so that when user visit the page it is served faster.
Even though the data changes in the data source, the build output will remain the same until we build the app again. So, the user will see the stale data, unless we rebuild the app again. The above behaviour can be noticed in production mode, in development mode the build output will be different each time we visit the page.
The build output will remain the same throughout the time unless we build the app again or revalidate the cache using techniques like revalidatePath or revalidateTag that we see earlier. This is useful for static pages like blog posts, product details etc.
Opting Out
First way to Opt Out from the Full Route Cache is by setting the data cache to no-store in the fetch function as shown above in data-cache option.
Second way is to use dynamic data like headers, cookies or url params such as id in /users/[id], this disables the Full Route Cache by default & fresh data will be served each time.
Router Cache
Router Cache is only applicable in client side, and the cache is stored in browser memory. Next.js caches visited routes and optimizes navigation by prefetching linked pages using the next/link component, reducing the need for repeated server requests as users move between pages.

This cache is temporary and only lasts during the user’s session. It’s cleared when the page is refreshed.
By default in Next.js, if the route is static, it remains cached for 5 minutes, and if dynamic, it remains cached for 30 seconds. This cache is stored at the user’s session level, so if the user refreshes the page or closes the tab, the cached data will be cleared.
We can easily refresh the data stored in this cache using either revalidatePath or revalidateTag, just like we did with the Data cache. So, if we clear the Data cache using these functions, we are also clearing the Router cache data.
Conclusion
Since its first release, the Next.js cache has sparked quite a bit of discussion and mixed feelings among developers. I’ve found that having a good understanding of how it works really helps. It lets you tweak the settings to better suit your specific app.
Here’s a quick, easy-to-understand overview of the four types of caching used in Next.js, including where they live and how they get refreshed. Understanding these can help you fine-tune your app’s performance.
| Cache | Description | Location | Revalidation Criteria |
| Request Memoization | Reuses values during the same server render to boost performance | Server | N/A – only lasts for the duration of a single server request |
| Data Cache | Holds data between user requests and even across deployments | Server | Time-based or manually triggered (on-demand) |
| Full Route Cache | Caches static routes during build time for faster page loads | Server | Refreshed when the Data Cache is revalidated or the app is redeployed |
| Router Cache | Stores visited routes to make navigation smoother for users | Client | Automatically expires after a set time or when the Data Cache is cleared |
Source: Read MoreÂ

 and Preference Optimization (SecAlign)")