
Imagine you’re building a React app where users can log in, get notifications, and change theme preferences. With traditional tools like Redux, managing all these states can be tricky. Lots of code, a complicated setup, and a steep learning curve. Now, with Jotai, you can handle all these states with very little code and setup. You can create “atoms” for user data, notifications, and theme settings, letting each state update on its own. This makes your app faster, easier to maintain, and free of unnecessary complexity. Jotai makes state management simple and efficient.
In my previous blog posts, I wrote about some of the most widely used state management libraries in the React ecosystem – do check them out if you haven’t already!
What is Jotai?
Jotai is a minimalist state management library for React. The name “Jotai” comes from the Japanese word jōtai, meaning “state.” With over 40,000 stars on GitHub, Jotai’s atomic model breaks down the state into small pieces called atoms, allowing for granular control and fewer re-renders.
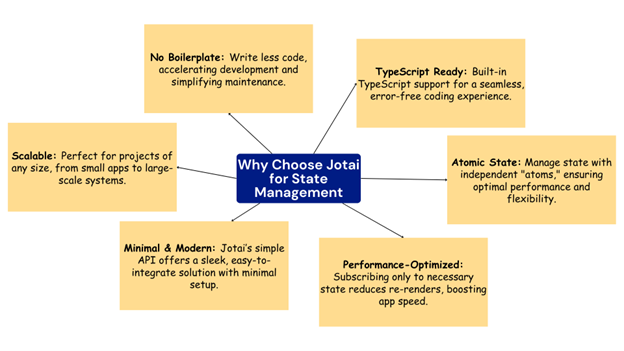
Key Advantages of Using Jotai for State Management in React
Setting Up Jotai in Your React Application
To set up Jotai, run this command in your project directory:
npm install jotai
After this, you can begin using Jotai by importing it into your React components:
import { atom, useAtom } from 'jotai';
Look at the package.json file, jotai has been installed in our project.

Let’s take an example to see how we use MobX to manage the state in our React app.
atom.jsx

import { atom } from 'jotai';

export const countAtom = atom(1);
Counter.jsx

import React from 'react';
import { useAtom } from 'jotai';
import { countAtom } from './atoms';

function Counter() {
  const [count, setCount] = useAtom(countAtom);

  return (
    <div>
      <h2>Count: {count}</h2>
      <button onClick={() => setCount(count + 1)}>Increment</button>
    </div>
  );
}

export default Counter;
App.jsx

import React from 'react';
import Counter from './Counter';

function App() {
  return (
    <div>
      <h1>Hello Jotai App</h1>
      <Counter />
    </div>
  );
}

export default App;
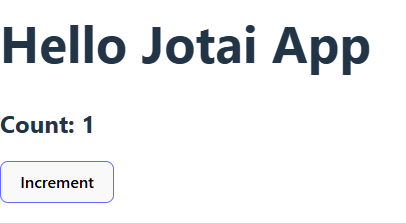
This example uses Jotai to manage shared state in a React app.
The line atom(1) creates a piece of state called countAtom with an initial value of 1. This is like a global variable that can be used in any component.
In the Counter component, useAtom(countAtom) is used to get the current count and a function to update it. When the button is clicked, the count increases by 1 using setCount(count + 1).
Only components that use countAtom will re-render when the count changes. This makes Jotai more efficient than useContext or Redux, where more components might re-render unnecessarily.
If multiple components use countAtom, they all stay in sync automatically and update only when needed. This helps improve performance and keeps the code clean.
Like any powerful tool, Jotai has its own unique quirks and limitations that you should be aware of.
Manual Handling of Loading/Error States: Jotai doesn’t have built-in ways to handle loading or error states, so you need to write custom code for async operations.
Re-renders with Frequent Updates: Frequent state changes or adding new providers can cause unnecessary re-renders, making it less ideal for apps with lots of dynamic data.
Inefficient Object Equality Checks: Jotai uses reference equality (===) for objects, which can lead to extra re-renders unless you add custom checks.
Limited Built-in Features: Jotai doesn’t include features like dev tools or middleware, so you’ll need to add extra tools for debugging and advanced state management.
Performance in Large Apps: Jotai may not be as fast as other libraries for large, complex apps with frequent state updates.
Comparing Jotai with other libraries like Redux, Recoil, and MobX
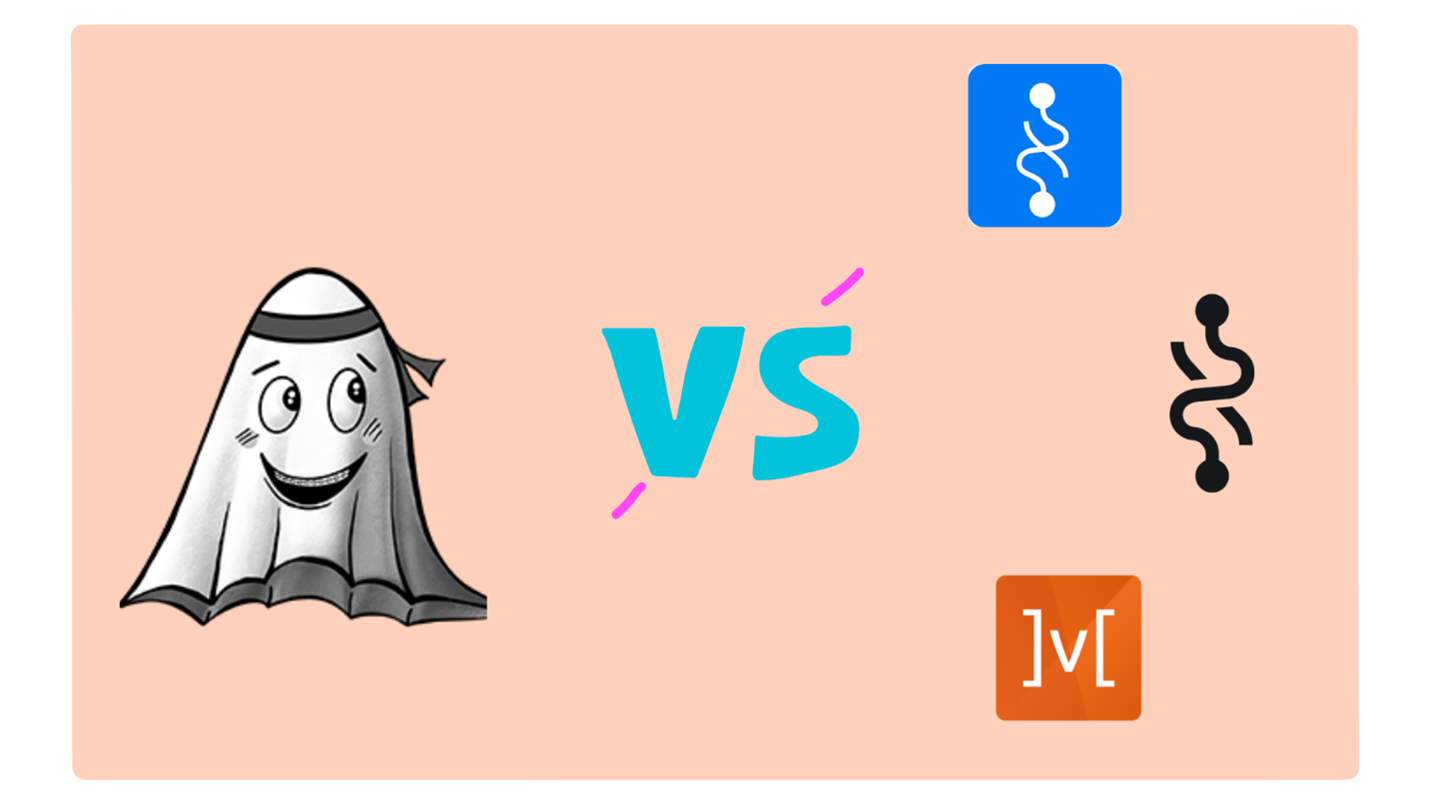
- Jotai vs Redux: Jotai is a lightweight alternative to Redux, focusing on atomic state management without the need for actions, reducers, or a global store. It’s simpler and quicker to set up, making it ideal for smaller apps or specific components within larger projects.
- Jotai vs Recoil: Both Jotai and Recoil use atomic state, but Recoil provides more built-in features like selectors for derived state and tools for handling async data. Jotai is more minimal, offering a simpler API, making it easier to integrate but with fewer out-of-the-box utilities compared to Recoil.
- Jotai vs MobX: Jotai uses explicit atomic state, giving you control over what changes trigger updates. MobX, on the other hand, uses observables that automatically track dependencies. MobX can handle more complex state management needs, while Jotai is easier to understand and better for smaller, simpler apps.
Some FAQs about Jotai –
- Does Jotai support debugging tools like Redux DevTools?
- No, Jotai doesn’t come with built-in debugging tools like Redux DevTools. However, you can still use React Developer Tools to inspect Jotai’s atoms or create your custom debugging solutions.
- How do I handle asynchronous operations in Jotai?
- You can handle async operations by using async atoms. These atoms store promises or data fetched from APIs, and you can update them once the data is available using the useAtom
- Is Jotai still relevant in 2025?
- Yes, Jotai will remain relevant in 2025 due to its simplicity, efficient atomic state management, and alignment with React’s modern patterns. It continues to be a popular choice for small to medium-sized applications.
Conclusion:
Jotai is a simple and powerful state management library for React. Its minimal API makes managing state easy, while its atomic design gives you precise control over local and global state. This makes Jotai great for projects of all sizes. Inspired by Recoil’s “atoms,” Jotai provides a clean and flexible way to manage the state. While Jotai is a great choice for developers looking for an easy and fast solution, it’s always good to explore other libraries to find the best fit for your project. Jotai also offers useful utility packages, which are fully explained in the documentation to help you get the most out of it.
And that’s a wrap for today! More insights into front-end technologies are coming your way – all geared to level up your development game. Until then, check out my other blogs, keep exploring, stay curious, and code with passion!
Source: Read MoreÂ
