
Azure Firewall, a managed, cloud-based network security service, is an essential component of Azure’s security offerings. It comes in three different versions – Basic, Standard, and Premium – each designed to cater to a wide range of customer use cases and preferences. This blog post will provide a comprehensive comparison of these versions, discuss best practices for their use, and delve into their application in hub-spoke and Azure Virtual WAN with Secure Hub architectures.
What is Azure Firewall?
Azure Firewall is a cloud-native, intelligent network firewall security service designed to protect your Azure cloud workloads. It offers top-tier threat protection and is fully stateful, meaning it can track the state of network connections and make decisions based on the context of the traffic.
Key Features of Azure Firewall
- High Availability: Built-in high availability ensures that your firewall remains operational at all times.
- Scalability: Unlimited cloud scalability to handle varying workloads.
- Traffic Inspection: Inspects both east-west (within the same network) and north-south (between different networks) traffic.
- Threat Intelligence: Uses advanced threat intelligence to block malicious IP addresses and domains.
- Centralized Management: Allows you to centrally create, enforce, and log application and network connectivity policies across multiple subscriptions and virtual networks.
- Compliance: Helps organizations meet regulatory and compliance requirements by providing detailed logging and monitoring capabilities.
- Cost Efficiency: By deploying Azure Firewall in a central virtual network, you can achieve cost savings by avoiding the need to deploy multiple firewalls across different networks.

Why Azure Firewall is Essential
Enhanced Security
In today’s digital landscape, cyber threats are becoming increasingly sophisticated. Organizations need robust security measures to protect their data and applications. Azure Firewall provides enhanced security by inspecting both inbound and outbound traffic, using advanced threat intelligence to block malicious IP addresses and domains. This ensures that your network is protected against a wide range of threats, including malware, phishing, and other cyberattacks.
Centralized Management
Managing network security across multiple subscriptions and virtual networks can be a complex and time-consuming process. Azure Firewall simplifies this process by allowing you to centrally create, enforce, and log application and network connectivity policies. This centralized management ensures consistent security policies across your organization, making it easier to maintain and monitor your network security.
Scalability
Businesses often experience fluctuating traffic volumes, which can strain network resources. Azure Firewall offers unlimited cloud scalability, meaning it can handle varying workloads without compromising performance. This scalability is crucial for businesses that need to accommodate peak traffic periods and ensure continuous protection.
High Availability
Downtime can be costly for businesses, both in terms of lost revenue and damage to reputation. Azure Firewall’s built-in high availability ensures that your firewall is always operational, minimizing downtime and maintaining continuous protection
Compliance
Many industries have strict data protection regulations that organizations must comply with. Azure Firewall helps organizations meet these regulatory and compliance requirements by providing detailed logging and monitoring capabilities. This is particularly vital for industries such as finance, healthcare, and government, where data security is of paramount importance.
Cost Efficiency
Deploying multiple firewalls across different networks can be expensive. By deploying Azure Firewall in a central virtual network, organizations can achieve cost savings. This centralized approach reduces the need for multiple firewalls, lowering overall costs while maintaining robust security.
Azure Firewall Versions: Basic, Standard, and Premium
Azure Firewall Basic
Azure Firewall Basic is recommended for small to medium-sized business (SMB) customers with throughput needs of up to 250 Mbps. It’s a cost-effective solution for businesses that require fundamental network protection.
Azure Firewall Standard
Azure Firewall Standard is recommended for customers looking for a Layer 3–Layer 7 firewall and need autoscaling to handle peak traffic periods of up to 30 Gbps. It supports enterprise features like threat intelligence, DNS proxy, custom DNS, and web categories.
Azure Firewall Premium
Azure Firewall Premium is recommended for securing highly sensitive applications, such as those involved in payment processing. It supports advanced threat protection capabilities like malware and TLS inspection. Azure Firewall Premium utilizes advanced hardware and features a higher-performing underlying engine, making it ideal for handling heavier workloads and higher traffic volumes.
Azure Firewall Features Comparison
Here’s a comparison of the features available in each version of Azure Firewall:
| Feature | Basic | Standard | Premium |
|---|---|---|---|
| Stateful firewall (Layer 3/Layer 4) | Yes | Yes | Yes |
| Application FQDN filtering | Yes | Yes | Yes |
| Network traffic filtering rules | Yes | Yes | Yes |
| Outbound SNAT support | Yes | Yes | Yes |
| Threat intelligence-based filtering | No | Yes | Yes |
| Web categories | No | Yes | Yes |
| Intrusion Detection and Prevention System (IDPS) | No | No | Yes |
| TLS Inspection | No | No | Yes |
| URL Filtering | No | No | Yes |
Azure Firewall Architecture
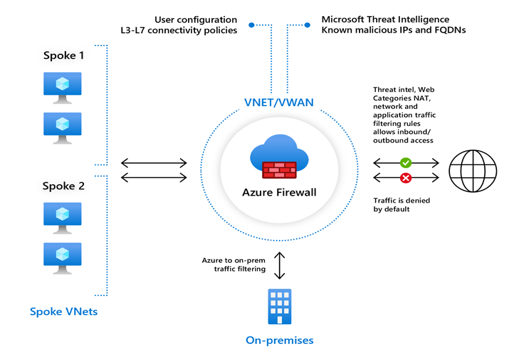
Azure Firewall plays a crucial role in the hub-spoke network architecture pattern in Azure. The hub is a virtual network (VNet) in Azure that acts as a central point of connectivity to your on-premises network. The spokes are VNets that peer with the hub and can be used to isolate workloads. Azure Firewall secures and inspects network traffic, but it also routes traffic between VNets .
A secured hub is an Azure Virtual WAN Hub with associated security and routing policies configured by Azure Firewall Manager. Use secured virtual hubs to easily create hub-and-spoke and transitive architectures with native security services for traffic governance and protection.

How Azure Firewall Works
Azure Firewall operates by using rules and rule collections to manage and filter network traffic. Here are some key concepts:
- Rule Collections: A set of rules with the same order and priority. Rule collections are executed in priority order.
- Application Rules: Configure fully qualified domain names (FQDNs) that can be accessed from a virtual network.
- Network Rules: Configure rules with source addresses, protocols, destination ports, and destination addresses.
- NAT Rules: Configure DNAT rules to allow incoming Internet or intranet connections.
Azure Firewall integrates with Azure Monitor for viewing and analyzing logs. Logs can be sent to Log Analytics, Azure Storage, or Event Hubs and analyzed using tools like Log Analytics, Excel, or Power BI.
Steps to Deploy and Configure Azure Firewall
Step 1: Set Up the Network
Create a Resource Group
Sign in to the Azure portal:
- Navigate to Azure Portal.
- Use your credentials to sign in.
- Create a Resource Group:
- On the Azure portal menu, select Resource groups or search for and select Resource groups from any page.
- Click Create.
- Enter the following values:
- Subscription: Select your Azure subscription.
- Resource group: Enter Test-FW-RG.
- Region: Select a region (ensure all resources you create are in the same region).
- Click Review + create and then Create.
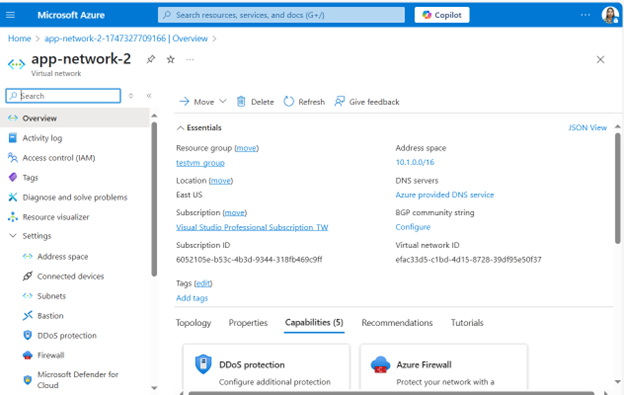
- Create a Virtual Network (VNet)
- On the Azure portal menu or from the Home page, select Create a resource.
- Select Networking and search for Virtual network, then click Create.
- Enter the following values:
- Subscription: Select your Azure subscription.
- Resource group: Select Test-FW-RG.
- Name: Enter Test-FW-VN.
- Region: Select the same region as the resource group.
- Click Next: IP Addresses.
- Configure IP Addresses:
- Set the Address space to 10.0.0.0/16.
- Create two subnets:
- AzureFirewallSubnet: Enter 10.0.1.0/26.
- Workload-SN: Enter 10.0.2.0/24.
- Click Next: Security.
- Configure Security Settings:
- Leave the default settings for Security.
- Click Next: Tags.
- Add Tags (Optional):
- Tags are useful for organizing resources. Add any tags if needed.
- Click Next: Review + create.
- Review and Create:
- Review the settings and click Create.
Step 2: Deploy the Firewall
Create the Firewall:
- On the Azure portal menu, select Create a resource.
- Search for Firewall and select Create.
- Enter the following values:
- Subscription: Select your Azure subscription.
- Resource group: Select Test-FW-RG.
- Name: Enter Test-FW.
- Region: Select the same region as the resource group.
- Virtual network: Select Test-FW-VN.
- Subnet: Select AzureFirewallSubnet.
- Click Next: IP Addresses.
- Configure IP Addresses:
- Assign a Public IP Address:
- Click Add new.
- Enter a name for the public IP address, e.g., Test-FW-PIP.Click OK.
- Click Next: Tags.
- Add Tags (Optional):
- Add any tags if needed.
- Click Next: Review + create.
- Review and Create:
- Review the settings and click Create.

Step 3: Configure Firewall Rules
Create Application Rules
- Navigate to the Firewall:
- Go to the Resource groups and select Test-FW-RG.
- Click on Test-FW.
- Configure Application Rules:
- Select Rules from the left-hand menu.
- Click Add application rule collection.
- Enter the following values:Name: Enter AppRuleCollection.
- Priority: Enter 100.
- Action: Select Allow.
- Rules: Click Add rule.
- Name: Enter AllowGoogle.
- Source IP addresses: Enter *.
- Protocol: Select http, https.
- Target FQDNs: Enter www.google.com.
- Click Add.
- Create Network Rules
- Configure Network Rules:
- Select Rules from the left-hand menu.
- Click Add network rule collection.
- Enter the following values:
- Name: Enter NetRuleCollection.
- Priority: Enter 200.
- Action: Select Allow.
- Rules: Click Add rule.
- Name: Enter AllowDNS.
- Source IP addresses: Enter *.
- Protocol: Select UDP.
- Destination IP addresses: Enter 8.8.8.8, 8.8.4.4.Destination ports: Enter 53.
- Click Add.
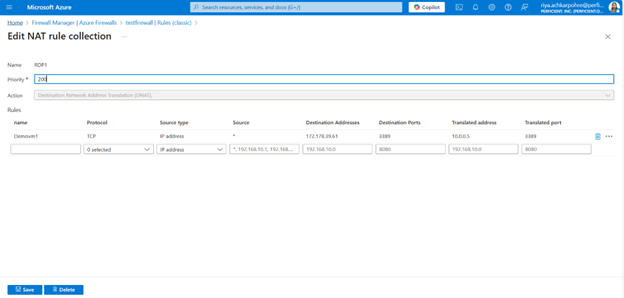
- Create NAT Rules
- Configure NAT Rules:
- Select Rules from the left-hand menu.
- Click Add NAT rule collection.
- Enter the following values:
- Name: Enter NATRuleCollection.
- Priority: Enter 300.
- Action: Select DNAT.
- Rules: Click Add rule.
- Name: Enter AllowRDP.
- Source IP addresses: Enter *.Protocol: Select TCP.
- Destination IP addresses: Enter the public IP address of the firewall.
- Destination ports: Enter 3389.
- Translated address: Enter the private IP address of the workload server.
- Translated port: Enter 3389.
- Click Add.
- Configure NAT Rules:
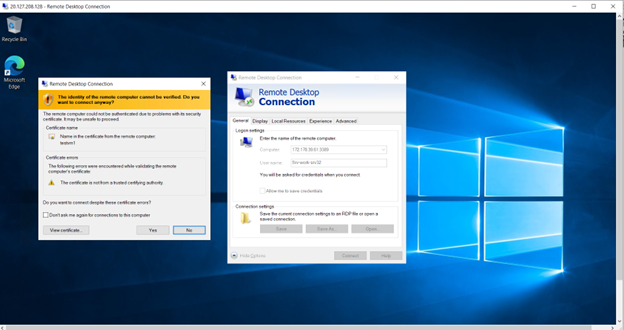
Step 4: Test the Firewall
- Deploy a Test VM:
- Create a virtual machine in the Workload-SN subnet.
- Ensure it has a private IP address within the 10.0.2.0/24 range.
- Test Connectivity:
- Attempt to access www.google.com from the test VM to verify the application rule.
- Attempt to resolve DNS queries to 8.8.8.8 and 8.8.4.4 to verify the network rule.
- Attempt to connect via RDP to the test VM using the public IP address of the firewall to verify the NAT rule.
- Monitoring and Managing Azure Firewall
- Integrate with Azure Monitor:
- Navigate to the firewall resource.
- Select Logs from the left-hand menu.
- Configure diagnostic settings to send logs to Azure Monitor, Log Analytics, or Event Hubs.
- Navigate to the firewall resource.
- Integrate with Azure Monitor:
- Analyze Logs:
- Use Azure Monitor to view and analyze firewall logs.
- Create alerts and dashboards to monitor firewall activity and performance.
Best Practices for Azure Firewall
To maximize the performance of your Azure Firewall, it’s important to follow best practices. Here are some recommendations:
- Optimize Rule Configuration and Processing: Organize rules using firewall policy into Rule Collection Groups and Rule Collections, prioritizing them based on their frequency of use.
- Use or Migrate to Azure Firewall Premium: Azure Firewall Premium offers a higher-performing underlying engine and includes built-in accelerated networking software.
- Add Multiple Public IP Addresses to the Firewall: Consider adding multiple public IP addresses (PIPs) to your firewall to prevent SNAT port exhaustion.
Source: Read MoreÂ

