
In this era of Web development, Next.JS and Vercel is the powerful couple. Next.JS offers performance, scalability and flexibility in building web applications whereas Vercel provides the easy and smooth deployment experience tailored for it.
Today, in this blog, we will cover the step-by-step process of deploying a Next.JS app on Vercel. We will also cover some best practices and key configurations to ensure the optimal performance in production.
Why Vercel + Next.js?
- Zero config deployment for Next.js projects
- Support for ISR (Incremental Static Regeneration) is built in
- First-class serverless function support
- CDN-backed global edge network for fast delivery
- Automatic scaling without infrastructure headaches
Prerequisites
Before we begin, ensure you have:
- A working Next.js project (npx create-next-app@latest if you want to create one)
- A GitHub, GitLab, or Bitbucket account
- A account of Vercel (sign up at vercel.com)
Step 1: Add and push Your Next.js App to Git
Make sure your Next.js code is version-controlled and hosted on a Git provider like GitHub.
git init

git add .

git commit -m "Initial commit"

git remote add origin https://github.com/your-username/your-repo.git

git push -u origin main
Step 2: Connect to Vercel
- Visit https://vercel.com
- Click “New Project”
- Connect your GitHub/GitLab/Bitbucket account (if not already done)
- Now Select the repository that contains the Next.js app
- Vercel will auto-detect it’s a js project. No extra configuration needed.
Below is the screenshot which you will get after these steps: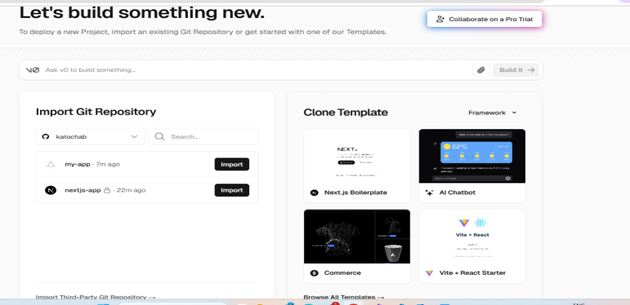
Step 3: Configure Build Settings (Optional)
Vercel sets default settings for Next.js automatically:
- Framework Preset: Next.js
- Build Command: next build
- Output Directory: .next
You can override these as needed. You can also define environment variables under the Environment Variables section (e.g., for API keys). After clicking on the project which you want to import, you can see this:

Step 4: Deploy!
Click “Deploy” and let Vercel take care of the rest.
- Within seconds or minutes, your app will be live at a .vercel.app domain.
- Every commit you push to the connected branch will automatically trigger a new deployment.
You will see the below dashboard in which the details will be mentioned. 
And this is how the vercel-hosted site will look on browser.

Step 5: Set Up a Custom Domain
You can add your own domain:
- Go to the project dashboard → Settings → Domains
- Enter your domain name and follow the DNS instructions
- Enable HTTPS with a free Vercel-managed SSL certificate

Scaling with Vercel
Vercel auto-scales with traffic using serverless functions and edge caching, but here are a few tips for scaling smartly:
- Use next/image for optimized image loading
- Prefer static generation where possible
- Use middleware and edge functions for routing and auth at the edge
- Utilize analytics and performance monitoring via Vercel integrations
Key Benefits Recap
| Feature | Benefit |
| Instant Deployments | Deploy in seconds with zero config |
| Global CDN | Fast delivery worldwide |
| Serverless Functions | Auto-scaling APIs without setup |
| Custom Domains + HTTPS | Free and easy SSL |
| CI/CD Integration | Auto deployment from Git |
| ISR & SSR Support | Perfect for dynamic + static content |
Final Thoughts
Deploying the scalable Next.JS app on Vercel is an easy and smooth process. Whether you are giving the shot to a blog or a site, Vercel ensures optimal performance with zero-config deployments.
So, what are you waiting for? Push and deploy your code to Vercel and enjoy the peace of mind that comes with this modern approach.
Source: Read MoreÂ
