Close Menu
    DevStackTipsDevStackTips
    • Home
    • News & Updates
      1. Tech & Work
      2. View All

      From Data To Decisions: UX Strategies For Real-Time Dashboards

      September 13, 2025

      Honeycomb launches AI observability suite for developers

      September 13, 2025

      Low-Code vs No-Code Platforms for Node.js: What CTOs Must Know Before Investing

      September 12, 2025

      ServiceNow unveils Zurich AI platform

      September 12, 2025

      DistroWatch Weekly, Issue 1139

      September 14, 2025

      Building personal apps with open source and AI

      September 12, 2025

      What Can We Actually Do With corner-shape?

      September 12, 2025

      Craft, Clarity, and Care: The Story and Work of Mengchu Yao

      September 12, 2025
    • Development
      1. Algorithms & Data Structures
      2. Artificial Intelligence
      3. Back-End Development
      4. Databases
      5. Front-End Development
      6. Libraries & Frameworks
      7. Machine Learning
      8. Security
      9. Software Engineering
      10. Tools & IDEs
      11. Web Design
      12. Web Development
      13. Web Security
      14. Programming Languages
        • PHP
        • JavaScript
      Featured

      Optimizely Mission Control – Part III

      September 14, 2025
      Recent

      Optimizely Mission Control – Part III

      September 14, 2025

      Learning from PHP Log to File Example

      September 13, 2025

      Online EMI Calculator using PHP – Calculate Loan EMI, Interest, and Amortization Schedule

      September 13, 2025
    • Operating Systems
      1. Windows
      2. Linux
      3. macOS
      Featured

      DistroWatch Weekly, Issue 1139

      September 14, 2025
      Recent

      DistroWatch Weekly, Issue 1139

      September 14, 2025

      sudo vs sudo-rs: What You Need to Know About the Rust Takeover of Classic Sudo Command

      September 14, 2025

      Dmitry — The Deep Magic

      September 13, 2025
    • Learning Resources
      • Books
      • Cheatsheets
      • Tutorials & Guides
    Home»Development»Sitecore XM Cloud Content Migration: Plan and Strategy

    Sitecore XM Cloud Content Migration: Plan and Strategy

    May 6, 2025

    Sitecore XM cloud content migration can be approached in various ways. The first thing that comes to mind when working on the Sitecore upgrade project to XM Cloud is content migration. Choosing the right method helps reduce migration time and avoid errors. I will outline the approach that best meets our client’s needs in this blog. We were provided with a master database backup that had all the content. Our task was to move Sitecore data, including media, from Sitecore 9.3 to XM Cloud.

    We connected the legacy Sitecore database to the XM Cloud instance for migration. My colleague Martin Miles wrote a detailed blog on XM Cloud content migration: connecting the external database

    Sitecore Items Data Migration to XM Cloud

    Extracting items and their field data was relatively straightforward. We used PowerShell scripts to export item field data into CSV files. These CSVs were later imported into the XM Cloud using import scripts, building different page types.

    We chose this approach due to a complete redesign of templates and renderings. The new XM Cloud setup did not reuse old templates, fields, or renderings. XM Cloud included fresh templates, fields, and renderings. This allowed us to map legacy page templates and fields to the new XM Cloud templates. This mapping helped us to import field values for different page types accordingly.

    Our import scripts created key page types and populated the fields using field mappings. We created some standardized renderings for key page templates like Rich Texts, Accordion, etc. The scripts assigned data sources automatically to save content authors’ time. Only a few pages, like home, landing, and search, were created manually, which were unique. Most other pages were created using automation scripts.

    XM Cloud runs in Docker containers in the local environment. So, we couldn’t access CSV files directly from the local file system. However, we have this covered by copying CSVs into dockerdeployplatformApp_Data. This folder is part of the project’s root directory. These CSVs then became accessible within the local XM Cloud instance. We leveraged Sitecore Package Designer to package the CSV files to be installed in higher environments to run import scripts.

    Sitecore Package Designer - Files Statically

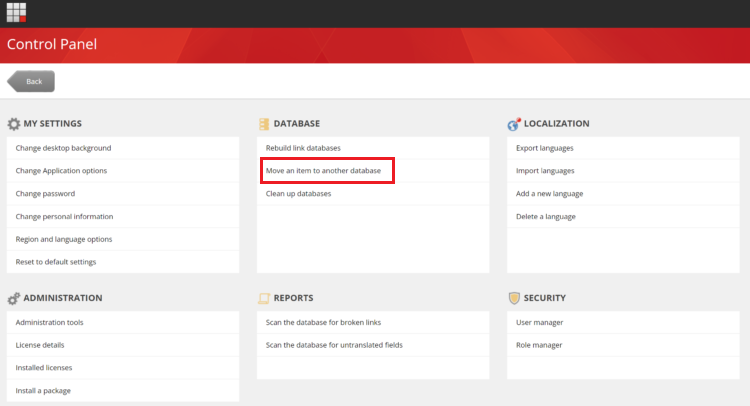
    Media Migration to XM Cloud

    We already have a legacy Sitecore database connected to the XM Cloud instance. Using Sitecore’s out-of-the-box UI for bulk content migration between databases, we locally transferred media from the legacy database to the XM Cloud.

    Controlpanel Moveitemtootherdb

    Once the media folder with all the subfolders moved to XM Cloud, we have used a script to create media packages. My colleague Nick has written thorough blog on Exporting Media Items with Sitecore PowerShell Extensions to create packages of media.

    The number of media packages depends on your database size. We had approximately 5GB of media items to migrate, so we created around 190 media packages for this migration. Package count also depends on the size of each media package. We limited each media package size to 25MB. Larger media packages take more time to upload and install. Sometimes, big packages get stuck without showing installation progress, which is frustrating.

    In higher environments, we used the script below to upload and install the packages created locally.

    $filepath = Receive-File -Path "C:inetpubwwwrootApp_Datapackages"
    Write-Host "Uploaded package Succesfully : " $filepath
    
    # get file size in MB in PowerShell   
    $size = (Get-Item -Path $filepath).Length/1MB
    Write-Host $size "MB"
    Write-Host "Installation Started......"
    Install-Package -Path $filepath -InstallMode Merge -MergeMode Merge
    Write-Host "Installation Completed - Package installed successfully"

    In this way, we had migrated a whole media library to XM Cloud. This process was tedious and took a day to create and upload all packages.

    I am sharing sample PowerShell scripts for extracting and importing Sitecore item data. The Sitecore IDs used in the scripts are not valid; you need to replace them as per your project’s Sitecore item IDs.

    Sitecore Item Data Extraction Script

    <#
        .SYNOPSIS
           Generic Page data extraction
            
        .DESCRIPTION
            Gets Sitecore Items from legacy database and extracts field values.
            List could be exported to csv by OOTB feature of List View in SPE.
            
        .NOTES
            Akash Borkar | Perficient 
    #>
    
    function Write-LogExtended {
        param(
            [string]$Message,
            [System.ConsoleColor]$ForegroundColor = $host.UI.RawUI.ForegroundColor,
            [System.ConsoleColor]$BackgroundColor = $host.UI.RawUI.BackgroundColor
        )
    
        Write-Log -Object $message
        Write-Host -Object $message -ForegroundColor $ForegroundColor -BackgroundColor $backgroundColor
    }
    
    # Function for getting item names from pipe-separated item ids
    function GetItemNamesFromIds {
        param(
            [System.String] $ids
        )
        
        if($ids.Contains("|"))
        {
            # Split the string by pipe and clean up each GUID
            $guids = $ids.Split("|") | ForEach-Object { $_.Trim(' {}') }
            [Sitecore.Text.ListString]$nameArr = ""
    
            foreach ($id in $guids) {
                $formattedId = "{0}{1}{2}" -f '{', $id, '}'
        
                $Id = [Sitecore.Data.ID]::Parse($formattedId) 
                $item = Get-Item -Path xyz: -ID $Id
                        
                if ($item -ne $null -and !$nameArr.Contains($item.Name)) {
                    $nameArr.Add($item.Name) | Out-Null
                }
            }
            
            # Join the names with pipe separator and return the result
            $names = [System.String]::Join("|", $nameArr)
            return $names
        }
        else
        {
            $item = Get-Item -Path xyz: -ID $ids
                return $item.Name
        }
    }
    
    #Function for getting datasource item, which is further used for extracting field value & assigning to new rendering
    function Get-DatasourceItem{
        param(
             [System.String] $path
            )
            $datasourceItem = $sourceDatabase.GetItem($path)
            return $datasourceItem
    }
    
    
    Write-LogExtended " "
    Write-LogExtended "Generic Pages Data Extraction"
    Write-LogExtended "-----------------------------------------------------------------"
    
    $processedItems = [System.Collections.Generic.List[PSCustomObject]]::new()
    $nonprocessedItems = [System.Collections.Generic.List[PSCustomObject]]::new()
    $sourceDatabase = Get-Database "xyz"
    
    $parentPath = Show-Input -Prompt "Please enter the Sitecore item path for getting children"
    if($parentPath -ne $null)
    {
        Write-Host "Selected path: $parentPath"
    
        #Get all child items based on provided path. /sitecore/content/XYZ/Home/Generic
        $nodePath = "xyz:" + $parentPath
        $items = Get-ChildItem -Path $nodePath -Recurse | Where-Object { $_.TemplateName -eq 'Generic Page'}
        
        Write-LogExtended "Total child items: $($items.Count)  Path: $($nodePath)" -ForegroundColor Green
        
        foreach($sourceItem in $items)
        {
            if($sourceItem -ne $null){
                
                #Retrieve RTE
                $rts = Get-Rendering -Item $sourceItem -Device $defaultLayout -FinalLayout | Where-Object { $_.ItemID -eq "{278F7B0D-98F4-4873-9B7B-940082158E4A}"}
                [Sitecore.Text.ListString]$rtArr = ""
                
                if($rts -ne $null)
                {
                    foreach($rt in $rts)
                    { 
                      $item = $sourceDatabase.GetItem($rt.Datasource)
                      if($item -ne $null -and $item["Text"] -ne "")
                      {
                          $rtArr.Add($item["Text"]) | Out-Null
                      }
                    }
                }
                
                
                #Retrieve Accordion
                $accordion = Get-Rendering -Item $sourceItem -Device $defaultLayout -FinalLayout | Where-Object { $_.ItemID -eq "{165B5ECC-E6A0-4B41-AA23-D28FA5A9BF68}"}
                $accordionCount = 0
                [Sitecore.Text.ListString]$titleArr = ""
                [Sitecore.Text.ListString]$descArr = ""
                
                if($accordion -ne $null)
                {
                    foreach ($renderingItem in $accordion) 
                    {
                        if($renderingItem.Datasource -ne "")
                        {
                            $rendering = Get-Item -Path xyz: -Id $renderingItem.Datasource
                            if($rendering.HasChildren)
                            {
                                $accdChildItems = Get-ChildItem -Path xyz: -ID $rendering.ID
                                foreach($item in $accdChildItems)
                                {
                                    if($item["Title"] -ne "" -and $item["Description"] -ne "")
                                    {
                                          $titleArr.Add($item["Title"]) | Out-Null
                                          $descArr.Add($item["Description"]) | Out-Null
                                    }
                                }
                            $accordionCount++;
                            }
                        }
                    }
                }
                    
                #Retrieve values of multilist field named Categories
                $categories = $sourceitem["Categories"]
                $categoriesnames = ""
                if($categories -ne "" -and $categories -ne $null)
                {
                    $categoriesnames = GetItemNamesFromIds -ids $categories
                }
                
                
                try{
                    $processedItems.Add(
                        [PSCustomObject]@{
                            Name = $sourceItem.Name
                            Id = $sourceItem.Id
                            Path = $sourceItem.Paths.FullPath
                            Title = $sourceItem["Title"]
                            HeaderTitle = $sourceItem["Header Title"]
                            Summary = $sourceItem["Summary"]
                            Image = $sourceItem["Image"]
                            OGImage = $sourceItem["Media Image"]
                            Categories = $categoriesnames
                            HasRTE = $rtArr.Count
                            RichText1 = $richText
                            RichText2 = $rtArr[1]
                            RichText3 = $rtArr[2]
                            
                            HasAccordion = $accordionCount
                            AccTitle1 = $titleArr[0]
                            AccDesc1 = $descArr[0]
                            AccTitle2 = $titleArr[1]
                            AccDesc2 = $descArr[1]
                            AccTitle3 = $titleArr[2]
                            AccDesc3 = $descArr[2]
                            AccTitle4 = $titleArr[3]
                            AccDesc4 = $descArr[3]
                            
                        }
                    )
                            
                Write-LogExtended "Added data for $($sourceItem.Name), Path: $($sourceItem.Paths.FullPath) " -ForegroundColor Green
                }
                catch{
                    Write-Host "Error occured" -BackgroundColor DarkRed
                                
                    $nonprocessedItems.Add(
                        [PSCustomObject]@{
                            Name = $sourceItem.Name
                            Id = $sourceItem.Id
                            Path = $sourceItem.Paths.FullPath
                        }
                    )
                }
            }
            else
            {
                Write-LogExtended "No Item found in csv for SourceURL: $($row.SourceURL)" -ForegroundColor RED
            }
        }
        
        $processedItems | Show-ListView -PageSize 15000 -Property  Name, Id, Path, Title, HeaderTitle, Summary, Categories, Image, OGImage, 
                                                                    HasRTE, RichText1, RichText2, RichText3, HasAccordion, AccTitle1, AccDesc1, AccTitle2, AccDesc2, AccTitle3, 
     AccDesc3, AccTitle4, AccDesc4
                                                                 
        $processedItems | export-csv -Path "C:inetpubwwwrootApp_DataProcess.csv" -NoTypeInformation                                                  
        $nonprocessedItems | Show-ListView -PageSize 15000 -Property  Name, Id, Path
    }
    else
    {
            Write-Host "Path is not provided : $parentPath"
    }

    Sitecore Item Import Script

    <#
        .SYNOPSIS
           Generic Pages Import
            
        .DESCRIPTION
            Iterate through CSV, create siteore items for generic pages and Populate fields. Generate List of processed and Non processed items.
            
        .NOTES
            Akash Borkar | Perficient 
    #>
    
    function Write-LogExtended {
        param(
            [string]$Message,
            [System.ConsoleColor]$ForegroundColor = $host.UI.RawUI.ForegroundColor,
            [System.ConsoleColor]$BackgroundColor = $host.UI.RawUI.BackgroundColor
        )
    
        Write-Log -Object $message
        Write-Host -Object $message -ForegroundColor $ForegroundColor -BackgroundColor $backgroundColor
    }
    
    
    Write-LogExtended " "
    Write-LogExtended "Generic Pages Import"
    Write-LogExtended "-----------------------------------------------------------------"
    
    # Prompt for the file path
    $filePath = Show-Input -Prompt "Please enter the full path to the CSV file"
    if($filePath -ne $null)
    {
    Write-Host "Selected file: $filePath"
    
    # Import the CSV file
    $csvData = Import-Csv -Path $filePath | Where-Object { -join $_.psobject.Properties.Value }
    
    Write-LogExtended "CSV file read successfully" -ForegroundColor Green
    
        if($csvData -ne $null)
        {
            $processedItems = [System.Collections.Generic.List[PSCustomObject]]::new()
            $NonProcessedItems = [System.Collections.Generic.List[PSCustomObject]]::new()
            $database = Get-Database "master"
            $placeholder = "/headless-main/container-1"
            
            foreach ($row in $csvData){
                
                #Generic Page branch
                $branchTemplateId = [Sitecore.Data.ID]::Parse("{8032FE9E-3CD1-4E80-8377-66BBF74F839E}")
                
                # Extract the desired item name, parent item and template id from the URL
                $itemName = $row.Name
                $parentItemPath = $row.Path -Replace $itemName, ""
    
                # Get the parent item
                $parentItem = $database.GetItem($parentItemPath)
                
                if ($parentItem){
                    # Check if the item already exists
                    $existingItemPath = "$($parentItem.Paths.FullPath)/$itemName"
                    $itemExists = Test-Path -Path $existingItemPath
                    
                    if (-not $itemExists){
                        $item = [Sitecore.Data.Managers.ItemManager]::AddFromTemplate($itemName, $branchTemplateId, $parentItem)
                        
                        if ($item -eq $null) {
                        Write-LogExtended "Unable to create new item - $($itemName) - in Language en" -ForegroundColor Red
                        
                            $NonProcessedItems.Add(
                            [PSCustomObject]@{
                                ID = $row.ID
                                Name    = $row.Name
                                Path = $row.Path
                            })
                        }
                        
                        if($item -ne $null){
                            $item.Editing.BeginEdit()
                            
                            $item["Title"] = $row.Title
                            
                            #Meta Properties/OG
                            $item["OpenGraphTitle"] = $row.Title
                            $item["OpenGraphDescription"] = $row.Summary
                            $item["MetaDescription"] = $row.Summary
                            $item["TwitterDescription"] = $row.Summary 
                            $item["TwitterImage"] = $row.OGImage
                            
                            $item.Editing.EndEdit() | Out-Null
                            
                            
                            $datasourcePath =  $item.Paths.FullPath + "/Data/"
                            #Create and Populate Rich Text (Max RT are 3 as we had extracted 3 RTEs)
                            if($row.RichText1 -ne "")
                            {
                                 For($i=1; $i -lt 4; $i++) 
                                    { 
                                        $propname = "RichText$i"
                                        if($row.$propname -ne "")
                                        {
                                            $dsitem = New-Item -Path $datasourcePath -Name "Text $i" -ItemType "{4FBDBF79-C7D6-42F1-8048-D5E70D6167D5}"
                                            $dsitem.Editing.BeginEdit()
                                            $dsitem.Text =  $row.$propname
                                            $dsitem.Editing.EndEdit() | Out-Null
                                            
                                            #Create and Set Rich text Rendering
                                            $rendering = get-item -path master: -id {EF82E4AE-C274-40D4-837C-B3E1BF180CCC}
                                            $renderinginstance = $rendering | new-rendering -placeholder $placeholder
                                            $renderinginstance.datasource = $dsitem.id
                                            Add-Rendering -Item $item -placeholder $placeholder -instance $renderinginstance -finallayout
                                            $item.Editing.beginedit()
                                            $item.Editing.endedit() | out-null
                                        }
                                    }
                            }
                            
                            
                            #Create and Populate Accrd datasource item (Max Acc are 4)
                            if($row.AccTitle1 -ne "" -and $row.AccDesc1 -ne "")
                            {
                                $accDatasourcePath =  $item.Paths.FullPath + "/Data/"
                                #Accordion
                                $Accitem = New-Item -Path $accDatasourcePath -Name "Accordion" -ItemType "{D482D45C-4248-46C8-BDD5-DE7C2255C52A}"
                                $Accitem.Editing.BeginEdit()
                                $Accitem.Title =  "Accordion"
                                $Accitem.Editing.EndEdit() | Out-Null
                                
                                #Create and Set Acc rendering
                                $rendering = Get-Item -Path master: -ID {3341A94D-42C9-4EE3-8A25-51D8B437982B} #Accordion
                                $renderingInstance = $rendering | New-Rendering -Placeholder $placeholder
                                $renderingInstance.Datasource = $Accitem.ID
                                Add-Rendering -Item $item -PlaceHolder $placeholder -Instance $renderingInstance -FinalLayout
                                
                                For($i=1; $i -lt 5; $i++) 
                                { 
                                    $titlename = "AccTitle$i"
                                    $descname = "AccDesc$i"
                                    if($row.$titlename -ne "" -and $row.$descname -ne "")
                                    {
                                        #Acc Panel
                                        $dsitem = New-Item -Path $Accitem.Paths.FullPath -Name $row.$titlename -ItemType "{B50C502C-2740-44C8-A63E-E9E4AF4BAA4B}"
                                        $dsitem.Editing.BeginEdit()
                                        $dsitem.Title =  $row.$titlename
                                        $dsitem.Content =  $row.$descname
                                        $dsitem.Editing.EndEdit() | Out-Null
                                        
                                        #Create and Set Acc panel rendering
                                        $rendering = Get-Item -Path master: -ID {7614DFFF-6735-4BA5-929A-A82FBC91DB25} #Acc Panel
                                        $renderingInstance = $rendering | New-Rendering -Placeholder "/headless-main/container-1/accordion-panels-1"
                                        $renderingInstance.Datasource = $dsitem.ID
                                        Add-Rendering -Item $item -PlaceHolder "/headless-main/container-1/accordion-panels-1" -Instance $renderingInstance -FinalLayout
                                        $item.Editing.BeginEdit()
                                        $item.Editing.EndEdit() | Out-Null
                                        
                                        Write-LogExtended "Added Accordion datasource to New Item - $($item.Name) at $($dsitem.Paths.FullPath)" -ForegroundColor Green
                                    }
                                }
                            }
                            
                            $ManualWork = "No"
                            if(($row.HasRTE -gt 3) -or ($row.HasAccordion -gt 4))
                            {
                                $ManualWork = "Yes"
                            }
                            
                            Write-LogExtended "Created New Item - $($itemName) at $($parentItemPath)" -ForegroundColor Green
                            $processedItems.Add(
                            [PSCustomObject]@{
                                Name    = $item.Name
                                Id = $item.ID
                                NewPath = $item.Paths.FullPath
                                HasRTE = $row.HasRTE
                                HasAccordion = $row.HasAccordion
                                ManualWork = $ManualWork 
                            })
                        }
                    }
                    else 
                    {
                        Write-LogExtended "Item $($itemName) already exists at $($parentItemPath) " -ForegroundColor Yellow
                    }
                }
                else 
                {
                    Write-LogExtended "Parent item not found: $parentItemPath" -ForegroundColor Red
                }
            }
            
        $processedItems | Show-ListView -PageSize 2000 -InfoTitle "Processed Items" -Property  Name, Id, NewPath, HasRTE, HasAccordion, ManualWork
            $processedItems | export-csv -Path "C:inetpubwwwrootApp_DataGenericPagesReport.csv" -NoTypeInformation
        $NonProcessedItems | Show-ListView -PageSize 2000 -InfoTitle "Non Processed Items" -Property  ID, Name, Path
        }
    }
    else
    {
        Write-Host "No file selected : $filePath"
    }

    I kept the script limited to extracting some fields and renderings; however, it gives a fair idea of how to extract data and import.

    Conclusion

    The PowerShell scripts you will write will be based on project requirements, template naming, rendering, and field mappings for your key page templates. When we first started migrating, we had a hard time figuring out the approach and connecting the dots. In this blog, I wanted to make sure the plan is clear. In my next blog, I will give the code snippets of the most widely used PSE commands used in Sitecore content migration.

    Source: Read More 

    Facebook Twitter Reddit Email Copy Link
    Previous ArticleDslogdRAT Malware Deployed via Ivanti ICS Zero-Day CVE-2025-0282 in Japan Attacks
    Next Article Community News: Latest PECL Releases (05.06.2025)

    Related Posts

    Repurposing Protein Folding Models for Generation with Latent Diffusion
    Artificial Intelligence

    Repurposing Protein Folding Models for Generation with Latent Diffusion

    September 14, 2025
    Artificial Intelligence

    Scaling Up Reinforcement Learning for Traffic Smoothing: A 100-AV Highway Deployment

    September 14, 2025
    Leave A Reply Cancel Reply

    For security, use of Google's reCAPTCHA service is required which is subject to the Google Privacy Policy and Terms of Use.

    Continue Reading

    CVE-2025-7770 – Tigo Energy CCA Predictable Session ID Vulnerability

    Common Vulnerabilities and Exposures (CVEs)

    CVE-2025-34027 – Versa Concerto Traefik Reverse Proxy Authentication Bypass and Remote Code Execution

    Common Vulnerabilities and Exposures (CVEs)

    Critical Flaws in ELECOM Routers: JPCERT/CC Issues Warning Over Command Injection and XSS Risks

    Security

    5 ways automation can speed up your daily workflow – and implementation is easy

    News & Updates

    Highlights

    Prompt Engineering 101: Master LLMs Like ChatGPT & Claude

    April 21, 2025

    With the rapid evolution of AI technology, large language models (LLMs) like ChatGPT and Claude have become essential tools across industries. These models are highly versatile, capable of assisting in everything from content creation to complex problem-solving. The key to harnessing their power lies in prompt engineering—the process of crafting inputs that guide the AI to produce desired outputs. This article delves deeper into the art and science of prompt engineering, offering actionable insights, techniques, tools, and applications.

    Understanding Prompt Engineering
    What Is Prompt Engineering?
    Prompt engineering involves designing precise and effective instructions (prompts) to optimize the output of LLMs. A well-constructed prompt acts as a guide, steering the AI to perform specific tasks accurately and efficiently.
    Why Is Prompt Engineering Important?

    Efficiency: Reduces the need for multiple iterations by achieving accurate results quickly.

    Customization: Allows tailoring responses to specific needs, from tone and structure to content scope.

    Unlocking Potential: Enables LLMs to perform a vast range of tasks, including generating creative ideas, coding, and offering strategic insights.

    Core Principles of Prompt Engineering
    1. Clarity Is Key
    Avoid ambiguity by crafting clear and concise prompts. The more specific you are, the better the model will understand and deliver results.

    Ambiguous Prompt: “Tell me about history.”

    Clear Prompt: “Provide a 200-word summary of the French Revolution, focusing on its causes and outcomes.”

    2. Context Matters
    Provide sufficient background information or instructions to help the model understand the task.

    Without Context: “Explain machine learning.”

    With Context: “Explain machine learning to a 12-year-old in simple terms with examples.”

    3. Leverage Constraints
    Incorporating constraints like word limits, tone, or format ensures responses align with expectations.

    Example: “Write a professional email to a client explaining a delay in product delivery in 150 words.”

    4. Experimentation and Iteration
    The first prompt may not always yield the best results. Experiment with variations and refine your approach to achieve optimal outcomes.

    Advanced Techniques in Prompt Engineering
    1. Chain of Thought Prompting
    Encourage the model to reason step-by-step for tasks that require logical thinking.

    Prompt: “Explain the steps to solve the quadratic equation x² – 4x + 3 = 0. Break it down into simple steps.”

    This approach helps the model generate structured, comprehensive answers.
    2. Few-Shot Prompting
    Provide a few examples within the prompt to illustrate the desired format or style.

    Prompt:
    “Convert these active sentences into passive voice:

    The team completed the project. -> The project was completed by the team.

    The chef cooked the meal. -> The meal was cooked by the chef.
    Now, convert: The artist painted the portrait.”

    3. Zero-Shot Prompting
    For straightforward tasks, use direct instructions without examples.

    Prompt: “List 5 benefits of remote work.”

    4. Multi-Turn Conversations
    Use iterative interactions to refine responses, simulating a dialogue to clarify and improve output.

    Example:

    User: “Summarize the benefits of renewable energy.”

    AI: Response.

    User: “Can you elaborate on the environmental benefits specifically?”

    5. Role-Specific Prompts
    Assign a role to the AI for more contextual and focused responses.

    Prompt: “You are a travel agent. Plan a 7-day itinerary for a family visiting Paris, including cultural landmarks and kid-friendly activities.”

    Popular Tools for Prompt Engineering
    1. OpenAI Playground
    Experiment with GPT models in a user-friendly interface to refine prompts and test their effectiveness.
    2. Hugging Face
    Explore and interact with various LLMs, offering an ecosystem for prompt experimentation.
    3. LangChain
    A framework for developing advanced applications with LLMs, enabling seamless integration of prompt engineering techniques.
    4. Notion AI & Jasper
    Commercial tools that integrate LLMs for content creation, allowing users to explore prompt engineering in real-world scenarios.

    Real-World Applications of Prompt Engineering
    1. Content Creation
    Generate articles, marketing copy, or social media posts tailored to specific audiences.

    Example: “Write a LinkedIn post promoting a webinar on AI ethics.”

    2. Education
    Create study materials, quizzes, or simplified explanations of complex topics.

    Example: “Generate 10 multiple-choice questions about World War II for high school students.”

    3. Software Development
    Streamline coding tasks such as debugging, code suggestions, or explanations.

    Example: “Write a Python script to sort a list of numbers in ascending order.”

    4. Business Applications
    Develop strategies, draft business emails, or analyze customer feedback.

    Example: “Analyze this customer feedback and provide a summary of common complaints.”

    Common Challenges in Prompt Engineering
    1. Vague Prompts
    Unclear instructions lead to irrelevant or generic responses.

    Solution: Always include details about the task, expected format, and desired outcomes.

    2. Overfitting Prompts
    Highly specific prompts may work for one task but fail in broader contexts.

    Solution: Balance specificity with flexibility to ensure versatility.

    3. Bias in Outputs
    LLMs may reflect biases present in their training data.

    Solution: Test and adjust prompts to mitigate bias.

    Future of Prompt Engineering
    Prompt engineering will continue evolving as AI models improve. Key trends to watch include:

    Automated Prompt Optimization: Tools that refine prompts for the best results automatically.

    Integration with Workflows: Embedding prompt engineering into professional tools like CRM systems or project management software.

    Dynamic Prompting: Systems that adapt prompts in real-time based on user input or context.

    Actionable Tips for Beginners

    Start with simple tasks and build complexity gradually.

    Document effective prompts for future use.

    Engage with communities like OpenAI forums or Hugging Face to learn from experienced users.

    Use tools like OpenAI Playground or LangChain to experiment in a hands-on environment.

    Conclusion
    Prompt engineering is a critical skill for anyone leveraging LLMs like ChatGPT and Claude. By mastering the principles and techniques outlined here, you can unlock their full potential across various domains, from education and business to creative pursuits. Whether you’re a beginner or an experienced user, continuous experimentation and refinement will help you master the art of prompt engineering.
    Take the first step today—craft a prompt, refine it, and witness the transformative power of AI in action!

    QuickPoint

    July 10, 2025

    Oracle Cloud EPM: Transitioning to Forms 2.0, Dashboards 2.0 by October 2025

    July 10, 2025

    CVE-2025-55170 – WeGIA Reflected Cross-Site Scripting Vulnerability

    August 12, 2025
    © DevStackTips 2025. All rights reserved.
    • Contact
    • Privacy Policy

    Type above and press Enter to search. Press Esc to cancel.