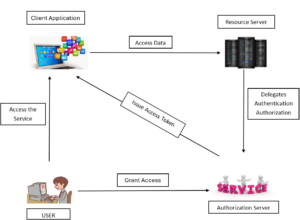
Authentication and authorization are two crucial aspects of web development. In modern applications, it’s essential to ensure that users are who they say they are (authentication) and have permission to access specific resources (authorization). OAuth2 and OpenID Connect are two widely used protocols that help achieve both goals.
What is OAuth2?
OAuth2 (Open Authorization 2.0) is an authorization framework that enables third-party applications to access a user’s resources without requiring them to share their credentials (username and password). It allows for delegated access, meaning that users can grant specific, controlled access to their data without revealing their login information.
OAuth2 is commonly used to enable users to authenticate via their existing accounts from services like Google, Facebook, or Microsoft. This allows users to securely log in to applications without exposing their sensitive credentials to the requesting application.
Key Concepts in OAuth2
- Resource Owner: The user who owns the data and grants permission to the client application.
- Client Application: The application requesting access to the user’s resources (e.g., a mobile app or a web application).
- Authorization Server: The server responsible for authenticating the user and issuing access tokens.
- Resource Server: The server that hosts the protected resources and validates the access tokens provided by the client.
- Access Token: A token issued by the authorization server that grants the client access to the protected resources.
OAuth2 Flow
- The user is redirected to the authorization server (e.g., Google’s OAuth2 server).
- The user authenticates and grants permission for the client application to access specific data (e.g., their Google profile).
- The authorization server issues an authorization code.
- The client application exchanges the authorization code for an access token.
- The client application uses the access token to request protected resources from the resource server.
Key Benefits of OAuth2
OAuth 2.0 is a widely adopted authorization framework that allows third-party applications to access user resources without sharing the credentials. It provides a secure and scalable way to manage authorization. Here are some key benefits of OAuth 2.0:
- Granular Access Control: Allows user to define fine-grained permissions for specific resources and grant third-party apps access to certain data or actions without providing blanket access to all their information.
- Improved Security: Credentials Protection and Scoped Access.
- Support for Multiple Grant Types: Supports several grant types (e.g., Authorization Code, Implicit, Client Credentials, and Resource Owner Password Credentials)
- Token-Based Authentication: Uses access tokens, which are temporary and can be scoped and time-limited.
- Token Expiry and Revocation: Tokens issued by OAuth 2.0 have an expiry time, which helps limit the duration of access.
- Interoperability: OAuth 2.0 is a well-defined, open standard that is widely supported by various service providers and applications, ensuring smooth integration between different systems and platforms.

What is OpenID Connect?
OpenID Connect (OIDC) is an identity layer built on top of OAuth2. It is used to verify the identity of the user and obtain their profile information. While OAuth2 is used for authorization, OpenID Connect extends OAuth2 to include authentication.
In simple terms, OAuth2 tells the client what the user is allowed to do (authorization), while OpenID Connect tells the client who the user is (authentication).
Key Concepts in OpenID Connect
- ID Token: This is a JWT (JSON Web Token) that contains information about the authenticated user. It is issued by the authorization server and can be used by the client application to authenticate the user.
- Authentication Request: The client sends a request to the authorization server to authenticate the user and receive an ID token along with an access token.
OAuth2 and OpenID Connect in .NET
For better understanding, we’ll integrate with Google as the OAuth2 and OpenID Connect provider.
Step 1: Create a Google Developer Project
1.1 Open the Google Cloud Console
-
- Open your browser and navigate to the Google Cloud Console.
- Sign in to your Google account. If you’re not already signed in, you’ll be prompted to log in.
1.2 Create a New Project
-
- On the top left of the page, you’ll see the Google Cloud Platform logo. To the right of the logo, there will be a dropdown that may say something like “Select a Project” or “My First Project.”
- Click on this dropdown. A new window will appear, showing a list of your existing projects.
- In the top right of the window, you’ll see a button that says “New Project.” Click on this button.
1.3 Fill in the Project Details
-
- Project Name: Enter a name for your project.
- After filling in the details, click Create.
Once your project is created, you’ll be redirected to the newly created project’s dashboard in the Google Cloud Console.
Step 2: Enable the Google+ API
2.1 Navigate to the APIs & Services Library
-
- In the left sidebar, click on the hamburger icon (three horizontal lines) to open the navigation menu.
- From the menu, go to APIs & Services > Library.
2.2 Search for the Google+ API
-
- In the search bar at the top of the Library page, type Google+ API and press enter.
- Click on the Google+ API result.
- Then, click the Enable button to enable this API for your project.
Step 3: Create OAuth2 Credentials
3.1 Go to the Credentials Page
-
- In the left sidebar, under APIs & Services, click on Credentials.
3.2 Create OAuth 2.0 Client ID
-
- On the Credentials page, click the Create Credentials button at the top and select OAuth 2.0 Client ID.
3.3 Configure the OAuth Consent Screen
-
- Before creating the OAuth credentials, you need to configure the OAuth consent screen. Click on the OAuth consent screen tab.
- Choose External as the user type.
3.4 Fill in the Required Fields
-
- App Name: Enter a name for your application.
- User Support Email: Provide your email address.
- Developer Contact Information: Enter your email address.
- Click Save and Continue to proceed.
3.5 Create the OAuth 2.0 Client ID
-
-
After completing the OAuth consent screen setup, you’ll be asked to configure the OAuth credentials.
-
Select Web application as the application type.
-
Add the following Authorized redirect URI:
Example Redirect URI (if your app is running on
https://localhost:{{portnumber}}): -
Click Create.
-
Step 4: Obtain Client ID and Client Secret
4.1 Create OAuth Credentials
After completing the OAuth 2.0 configuration and clicking Create, a new window will appear with your Client ID and Client Secret.
4.2 Copy and Store Credentials
It is crucial to copy both the Client ID and Client Secret and store them securely. These credentials will be necessary for integrating Google authentication into your app and ensuring secure access to users’ Google accounts.
4.3 Use the Credentials in Your App
You will use these credentials in your application to authenticate users and interact with Google’s services. Keep them safe, as they allow access to sensitive user data.
Set Up the .NET Core Project:
-
- Create a new ASP.NET Core web application using the template for Web Application (Model-View-Controller).
- Add the Microsoft.AspNetCore.Authentication.Google NuGet package.
- Configure OAuth2 and OpenID Connect in Program.cs
In the Program.cs file, configure the authentication middleware to use Google’s OAuth2 and OpenID Connect:
// Add authentication services (Google login, etc.)

builder.Services.AddAuthentication(options =>

{

options.DefaultScheme = "Cookies";

options.DefaultChallengeScheme = GoogleDefaults.AuthenticationScheme;

})

.AddCookie()

.(options =>

{

options.ClientId = "client-id";

options.ClientSecret = "client-secret";

options.CallbackPath = "/signin-google";

});


app.UseAuthentication();

app.UseAuthorization();
- AddGoogle enables OAuth2 and OpenID Connect using Google as the identity provider.
- SaveTokens = true ensures that both the access token and ID token are saved.
The .AddGoogle method is part of the ASP.NET Core framework, introduced in .NET 9.0 for authentication purposes (typically in the context of OAuth 2.0 or OpenID Connect for integrating Google sign-in). If we are using a version of .NET earlier than 9.0, we will not have access to this method directly.
To handle lower versions of .NET (e.g., .NET 5.0, .NET 6.0, or .NET 7.0) and integrate Google authentication, we will need to use the older approach provided by the AddOAuth or AddGoogle method from previous versions. Here’s how we can implement it for .NET 6.0 or lower:
.AddOAuth("Google", options =>

{

options.ClientId = Configuration["Google:ClientId"];

options.ClientSecret = Configuration["Google:ClientSecret"];

options.CallbackPath = new PathString("/signin-google");

options.AuthorizationEndpoint = "https://accounts.google.com/o/oauth2/auth";

options.TokenEndpoint = "https://oauth2.googleapis.com/token";

options.UserInformationEndpoint = "https://www.googleapis.com/oauth2/v3/userinfo";

options.Scope.Add("openid");

options.Scope.Add("profile");

options.Scope.Add("email");

options.SaveTokens = true;

}
Step 5: Create a Controller to Handle Authentication
Create a simple controller to handle login and display the authenticated user’s profile.
- The Login action redirects users to Google’s login page.
- The Logout action logs the user out.
- The Profile action the authenticated principal and displays the ID token.
Identity Management in ASP.NET Core relies heavily on OAuth 2.0 or OpenID Connect for user authentication. The Profile action retrieves user information, typically stored in claims, such as the ID token, and uses it for user management. With the appropriate configuration and token handling, the application can securely manage user identity, retrieve profile data, and display relevant information to the user.
Step 6: Add Views to Display User Information
Add a simple view to show the user’s profile in the Views/Account/Profile.cshtml:
Step 7: Run the Application
Run application using:
dotnet run
Conclusion
OAuth2 and OpenID Connect are powerful protocols for handling authentication and authorization in modern applications. By integrating these protocols into .NET applications, we can securely authenticate users, delegate access to resources, and ensure that only authorized users can access services.
By following the steps we should now have a basic understanding of how to implement OAuth2 and OpenID Connect in a .NET application. These concepts are essential for any developer working on building secure, scalable, and modern web applications.
Source: Read MoreÂ
