Close Menu
    DevStackTipsDevStackTips
    • Home
    • News & Updates
      1. Tech & Work
      2. View All

      Sunshine And March Vibes (2025 Wallpapers Edition)

      May 13, 2025

      The Case For Minimal WordPress Setups: A Contrarian View On Theme Frameworks

      May 13, 2025

      How To Fix Largest Contentful Paint Issues With Subpart Analysis

      May 13, 2025

      How To Prevent WordPress SQL Injection Attacks

      May 13, 2025

      This $4 Steam Deck game includes the most-played classics from my childhood — and it will save you paper

      May 13, 2025

      Microsoft shares rare look at radical Windows 11 Start menu designs it explored before settling on the least interesting one of the bunch

      May 13, 2025

      NVIDIA’s new GPU driver adds DOOM: The Dark Ages support and improves DLSS in Microsoft Flight Simulator 2024

      May 13, 2025

      How to install and use Ollama to run AI LLMs on your Windows 11 PC

      May 13, 2025
    • Development
      1. Algorithms & Data Structures
      2. Artificial Intelligence
      3. Back-End Development
      4. Databases
      5. Front-End Development
      6. Libraries & Frameworks
      7. Machine Learning
      8. Security
      9. Software Engineering
      10. Tools & IDEs
      11. Web Design
      12. Web Development
      13. Web Security
      14. Programming Languages
        • PHP
        • JavaScript
      Featured

      Community News: Latest PECL Releases (05.13.2025)

      May 13, 2025
      Recent

      Community News: Latest PECL Releases (05.13.2025)

      May 13, 2025

      How We Use Epic Branches. Without Breaking Our Flow.

      May 13, 2025

      I think the ergonomics of generators is growing on me.

      May 13, 2025
    • Operating Systems
      1. Windows
      2. Linux
      3. macOS
      Featured

      This $4 Steam Deck game includes the most-played classics from my childhood — and it will save you paper

      May 13, 2025
      Recent

      This $4 Steam Deck game includes the most-played classics from my childhood — and it will save you paper

      May 13, 2025

      Microsoft shares rare look at radical Windows 11 Start menu designs it explored before settling on the least interesting one of the bunch

      May 13, 2025

      NVIDIA’s new GPU driver adds DOOM: The Dark Ages support and improves DLSS in Microsoft Flight Simulator 2024

      May 13, 2025
    • Learning Resources
      • Books
      • Cheatsheets
      • Tutorials & Guides
    Home»Development»Plop.js – A micro-generator framework: Introduction and Installation (Part-1)

    Plop.js – A micro-generator framework: Introduction and Installation (Part-1)

    March 20, 2025

    We all may have come across this situation countless times in our projects—copying and pasting files just to create a new component, page, or service. Unfortunately, this slows us down and hampers our productivity by introducing errors into the workflow. However, there’s a solution! Plop.js is the answer to this problem, as it automates these tasks and allows us to focus on writing great code.

    What is Plop.js?

    Plop.js is a simple yet powerful scaffolding tool—in other words, a micro-generator framework—that helps us automate repetitive coding tasks for projects. As a result, it saves time, reduces errors, and standardizes code structures. Moreover, it ensures uniformity across files, making life easier for the entire team.

    Highlight Features:

    • First and foremost, template-based file generation.
    • Additionally, an interactive CLI enabling a smoother user experience.
    • Lastly, achieving extensibility through custom actions.

    Installation of Plop.js

    Plop.js can be installed in any of your projects. To illustrate this, let’s take an example of a Next.js project.

    Step 1: Create a Next.js Project

    To begin with, create a Next.js project using the following command:

    Nextjs Installation Cli

    As a result, the above CLI command will prompt you with further questions for setting up your Next.js project.
    (Select answers as per your requirement):

    • What is your project named? my-app
    • Would you like to use TypeScript? No / Yes
    • Would you like to use ESLint? No / Yes
    • Would you like to use Tailwind CSS? No / Yes
    • Would you like your code inside a `src/` directory? No / Yes
    • Would you like to use App Router? (recommended) No / Yes
    • Would you like to use Turbopack for `next dev`? No / Yes
    • Would you like to customize the import alias (`@/*` by default)? No / Yes

    Step 2: Install Plop.js

    Once your Next.js project is set up, navigate to the project folder and install Plop.js using the command below:
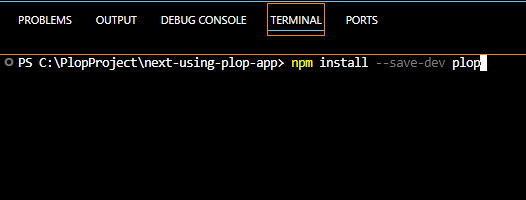
    Install Plop

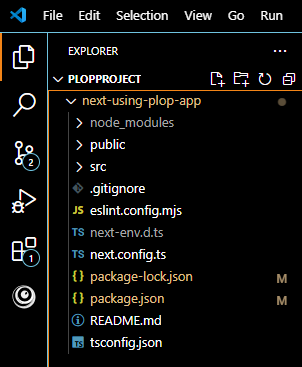
    This installation generates three key files:

    1. A node_modules folder for all your libraries, packages, and third-party code.
    2. A package.json file which will give you a starting point for your scripts.
    3. A package-lock.json file, which will lock down the versions for each package.
      Plop Project Scaffolding

    In addition to this, installing Plop globally is optional but recommended:
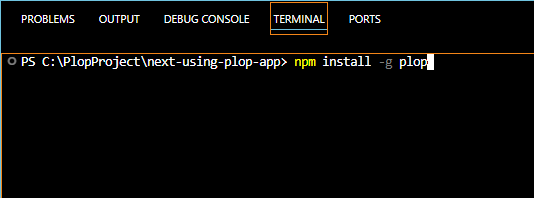
    Install Plop Globally

    Step 3: Create plopfile.js

    Next, create a plopfile.js at the root of your project. Below is a very basic example of plopfile.js
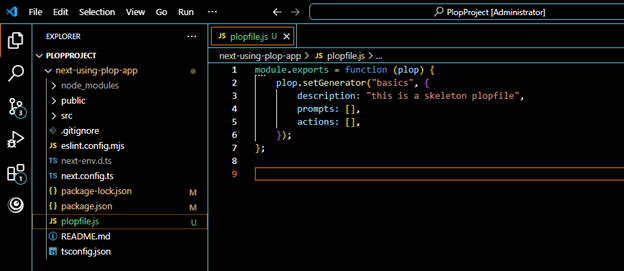
    Plopfile Js Config

    module.exports = function (plop) {
      plop.setGenerator("basics", {
        description: "My first Plop generator",
        prompts: [
          {
            type: "input",
            name: "name",
            message: "What is the name of your component?",
          },
        ],
        actions: [
          {
            type: "add",
            path: "./components/{{pascalCase name}}.js",
            templateFile: "templates/component.hbs",
          },
        ],
      });
    };
    

    Breaking Down the Code:

    • The “setGenerator” creates a generator of the plop. Here, this plopfile.js has a single generator called “basics”.
    • The “description” as the name suggests, describes the purpose of the generator.
    • The “prompts” is an array of prompts. This could be added for your created generator.
    • The “actions” takes the information that the user provided to each prompt. It is an array of where each action is an object. This is an important step and requires creating some templates.

    Step 4: Add a Script to package.json

    Before running Plop, add the following script (highlighted in the screenshot below) to package.json
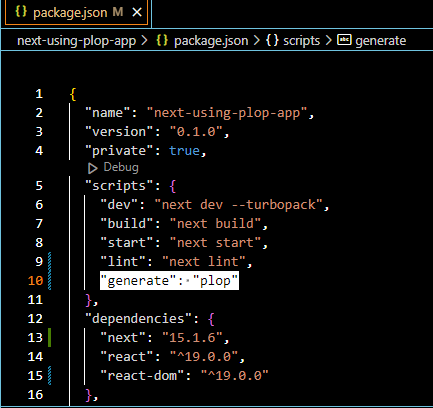
    Generate Plop Script

    Step 5: Run plop

    And lastly, run plop through CLI command “npm run generate”
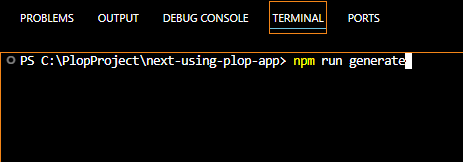
    Run Generate Script

    At this point, Plop will execute and guide you through the component creation process!


    What’s Next?

    So far, we’ve covered the introduction and installation of Plop.js along with a basic skeleton for plopfile.js.
    In the next part Plop.js Template Creation, we will dive deeper into plopfile.js, replace the skeleton code with working code, and create our first real template. Stay tuned!


    Source: Read More 

    Hostinger
    Facebook Twitter Reddit Email Copy Link
    Previous ArticlePlop.js – A micro-generator framework: Template Creation (Part-2)
    Next Article billboard.js 3.15.0 release: Container-based resizing & enhanced regions

    Related Posts

    Security

    Nmap 7.96 Launches with Lightning-Fast DNS and 612 Scripts

    May 14, 2025
    Common Vulnerabilities and Exposures (CVEs)

    CVE-2025-3623 – WordPress Uncanny Automator PHP Object Injection Vulnerability

    May 14, 2025
    Leave A Reply Cancel Reply

    Continue Reading

    Mastering Buttons in CSS

    Web Development

    AWS Secrets Manager – A Secure Solution for Protecting Your Data

    Development

    Microsoft Edge Tests Bottom Address Bar Swipe Gesture for Tab Switching on Android

    Operating Systems

    Four Years of CISA: A Policy Review of U.S. Cybersecurity and Infrastructure Security

    Development

    Highlights

    Facebook porn scam infects 110k users in 48 hours

    April 9, 2025

    A new porn scam is spreading startlingly quickly through Facebook – one that has managed…

    Testing load of a highchart using python and selenium

    November 19, 2024

    This Microsoft app is the latest to get infused with Copilot

    February 3, 2025

    DDoS attack on feminist blog backfires on International Women’s Day

    April 9, 2025
    © DevStackTips 2025. All rights reserved.
    • Contact
    • Privacy Policy

    Type above and press Enter to search. Press Esc to cancel.