


Hello Trailblazers!
Salesforce Reports are a cornerstone of effective data-driven decision-making. They allow you to analyze and visualize business data efficiently. Salesforce offers a subscription feature for reports to ensure you or your team stay updated on important metrics without manually checking them. Subscribing ensures that you receive reports regularly in your email inbox, making it easy to monitor performance and trends.
In this blog, we’ll learn a step-by-step guide to subscribing to Salesforce Reports.
So stay tuned!
Before You Begin:
In the earlier sections of this Salesforce Reports series, we explored What Salesforce Reports are and the various types of Salesforce Reports. I highly recommend revisiting those sections to gain a deeper understanding and maximize your knowledge.
Why Subscribe to Salesforce Reports?
Subscribing to Salesforce Reports provides numerous benefits, including:
- Timely Updates: Receive reports at a frequency that suits your business needs.
- Automation: Eliminate the need to manually run reports.
- Collaboration: Share critical data with stakeholders without additional effort.
- Customization: Tailor subscription settings to fit your specific reporting requirements.
Prerequisites for Report Subscription
Before subscribing to reports in Salesforce, ensure the following:
- Permission to Subscribe: So verify that your profile or role includes the permission to subscribe to reports. If not, contact your Salesforce Administrator.
- Access to Report: So you must have view access to the report you wish to subscribe to.
- Email Configuration: Ensure your organization’s email settings in Salesforce are correctly configured for outbound emails.
By the end of this blog, I will have shared some images and demonstrated how you can receive automated email updates for Salesforce Reports by subscribing to them. So keep reading for all the details!
Steps to Subscribe to a Salesforce Report
Step 1: Navigate to the Reports Tab
- Go to the Reports tab in your Org.
- Locate the report you want to subscribe.
Step 2: Open the Desired Report
- Click on the report name to open it.
- So, review the report to ensure it contains the data you need.

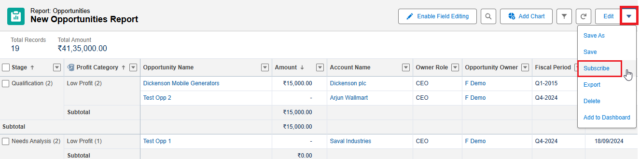
Step 3: Click on the Subscribe Button
- Once you open the report, click the down arrow menu button beside the ‘Edit’ button in the top right corner.
- When clicked, a menu will appear.
- So click the Subscribe button to initiate the subscription process, as shown below.
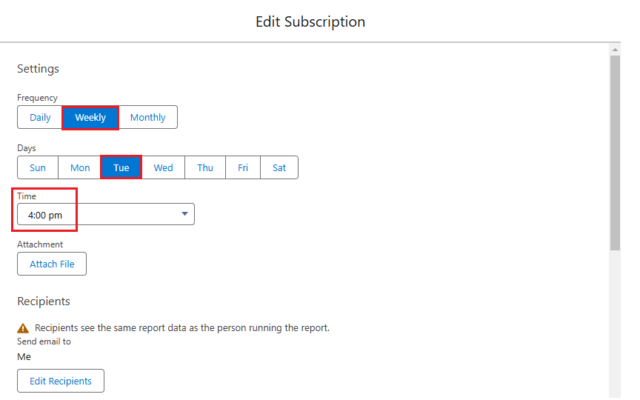
Step 4: Configure Subscription Settings
1. Set Frequency: Choose how often you want to receive the report. So options include:
-
- Daily
- Weekly
- Monthly
2. Select Time: Here, specify when the report email should be sent.
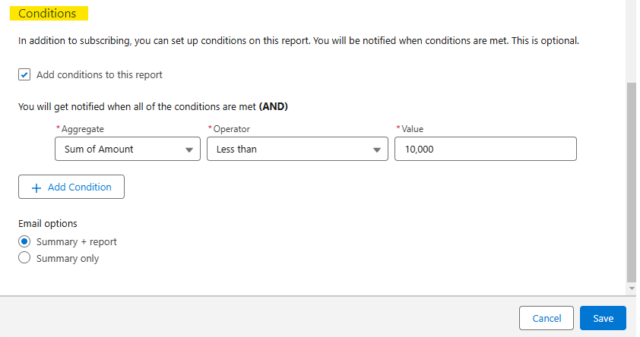
3. Add Conditions (Optional):
-
- Define conditions for sending the report.
- For example, “Send only if revenue is less than $10,000.”
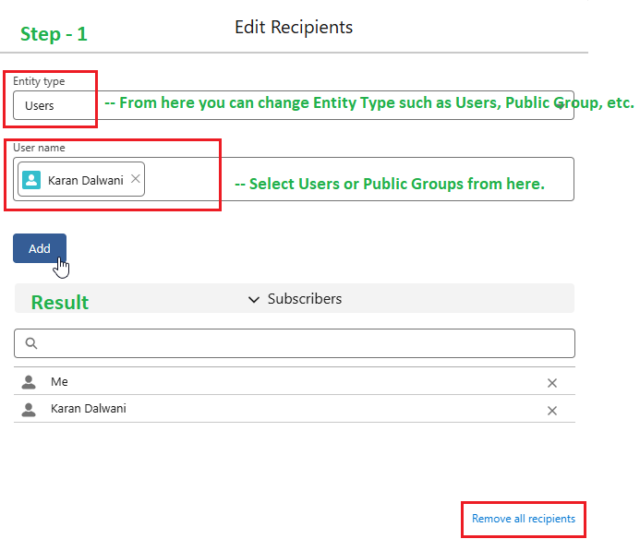
Step 5: Add Recipients
- Include Yourself: By default, you will be subscribed to the report.
- Add Others: Add additional users, roles, or groups who should receive the report and ensure they have access to it.
Note: If you would like to learn more about how to give access of the reports to the users, then please follow the provided link.
Step 6: Save the Subscription
- Review the settings to ensure accuracy.
- Click Save to activate the subscription.
Your subscription will be visible in the “Subscribed” column, as shown below.

So, you can subscribe to Salesforce Reports.
Note: To learn how to subscribe to Salesforce Dashboards, please explore the detailed blog post by clicking on the provided link.
Managing Report Subscriptions
-
View Current Subscriptions
- Navigate to the Reports tab and open the report.
- Click on Subscribe to view and manage your existing subscription settings.
-
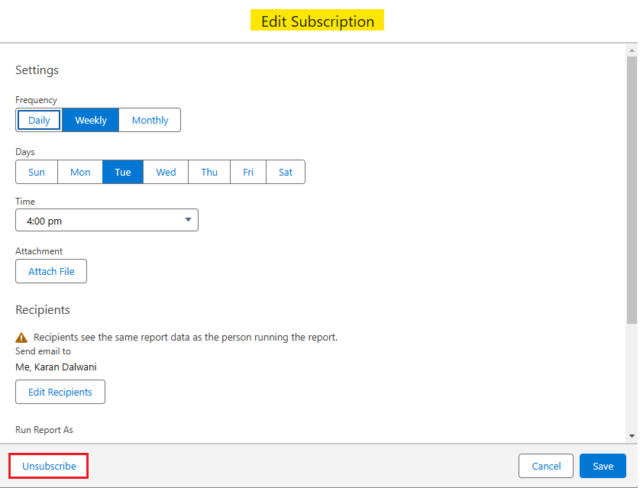
Edit Subscriptions
- Modify the frequency, time, or recipients as required.
- Save changes to update the subscription.
-
Unsubscribe from Reports
- If you no longer wish to receive updates, click Unsubscribe from the subscription settings below.
Best Practices for Report Subscriptions:
- Optimize Frequency: Avoid overloading your inbox by choosing a frequency that matches your reporting needs.
- Choose Relevant Recipients: Ensure only stakeholders who need the report are included in the subscription.
- Define Conditions: Use filters to trigger report emails only when specific criteria are met.
- Test Email Delivery: Confirm that reports are delivered correctly to all recipients.
Result – How do you Receive Emails for Salesforce Reports?
So here, I demonstrate the outcome of receiving Salesforce Dashboard updates via email after subscribing to them.
Troubleshooting Report Subscription Issues
-
Emails Not Received
- Check your spam folder.
- Verify that your email address is correctly entered in Salesforce.
- Ensure your organization’s email server is not blocking Salesforce emails.
-
Permission Errors
- Contact your Salesforce Administrator to ensure you have the required permissions.
-
Access Issues
- Confirm that all recipients have access to the report and its underlying data.
Conclusion
Subscribing to Salesforce Reports is an efficient way to stay informed about your business’s performance metrics. So, by automating the delivery of reports, you save time and ensure timely decision-making. So follow the steps in this guide to set up report subscriptions and optimize your reporting workflow.
Happy Reading!
“Positivity is not about ignoring challenges; it’s about facing them with hope, resilience, and the belief that every setback is a step toward something better.”
Related Posts:
You Can Also Read:
- Introduction to the Salesforce Queues – Part 1
- Mastering Salesforce Queues: A Step-by-Step Guide – Part 2
- How to Assign Records to Salesforce Queue: A Complete Guide
- An Introduction to Salesforce CPQ
- Revolutionizing Customer Engagement: The Salesforce Einstein Chatbot
Source: Read MoreÂ

