
Modern business workflows often require flexible and efficient ways to export, transform, and share data. By combining the capabilities of Power Apps, Power Automate, and Office Scripts, you can create a seamless process to dynamically customize and update Excel files with minimal effort.
This guide demonstrates how to dynamically export data from Power Apps, process it with Power Automate, format it in Excel using Office Scripts, and send the updated file via email. Let’s dive into the details.
This blog demonstrates a practical solution for automating data exports and dynamic reporting in Excel, tailored to users who expect dynamic column selection for report headers. Manual data preparation and formatting can be time-consuming and error-prone in many projects, especially those involving custom reporting.
With the process outlined in this blog, you can:
- Dynamically select and modify column headers based on user input.
- Automate the transformation of raw data into a formatted Excel file.
- Share the final output effortlessly via email.
This solution integrates Power Apps, Power Automate, and Office Scripts to ensure that your reporting process is faster, error-free, and adaptable to changing requirements, saving you significant time and effort.
Exporting Data from Power Apps
Creating a Collection in Power Apps
A collection in Power Apps serves as a temporary data storage container that holds the records you want to process. Here’s how to set it up:
Step 1: Define the DATA Collection
- Open your Power App and navigate to the screen displaying or managing your data.
- Use the Collect or ClearCollect function in Power Apps to create a collection named ExportData that holds the required data columns.
- You can dynamically populate this collection based on user interaction or pre-existing data from a connected source. For example:
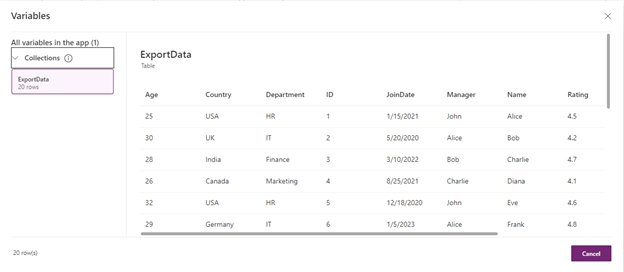
- Here, the ExportData collection is populated with a static table of records. You can replace this static data with actual data retrieved from your app’s sources.
- Tip: Use data connectors like SharePoint, SQL Server, or Dataverse to fetch real-time data and add it to the collection.
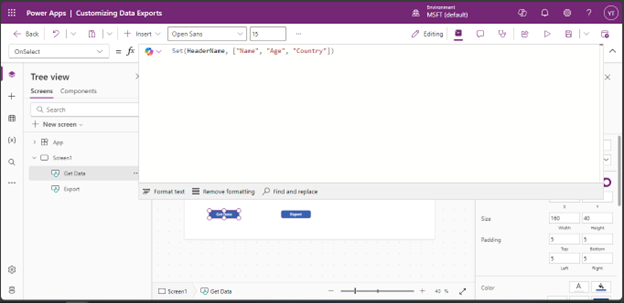
Step 2: Define a Table HeaderName for Column Names
- To ensure the exported Excel file includes the correct column headers, define a Variable named HeaderName that holds the names of the columns to be included.
Set(HeaderName, ["Name", "Age", "Country"])
This Variable specifies the column headers appearing in the exported Excel file.
Pass Data to Power Automate
Once the ExportData collection and HeaderName are set up, pass them as inputs to the Power Automate flow.
Step 1: Add the Flow to Power Apps
- Navigate to the Power Automate tab in Power Apps.
- Click on + Add Flow and select the flow you created for exporting data to Excel.
Step 2: Trigger the Flow and Send the Data
- Use the following formula to trigger the flow and pass the data:
CustomizingDataExports.Run(JSON(ExportData), JSON(HeaderName))

- CustomizingDataExports is the Power Automate flow.
- JSON(ExportData) converts the collection to a JSON object that Power Automate can process.
- JSON(HeaderName) converts the collection to a JSON object that passes the column headers for use in the Excel export.
Processing Data with Power Automate
Power Automate bridges Power Apps and Excel, enabling seamless data processing, transformation, and sharing. Follow these steps to configure your flow:
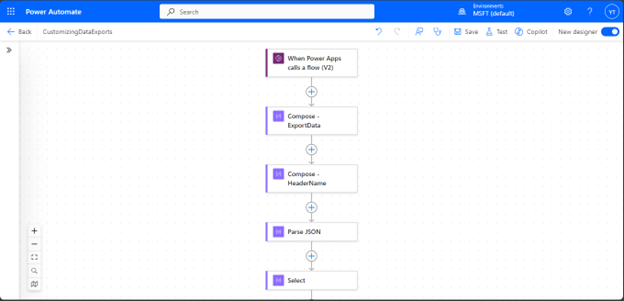
1. Receive Inputs
- Trigger Action: Use the Power Apps trigger to accept two input variables:
- ExportData: The dataset.
- HeaderName: The column headers.
- Add input parameters:
- Navigate to the trigger action.
- Click Add an input, select Text type for both variables and label them.
2. Prepare Data
Add two Compose actions to process inputs.
Use these expressions:
For ExportData:
json(triggerBody()?['text'])
For HeaderName:
json(triggerBody()?['text_1'])
Add a Parse JSON action to structure the HeaderName input:
Content:
outputs('Compose_-_HeaderName')Schema:
{
    "type": "array",
    "items": {
        "type": "object",
        "properties": {
            "Value": {
                "type": "string"
            }
        },
        "required": [
            "Value"
        ]
    }
}
Use a Select action to extract the values:
From:
body('Parse_JSON')Map:
item()['Value']
3. Setup Excel Template
Add a Get file content action to fetch a pre-defined Excel template from storage (e.g., SharePoint or OneDrive).
Use a Create file action to save the template as a new file:
Dynamic File Name:
guid().xlsx
Convert the ExportData to a CSV format:
- Add a Create CSV Table action:
From:
outputs('Compose_-_ExportData')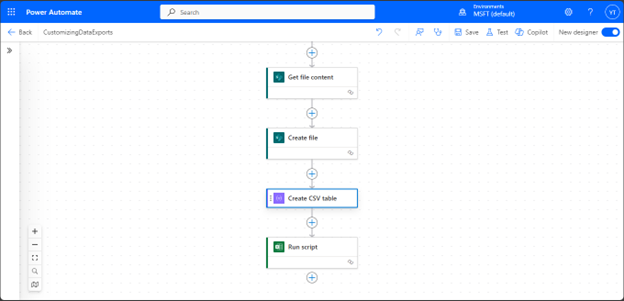
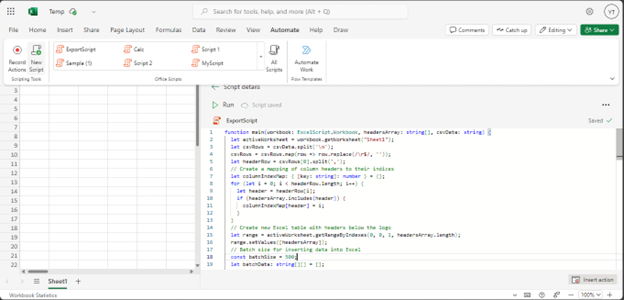
Formatting Data with Office Scripts
Office Scripts are used to dynamically process and format data in Excel. Here’s how you implement it:
Set up the script
Open Excel and navigate to the “Automate” tab.
Create a new Office Script and paste the following code:
function main(workbook: ExcelScript.Workbook, headersArray: string[], csvData: string) {
  let activeWorksheet = workbook.getWorksheet("Sheet1");
  let csvRows = csvData.split('n');
  csvRows = csvRows.map(row => row.replace(/r$/, ''));
  let headerRow = csvRows[0].split(',');
  // Create a mapping of column headers to their indices
  let columnIndexMap: { [key: string]: number } = {};
  for (let i = 0; i < headerRow.length; i++) {
    let header = headerRow[i];
    if (headersArray.includes(header)) {
      columnIndexMap[header] = i;
    }
  }
  // Create new Excel table with headers below the logo
  let range = activeWorksheet.getRangeByIndexes(0, 0, 1, headersArray.length);
  range.setValues([headersArray]);
  // Batch size for inserting data into Excel
  const batchSize = 500;
  let batchData: string[][] = [];
  let columncount = 0;
  // Loop through CSV data and filter/select desired columns
  for (let j = 1; j < csvRows.length; j++) {
    let rowData = parseCSVRow(csvRows[j]);
    let filteredRowData: string[] = [];
    for (let k = 0; k < headersArray.length; k++) {
      let header = headersArray[k];
      let columnIndex = columnIndexMap[header];
      filteredRowData.push(rowData[columnIndex]);
    }
    batchData.push(filteredRowData);
    // Insert data into Excel in batches
    if (batchData.length === batchSize || j === csvRows.length - 1) {
      let startRowIndex = j - batchData.length + 1; // Start after the logo and headers
      let startColIndex = 0;
      let newRowRange = activeWorksheet.getRangeByIndexes(startRowIndex, startColIndex, batchData.length, batchData[0].length);
      newRowRange.setValues(batchData);
      batchData = [];
    }
    columncount=j;
  }
  workbook.addTable(activeWorksheet.getRangeByIndexes(0, 0, columncount, headersArray.length), true).setPredefinedTableStyle("TableStyleLight8");
  activeWorksheet.getRangeByIndexes(0, 0, columncount, headersArray.length).getFormat().autofitColumns();

  // Release the lock on the workbook
  activeWorksheet.exitActiveNamedSheetView();
}
// Custom CSV parsing function to handle commas within double quotes
function parseCSVRow(row: string): string[] {
  let columns: string[] = [];
  let currentColumn = '';
  let withinQuotes = false;
  for (let i = 0; i < row.length; i++) {
    let char = row[i];
    if (char === '"') {
      withinQuotes = !withinQuotes;
    } else if (char === ',' && !withinQuotes) {
      columns.push(currentColumn);
      currentColumn = '';
    } else {
      currentColumn += char;
    }
  }
  columns.push(currentColumn); // Add the last column
  return columns;
}
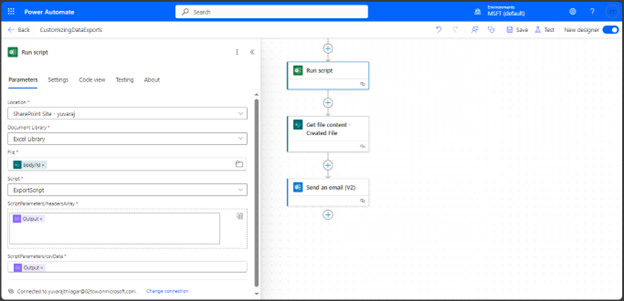
Integrate with Power Automate
Use the Run script action in Power Automate to execute the Office Script.
Pass the header array and CSV data as parameters.
Send the Updated File via Email
Once the Excel file is updated with Office Scripts, you can send it to recipients via Outlook email.
1. Retrieve the Updated File:
- Add a Get file content action to fetch the updated file.
Use the file path or identifier from the Create file action.
outputs('Create_file')?['body/Id']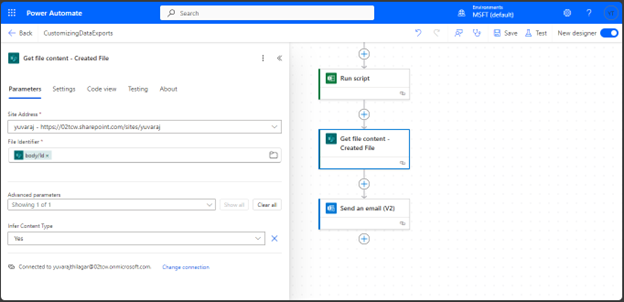
2. Send an Email (V2):
- Add the Send an email (V2) action from the Outlook connector.
- Configure the email:
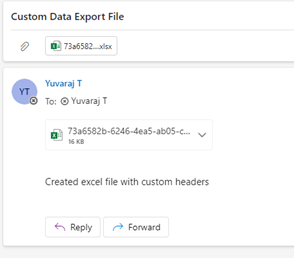
- To: Add the recipient’s email dynamically or enter it manually.
- Subject: Provide a meaningful subject, such as “Custom Data Export File”
- Body: Add a custom message, including details about the file or process.
- Attachments:
- Name: Use a dynamic value
outputs('Create_file')?['body/Name']- Content: Pass the output from the Get file content action.
body('Get_file_content_-_Created_File')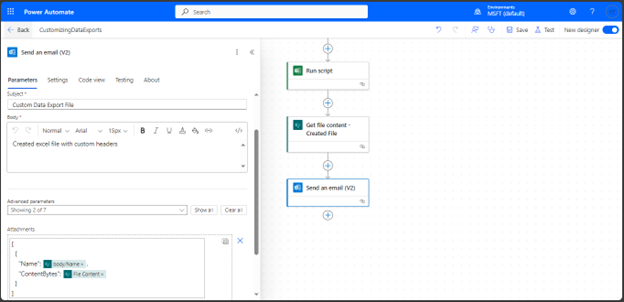
Integrating the Workflow
- Test the entire integration from Power Apps to Power Automate and Office Scripts.
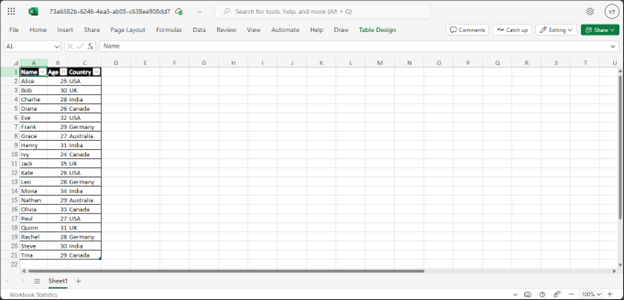
- Verify the final Excel file includes the correct headers and data formatting.
- Confirm that the updated Excel file is attached to the email and sent to the specified recipients.
Result:
Excel
How This Solution Saves Time
This approach is tailored for scenarios where users require a dynamic selection of column headers for custom reporting. Instead of spending hours manually formatting data and preparing reports, this solution automates the process end-to-end, ensuring:
- Accurate data formatting without manual intervention.
- Quick adaptation to changing requirements (e.g., selecting different report headers).
- Seamless sharing of reports via email in just a few clicks.
This workflow minimizes errors, accelerates the reporting process, and enhances overall project efficiency by automating repetitive tasks.
Conclusion
You can create robust, dynamic workflows for exporting and transforming data by combining Power Apps, Power Automate, and Office Scripts. This approach saves time, reduces manual effort, and ensures process consistency. Adding email functionality ensures the updated file reaches stakeholders without manual intervention. Whether you’re managing simple data exports or complex transformations, this solution provides a scalable and efficient way to handle Excel data.
Source: Read MoreÂ