


In the world of web development, adding interactive elements to a webpage can make it more engaging and fun for users. One such feature is a color flipper – a button that changes the background color of a page with each click. If you’re looking to build your own simple color flipper, you’re in the right place! In this post, we’ll explore a simple implementation of a color flipper using HTML, CSS, and JavaScript.
What is a Color Flipper?
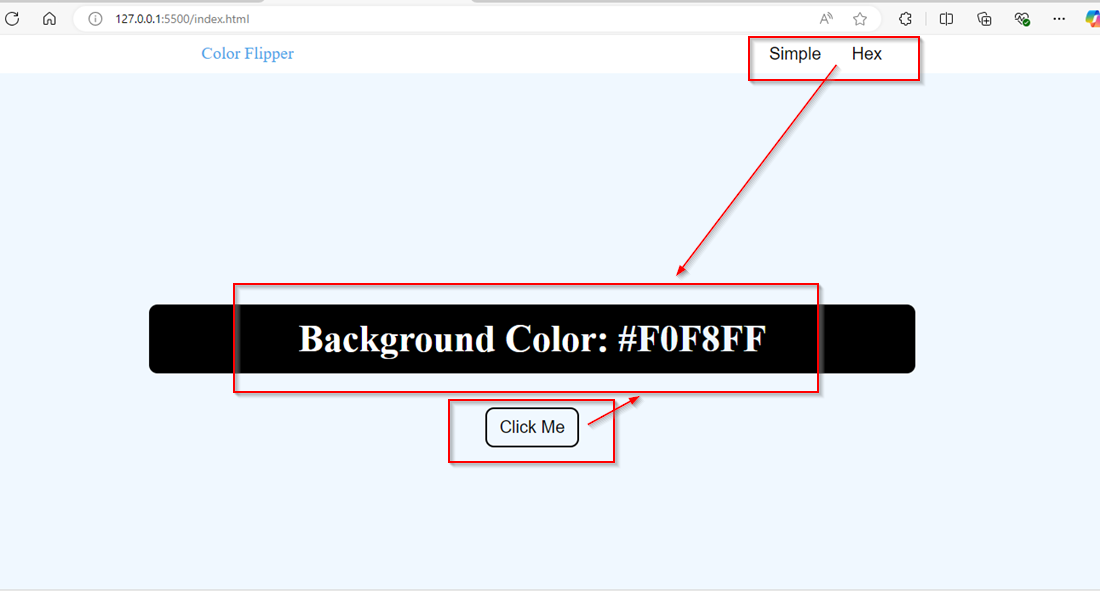
A color flipper is a small interactive tool that allows users to change the background color of a page (or an element) every time they click a button. For this example, we will give users two modes: one that flips through simple color names and another that flips through color hex codes. The goal is to make the webpage more dynamic and visually interesting!
Basic Functionality:
Our color flipper works by providing the user with two buttons:
- Simple Mode – Flips through basic color names like “red”, “blue”, and “yellow”.
- Hex Mode – Flips through hexadecimal color values like #FF5733, #33FF57, etc.
Each time the user clicks the “Click Me” button, the background color of the page changes to a random color from the selected mode.
Exploring the Code
Let’s break down the code for the color flipper.
Step 1: index.html (Structure of the Page)
<!DOCTYPE html>
<html lang="en">
  <head>
    <meta charset="UTF-8" />
    <meta http-equiv="X-UA-Compatible" content="IE=edge" />
    <meta name="viewport" content="width=device-width, initial-scale=1.0" />
    <title>Welcome In My Color Flipper Page</title>
    <link rel="stylesheet" href="index.css" />
  </head>

  <body id="body">
    <div class="header">
      <div class="header-left_block page_title">Color Flipper</div>
      <div class="header-right_block">
        <button id="right-block_btn1" onclick="swap('simple')">Simple</button>
        <button id="right-block_btn2" onclick="swap('hex')">Hex</button>
      </div>
    </div>
    <div class="container">
      <h2>Background Color: <span id="container-input_field"></span></h2>
      <button id="container-flip_btn">Click Me</button>
    </div>
<script src="index.js"></script>
</body>
</html>
- <div class=”header”>: This contains the title of the page and two buttons for selecting the color mode (Simple or Hex).
- <div class=”container”>: This holds the current color name or hex value and the “Click Me” button that triggers the color change.
Step 2: index.css (Styling the Page with CSS)
While this tutorial primarily focuses on functionality, you are encouraged to style the page according to your preferences to enhance both its design and overall user experience.
Step 3: index.js (JavaScript Logic)
const simpleColor = ["honeydew","paleturquoise","hotpink","red","aliceblue","orange","yellow",];
const hexColor = ["#F0FFF0","#AFEEEE","#FF69B4","#FF0000","#F0F8FF","#FFA500","#FFFF00",];
let colorFlipper = [];
let swapBtn1 = document.querySelector("#right-block_btn1");
let swapBtn2 = document.querySelector("#right-block_btn2");
let flipBtn = document.querySelector("#container-flip_btn");
let userOutput = document.querySelector("#container-input_field");
let swapbgColor = document.querySelector("#body");
let areEqual = false;

const colorPicker = () => {
  let colorChoose =
  colorFlipper[Math.floor(Math.random() * colorFlipper.length)];
  userOutput.innerHTML = colorChoose;
  userOutput.style.color = colorChoose;
  swapbgColor.style.backgroundColor = colorChoose;
};

const flipRandomColor = () => {
  if (areEqual) {
    colorFlipper = simpleColor;
    colorPicker();
  } else {
    colorFlipper = hexColor;
    colorPicker();
  }
};
const colorSwapping = () => {
  for (let i = 0; i <= colorFlipper.length; i++) {
    if (userOutput.innerHTML === colorFlipper[i]) {
      if (areEqual) {
        userOutput.innerHTML = simpleColor[i];
        userOutput.style.color = simpleColor[i];
        swapbgColor.style.backgroundColor = simpleColor[i];
      } else {
        userOutput.innerHTML = hexColor[i];
        userOutput.style.color = hexColor[i];
        swapbgColor.style.backgroundColor = hexColor[i];
      }
    }
  }
};
flipRandomColor();

flipBtn.addEventListener("click", () => {
  flipRandomColor();
});

function swap(abc) {
  if ("simple" === abc) {
    areEqual = true;
    colorFlipper = hexColor;
    colorSwapping();
  } else if ("hex" === abc) {
    areEqual = false;
    colorFlipper = simpleColor;
    colorSwapping();
  }
}
Explanation of the above code:
Color Arrays: There are two arrays: simpleColor and hexColor, which hold simple color names and hex color codes, respectively.
Random Color Picker: The colorPicker() function randomly selects a color from the active color array (either simpleColor or hexColor) and applies it to the background of the webpage and the displayed text.
Mode Switching: The swap() function is triggered when the user clicks on either of the mode buttons (“Simple” or “Hex”). This function swaps the current color array, allowing the user to toggle between simple colors and hex codes.
Color Flipping: When the “Click Me” button is clicked, the flipRandomColor() function is called, which randomly selects a color from the active array and changes the background accordingly.
Dynamic Updates: Each time a color is changed, the color name (or hex value) is updated on the webpage so the user can see which color is currently being used.
Output:
Conclusion
Congratulations! You’ve just built a simple and fun Color Flipper using HTML, CSS, and JavaScript. Now, you can experiment by adding more color modes, animations, or other interactive features to make it even more exciting!
Source: Read MoreÂ

