


This blog offers a comprehensive guide to setting up Continuous Integration (CI) in Azure DevOps to automate the integration of SharePoint Framework (SPFx) code by leveraging Azure DevOps pipelines. This process aims to streamline development workflows, improve code quality, and ensure quicker code validation before deployment without any manual processing.
Continuous Integration (CI) is the process of automating the build and testing of code when a developer commits changes to source control. Commit to source control triggers an automated build that grabs the latest code from version control, builds it, and runs tests on it (if configured).
Prerequisite for Building CI pipeline for SPFx in Azure DevOps
To set up Continuous Integration (CI) for SPFx in Azure DevOps, ensure you have the following things already setup:
- An Azure DevOps account with required access
- Your SharePoint Framework (SPFx) project should be stored in a Git repository
- Ensure the repository includes the necessary
package.json,gulpfile.js, and other configuration files required to build and bundle your SPFx solution
Implementation
To implement CI, we must create a new Pipeline in Azure DevOps. Building a pipeline includes the following major steps:
- Create a build definition
- Install NodeJS
- Restore npm packages
- Build the solution
- Package the solution
- Prepare the Artifacts
- Publish the Artifacts
Create a Build Definition
Build definition contains the definition and configuration for the build. Follow the below steps to create a new build definition.
- Login to Visual Studio Online (Azure DevOps)
- Select your project to set up a build definition.
- From the left navigation, click Pipelines > Builds.
- Click “New pipeline” > Click on “Use the classic editor”.
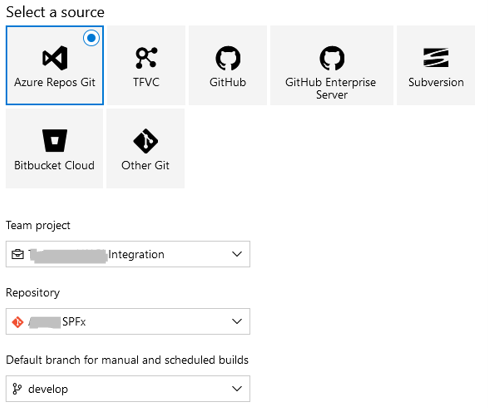
- Select “Azure Repos Git” > Select Team Project > Select Repository > Select branch for CI implementation.
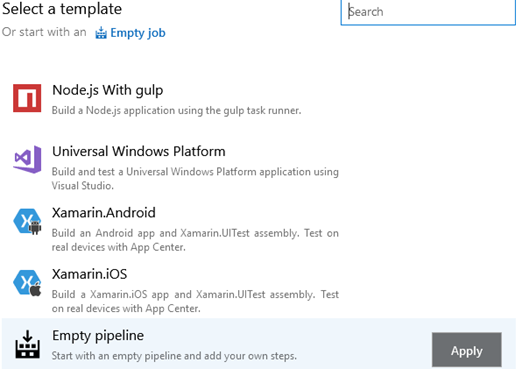
- Under “Select a template”, select “Empty Pipeline”.
- The build definition has a default agent. We can add multiple tasks to the agent to define our build.
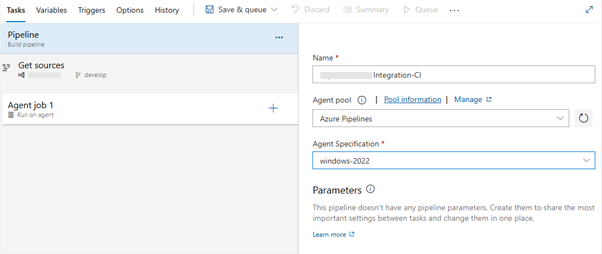
In this case, in agent specification, I have used Windows-2022, but you can also choose “Windows-latest” based on the environment in which you want to run your build.
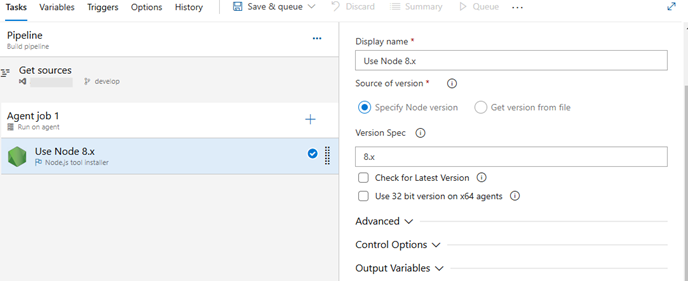
Install NodeJS
- On the default agent, click the + sign.
- Search for “Node”.
- Add Node.js tool installer.
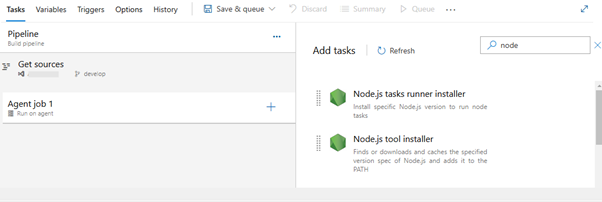
- Make sure you specify 10.x in the Version Spec field. If your project is based on SharePoint Framework 1.7.1 or earlier, use version 8.x.
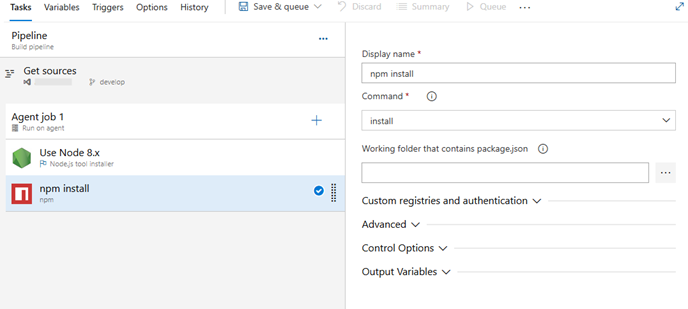
Restore npm Packages
SharePoint Framework solution uses third-party npm packages. We need to restore those before starting the build process.
- Add npm task.
- Verify if the command is set to install.
Build the Solution
Build the SPFx solution to minify the required assets to upload to CDN.
- Add gulp task.
- Set Gulp file path to gulpfile.js.
- Set Gulp task as a bundle.
- Set Gulp arguments to –ship.
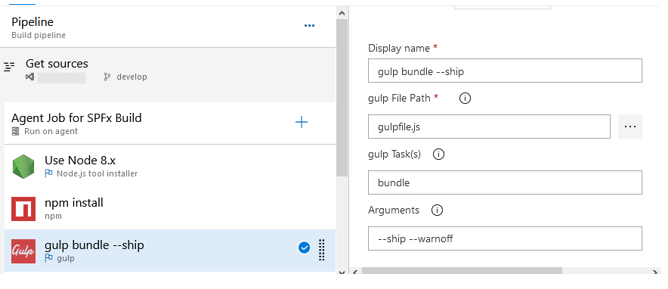
Note: Ensure the gulp task has the “–warnoff” command and “–ship” to avoid build failure in a production environment. Refer to the Configuration section below for details.
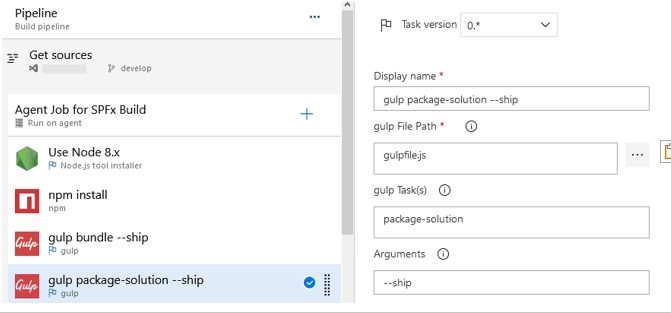
Package the Solution
The next step is to combine the assets into a package.
- Add gulp task.
- Set Gulp file path to gulpfile.js.
- Set Gulp task as package-solution.
- Set Gulp arguments to –ship.
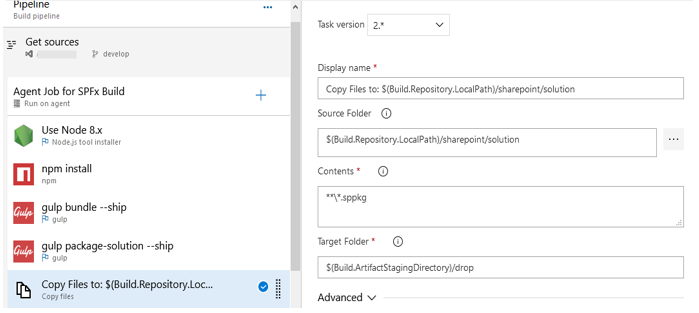
Prepare the Artifacts
Azure DevOps build does not retain any files. The “.sppkg” file created from the above step needs to be copied to the staging directory to be published to the release pipeline.
- Add “Copy Files” task.
- Set “Source Folder” to $(Build.Repository.LocalPath)/sharepoint/solution.
- Set “Contents” to *.sppkg.
- Set target folder to $(Build.ArtifactStagingDirectory)/drop.
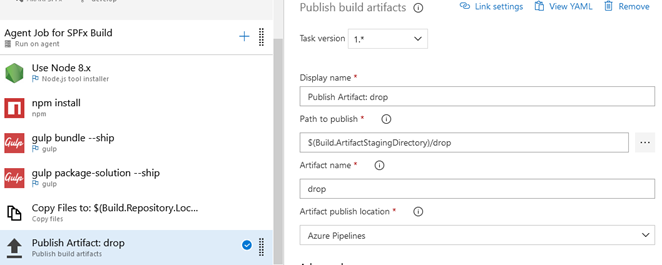
Publish the Artifacts
Instruct Azure DevOps to keep the files after build execution.
- Add the “Publish Build Artifacts” task.
- Set “Path to publish” to $(Build.ArtifactStagingDirectory)/drop.
- Set “Artifact name” to drop.
Configuration
During bundling and packaging of your SharePoint Framework solution, you could see two types of messages:
- Warnings
- Errors
When running a DEBUG build, both messages do not cause the process to fail by a stderr (or standard error). But in the PRODUCTION build, you would get the following type of error output:
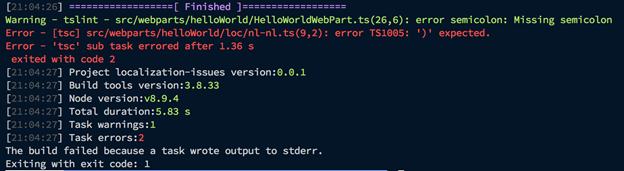
This might be an issue in your automated build/release pipelines. For instance, when you automatically bundle and package your solution on Azure DevOps, there is no way to tell that it should continue when warnings occur. The only option you have is to “continue” on error.
To restrict this, we can add a “warnoff” command in the build process, which won’t cause the build process to fail. For this, make the following changes in gulpfile.js.
// Retrieve the current build config and check if there is a `warnoff` flag set
const crntConfig = build.getConfig();
const warningLevel = crntConfig.args["warnoff"];
// Extend the SPFx build rig, and overwrite the `shouldWarningsFailBuild` property
if (warningLevel) {
    class CustomSPWebBuildRig extends build.SPWebBuildRig {
        setupSharedConfig() {
            build.log("IMPORTANT: Warnings will not fail the build.")
            build.mergeConfig({
                shouldWarningsFailBuild: false
            });
            super.setupSharedConfig();
        }
    }
    build.rig = newCustomSPWebBuildRig();
}
build.initialize(gulp)
Conclusion
Setting up a Continuous Integration (CI) pipeline for SPFx in Azure DevOps automates the process of building, testing, and bundling your SPFx solutions whenever any code changes occur. This pipeline will eventually reduce the need for manual intervention and guarantee that the latest code is thoroughly validated before deployment.
Source: Read MoreÂ
