
Hello Trailblazers!
Salesforce Reports are a powerful way to analyze data, and one of their most useful features is the Bucket Field. This tool allows you to group report data into categories without creating custom fields or formula fields in your Salesforce objects. Whether you’re working with large datasets or need a quick way to analyze trends, bucket field can save time and streamline your reporting.
In this blog, we’ll learn what is Bucket field in Salesforce is and how to create it, along with its benefits and limitations.
So let’s get started…
Before you Begin:
In the earlier parts of this Salesforce Reports blog series, we explored the fundamentals of Salesforce Reports, including their types, how to create them, and several key aspects surrounding them. I highly recommend reviewing those previous posts using the provided links for a better understanding before diving into this section.
What is a Bucket Field in Salesforce?
A Bucket Field is a feature in Salesforce Reports that lets you group report records based on criteria you define. Instead of modifying your Salesforce schema to create custom fields, you can categorize records dynamically within the report.
For example:
- Group revenue/Profit into “High,” “Medium,” and “Low” categories.
- Classify accounts based on annual revenue ranges.
- Organize leads by age groups.
Benefits of Using Bucket Fields
- No Schema Changes: Avoid altering the underlying Salesforce object structure.
- Dynamic Categorization: Adjust categories directly in the report as needed.
- Simplified Analysis: Focus on trends without extensive pre-processing.
- Flexibility: Combine values from multiple fields into a single category.
Limitations of Bucket Fields
- Static Configuration: Categories are hardcoded into the report and don’t update dynamically.
- Field Limits: A report can have up to 5 bucket fields, and each bucket field can contain up to 20 buckets.
- Availability: Bucket fields are only available in tabular, summary, and matrix reports.
Note: To explore more about the limitations of Bucket Fields, please refer to the link provided under the “Related Posts” section.
Steps to Create a Bucket Field in Salesforce Reports
Follow these steps to create and use a Bucket Field in your Salesforce report:
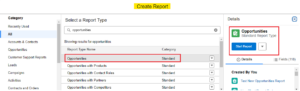
Step 1: Create or Open a Report
- Navigate to the Reports tab in Salesforce.
- Click on New Report or open an existing report.
- Select the report type (e.g., Accounts, Opportunities).
- Here we are selecting the “Opportunities” report type as shown in the figure below.
Step 2: Add a Bucket Field
There are two methods to add Bucket Fields/Column into the report.
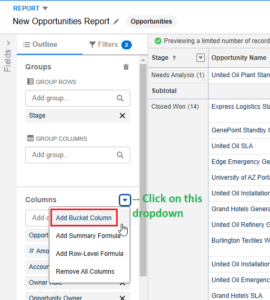
Method 1 –
- In the report builder, click Outline in the left-hand panel and go to the Columns.
- Click on the dropdown menu next to Columns.
- Select Add Bucket Column as shown in the figure below.

- One more step – Once you click, a pop-up will open, there you need to select ‘Field’ for the bucket column.
Method 2-
- Open the Report Builder and navigate to the field you want to create a bucket column for. In this example, we’ll create a bucket column for the “Amount” field.
- Click the dropdown menu located next to the “Amount” field.
- From the displayed options, select “Bucket this Column” as illustrated in the figure below.

These are the 2 methods to add bucket fields into the report.
So, we will move forward with the Method 2.
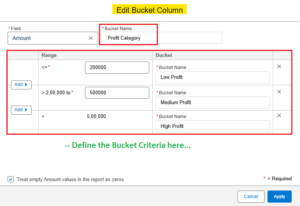
Step 3: Configure the Bucket Field
Once you select the ‘Bucket this Column’ as illustrated above, a popup will open to the edit bucket column.
- Name Your Bucket Field: Enter a descriptive name (e.g., “Profit Category”).
- Select a Source Field: Choose the field you want to bucket (e.g., Amount). (It will be auto-selected if you go with Method 2)
- Define Bucket Criteria:
- Enter a name for the bucket (e.g., “Low Profit”).
- Set Values/Ranges for each Bucket.
- Click Add to create new buckets like Medium Profit, High Profit, etc. by defining their respective criteria of Amount.

- Click Apply to save the bucket field configuration.
Step 4: Use the Bucket Field in Your Report
After creating the bucket column, Salesforce automatically adds it to your report. This new column functions like a formula, dynamically applying the defined criteria to each row of your report for streamlined data grouping and analysis.
- Drag and drop the newly created bucket field anywhere as required into the report canvas.

- Group, filter, or summarize data using the bucket field as needed.
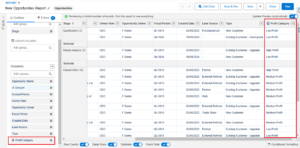
To group your report data by Bucket field, follow the below steps:
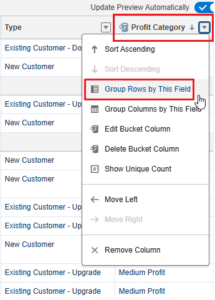
- Click on the dropdown menu next to the recently created bucket field – Profit Category.
- Choose the option “Group Rows by this Field” from the menu, as demonstrated in the image below.

- This action will summarize the report data based on the Bucket fields/column, and the resulting report will appear as shown below.

Step 5: Save and Run the Report
- Save the report by clicking Save & Run.
- Provide a name, description, and folder location for the report.
- Click Save to view your categorized data.
Note: The bucket options available in the Edit Bucket Column menu vary based on the data type of the column you’re working with. Salesforce allows you to bucket three data types: numeric, picklist, and text, providing flexibility to categorize your data effectively.
Best Practices for Bucket Fields
- Plan Categories Thoughtfully: Use meaningful names and criteria for buckets to ensure clarity.
- Test with Sample Data: Verify that records are grouped correctly before finalizing the report.
- Keep It Simple: Avoid overloading reports with too many bucket fields to maintain readability.
- Document Configurations: Include descriptions for bucket fields to help collaborators understand the logic.
Use Cases for Bucket Fields
- Sales Performance: Categorize opportunities by deal size.
- Customer Segmentation: Group accounts by revenue tiers or industry types.
- Lead Analysis: Classify leads based on lead source or age.
- Trend Analysis: Break down data into time-based buckets for insights into seasonal patterns.
Conclusion
Bucket Fields in Salesforce Reports are an invaluable tool for categorizing data dynamically. They empower users to create flexible and insightful reports without making changes to Salesforce objects. By following the steps outlined in this blog, you can easily implement bucket fields in your reports and uncover actionable insights that drive better decision-making.
Happy Reading!
“Positive affirmations are like seeds planted in the mind; with consistency and care, they grow into a garden of confidence, resilience, and self-belief.”
Related Posts:
You Can Also Read:
1. Introduction to the Salesforce Queues – Part 1
2. Mastering Salesforce Queues: A Step-by-Step Guide – Part 2
3. How to Assign Records to Salesforce Queue: A Complete Guide
4. An Introduction to Salesforce CPQ
5. Revolutionizing Customer Engagement: The Salesforce Einstein Chatbot
Source: Read MoreÂ

