


People praise Vue.js as a powerful and flexible JavaScript framework for its simplicity and ease of use. Vue.js includes lifecycle hooks as one of its standout features. These hooks allow developers to execute specific actions at various stages of a component’s life, making it easier to manage complex logic and interactions. In this guide, we’ll explore these lifecycle hooks and show how you can leverage them to create more efficient and responsive Vue.js applications.
What Are Lifecycle Hooks?
Every Vue component goes through a lifecycle, from its creation and updates to its eventual removal from the DOM. Vue lifecycle hooks are built-in methods that allow you to “hook” into different stages of this lifecycle, so you can run custom logic at the right moment.
Lifecycle hooks are divided into four main stages:
- Creation
- Mounting
- Updating
- Destruction
Let’s dive into each of these stages to understand how they work.
1) Creation Hooks:
Kickstart Your Vue Component: Creation Hooks Explained
Creation hooks are triggered when a component is first created, but before it is added to the DOM. This stage is useful for setting default values, initializing data, or making initial API requests.
beforeCreate()
- Purpose: This hook is called immediately after the Vue instance is created, but before any data or styles are set up.
- Use Case: This hook is typically used for initializing basic operations, such as setting up a loading state or preparing some default properties.
created()
- Purpose: This hook is called after the Vue instance has been created, and the component’s data, computed properties, and methods are now accessible.
- Use Case: A great place for fetching data from an API or setting initial component data.
Example: Fetching user data when the component is created
<template>
    <div>
      <h2>User Profile</h2>
      <div v-if="loading">Loading user data...</div>
      <div v-else-if="error">{{ error }}</div>
      <div v-else>
        <p><strong>Name:</strong> {{ userData.firstName }} {{ userData.lastName }}</p>
        <p><strong>Email:</strong> {{ userData.email }}</p>
        <p><strong>Image:</strong></p>
        <img :src="userData.image" alt="User Image" />
      </div>
    </div>
  </template>

  <script>
  export default {
    data() {
      return {
        userData: null,    // Will hold a single user's data after fetching
        loading: true,     // Used to show loading state
        error: null        // Used to show error messages if the API call fails
      };
    },
    beforeCreate() {
      console.log("Component is initializing...");
    },
    created() {
      console.log("Component has been created, data and methods are accessible now.");
      this.fetchUserData(); // Fetch data when component is created
    },
    methods: {
      async fetchUserData() {
        try {
          // API request to fetch user data
          const response = await fetch("https://dummyjson.com/users");
          if (!response.ok) throw new Error("Failed to fetch user data");
          const data = await response.json(); // Get the response as JSON
          this.userData = data.users[0]; // Assign the first user in the array to `userData`
        } catch (error) {
          this.error = "An error occurred while fetching user data.";
          console.error(error); // Log the error for debugging
        } finally {
          this.loading = false; // Stop showing the loading indicator
        }
      }
    }
  };
  </script>
Output:
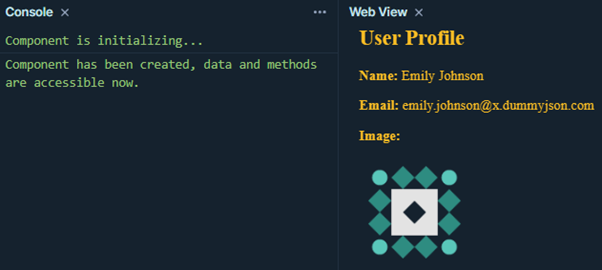
Explanation:
In this example, the created() hook triggers the data-fetching process, and the component’s state is updated accordingly. It first shows a loading message, and then either the user’s data or an error message is displayed.
2) Mounting Hooks
Smooth DOM Integration with Mounting Hooks
Mounting hooks are triggered when a component is added to the DOM. This is the ideal time to perform DOM-related tasks, as the component is fully initialized at this point.
beforeMount()
- Purpose: Called before the component is mounted to the DOM, but after the render function has been prepared.
- Use Case: Useful for setup tasks right before the DOM is rendered (e.g., adjusting styles or preparing data), but it’s less commonly used in practice.
mounted()
- Purpose: Called after the component is mounted to the DOM. This is the best time to interact with the DOM, set up third-party libraries, or add event listeners.
- Use Case: Frequently used for tasks like DOM manipulation or setting up event listeners.
Example: Fetching user data when the component is mounted
<template>
    <div>
      <h2>User Profile</h2>
      <div v-if="loading">Loading user data...</div>
      <div v-else-if="error">{{ error }}</div>
      <div v-else>
        <p><strong>Name:</strong> {{ userData.firstName }} {{ userData.lastName }}</p>
        <p><strong>Email:</strong> {{ userData.email }}</p>
        <p><strong>Image:</strong></p>
        <img :src="userData.image" alt="User Image" />
      </div>
    </div>
  </template>
  <script>
  export default {
    data() {
      return {
        userData: null,    // Will hold user data after fetching
        loading: true,     // Used to show loading state
        error: null        // Used to show error messages if the API call fails
      };
    },
    beforeMount() {
      console.log("Component is about to mount...");
      // Useful for pre-mount setup (e.g., adjusting DOM, preparing data)
    },
     mounted() {
      console.log("Component has been mounted to the DOM!");
      // Ideal for interacting with the DOM, like setting focus or event listeners
      this.fetchUserData(); // Call fetch data when component is mounted
    },
    methods: {
      async fetchUserData() {
        try {
          const response = await fetch("https://dummyjson.com/users");
          if (!response.ok) throw new Error("Failed to fetch user data");
          const data = await response.json();
          this.userData = data.users[0]; // Set the first user in the list
        } catch (error) {
          this.error = "An error occurred while fetching user data.";
          console.error(error);
        } finally {
          this.loading = false;
        }
      }
    }
  };
  </script>
Output:
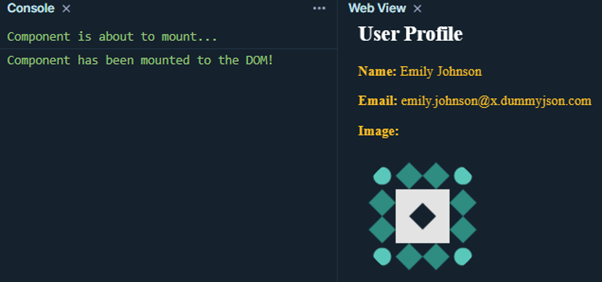
Explanation:
The mounted() hook handles data fetching here. Vue loads the user data only after mounting the component, making this the ideal time to interact with the DOM.
3) Updating Hooks
Managing Data Changes: Mastering Updating Hooks
Updating hooks are triggered whenever reactive data changes, causing the component to re-render. These hooks allow you to monitor and react to these changes.
beforeUpdate()
- Purpose: Invoked just before the DOM is about to update due to a reactive data change.
- Use Case: Can be used for preparation tasks, such as logging data changes or making minor UI adjustments before the update.
updated()
- Purpose: Called right after the DOM update occurs.
- Use Case: Useful for tasks that rely on the updated DOM, such as triggering animations or interacting with third-party libraries.
Example: Updating data and tracking changes
<template>
    <div>
      <h2>Counter Example with Updating Hooks</h2>
      <p>Counter Value: {{ counter }}</p>
      <button @click="incrementCounter">Increment Counter</button>
      <p>{{ message }}</p>
    </div>
  </template>
  <script>
  export default {
    data() {
      return {
        counter: 0,    // Counter that will be incremented
        message: ""    // Message to display after updating
      };
    },
    beforeUpdate() {
      console.log("Component is about to re-render...");
      this.message = "Updating counter...";
      // This hook can be used to perform any preparation or clean-up just before the update happens.
    },
    updated() {
      console.log("Component has re-rendered!");
      this.message = "Counter updated successfully!";
    },
    methods: {
      incrementCounter() {
        this.counter += 1; // Increment the counter, triggering the update lifecycle hooks
      }
    }
  };
  </script>
Output:
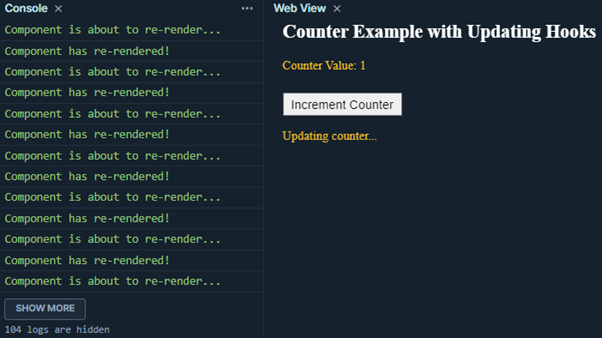
Explanation:
Clicking the button triggers both beforeUpdate() and updated(), allowing you to manage the component’s state before and after the update.
4) Destruction Hooks
Cleaning Up After Your Component: Destruction Hooks
Destruction hooks are triggered before a component is removed from the DOM. This stage is essential for cleaning up resources like timers or event listeners.
beforeUnmount()
- Purpose: Called just before the component instance is destroyed.
- Use Case: Used for cleaning up things like event listeners or clearing intervals.
unmounted()
- Purpose: Called after the component is destroyed and removed from the DOM.
- Use Case: Final cleanup tasks, such as removing global event listeners or stopping ongoing processes.
Example: Cleaning up after a timer
<template>
    <div>
      <h2>Timer Component</h2>
      <p>Elapsed Time: {{ seconds }} seconds</p>
      <button @click="toggleTimer">Toggle Timer</button>
    </div>
  </template>

  <script>
  export default {
    data() {
      return {
        seconds: 0,     // Keeps track of elapsed time
        timer: null     // Stores the timer reference
      };
    },
    mounted() {
      console.log("Component mounted, starting timer...");
      this.startTimer(); // Start timer when component is mounted
    },
    beforeUnmount() {
      console.log("Component is about to be unmounted, clearing timer...");
      clearInterval(this.timer); // Clear timer before unmounting
    },
    unmounted() {
      console.log("Component has been unmounted!");
      // Any additional cleanup can be performed here
    },

    methods: {
      startTimer() {
        this.timer = setInterval(() => {
          this.seconds += 1; // Increment seconds every second
        }, 1000);
      },
      stopTimer() {
        clearInterval(this.timer); // Stop the timer
        this.timer = null;
      },
      toggleTimer() {
        if (this.timer) {
          this.stopTimer();
        } else {
          this.startTimer();
        }
      }
    }
  };
  </script>
Output:
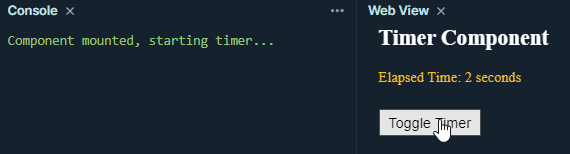
Explanation:
In this example, the timer is started when the component is mounted, and stopped when it’s about to be unmounted, ensuring no memory leaks.
Conclusion:
Lifecycle hooks in Vue.js offer a powerful way to control and manage the lifecycle of components. By understanding when and how to use these hooks—whether for initialization, data updates, or cleanup—you can significantly improve the performance and maintainability of your Vue applications.
By leveraging the creation, mounting, updating, and destruction stages, you can optimize your app’s behavior, create seamless user interactions, and avoid common pitfalls like memory leaks or inefficient DOM updates.
Mastering lifecycle hooks will deepen your understanding of Vue.js and enable you to write more responsive and efficient applications.
These revisions enhance clarity, consistency, and flow while reinforcing the core concepts of Vue.js lifecycle hooks.
Source: Read MoreÂ
