What is Tailwind CSS?
Tailwind CSS is a utility-first CSS framework that makes styling easier by offering pre-built utility classes. These classes let developers quickly create responsive and modern designs. When used with Vue.js, a progressive JavaScript framework, it provides an efficient setup for building complex web apps. This guide will show you how to set up Tailwind CSS in a Vue.js project, create theme files for customization, and manage images properly.
Step 1: Setting Up a Vue.js Project
Before starting, ensure that Node.js and npm are installed on your system.
Using Vue CLI
- Install Vue CLI globally:
npm install -g @vue/cli

- Create a new project:
vue create my-vue-tailwind-css-project

- Navigate to the project directory:
cd my-vue-tailwind-css-project

Step 2: Installing Tailwind CSS
Tailwind CSS must be added to your project, along with its dependencies.
- Install Tailwind CSS, PostCSS, and Autoprefixer:
npm install -D tailwindcss postcss autoprefixer

Note: PostCSS is a tool that uses plugins to optimize and improve CSS styles, whereas Autoprefixer inserts browser-specific prefixes to ensure compatibility with older browsers. Tailwind CSS makes advantage of both to ensure seamless development and cross-browser support. - Initialize Tailwind CSS:
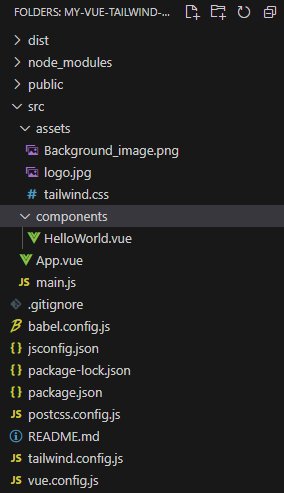
npx tailwindcss init

Note: This command generates a tailwind.config.js file for configuration.
Step 3: Configuring Tailwind CSS
To make Tailwind CSS functional in your project:
- Open tailwind.config.js and specify the files Tailwind should scan for class names:
//Path: tailwind.config.js /** @type {import('tailwindcss').Config} */ module.exports = { content: ['./index.html', './src/**/*.{vue,js,ts,jsx,tsx}'], theme: { extend: { }, }, plugins: [], } - Create a Tailwind CSS file (e.g., src/assets/tailwind.css) and include Tailwind’s base, component, and utility styles:
//Path: tailwind.css
@tailwind base;
@tailwind components;
@tailwind utilities;
- Import this CSS file in your main JavaScript file (main.js or main.ts):
//Path: main.js
{ createApp } from 'vue'
import App from './App.vue'
import './assets/tailwind.css';
createApp(App).mount('#app')
Step 4: Adding Theme Files for Customization
A key feature of Tailwind CSS is its ability to extend the default design system with custom themes.
Customize Colors and Fonts
Modify tailwind.config.js to define your brand-specific colors and fonts:
//Path: tailwind.config.js
/** @type {import('tailwindcss').Config} */
module.exports = {
  content: ['./index.html', './src/**/*.{vue,js,ts,jsx,tsx}'],
  theme: {
    extend: {
      colors: {
        primary: '#1D4ED8',  // Primary color
        secondary: '#9333EA', // Secondary color
      },
      fontFamily: {
        sans: ['Inter', 'sans-serif'], // Custom font
      },
      backgroundImage: {
        'hero-pattern': "url('@/assets/Background_image.png')",
      },
    },
  },
  plugins: [],
}
Usage in Vue Components
Use the defined classes directly in your components:
//Path: HelloWorld.vue
<template>
  <div class="bg-black text-white font-sans p-4">
    Welcome to Tailwind CSS in Vue Js Project!
  </div>
</template>

<script>
export default{
  name: 'HelloWorld'
}
</script>
Output:

Step 5: Managing Images in Vue.js
Most web apps include images. Proper handling guarantees improved performance and maintainability.
Adding Images
Place all your images in the src/assets directory.

Using Images in Vue Templates
Reference images using relative paths:
//Path: HelloWorld.vue
<template>
  <div>
    <!-- Welcome section -->
    <div class="bg-black text-white font-sans p-4">
      Welcome to Tailwind CSS in Vue.js Project!
    </div>

    <!-- Image section with a centered image -->
    <div class="p-4">
      <img :src="require('@/assets/Background_image.png')" alt="Background Image" class="rounded-lg shadow-lg w-full max-w-[600px] mx-auto" />
    </div>
  </div>
</template>

<script>
export default {
  name: 'HelloWorld',
};
</script>

<style scoped>
/* Optional: Styling for the image */
img {
  width: 100%;
  max-width: 600px;
}
</style>
Output:

Using Images as Backgrounds
To use images as background properties, update tailwind.config.js:
// Path: tailwind.config.js
/** @type {import('tailwindcss').Config} */
module.exports = {
  content: ['./index.html', './src/**/*.{vue,js,ts,jsx,tsx}'],
  theme: {
    extend: {
      colors: {
        secondary: '#9333EA', // Custom secondary color
      },
      fontFamily: {
        sans: ['Inter', 'sans-serif'], // Custom sans-serif font
      },
      backgroundImage: {
        'hero-pattern': "url('@/assets/logo.jpg')", // Set custom background image
      },
    },
  },
  plugins: [],
}
Apply the custom background in your component:
// Path: HelloWorld.vue
<template>
  <div>
    <!-- First div with background color and styling -->
    <div class="bg-indigo-500 text-white font-sans p-4">
      Welcome to Tailwind CSS in Vue.js Project!
    </div>

    <!-- Second div with the custom background image applied -->
    <div class="bg-hero-pattern bg-contain bg-center bg-no-repeat h-64 w-full">
      <!-- Content for this section (if any) can go here -->
    </div>
  </div>
</template>

<script>
export default {
  name: "HelloWorld",
};
</script>

<style scoped>
/* The background image is already applied via Tailwind's bg-hero-pattern class.
   No need to redefine it here. If you want additional styles, add them below. */

/* Optional styles for the section could go here. */
</style>
Output:

Conclusion
Tailwind CSS and Vue.js are an effective mix for creating modern, responsive, and maintainable applications. You can develop visually attractive UIs tailored to the needs of your project by configuring a custom theme and effectively managing pictures.
Source: Read MoreÂ


