Hello Trailblazers!
Salesforce Schema Builder is a robust tool that provides a visual representation of your data model. It allows administrators and developers to view, design, and modify objects, fields, and relationships in Salesforce effortlessly. Whether you’re a seasoned Salesforce expert or a beginner, Schema Builder can simplify your work and enhance your understanding of the Salesforce data architecture.
What is Schema Builder?
Schema Builder is a dynamic tool within Salesforce that visually represents objects, fields, and their relationships. Unlike the traditional method of navigating through object manager tabs, Schema Builder provides a drag-and-drop interface for creating and editing objects and fields directly.
Key Features of Schema Builder
- Interactive Visualization: View all standard and custom objects along with their relationships in a single diagram.
- Drag-and-Drop Interface: Create new objects, fields, and relationships without writing any code.
- Field Details: Easily access field-level information such as data type and API name.
- Real-Time Updates: The changes made in Schema Builders are reflected immediately in the Salesforce org.
- Customizable View: Filter objects and relationships to focus on specific areas of your schema.
Benefits of Using Schema Builder
- Time-Saving: Simplifies the process of designing and modifying your data model.
- Improved Collaboration: Provides a clear visual representation that can be shared with stakeholders.
- Reduced Errors: Ensures accuracy in creating fields and relationships by providing instant feedback.
- Enhanced Understanding: Helps new team members quickly understand the data model.
How to Access Schema Builder
Follow these steps to access Schema_Builder in Salesforce:
- Log in to your Salesforce org.
- To access Setup, click the gear symbol in the top-right corner.
- In the Quick Find box, type Schema Builder.
- Click on Schema Builder under Objects and Fields as shown in the figure below.
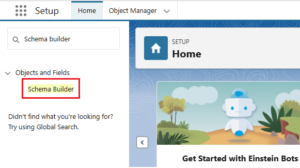
Once the Schema Builders interface opens, you can view and interact with your data model.
Start Using Schema Builder:
- In the left panel, click Clear All to remove any existing selections.
- Select the Account, Contact, and Opportunity
- Click on Auto-Layout to automatically arrange the components.
Once done, the layout will look similar to this:
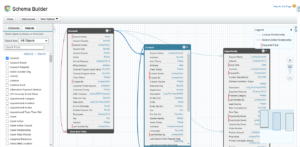
Note: You can easily drag these objects around the canvas in Schema_Builder. While this doesn’t alter the objects or their relationships, it allows you to better visualize your data model in an organized and meaningful way.
Schema Builder is a powerful tool for showcasing your Salesforce customizations to colleagues or visualizing the seamless flow of data across your system, making it easier to understand and explain your data model.
Using Schema Builder to Create Objects, Fields, and Relationships
Step 1: Create a Custom Object
- Open Schema Builder.
- Click on Elements in the top-left corner.
- Drag the Object icon onto the canvas.
- Fill in the required details like Object Label, Record Name, Data type, etc.
- Save the object as shown below.
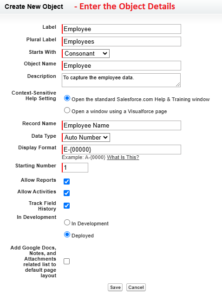
The object we created, will look like this.
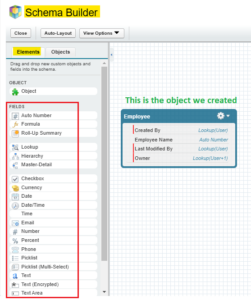
And now you can start adding or creating the fields into the object.
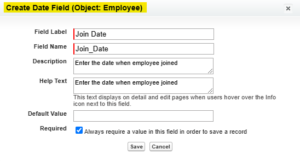
Step 2: Add Fields to an Object
- Drag the Field icon onto an existing object in the canvas from the Elements.
- Choose the field type (e.g., Text, Number, Date).
- Specify field details like Field Label and Field Name.
- Save the field.
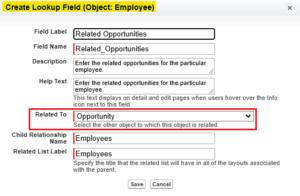
Step 3: Create Relationships Between Objects
- Drag the Lookup Relationship or Master-Detail Relationship icon onto an object.
- Specify the related object.
- Define the relationship settings, such as field names and sharing rules.
- Save the relationship.
So, the object will look like this after adding the fields.
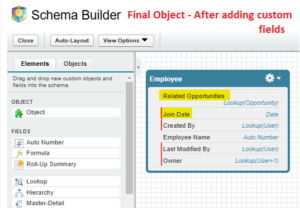
So, in this way, you can create objects from Schema_Builder itself without going to Object Manager.
Best Practices for Using Schema Builder
- Plan Your Data Model: Outline your objects, fields, and relationships before starting.
- Use Filters: Focus on specific objects or relationships to reduce clutter.
- Collaborate with Teams: Share the Schema Builders view with your team to ensure alignment.
- Test Before Deployment: Validate the changes in a sandbox environment before applying them in production.
Limitations of Schema Builder
- Performance Issues: For orgs with large numbers of objects and fields, Schema_Builder can become slow.
- Limited Functionality: Advanced customizations, like triggers and validation rules, cannot be managed through Schema Builder.
- No Version Control: Changes made in Schema Builders are not version-controlled, so careful tracking is necessary.
Note: To dive deeper into the considerations for using Schema Builders, feel free to explore further by following this link.
Conclusion
Schema Builder in Salesforce is an invaluable tool for visualizing and managing your data model. By providing a user-friendly interface and real-time updates, it simplifies complex data architecture tasks and improves collaboration across teams.
Happy Reading!
“Continuous learning is the bridge between where you are and where you aspire to be. Every step forward, no matter how small, brings growth and opens doors to new possibilities.”
Related Posts:
You Can Also Read:
1. Introduction to the Salesforce Queues – Part 1
2. Mastering Salesforce Queues: A Step-by-Step Guide – Part 2
3. How to Assign Records to Salesforce Queue: A Complete Guide
4. An Introduction to Salesforce CPQ
5. Revolutionizing Customer Engagement: The Salesforce Einstein Chatbot
Source: Read MoreÂ


