Hello Trailblazers!
Sharing Lightning Report Folders in Salesforce is essential for team collaboration, ensuring that the right people can access critical reports for decision-making. Salesforce allows you to securely manage and share report folders with users, roles, and groups while maintaining control over their level of access.
In this blog, we’ll explore the importance of sharing report folders and prerequisites and provide a detailed step-by-step guide to sharing Lightning Report Folders in Salesforce.
Before You Begin
In the earlier part of this blog series, I discussed what Salesforce Reports are, the different types of reports available, and the steps to create them. I recommend reviewing those sections for a clearer understanding before proceeding further.
Why Share Lightning Report Folders?
-
Collaboration Across Teams
Sharing report folders enables team members to access, view, and analyze the same data, fostering better collaboration and understanding.
-
Improved Productivity
When reports are shared efficiently, stakeholders can quickly access the information they need without requesting it repeatedly.
-
Transparency and Alignment
By sharing reports, you ensure that all team members are on the same page regarding metrics and performance indicators.
Prerequisites for Sharing Report Folders
Before sharing Lightning Report Folders, ensure the following:
- Manage Access: You must have “Manage†access to the folder to share it with others.
- Appropriate Permissions: Users must have Salesforce permissions to view or edit reports.
- Enhanced Folder Sharing: This feature must be enabled in your Salesforce organization. Because it provides more granular control over folder sharing.
Access Levels for Lightning Report Folders
When sharing folders, you can assign the following access levels:
- Viewer: Can view and run reports but cannot make changes.
- Editor: Can view, run, and modify reports but cannot manage folder sharing.
- Manager: Has full access but includes the ability to manage sharing settings and delete reports.
Step-by-Step Guide to Share Lightning Report Folders
Step 1: Open the Reports Tab
- In Salesforce, click on the App Launcher and search for Reports.
- Click the Reports tab to access all saved reports and folders.
Step 2: Locate the Report Folder
- On the left panel, locate the folder containing the reports you want to share. (All Folders/Created by Me)
- So click the folder name to open it.
Step 3: Open Folder Sharing Settings
- Click the More Options icon (three dots or gear icon) next to the folder name.
- Select Share from the dropdown menu. This action opens the folder-sharing interface, as shown in the figure below.

Step 4: Add Users, Roles, or Groups
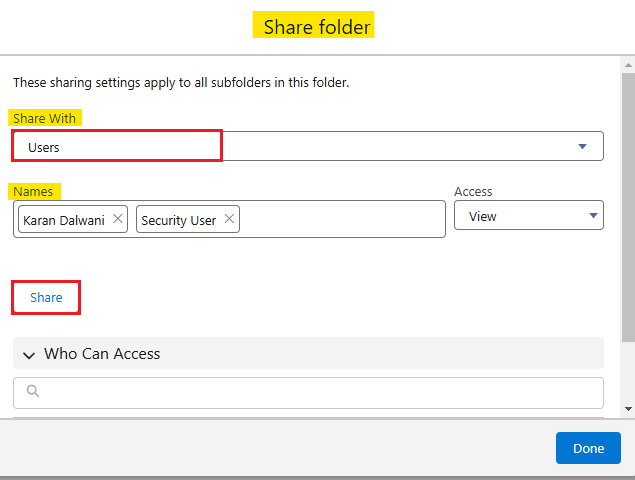
- A pop-up will appear in the sharing interface, allowing you to search for specific users, roles, or public groups.
- Select “Users†from “Share With†dropdown.
- Search for users in the “Names†field.
- Once you selected the users, click on Share, as shown in the figure below.

Step 5: Assign Access Levels
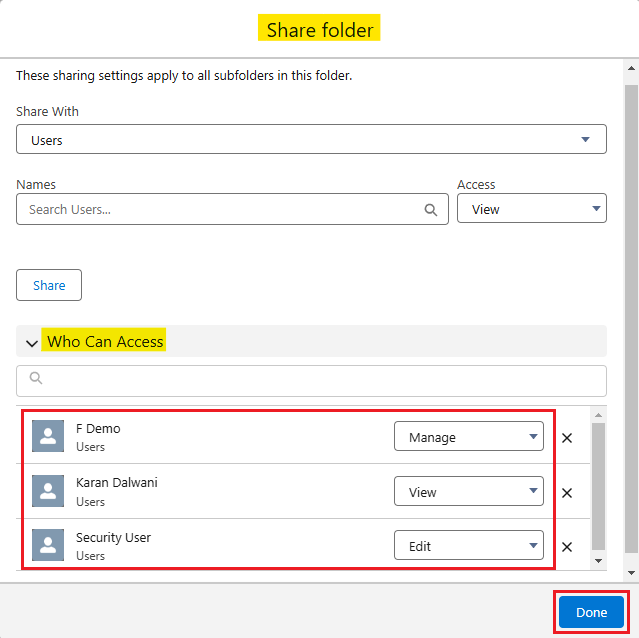
- Once you add users or groups and click on “Share,†the information automatically appears in the “Who Can Access†section.
- Â So here, assign the desired access level (Viewer, Editor, or Manager).

Step 6: Review and Save Report Sharing Settings
- So once done, review the list of users, roles, and groups with access to the folder.
- But make sure the permissions align with organizational policies.
- Click Done to save the changes.
Example Use Case: Sharing a Sales Report Folder
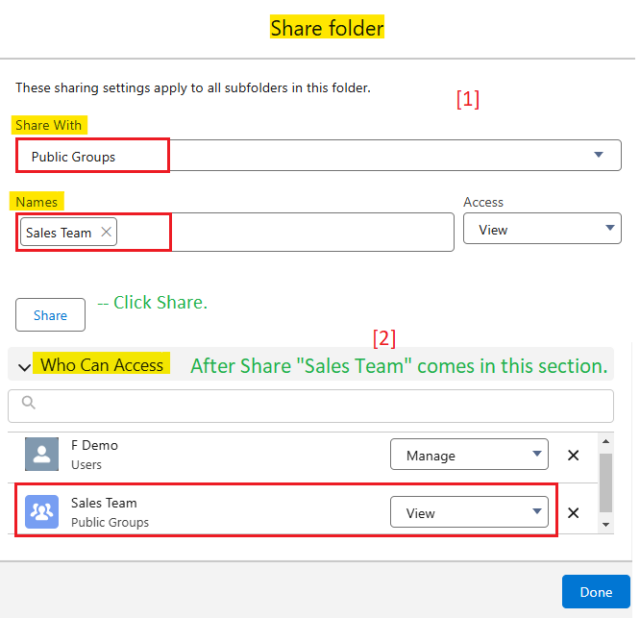
Imagine you have a folder named Sales Reports containing critical reports on pipeline value, closed deals, and team performance. So you want to share it with the Sales Team and Sales Managers:
- Create a public group in Salesforce called Sales Team.
- Add all team members and managers to this group.
- Share the Sales Reports folder with the Sales Team group. For collaboration, assign team members Viewer access and managers Editor access. Please refer to the below image.

Note: If you would like to learn more about Public Groups in Salesforce, please feel free to follow the link mentioned.
Best Practices for Sharing Report Folders
- Use Roles and Groups
- Instead of adding individual users, use public groups or roles for efficient management.
- Follow the Principle of Least Privilege
- Assign only the permissions necessary for users to perform their tasks.
- Secure Sensitive Data
- Ensure sensitive reports are shared only with authorized users. To enforce restrictions, use role hierarchies and sharing settings.
Troubleshooting Common Issues
- Missing Folder Sharing Option
- Ensure you have “Manage†access to the folder. Without it, you won’t be able to share it.
- Permission Denied Errors
- Users must have the necessary permissions (like “Run Reportsâ€) to access shared folders. Verify their user profiles or permission sets.
- Folder Not Visible to Users
- Confirm that the users can access the folder and the underlying data. However, data visibility depends on Salesforce’s record-level security.
Conclusion
Sharing Lightning Report Folders in Salesforce is crucial to fostering collaboration, improving transparency, and ensuring the right stakeholders have access to vital data. Following the steps outlined in this guide, you can easily share report folders while maintaining control over who can view, edit, or manage them.
Happy Reading!
 “Success isn’t just about reaching your destination; it’s about embracing the journey, learning from every step, and growing stronger with each challenge.â€
Â
Related Posts:
You Can Also Read:
1. Introduction to the Salesforce Queues – Part 1
2. Mastering Salesforce Queues: A Step-by-Step Guide – Part 2
3. How to Assign Records to Salesforce Queue: A Complete Guide
4. An Introduction to Salesforce CPQ
5. Revolutionizing Customer Engagement: The Salesforce Einstein Chatbot
Â
Â
Source: Read MoreÂ


