
Xdebug has a history of having a steep setup learning curve. I am here to show you that setting up Xdebug doesn’t have to be painful. In fact, I am confident that you can start using Xdebug with Docker in about a minute.
OK, maybe it will take some of you a few minutes 🙂
We will demonstrate the setup with Laravel, PHP 8.4 and Xdebug v3.4.0, the latest stable versions at the time of writing.
The gist of what we need to get Xdebug configured with a Docker image includes:
- A Dockerfile that installs the Xdebug module and configuration
- A
compose.yamlfile to start the container - A supported editor or IDE you can use as an Xdebug client
Project Setup
In this post, we are going to use Apache to simplify the server setup; however, the Dockerfile code is identical to configuring Xdebug in a PHP-FPM image.
We will start by setting up a demo project if you want to follow along:
laravel new xdebug-demo --git --no-interaction
cd xdebug-demo
mkdir -p build/php/conf.d build/apache
touch compose.yaml
build/Dockerfile
build/php/conf.d/xdebug.ini
    build/apache/vhost.conf
We created folders and files for our setup via the command line, but feel free to make them however you want. In addition to the typical Docker files, we created a vhost.conf file to configure the web root path to our application.
Docker Image Setup
Next, add the following to your build/Dockerfile file:
FROM php:8.4-apache as base

LABEL maintainer="Paul Redmond"

RUN docker-php-ext-install pdo_mysql opcache &&
    a2enmod rewrite negotiation

COPY build/apache/vhost.conf /etc/apache2/sites-available/000-default.conf

FROM base as development

RUN cp $PHP_INI_DIR/php.ini-development $PHP_INI_DIR/php.ini

COPY build/php/conf.d/xdebug.ini $PHP_INI_DIR/conf.d/xdebug.ini

RUN pecl channel-update pecl.php.net &&
    pecl install xdebug-3.4.0 &&
    docker-php-ext-enable xdebug

FROM base as app

RUN cp $PHP_INI_DIR/php.ini-production $PHP_INI_DIR/php.ini
COPY . /srv/app
The Dockerfile has quite a few lines, so lets go over the most important code to help you grasp how to configure Xdebug. First, we use multi-stage builds so we can configure Xdebug in development environments. Before the development stage is the base stage, which has the foundational setup our image needs such as PHP extensions we want in any environment and configuring Apache.
Next the development stage copies the development version of the PHP.ini file, copies the xdebug.ini configuration that will hold our customizations we make to Xdebug. We use v3.4.0 which has support for PHP 8.4 and is the latest stable at the time of writing.
Last, we have a app stage, which is what our application image would use in production builds. Using the app target omits configuring Xdebug and uses the production version of the php.ini file.
Apache Vhost
We aren’t here to learn how to configure Apache, we just want to use it to quickly demonstrate how easy it is to set up Xdebug in Docker. Just add the following code to the build/apache/vhost.conf file, which is copied into the Docker image to point to the application code:
<VirtualHost *:80>
 ServerAdmin webmaster@localhost
 DocumentRoot /srv/app/public

 <Directory "/srv/app/public">
 AllowOverride all
 Require all granted
 </Directory>

 ErrorLog ${APACHE_LOG_DIR}/error.log
 CustomLog ${APACHE_LOG_DIR}/access.log combined
</VirtualHost>
Xdebug Configuration
Next, we need to configure Xdebug via the xdebug.ini file we created. Add the following to this file if you are following along:
; build/php/conf.d/xdebug.ini file
[xdebug]
xdebug.mode = debug

xdebug.client_host = host.docker.internal

; Or use the host machine IP address:
; xdebug.client_host = 192.168.86.203

xdebug.start_with_request = yes
Our customizations are needed to define the client host. Since we are using a Docker network, Xdebug needs to know how to communicate with our host machine. If you are using Docker desktop, Docker has a host.docker.internal host that points to your host computer.
If not, you will need to find your computer’s local network IP and use that. We could power this value with an environment variable, but I’ll save that for a future post.
Last, we use xdebug.start_with_request = yes to always start Xdebug with every request. We can disable Xdebug using our editor’s UI when we don’t want to use Xdebug, but it will always attempt to establish a connection.
Running the Image
Before we verify an Xdebug connection, we need to configure our application container. We will use Docker compose to run our application with Docker by adding the following to compose.yaml:
services:
  app:
    build:
      context: .
      dockerfile: build/Dockerfile
      target: development
    ports:
      - "8080:80"
    volumes:
      - .:/srv/app
Our app service targets the development stage of our build, mounts a volume so we can change our code without rebuilding the image, and uses port 8080 to serve the application locally.
We can now build and start our image using Docker Compose:
docker compose up --build -d
The previous command will build the image, start the container, and run it in the background. At this point, Xdebug is ready to receive connections, however, we need to tweak one thing in our IDE to get it working.
Configuring PhpStorm
We will use PhpStorm, but you can use any editor you want that supports Xdebug. Since we are using Docker, we need to configure a server in PhpStorm that maps our Docker volume to our local project code. You can do so by opening Settings > PHP > Servers and configuring a localhost server with a mapping of /srv/app:

If you don’t have a localhost server, you can add one from this settings page using port 8080 and selecting the Xdebug debugger. The server mapping allows our IDE to understand how to map the server stack trace to files in the project.
Next, we are ready to enable Xdebug using the Bug icon near the top right menu that says “Start Listening for PHP Debug Connections” when you hover over it:

When you click it, you should see the icon turn green.
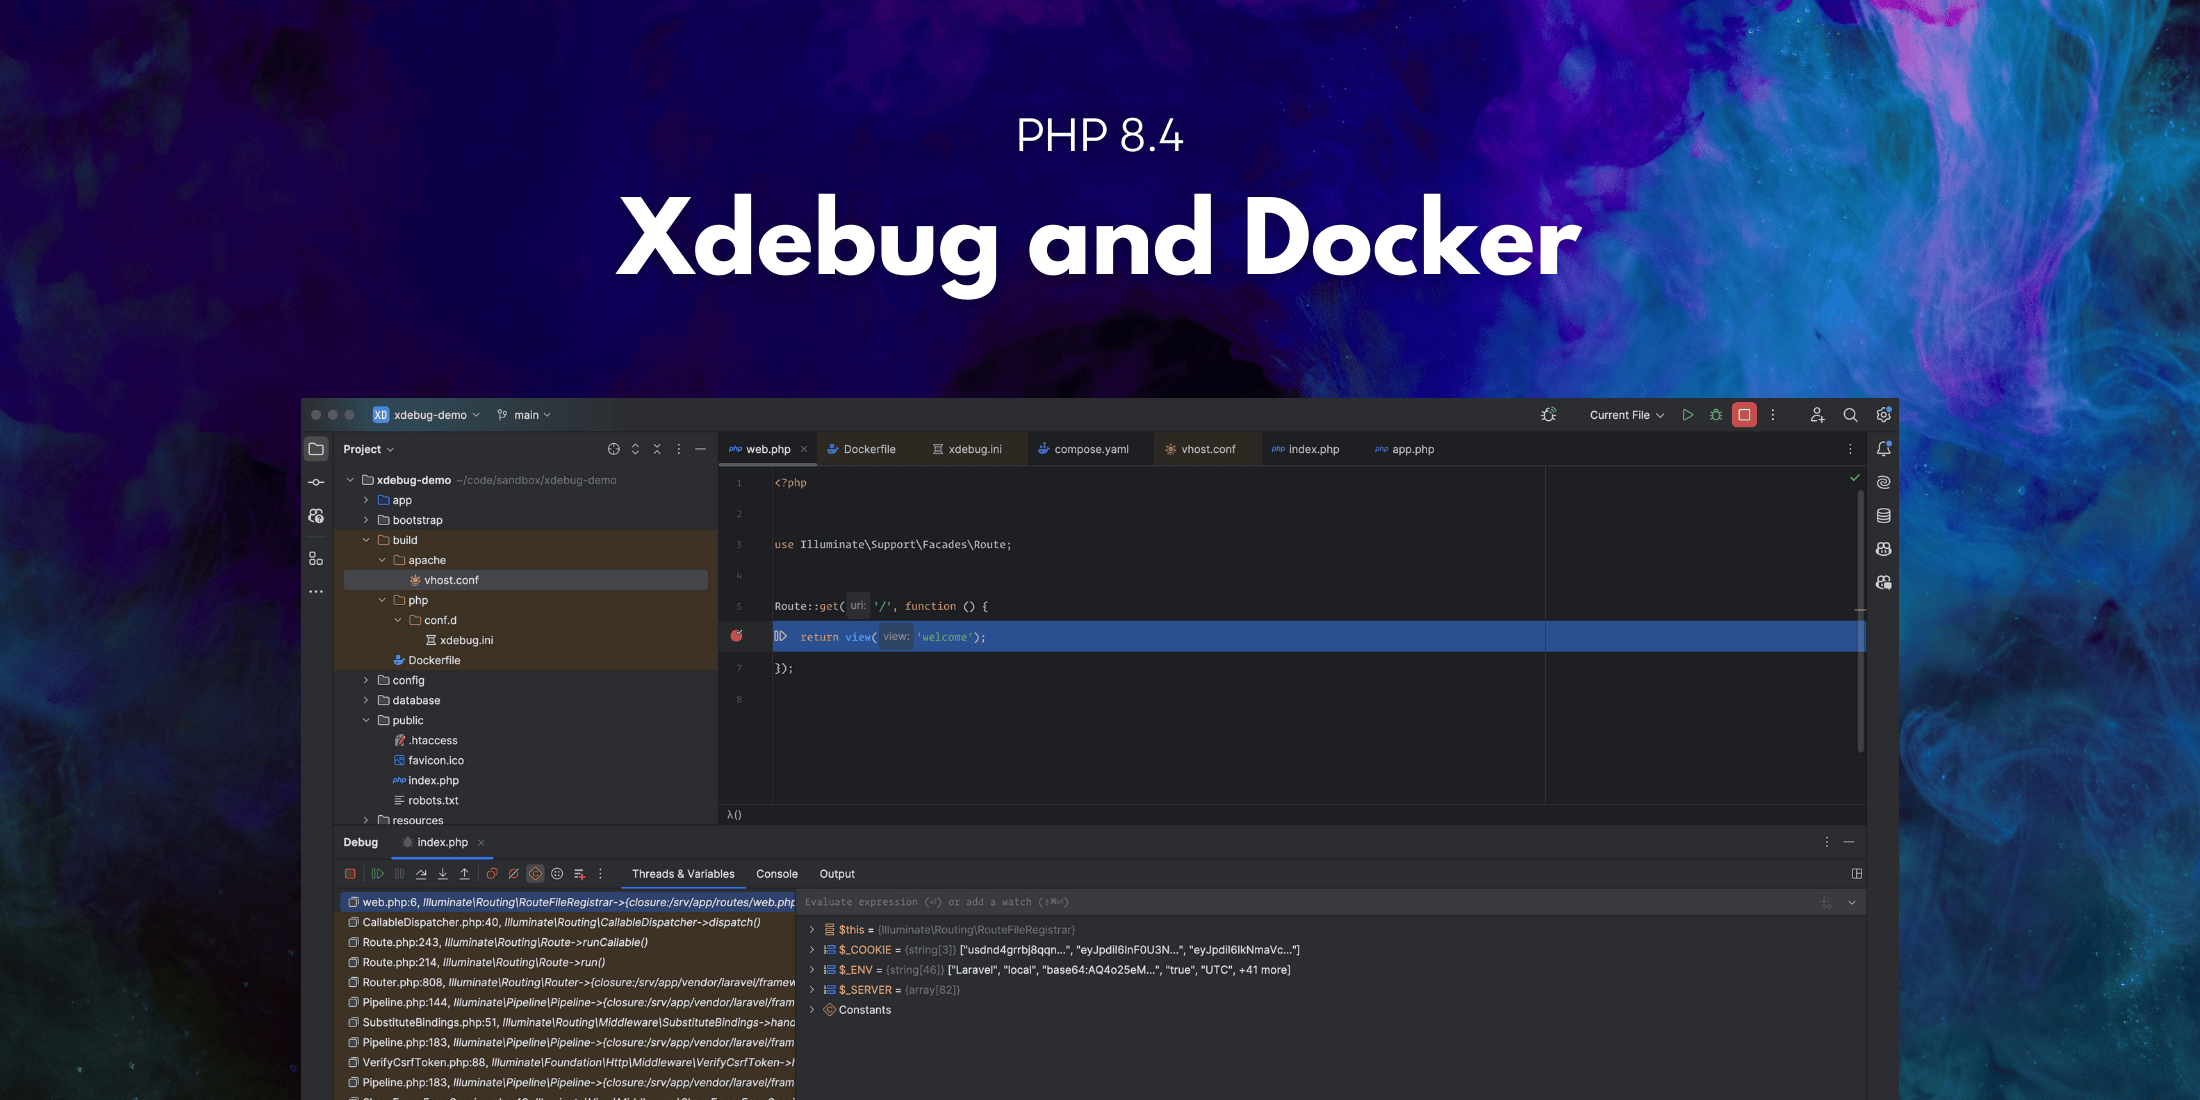
The last thing we need to do is set a breakpoint. Open up the routes/web.php file and set a breakpoint on the only line of the homepage route:

If you open your project in a web browser (localhost:8080), PhpStorm should prompt you to connect the first time. After that, it will automatically pause on any breakpoints you set. Once you are done debugging, you can click the bug icon to disable Xdebug connections.
Learn More
You should now be able to use Xdebug with your project! I also showed you a bonus topic – using multi-stage images to set up development tools and a separate stage for production settings. Using multi-stage builds can take your images to another level of flexability.
If you get stuck on the editor portion of setting up Xdebug, PhpStorm has extensive documentation on how to Configure Xdebug. Xdebug’s documentation is another excellent reference, including docs on setup, tools, configuration options, and more.
The post Get Xdebug Working With Docker and PHP 8.4 in One Minute appeared first on Laravel News.
Join the Laravel Newsletter to get all the latest
Laravel articles like this directly in your inbox.
Source: Read MoreÂ

