Close Menu
    DevStackTipsDevStackTips
    • Home
    • News & Updates
      1. Tech & Work
      2. View All

      10 Top Generative AI Development Companies for Enterprise Node.js Projects

      August 30, 2025

      Prompting Is A Design Act: How To Brief, Guide And Iterate With AI

      August 29, 2025

      Best React.js Development Services in 2025: Features, Benefits & What to Look For

      August 29, 2025

      August 2025: AI updates from the past month

      August 29, 2025

      Motion Highlights #12

      August 30, 2025

      AI is returning to Taco Bell and McDonald’s drive-thrus – will customers bite this time?

      August 30, 2025

      I deciphered Apple’s iPhone 17 event invite – my 3 biggest theories for what’s expected

      August 30, 2025

      This Milwaukee 9-tool kit is $200 off for Labor Day – here’s what’s included

      August 30, 2025
    • Development
      1. Algorithms & Data Structures
      2. Artificial Intelligence
      3. Back-End Development
      4. Databases
      5. Front-End Development
      6. Libraries & Frameworks
      7. Machine Learning
      8. Security
      9. Software Engineering
      10. Tools & IDEs
      11. Web Design
      12. Web Development
      13. Web Security
      14. Programming Languages
        • PHP
        • JavaScript
      Featured

      Call for Speakers – JS Conf Armenia 2025

      August 30, 2025
      Recent

      Call for Speakers – JS Conf Armenia 2025

      August 30, 2025

      Streamlining Application Automation with Laravel’s Task Scheduler

      August 30, 2025

      A Fluent Path Builder for PHP and Laravel

      August 30, 2025
    • Operating Systems
      1. Windows
      2. Linux
      3. macOS
      Featured

      Windows 11 KB5064081 24H2 adds taskbar clock, direct download links for .msu offline installer

      August 30, 2025
      Recent

      Windows 11 KB5064081 24H2 adds taskbar clock, direct download links for .msu offline installer

      August 30, 2025

      My Family Cinema not Working? 12 Quick Fixes

      August 30, 2025

      Super-linter – collection of linters and code analyzers

      August 30, 2025
    • Learning Resources
      • Books
      • Cheatsheets
      • Tutorials & Guides
    Home»Development»Machine Learning»Set up custom domain names for Amazon Bedrock AgentCore Runtime agents

    Set up custom domain names for Amazon Bedrock AgentCore Runtime agents

    August 30, 2025

    When deploying AI agents to Amazon Bedrock AgentCore Runtime (currently in preview), customers often want to use custom domain names to create a professional and seamless experience.

    By default, AgentCore Runtime agents use endpoints like https://bedrock-agentcore.{region}.amazonaws.com/runtimes/{EncodedAgentARN}/invocations.

    In this post, we discuss how to transform these endpoints into user-friendly custom domains (like https://agent.yourcompany.com) using Amazon CloudFront as a reverse proxy. The solution combines CloudFront, Amazon Route 53, and AWS Certificate Manager (ACM) to create a secure, scalable custom domain setup that works seamlessly with your existing agents.

    Benefits of Amazon Bedrock AgentCore Runtime

    If you’re building AI agents, you have probably wrestled with hosting challenges: managing infrastructure, handling authentication, scaling, and maintaining security. Amazon Bedrock AgentCore Runtime helps address these problems.

    Amazon Bedrock AgentCore Runtime is framework agnostic; you can use it with LangGraph, CrewAI, Strands Agents, or custom agents you have built from scratch. It supports extended execution times up to 8 hours, perfect for complex reasoning tasks that traditional serverless functions can’t handle. Each user session runs in its own isolated microVM, providing security that’s crucial for enterprise applications.

    The consumption-based pricing model means you only pay for what you use, not what you provision. And unlike other hosting solutions, Amazon Bedrock AgentCore Runtime includes built-in authentication and specialized observability for AI agents out of the box.

    Benefits of custom domains

    When using Amazon Bedrock AgentCore Runtime with Open Authorization (OAuth) authentication, your applications make direct HTTPS requests to the service endpoint. Although this works, custom domains offer several benefits:

    • Custom branding – Client-side applications (web browsers, mobile apps) display your branded domain instead of AWS infrastructure details in network requests
    • Better developer experience – Development teams can use memorable, branded endpoints instead of copying and pasting long AWS endpoints across code bases and configurations
    • Simplified maintenance – Custom domains make it straightforward to manage endpoints when deploying multiple agents or updating configurations across environments

    Solution overview

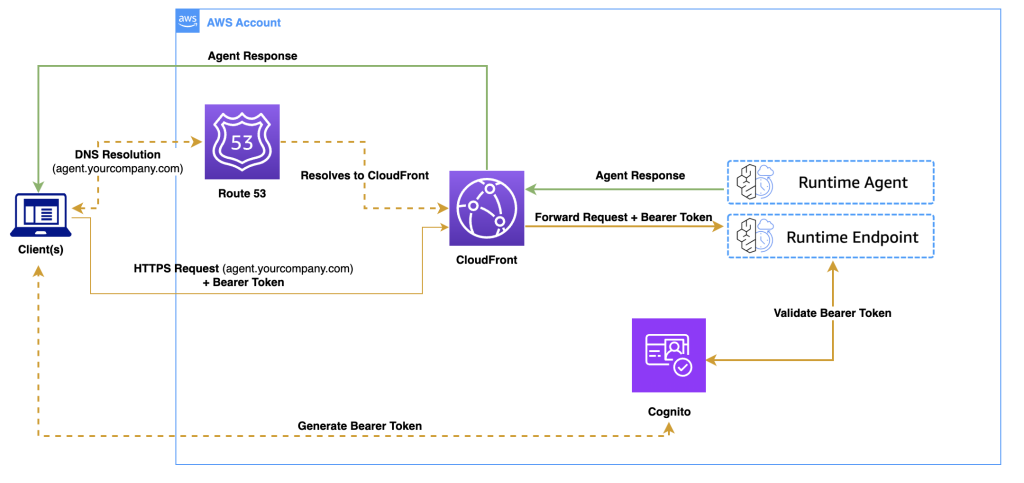
    In this solution, we use CloudFront as a reverse proxy to transform requests from your custom domain into Amazon Bedrock AgentCore Runtime API calls. Instead of using the default endpoint, your applications can make requests to a user-friendly URL like https://agent.yourcompany.com/.

    The following diagram illustrates the solution architecture.

    AgentCore-Diagram

    The workflow consists of the following steps:

    1. A client application authenticates with Amazon Cognito and receives a bearer token.
    2. The client makes an HTTPS request to your custom domain.
    3. Route 53 resolves the DNS request to CloudFront.
    4. CloudFront forwards the authenticated request to the Amazon Bedrock Runtime agent.
    5. The agent processes the request and returns the response through the same path.

    You can use the same CloudFront distribution to serve both your frontend application and backend agent endpoints, avoiding cross-origin resource sharing (CORS) issues because everything originates from the same domain.

    Prerequisites

    To follow this walkthrough, you must have the following in place:

    • An AWS account with appropriate permissions
    • The AWS Cloud Development Kit (AWS CDK) version 2.x or later
    • An AWS Identity and Access Management (IAM) execution role with appropriate permissions for Amazon Bedrock AgentCore Runtime

    Although Amazon Bedrock AgentCore Runtime can be in other supported AWS Regions, CloudFront requires SSL certificates to be in the us-east-1 Region.

    You can choose from the following domain options:

    • Use an existing domain – Add a subdomain like agent.yourcompany.com
    • Register a new domain – Use Route 53 to register a domain if you don’t have one
    • Use the default URL from CloudFront – No domain registration or configuration required

    Choose the third option if you want to test the solution quickly before setting up a custom domain.

    Create an agent with inbound authentication

    If you already have an agent deployed with OAuth authentication, you can skip to the next section to set up the custom domain. Otherwise, follow these steps to create a new agent using Amazon Cognito as your OAuth provider:

    1. Create a new directory for your agent with the following structure:
    your_project_directory/
    ├── agent_example.py # Your main agent code
    ├── requirements.txt # Dependencies for your agent
    └── __init__.py # Makes the directory a Python package
    1. Create the main agent code in agent_example.py:
    # agent_example.py
    from strands import Agent
    from bedrock_agentcore.runtime import BedrockAgentCoreApp
    
    agent = Agent()
    app = BedrockAgentCoreApp()
    @app.entrypoint
    def invoke(payload):
        """Process user input and return a response"""
        user_message = payload.get("prompt", "Hello")
        response = agent(user_message)
        return str(response) # response should be json serializable
    if __name__ == "__main__":
        app.run()
    1. Add dependencies to requirements.txt:
    # requirements.txt
    strands-agents
    bedrock-agentcore
    1. Run the following commands to create an Amazon Cognito user pool and test user:
    # Create User Pool and capture Pool ID
    export POOL_ID=$(aws cognito-idp create-user-pool 
      --pool-name "MyUserPool" 
      --policies '{"PasswordPolicy":{"MinimumLength":8}}' 
      --region us-east-1 | jq -r '.UserPool.Id')
    
    # Create App Client and capture Client ID
    export CLIENT_ID=$(aws cognito-idp create-user-pool-client 
      --user-pool-id $POOL_ID 
      --client-name "MyClient" 
      --no-generate-secret 
      --explicit-auth-flows "ALLOW_USER_PASSWORD_AUTH" "ALLOW_REFRESH_TOKEN_AUTH" 
      --region us-east-1 | jq -r '.UserPoolClient.ClientId')
    
    # Create and configure a test user
    aws cognito-idp admin-create-user 
      --user-pool-id $POOL_ID 
      --username "testuser" 
      --temporary-password "Temp1234" 
      --region us-east-1 
      --message-action SUPPRESS
    
    aws cognito-idp admin-set-user-password 
      --user-pool-id $POOL_ID 
      --username "testuser" 
      --password "MyPassword123" 
      --region us-east-1 
      --permanent
    
    echo "Pool ID: $POOL_ID"
    echo "Discovery URL: https://cognito-idp.us-east-1.amazonaws.com/$POOL_ID/.well-known/openid-configuration"
    echo "Client ID: $CLIENT_ID"
    1. Deploy the agent using the Amazon Bedrock AgentCore command line interface (CLI) provided by the starter toolkit:
    pip install bedrock-agentcore-starter-toolkit #install the starter toolkit
    
    agentcore configure --entrypoint agent_example.py 
    --name my_agent 
    --execution-role your-execution-role-arn 
    --requirements-file requirements.txt 
    --authorizer-config "{"customJWTAuthorizer":{"discoveryUrl":"https://cognito-idp.us-east-1.amazonaws.com/$POOL_ID/.well-known/openid-configuration","allowedClients":["$CLIENT_ID"]}}"
    
    agentcore launch

    Make note of your agent runtime Amazon Resource Name (ARN) after deployment. You will need this for the custom domain configuration.

    For additional examples and details, see Authenticate and authorize with Inbound Auth and Outbound Auth.

    Set up the custom domain solution

    Now let’s implement the custom domain solution using the AWS CDK. This section shows you how to create the CloudFront distribution that proxies your custom domain requests to Amazon Bedrock AgentCore Runtime endpoints.

    1. Create a new directory and initialize an AWS CDK project:
    mkdir agentcore-custom-domain
    cd agentcore-custom-domain
    cdk init app --language python
    source .venv/bin/activate
    pip install aws-cdk-lib constructs
    1. Encode the agent ARN and prepare the CloudFront origin configuration:
    # agentcore_custom_domain_stack.py 
    import urllib.parse
    
    agent_runtime_arn = "arn:aws:bedrock-agentcore:us-east-1:accountId:runtime/my_agent-xbcDkz4FR9"
    encoded_arn = urllib.parse.quote(agent_runtime_arn, safe='') # URL-encode the ARN
    region = agent_runtime_arn.split(':')[3]  # Extract region from ARN

    If your frontend application runs on a different domain than your agent endpoint, you must configure CORS headers. This is common if your frontend is hosted on a different domain (for example, https://app.yourcompany.com calling https://agent.yourcompany.com), or if you’re developing locally (for example, http://localhost:3000 calling your production agent endpoint).

    1. To handle CORS requirements, create a CloudFront response headers policy:
    # agentcore_custom_domain_stack.py 
    from aws_cdk.aws_cloudfront import ResponseHeadersPolicy, ResponseHeadersCorsBehavior
    
    # Create CORS response headers policy
    cors_policy = ResponseHeadersPolicy(self, 'CorsPolicy',
        cors_behavior=ResponseHeadersCorsBehavior(
            access_control_allow_origins=['*'], # Or specify your frontend domains
            access_control_allow_headers=[
                'Authorization',
                'Content-Type', 
                'X-Amzn-*',
                'X-Requested-With'
            ],
            access_control_allow_methods=['GET', 'POST', 'OPTIONS'],
            access_control_allow_credentials=False,
            access_control_expose_headers=['*'],
            origin_override=True # Overrides CORS headers from origin
        )
    )
    1. Create a CloudFront distribution to act as a reverse proxy for your agent endpoints:
    # agentcore_custom_domain_stack.py
     from aws_cdk.aws_cloudfront import (
        Distribution, BehaviorOptions, CachePolicy, 
        AllowedMethods, ViewerProtocolPolicy,
        OriginProtocolPolicy, OriginRequestPolicy
    )
    from aws_cdk.aws_cloudfront_origins import HttpOrigin
    
    bedrock_agentcore_hostname = f"bedrock-agentcore.{region}.amazonaws.com"
    origin_path = f"/runtimes/{encoded_arn}/invocations"
    
    distribution = Distribution(self, 'Distribution',
        default_behavior=BehaviorOptions(
            origin=HttpOrigin(
                bedrock_agentcore_hostname,
                origin_path=origin_path, 
                protocol_policy=OriginProtocolPolicy.HTTPS_ONLY,
                read_timeout=Duration.seconds(120) # Optional: for responses >30s, adjust as needed
            ),
            viewer_protocol_policy=ViewerProtocolPolicy.REDIRECT_TO_HTTPS,
            cache_policy=CachePolicy.CACHING_DISABLED,  # Critical for dynamic APIs
            allowed_methods=AllowedMethods.ALLOW_ALL,
            response_headers_policy=cors_policy,  # Add CORS policy if created
            origin_request_policy=OriginRequestPolicy.ALL_VIEWER,  # Forward headers for MCP
        ),
        # Add domain configuration if using custom domains
        domain_names=[domain_name] if domain_name else None,
        certificate=certificate if domain_name else None,
    )

    Set cache_policy=CachePolicy.CACHING_DISABLED to make sure your agent responses remain dynamic and aren’t cached by CloudFront.

    1. If you’re using a custom domain, add an SSL certificate and DNS configuration to your stack:
    # agentcore_custom_domain_stack.py 
    from aws_cdk.aws_certificatemanager import Certificate, CertificateValidation
    from aws_cdk.aws_route53 import HostedZone, ARecord, RecordTarget
    from aws_cdk.aws_route53_targets import CloudFrontTarget
    
    # For existing domains
    hosted_zone = HostedZone.from_lookup(self, 'HostedZone',
        domain_name='yourcompany.com'
    )
    # SSL certificate with automatic DNS validation
    certificate = Certificate(self, 'Certificate',
        domain_name='my-agent.yourcompany.com',
        validation=CertificateValidation.from_dns(hosted_zone),
    )
    # DNS record pointing to CloudFront
    ARecord(self, 'AliasRecord',
        zone=hosted_zone,
        record_name='my-agent.yourcompany.com',
        target=RecordTarget.from_alias(CloudFrontTarget(distribution)),
    )

    The following code is the complete AWS CDK stack that combines all the components:

    # agentcore_custom_domain_stack.py
    import urllib.parse
    from aws_cdk import Stack, CfnOutput, Duration
    from aws_cdk.aws_cloudfront import (
        Distribution, BehaviorOptions,
        CachePolicy, AllowedMethods,
        ViewerProtocolPolicy, OriginProtocolPolicy,
        ResponseHeadersPolicy, ResponseHeadersCorsBehavior,
        OriginRequestPolicy
    )
    from aws_cdk.aws_cloudfront_origins import HttpOrigin
    from aws_cdk.aws_certificatemanager import Certificate, CertificateValidation
    from aws_cdk.aws_route53 import HostedZone, ARecord, RecordTarget
    from aws_cdk.aws_route53_targets import CloudFrontTarget
    from constructs import Construct
    
    class AgentcoreCustomDomainStack(Stack):
        def __init__(self, scope: Construct, construct_id: str, **kwargs) -> None:
            super().__init__(scope, construct_id, **kwargs)
    
            # Configuration - Update these for your setup
            agent_runtime_arn = "arn:aws:bedrock-agentcore:us-east-1:accountId:runtime/my_agent-xbcDkz4FR9"
            region = agent_runtime_arn.split(':')[3]  # Extract region from ARN
            domain_name = "agent.yourcompany.com"  # Using your hosted zone
            hosted_zone_id = "Z1234567890ABC"  # Your hosted zone ID
            enable_cors = True  # Set to False if serving frontend and backend from same domain
    
            # Encode the agent ARN for the origin path
            encoded_arn = urllib.parse.quote(agent_runtime_arn, safe='')
            bedrock_agentcore_hostname = f"bedrock-agentcore.{region}.amazonaws.com"
            origin_path = f"/runtimes/{encoded_arn}/invocations"
    
            # Create CORS response headers policy if needed
            cors_policy = None
            if enable_cors:
                cors_policy = ResponseHeadersPolicy(self, 'CorsPolicy',
                    cors_behavior=ResponseHeadersCorsBehavior(
                        access_control_allow_origins=['*'],  # Or specify your frontend domains
                        access_control_allow_headers=[
                            'Authorization',
                            'Content-Type', 
                            'X-Amzn-*',
                            'X-Requested-With'
                        ],
                        access_control_allow_methods=['GET', 'POST', 'OPTIONS'],
                        access_control_expose_headers=['*'],
                        access_control_allow_credentials=False,
                        origin_override=True  # Overrides CORS headers from origin
                    )
                )
    
            # Base distribution configuration
            distribution_props = {
                "default_behavior": BehaviorOptions(
                    origin=HttpOrigin(
                        bedrock_agentcore_hostname,
                        origin_path=origin_path,  # Direct path to agent endpoint
                        protocol_policy=OriginProtocolPolicy.HTTPS_ONLY,
                        read_timeout=Duration.seconds(120) # Optional: for responses >30s, adjust as needed
                    ),
                    viewer_protocol_policy=ViewerProtocolPolicy.REDIRECT_TO_HTTPS,
                    cache_policy=CachePolicy.CACHING_DISABLED,
                    allowed_methods=AllowedMethods.ALLOW_ALL,
                    response_headers_policy=cors_policy,  # Add CORS policy if enabled
                    origin_request_policy=OriginRequestPolicy.ALL_VIEWER,  # Forward headers for MCP
                )
            }
    
            # Optional: Add custom domain
            if domain_name:
                # Use from_hosted_zone_attributes for specific zone
                hosted_zone = HostedZone.from_hosted_zone_attributes(self, 'HostedZone',
                                                                     zone_name='yourcompany.com',  # Your root domain
                                                                     hosted_zone_id=hosted_zone_id
                                                                     )
    
                certificate = Certificate(self, 'Certificate',
                                          domain_name=domain_name,
                                          validation=CertificateValidation.from_dns(
                                              hosted_zone),
                                          )
    
                # Add custom domain to distribution
                distribution_props["domain_names"] = [domain_name]
                distribution_props["certificate"] = certificate
    
            distribution = Distribution(self, 'Distribution', **distribution_props)
    
            # Create DNS record if using custom domain
            if domain_name:
                ARecord(self, 'AliasRecord',
                        zone=hosted_zone,
                        record_name=domain_name,
                        target=RecordTarget.from_alias(
                            CloudFrontTarget(distribution)),
                        )
    
            # Outputs
            if domain_name:
                domain_url = f"https://{domain_name}/"
                CfnOutput(self, "AgentEndpoint",
                          value=domain_url,
                          description="Your custom domain endpoint"
                          )
    
            CfnOutput(self, "CloudFrontDistribution",
                      value=f"https://{distribution.distribution_domain_name}/",
                      description="CloudFront default domain (works without custom domain)"
                      )
    1. Configure the AWS CDK app entry point:
    # app.py
    #!/usr/bin/env python3
    import aws_cdk as cdk
    from agentcore_custom_domain.agentcore_custom_domain_stack import AgentCoreCustomDomainStack
    
    app = cdk.App()
    AgentcoreCustomDomainStack(app, "AgentCoreCustomDomainStack",
        # CloudFront requires certificates in us-east-1
        env=cdk.Environment(region='us-east-1'),
    )
    app.synth()

    Deploy your custom domain

    Now you can deploy the solution and verify it works with both custom and default domains. Complete the following steps:

    1. Update the following values in agentcore_custom_domain_stack.py:
      • Your Amazon Bedrock AgentCore Runtime ARN
      • Your domain name (if using a custom domain)
      • Your hosted zone ID (if using a custom domain)
    2. Deploy using the AWS CDK:
    cdk deploy

    Test your endpoint

    After you deploy the custom domain, you can test your endpoints using either the custom domain or the CloudFront default domain.First, get a JWT token from Amazon Cognito:

    export TOKEN=$(aws cognito-idp initiate-auth 
      --client-id "your-client-id" 
      --auth-flow USER_PASSWORD_AUTH 
      --auth-parameters USERNAME='testuser',PASSWORD='MyPassword123' 
      --region us-east-1 | jq -r '.AuthenticationResult.AccessToken')

    Use the following code to test with your custom domain:

    curl -X POST "https://my-agent.yourcompany.com/" 
      -H "Authorization: Bearer $TOKEN" 
      -H "Content-Type: application/json" 
      -H "X-Amzn-Bedrock-AgentCore-Runtime-Session-Id: session-12345678901234567890123456789012345" 
      -d '{"prompt": "Hello, how can you help me today?"}'

    Alternatively, use the following code to test with the CloudFront default domain:

    curl -X POST "https://d1234567890123.cloudfront.net/" 
      -H "Authorization: Bearer $TOKEN" 
      -H "Content-Type: application/json" 
      -H "X-Amzn-Bedrock-AgentCore-Runtime-Session-Id: session-12345678901234567890123456789012345" 
      -d '{"prompt": "Hello, how can you help me today?"}'

    If everything works correctly, you will receive a response from your agent through either endpoint. You’ve successfully created a custom domain for your Amazon Bedrock AgentCore Runtime agent!

    Considerations

    As you implement this solution in production, the following are some important considerations:

    • Cost implications – CloudFront adds costs for data transfer and requests. Review Amazon CloudFront pricing to understand the impact for your usage patterns.
    • Security enhancements – Consider implementing the following security measures:
      • AWS WAF rules to help protect against common web exploits.
      • Rate limiting to help prevent abuse.
      • Geo-restrictions if your agent should only be accessible from specific Regions.
    • Monitoring – Enable CloudFront access logs and set up Amazon CloudWatch alarms to monitor error rates, latency, and request volume.

    Clean up

    To avoid ongoing costs, delete the resources when you no longer need them:

    cdk destroy

    You might need to manually delete the Route 53 hosted zones and ACM certificates from their respective service consoles.

    Conclusion

    In this post, we showed you how to create custom domain names for your Amazon Bedrock AgentCore Runtime agent endpoints using CloudFront as a reverse proxy. This solution provides several key benefits: simplified integration for development teams, custom domains that align with your organization, cleaner infrastructure abstraction, and straightforward maintenance when endpoints need updates. By using CloudFront as a reverse proxy, you can also serve both your frontend application and backend agent endpoints from the same domain, avoiding common CORS challenges.

    We encourage you to explore this solution further by adapting it to your specific needs. You might want to enhance it with additional security features, set up monitoring, or integrate it with your existing infrastructure.

    To learn more about building and deploying AI agents, see the Amazon Bedrock AgentCore Developer Guide. For advanced configurations and best practices with CloudFront, refer to the Amazon CloudFront documentation. You can find detailed information about SSL certificates in the AWS Certificate Manager documentation, and domain management in the Amazon Route 53 documentation.

    Amazon Bedrock AgentCore is currently in preview and subject to change. Standard AWS pricing applies to additional services used, such as CloudFront, Route 53, and Certificate Manager.


    About the authors

    Rahmat Fedayizada is a Senior Solutions Architect with the AWS Energy and Utilities team. He works with energy companies to design and implement scalable, secure, and highly available architectures. Rahmat is passionate about translating complex technical requirements into practical solutions that drive business value.

    Paras Bhuva is a Senior Manager of Solutions Architecture at AWS, where he leads a team of solution architects helping energy customers innovate and accelerate their transformation. Having started as a Solution Architect in 2012, Paras is passionate about architecting scalable solutions and building organizations focused on application modernization and AI initiatives.

    Source: Read More 

    Facebook Twitter Reddit Email Copy Link
    Previous ArticleDetect Amazon Bedrock misconfigurations with Datadog Cloud Security
    Next Article Introducing auto scaling on Amazon SageMaker HyperPod

    Related Posts

    Machine Learning

    How to Evaluate Jailbreak Methods: A Case Study with the StrongREJECT Benchmark

    August 31, 2025
    Machine Learning

    Introducing auto scaling on Amazon SageMaker HyperPod

    August 30, 2025
    Leave A Reply Cancel Reply

    For security, use of Google's reCAPTCHA service is required which is subject to the Google Privacy Policy and Terms of Use.

    Continue Reading

    How much RAM does your PC really need in 2025? I did the math for Windows and Mac users

    News & Updates

    CVE-2025-49596: Critical RCE Vulnerability in MCP Inspector Exposes AI Developer Environments

    Security

    Resources for Web Designers and Developers (March 2025

    Web Development
    Modernize On-Prem MongoDB With Google Cloud Migration Center

    Modernize On-Prem MongoDB With Google Cloud Migration Center

    Databases

    Highlights

    News & Updates

    My favorite gaming service is 40% off right now (and no, it’s not Xbox Game Pass)

    May 23, 2025

    NVIDIA GeForce Now has become my favorite gaming service, surpassing even Xbox Game Pass in…

    Powerful JavaScript Frameworks for Game Developers

    July 1, 2025

    CVE-2025-38154 – Linux Kernel BPF Sockmap Use After Free Vulnerability

    July 3, 2025

    CVE-2025-5561 – PHPGurukul Curfew e-Pass Management System SQL Injection Vulnerability

    June 4, 2025
    © DevStackTips 2025. All rights reserved.
    • Contact
    • Privacy Policy

    Type above and press Enter to search. Press Esc to cancel.