
Fine-tuning of large language models (LLMs) has emerged as a crucial technique for organizations seeking to adapt powerful foundation models (FMs) to their specific needs. Rather than training models from scratch—a process that can cost millions of dollars and require extensive computational resources—companies can customize existing models with domain-specific data at a fraction of the cost. This approach has become particularly valuable as organizations across healthcare, finance, and technology sectors look to use AI for specialized tasks while maintaining cost-efficiency. However, implementing a production-grade fine-tuning solution presents several significant challenges. Organizations must navigate complex infrastructure setup requirements, enforce robust security measures, optimize performance, and establish reliable model hosting solutions.
In this post, we present a complete solution for fine-tuning and deploying the Llama-3.2-11B-Vision-Instruct model for web automation tasks. We demonstrate how to build a secure, scalable, and efficient infrastructure using AWS Deep Learning Containers (DLCs) on Amazon Elastic Kubernetes Service (Amazon EKS). By using AWS DLCs, you can gain access to well-tested environments that come with enhanced security features and pre-installed software packages, significantly simplifying the optimization of your fine-tuning process. This approach not only accelerates development, but also provides robust security and performance in production environments.
Solution overview
In this section, we explore the key components of our architecture for fine-tuning a Meta Llama model and using it for web task automation. We explore the benefits of different components and how they interact with each other, and how we can use them to build a production-grade fine-tuning pipeline.
AWS DLCs for training and hosting AI/ML workloads
At the core of our solution are AWS DLCs, which provide optimized environments for machine learning (ML) workloads. These containers come preconfigured with essential dependencies, including NVIDIA drivers, CUDA toolkit, and Elastic Fabric Adapter (EFA) support, along with preinstalled frameworks like PyTorch for model training and hosting. AWS DLCs tackle the complex challenge of packaging various software components to work harmoniously with training scripts, so you can use optimized hardware capabilities out of the box. Additionally, AWS DLCs implement unique patching algorithms and processes that continuously monitor, identify, and address security vulnerabilities, making sure the containers remain secure and up-to-date. Their pre-validated configurations significantly reduce setup time and reduce compatibility issues that often occur in ML infrastructure setup.
AWS DLCs, Amazon EKS, and Amazon EC2 for seamless infrastructure management
We deploy these DLCs on Amazon EKS, creating a robust and scalable infrastructure for model fine-tuning. Organizations can use this combination to build and manage their training infrastructure with unprecedented flexibility. Amazon EKS handles the complex container orchestration, so you can launch training jobs that run within DLCs on your desired Amazon Elastic Compute Cloud (Amazon EC2) instance, producing a production-grade environment that can scale based on training demands while maintaining consistent performance.
AWS DLCs and EFA support for high-performance networking
AWS DLCs come with pre-configured support for EFA, enabling high-throughput, low-latency communication between EC2 nodes. An EFA is a network device that you can attach to your EC2 instance to accelerate AI, ML, and high performance computing applications. DLCs are pre-installed with EFA software that is tested and compatible with the underlying EC2 instances, so you don’t have to go through the hassle of setting up the underlying components yourself. For this post, we use setup scripts to create EKS clusters and EC2 instances that will support EFA out of the box.
AWS DLCs with FSDP for enhanced memory efficiency
Our solution uses PyTorch’s built-in support for Fully Sharded Data Parallel (FSDP) training, a cutting-edge technique that dramatically reduces memory requirements during training. Unlike traditional distributed training approaches where each GPU must hold a complete model copy, FSDP shards model parameters, optimizer states, and gradients across workers. The optimized implementation of FSDP within AWS DLCs makes it possible to train larger models with limited GPU resources while maintaining training efficiency.
For more information, see Scale LLMs with PyTorch 2.0 FSDP on Amazon EKS – Part 2.
Model deployment on Amazon Bedrock
For model deployment, we use Amazon Bedrock, a fully managed service for FMs. Although we can use AWS DLCs for model hosting, we use Amazon Bedrock for this post to demonstrate diversity in service utilization.
Web automation integration
Finally, we implement the SeeAct agent, a sophisticated web automation tool, and demonstrate its integration with our hosted model on Amazon Bedrock. This combination creates a powerful system capable of understanding visual inputs and executing complex web tasks autonomously, showcasing the practical applications of our fine-tuned model.In the following sections, we demonstrate how to:
- Set up an EKS cluster for AI workloads.
- Use AWS DLCs to fine-tune Meta Llama 3.2 Vision using PyTorch FSDP.
- Deploy the fine-tuned model on Amazon Bedrock.
- Use the model with SeeAct for web task automation.
Prerequisites
You must have the following prerequisites:
- An AWS account.
- An AWS Identity and Access Management (IAM) role with appropriate policies. Because this post deals with creating clusters, nodes, and infrastructure, administrator-level permissions would work well. However, if you must have restricted permissions, you should at least have the following permissions:
AmazonEC2FullAccess,AmazonSageMakerFullAccess,AmazonBedrockFullAccess,AmazonS3FullAccess,AWSCloudFormationFullAccess,AmazonEC2ContainerRegistryFullAccess. For more information about other IAM policies needed, see Minimum IAM policies. - The necessary dependencies installed for Amazon EKS. For instructions, see Set up to use Amazon EKS.
- For this post, we use P5 instances. To request a quota increase, see Requesting a quota increase.
- An EC2 key pair. For instructions, see Create a key pair for your Amazon EC2 instance.
Run export AWS_REGION=<region_name> in your bash script from where you are running the commands.
Set up the EKS cluster
In this section, we walk through the steps to create your EKS cluster and install the necessary plugins, operators, and other dependencies.
Create an EKS cluster
The simplest way to create an EKS cluster is to use the cluster configuration YAML file. You can use the following sample configuration file as a base and customize it as needed. Provide the EC2 key pair created as a prerequisite. For more configuration options, see Using Config Files.
Run the following command to create the EKS cluster:
eksctl create cluster --config-file cluster.yamlThe following is an example output:
Cluster creation might take between 15–30 minutes. After it’s created, your local ~/.kube/config file gets updated with connection information to your cluster.
Run the following command line to verify that the cluster is accessible:
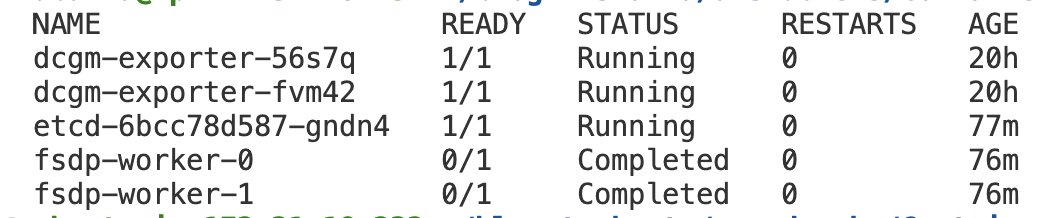
kubectl get nodes
Install plugins, operators, and other dependencies
In this step, you install the necessary plugins, operators and other dependencies on your EKS cluster. This is necessary to run the fine-tuning on the correct node and save the model.
- Install the NVIDIA Kubernetes device plugin:
- Install the AWS EFA Kubernetes device plugin:
- Delete
aws-efa-k8s-device-plugin-daemonsetby running the following command:
- Clone the code locally that with help with setup and fine-tuning:
- Install etcd for running distributed training with PyTorch:
- Deploy the FSx CSI driver for saving the model after fine-tuning:
- Enter into the
fsxfolder: - Edit the
fsx.conffile to modify theCLUSTER_NAME,CLUSTER_REGION, andCLUSTER_ZONEvalues to your cluster specific data: - Deploy the FSX CSI driver:
- Enter into the
- Deploy the Kubeflow Training Operator that will be used to run the fine-tuning job:
- Change the location to the following:
- Deploy the Kubeflow Training Operator:
- Deploy the Kubeflow MPI Operator for running NCCL tests:
- Run
deploy.shfrom the following GitHub repo. - Change the location to the following:
- Deploy the Kubeflow MPI Operator:
- Run
Fine-tune Meta Llama 3.2 Vision using DLCs on Amazon EKS
This section outlines the process for fine-tuning the Meta Llama 3.2 Vision model using PyTorch FSDP on Amazon EKS. We use the DLCs as the base image to run our training jobs.
Configure the setup needed for fine-tuning
Complete the following steps to configure the setup for fine-tuning:
- Create a Hugging Face account and get a Hugging Face security token.
- Enter into the
fsdpfolder:
- Create a Persistent Volume Claim (PVC) that will use the underlying FSx CSI driver that you installed earlier:
Monitor kubectl get pvc fsx-claim and make sure it reached BOUND status. You can then go to the Amazon EKS console to see an unnamed volume created without a name. You can let this happen in the background, but before you run the ./run.sh command to run the fine-tuning job in a later step, make sure the BOUND status is achieved.
- To configure the environment, open the .env file and modify the following variables:
HF_TOKEN: Add the Hugging Face token that you generated earlier.S3_LOCATION: Add the Amazon Simple Storage Service (Amazon S3) location where you want to store the fine-tuned model after the training is complete.
- Create the required resource YAMLs:
This line uses the values in the .env file to generate new YAML files that will eventually be used for model deployment.
- Build and push the container image:
Run the fine-tuning job
In this step, we use the upstream DLCs and add the training scripts within the image for running the training.
Make sure that you have requested access to the Meta Llama 3.2 Vision model on Hugging Face. Continue to the next step after permission has been granted.
Execute the fine-tuning job:
For our use case, the job took 1.5 hours to complete. The script uses the following PyTorch command that’s defined in the .env file within the fsdp folder:
You can use the ./logs.sh command to see the training logs in both FSDP workers.
After a successful run, logs from fsdp-worker will look as follows:
Additionally:
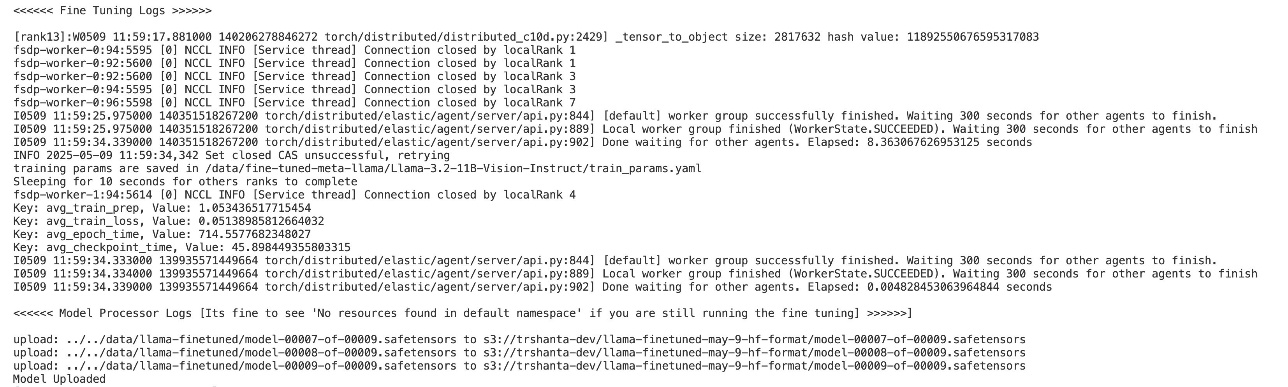
Run the processing model and store output in Amazon S3
After the jobs are complete, the fine-tuned model will exist in the FSx file system. The next step is to convert the model into Hugging Face format and save it in Amazon S3 so you can access and deploy the model in the upcoming steps:kubectl apply -f model-processor.yaml
The preceding command deploys a pod on your instance that will read the model from FSx, convert it to Hugging Face type, and push it to Amazon S3. It takes approximately 8–10 minutes for this pod to run. You can monitor the logs for this using ./logs.sh or kubectl logs -l app=model-processor.
Get the location where your model has been stored in Amazon S3. This is the same Amazon S3 location that was mentioned the .env file in an earlier step. Run the following command (provide the Amazon S3 location):aws s3 cp tokenizer_config.json <S3_LOCATION>://tokenizer_config.json
This is the tokenizer config that is needed by Amazon Bedrock to import Meta Llama models so they work with the Amazon Bedrock Converse API. For more details, see Converse API code samples for custom model import.
For this post, we use the Mind2Web dataset. We have implemented code that has been adapted from the Mind2Web code for fine-tuning. The adapted code is as follows:
Deploy the fine-tuned model on Amazon Bedrock
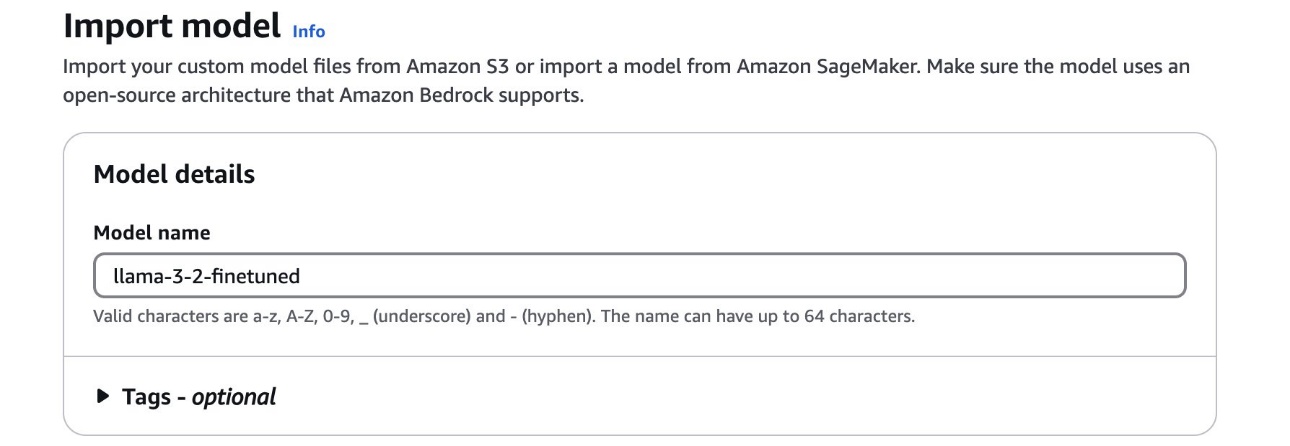
After you fine-tune your Meta Llama 3.2 Vision model, you have several options for deployment. This section covers one deployment method using Amazon Bedrock. With Amazon Bedrock, you can import and use your custom trained models seamlessly. Make sure your fine-tuned model is uploaded to an S3 bucket, and it’s converted to Hugging Face format. Complete the following steps to import your fine-tuned Meta Llama 3.2 Vision model:
- On the Amazon Bedrock console, under Foundation models in the navigation pane, choose Imported models.
- Choose Import model.
- For Model name, enter a name for the model.
- For Model import source, select Amazon S3 bucket.
- For S3 location, enter the location of the S3 bucket containing your fine-tuned model.
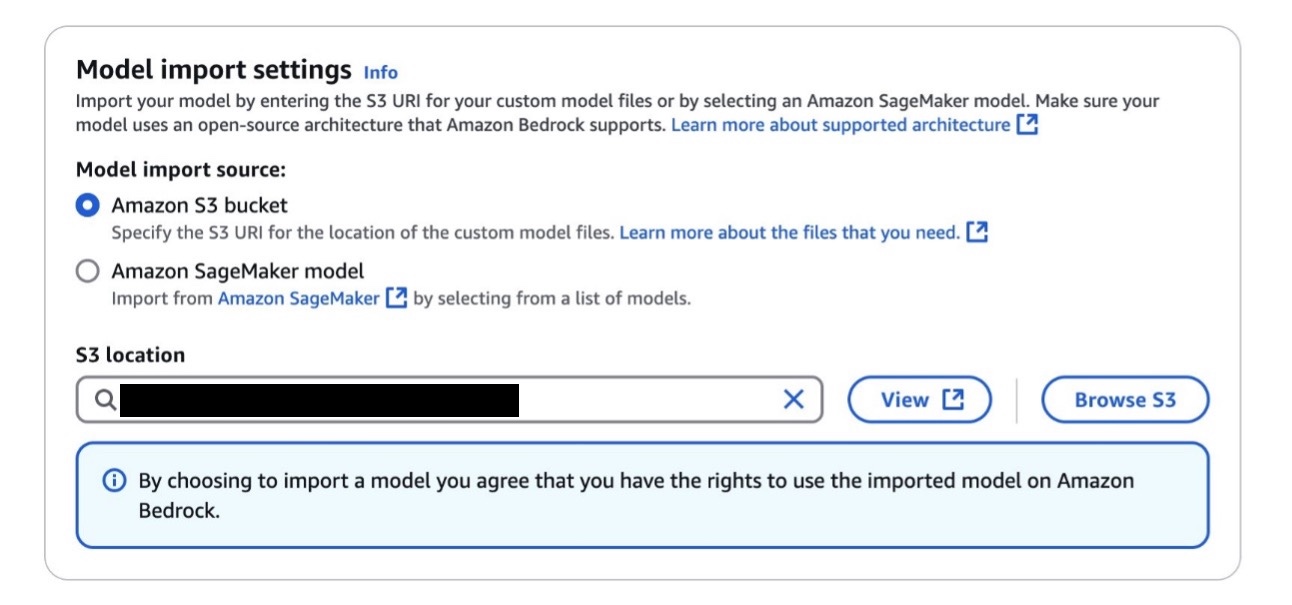
- Configure additional model settings as needed, then import your model.
The process might take 10–15 minutes depending on the model size to complete.
After you import your custom model, you can invoke it using the same Amazon Bedrock API as the default Meta Llama 3.2 Vision model. Just replace the model name with your imported model’s Amazon Resource Name (ARN). For detailed instructions, refer to Amazon Bedrock Custom Model Import.
You can follow the prompt formats mentioned in the following GitHub repo. For example:
What are the steps to build a docker image?<|eot_id|><|start_header_id|>assistant<|end_header_id|>
Run the agent workload using the hosted Amazon Bedrock model
Running the agent workload involves using the SeeAct framework and browser automation to start an interactive session with the AI agent and perform the browser operations. We recommend completing the steps in this section on a local machine for browser access.
Clone the SeeAct repository
Clone the customized SeeAct repository, which contains example code that can work with Amazon Bedrock, as well as a couple of test scripts:
Set up SeeAct in a local runtime environment
Complete the following steps to set up SeeAct in a local runtime environment:
- Create a Python virtual environment for this demo. We use Python 3.11 in the example, but you can change to other Python versions.
- Apply a patch to add the code change needed for this demo:
- Run the following commands to install the SeeAct package and dependencies:
Make sure you’re using the latest version of Boto3 for these steps.
Validate the browser automation tool used by SeeAct
We added a small Python script to verify the functionality of Playwright, the browser automation tool used by SeeAct:
You should see a browser launched and closed after a few seconds. You should also see a screenshot being captured in SeeAct/src/example.png showing google.com.

Test Amazon Bedrock model availability
Modify the content of test_bedrock.py. Update the MODEL_ID to be your hosted Amazon Bedrock model ARN and set up the AWS connection.
Run the test:
After a successful invocation, you should see a log similar to the following in your terminal:
If the botocore.errorfactory.ModelNotReadyException error occurs, retry the command in a few minutes.
Run the agent workflow
The branch has already added support for BedrockEngine and SGLang for running inference with the fine-tuned Meta Llama 3.2 Vision model. The default option uses Amazon Bedrock inference.
To run the agent workflow, update self.model from src/demo_utils/inference_engine.py at line 229 to your Amazon Bedrock model ARN. Then run the following code:
This will launch a terminal prompt like the following code, so you can input the task you want the agent to do:
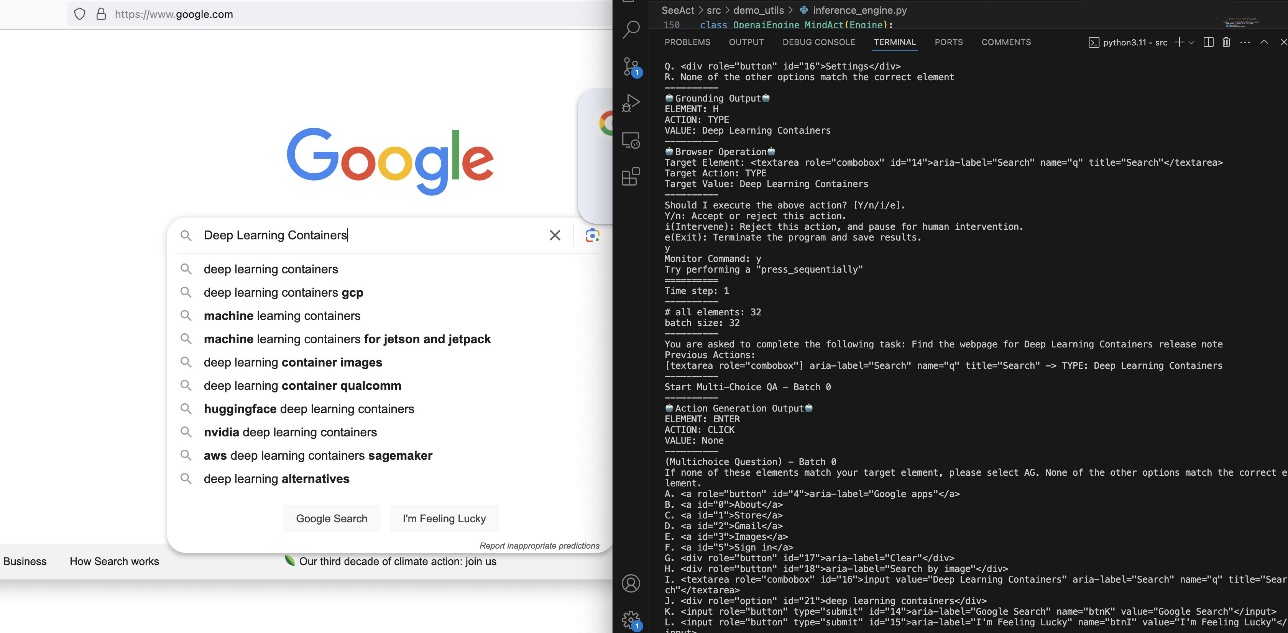
In the following screenshot, we asked the agent to search for the website for DLCs.
Clean up
Use the following code to clean the resources you created as part of this post:
To stop the P5 nodes and release them, complete the following steps:
- On the Amazon EKS console, choose Clusters in the navigation pane.
- Choose the cluster that contains your node group.
- On the cluster details page choose the Compute tab.
- In the Node groups section, select your node group, then choose Edit.
- Set the desired size to 0.
Conclusion
In this post, we presented an end-to-end workflow for fine-tuning and deploying the Meta Llama 3.2 Vision model using the production-grade infrastructure of AWS. By using AWS DLCs on Amazon EKS, you can create a robust, secure, and scalable environment for model fine-tuning. The integration of advanced technologies like EFA support and FSDP training enables efficient handling of LLMs while optimizing resource usage. The deployment through Amazon Bedrock provides a streamlined path to production, and the integration with SeeAct demonstrates practical applications in web automation tasks. This solution serves as a comprehensive reference point for engineers to develop their own specialized AI applications, adapt the demonstrated approaches, and implement similar solutions for web automation, content analysis, or other domain-specific tasks requiring vision-language capabilities.
To get started with your own implementation, refer to our GitHub repo. To learn more about AWS DLCs, see the AWS Deep Learning Containers Developer Guide. For more details about Amazon Bedrock, see Getting started with Amazon Bedrock.
For deeper insights into related topics, refer to the following resources:
- Scale LLMs with PyTorch 2.0 FSDP on Amazon EKS – Part 2
- Build high-performance ML models using PyTorch 2.0 on AWS – Part 1
- Mind2Web dataset
Need help or have questions? Join our AWS Machine Learning community on Discord or reach out to AWS Support. You can also stay updated with the latest developments by following the AWS Machine Learning Blog.
About the Authors
 Shantanu Tripathi is a Software Development Engineer at AWS with over 4 years of experience in building and optimizing large-scale AI/ML solutions. His experience spans developing distributed AI training libraries, creating and launching DLCs and Deep Learning AMIs, designing scalable infrastructure for high-performance AI workloads, and working on generative AI solutions. He has contributed to AWS services like Amazon SageMaker HyperPod, AWS DLCs, and DLAMIs, along with driving innovations in AI security. Outside of work, he enjoys theater and swimming.
 Junpu Fan is a Senior Software Development Engineer at Amazon Web Services, specializing in AI/ML Infrastructure. With over 5 years of experience in the field, Junpu has developed extensive expertise across the full cycle of AI/ML workflows. His work focuses on building robust systems that power ML applications at scale, helping organizations transform their data into actionable insights.
 Harish Rao is a Senior Solutions Architect at AWS, specializing in large-scale distributed AI training and inference. He helps customers harness the power of AI to drive innovation and solve complex challenges. Outside of work, Harish embraces an active lifestyle, enjoying the tranquility of hiking, the intensity of racquetball, and the mental clarity of mindfulness practices.
 Arindam Paul is a Sr. Product Manager in SageMaker AI team at AWS responsible for Deep Learning workloads on SageMaker, EC2, EKS, and ECS. He is passionate about using AI to solve customer problems. In his spare time, he enjoys working out and gardening.
Source: Read MoreÂ

