
This post is cowritten with Siddhant Waghjale and Samuel Barry from Mistral AI.
Model Context Protocol (MCP) is a standard that has been gaining significant traction in recent months. At a high level, it consists of a standardized interface designed to streamline and enhance how AI models interact with external data sources and systems. Instead of hardcoding retrieval and action logic or relying on one-time tools, MCP offers a structured way to pass contextual data (for example, user profiles, environment metadata, or third-party content) into a large language model (LLM) context and to route model outputs to external systems. For developers, MCP abstracts away integration complexity and creates a unified layer for injecting external knowledge and executing model actions, making it more straightforward to build robust and efficient agentic AI systems that remain decoupled from data-fetching logic.
Mistral AI is a frontier research lab that emerged in 2023 as a leading open source contender in the field of generative AI. Mistral has released many state-of-the-art models, from Mistral 7B and Mixtral in the early days up to the recently announced Mistral Medium 3 and Small 3—effectively popularizing the mixture of expert architecture along the way. Mistral models are generally described as extremely efficient and versatile, frequently reaching state-of-the-art levels of performance at a fraction of the cost. These models are now seamlessly integrated into Amazon Web Services (AWS) services, unlocking powerful deployment options for developers and enterprises. Through Amazon Bedrock, users can access Mistral models using a fully managed API, enabling rapid prototyping without managing infrastructure. Amazon Bedrock Marketplace further extends this by allowing quick model discovery, licensing, and integration into existing workflows. For power users seeking fine-tuning or custom training, Amazon SageMaker JumpStart offers a streamlined environment to customize Mistral models with their own data, using the scalable infrastructure of AWS. This integration makes it faster than ever to experiment, scale, and productionize Mistral models across a wide range of applications.
This post demonstrates building an intelligent AI assistant using Mistral AI models on AWS and MCP, integrating real-time location services, time data, and contextual memory to handle complex multimodal queries. This use case, restaurant recommendations, serves as an example, but this extensible framework can be adapted for enterprise use cases by modifying MCP server configurations to connect with your specific data sources and business systems.
Solution overview
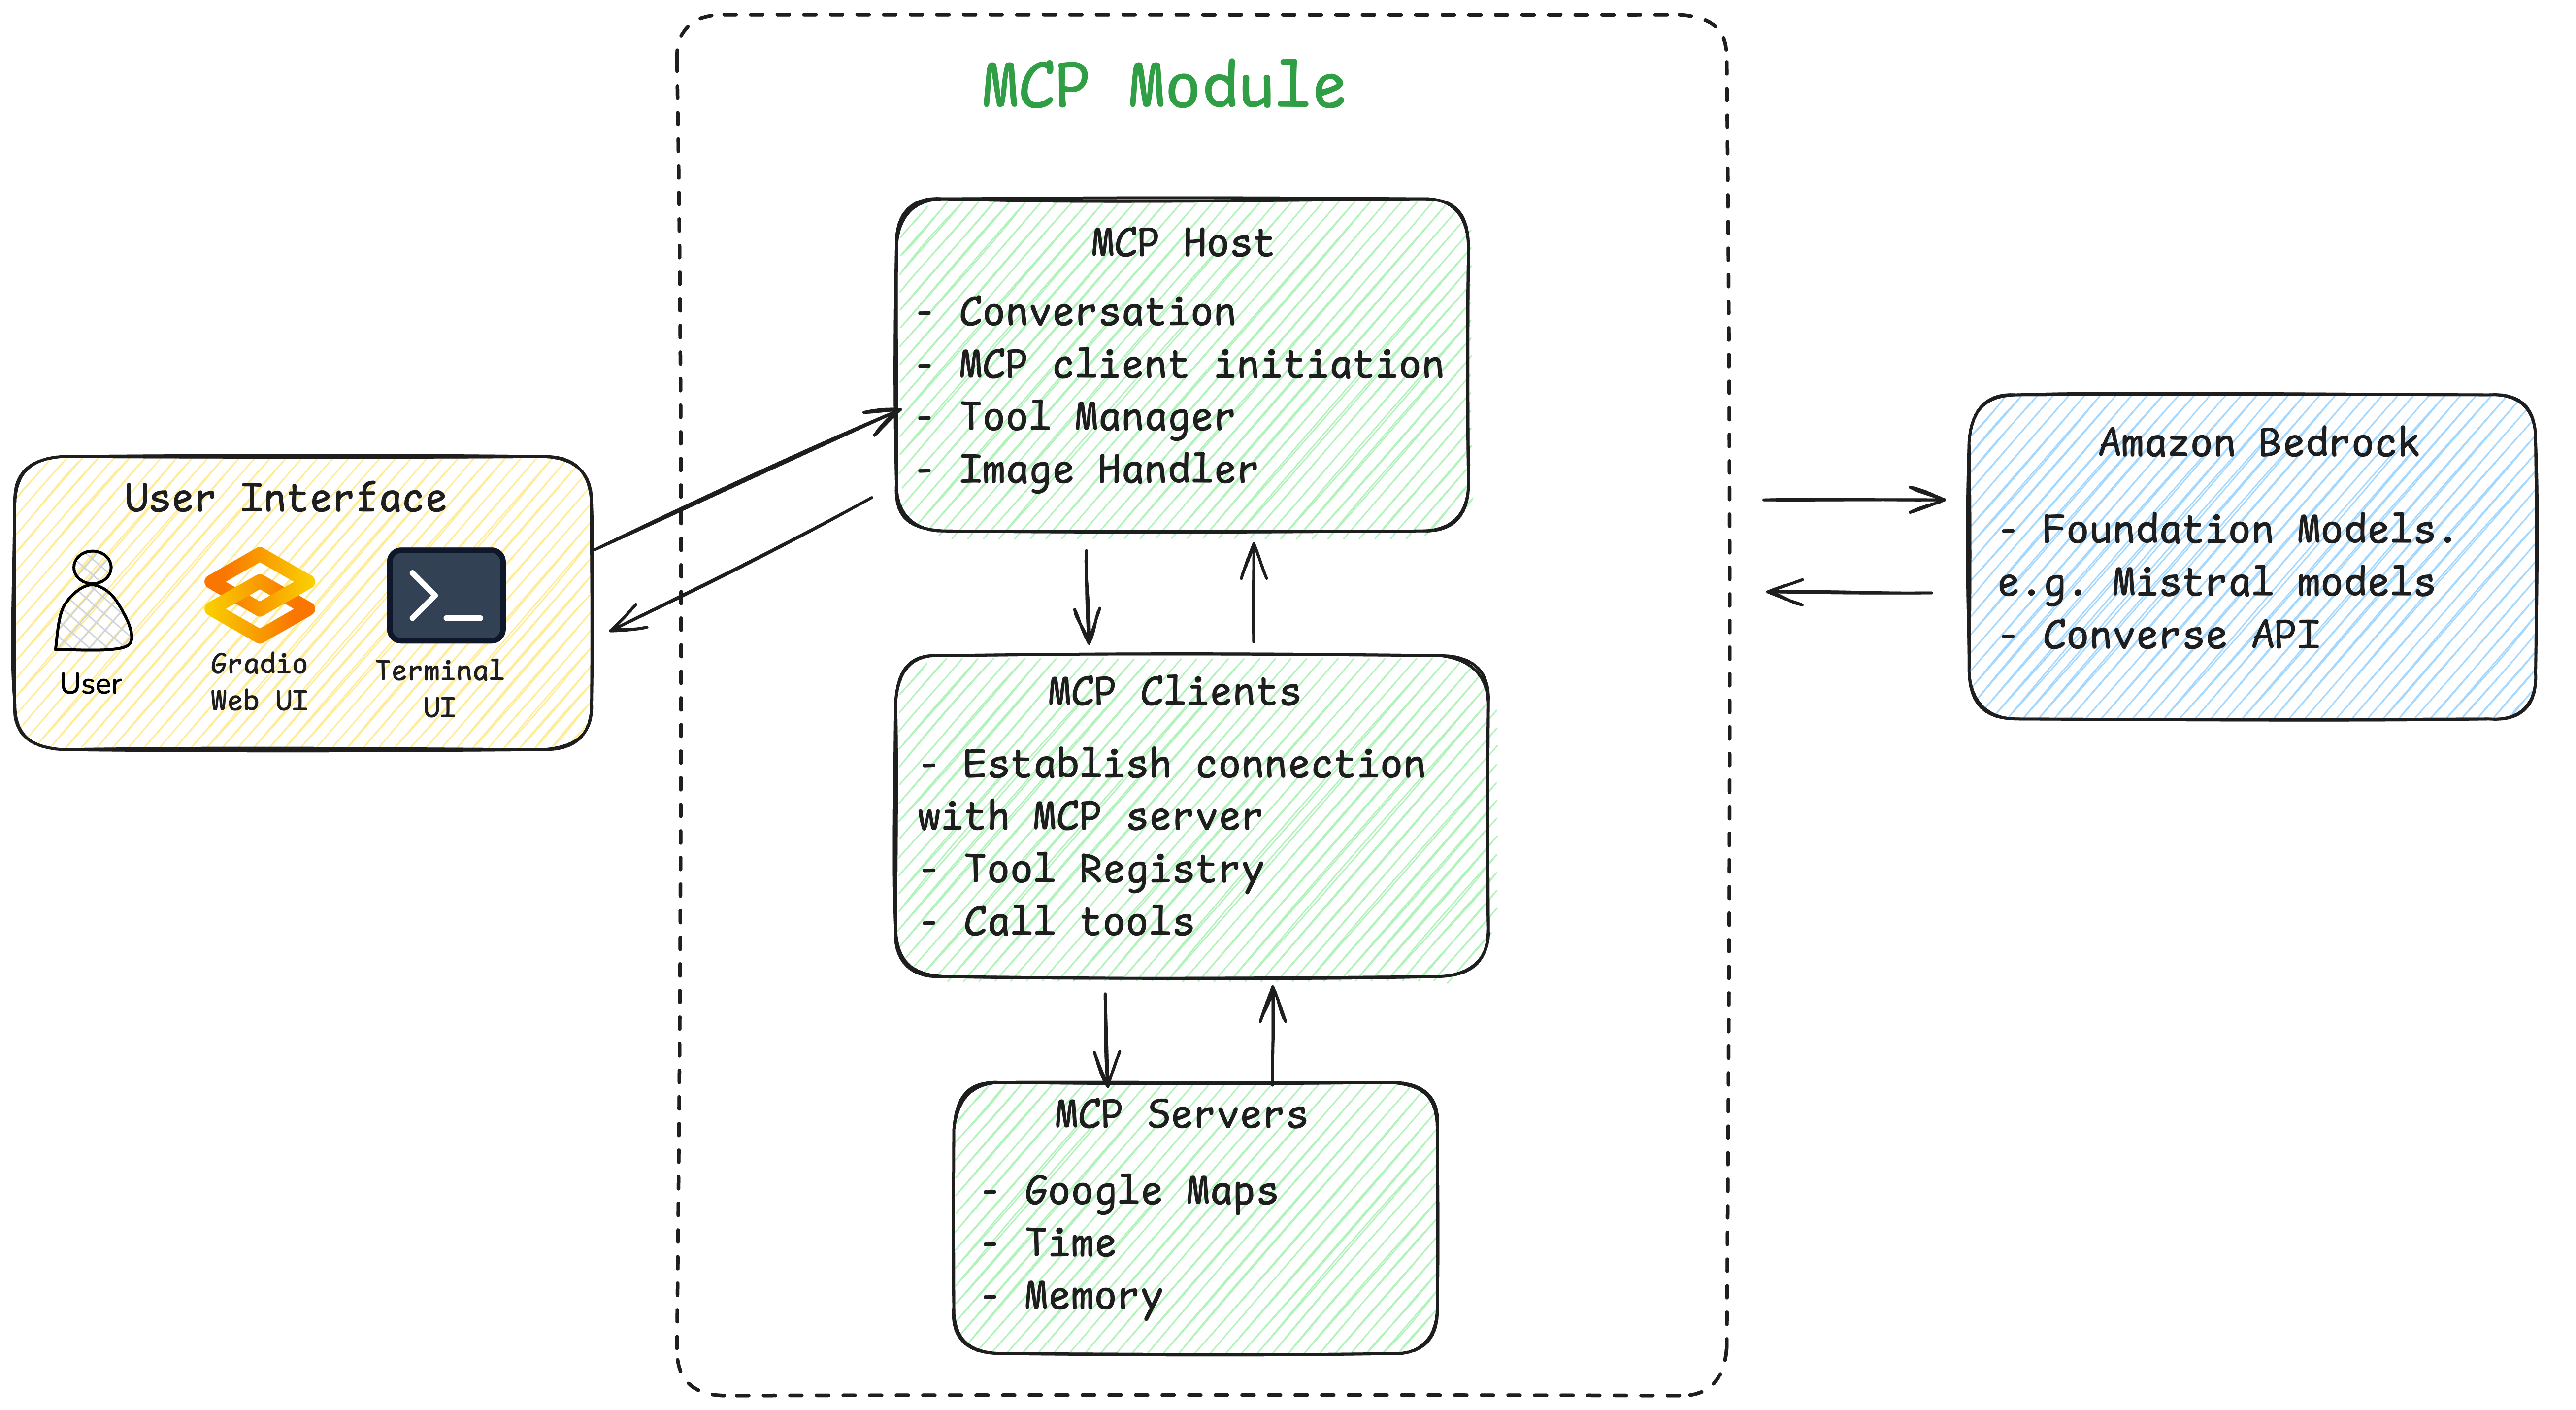
This solution uses Mistral models on Amazon Bedrock to understand user queries and route the query to relevant MCP servers to provide accurate and up-to-date answers. The system follows this general flow:
- User input – The user sends a query (text, image, or both) through either a terminal-based or web-based Gradio interface
- Image processing – If an image is detected, the system processes and optimizes it for the AI model
- Model request – The query is sent to the Amazon Bedrock Converse API with appropriate system instructions
- Tool detection – If the model determines it needs external data, it requests a tool invocation
- Tool execution – The system routes the tool request to the appropriate MCP server and executes it
- Response generation – The model incorporates the tool’s results to generate a comprehensive response
- Response delivery – The final answer is displayed to the user
In this example, we demonstrate the MCP framework using a general use case of restaurant or location recommendation and route planning. Users can provide multimodal input (such as text plus image), and the application integrates Google Maps, Time, and Memory MCP servers. Additionally, this post showcases how to use the Strands Agent framework as an alternative approach to build the same MCP application with significantly reduced complexity and code. Strands Agent is an open source, multi-agent coordination framework that simplifies the development of intelligent, context-aware agent systems across various domains. You can build your own MCP application by modifying the MCP server configurations to suit your specific needs. You can find the complete source code for this example in our Git repository. The following diagram is the solution architecture.
Prerequisites
Before implementing the example, you need to set up the account and environment. Use the following steps.To set up the AWS account :
- Create an AWS account. If you don’t already have one, sign up at https://aws.amazon.com
- To enable Amazon Bedrock access, go to the Amazon Bedrock console and request access to the models you plan to use (for this walkthrough, request access to Mistral Pixtral Large). Or deploy Mistral Small 3 model from Amazon Bedrock Marketplace. (For more details, refer to the Mistral Model Deployments on AWS section later in this post.) When your request is approved, you’ll be able to use these models through the Amazon Bedrock Converse API
To set up the local environment:
- Install the required tools:
- Python 3.10 or later
- Node.js (required for MCP tool servers)
- AWS Command Line Interface (AWS CLI), which is needed for configuration
- Clone the Repository:
- Install Python dependencies:
- Configure AWS credentials:
Then enter your AWS access key ID, secret access key, and preferred AWS Region.
- Set up MCP tool servers. The server configurations are provided in file:
server_configs.py. The system uses Node.js-based MCP servers. They’ll be installed automatically when you run the application for the first time using NPM. You can add other MCP server configurations in this file. This solution can be quickly modified and extended to meet your business requirements.
Mistral model deployments on AWS
Mistral models can be accessed or deployed using the following methods. To use foundation models (FMs) in MCP applications, the models must support tool use functionality.
Amazon Bedrock serverless (Pixtral Large)
To enable this model, follow these steps:
- Go to the Amazon Bedrock console.
- From the left navigation pane, select Model access.
- Choose Manage model access.
- Search for the model using the keyword Pixtral, select it, and choose Next, as shown in the following screenshot. The model will then be ready to use.
This model has cross-Region inference enabled. When using the model ID, always add the Region prefix eu or us before the model ID, such as eu.mistral.pixtral-large-2502-v1:0. Provide this model ID in config.py. You can now test the example with the Gradio web-based app.

Amazon Bedrock Marketplace (Mistral-Small-24B-Instruct-2501)
Amazon Bedrock Marketplace and SageMaker JumpStart deployments are dedicated instances (serverful) and incur charges as long as the instance remains deployed. For more information, refer to Amazon Bedrock pricing and Amazon SageMaker pricing.
To enable this model, follow these steps:
- Go to the Amazon Bedrock console
- In the left navigation pane, select Model catalog
- In the search bar, search for “Mistral-Small-24B-Instruct-25-1,” as shown in the following screenshot
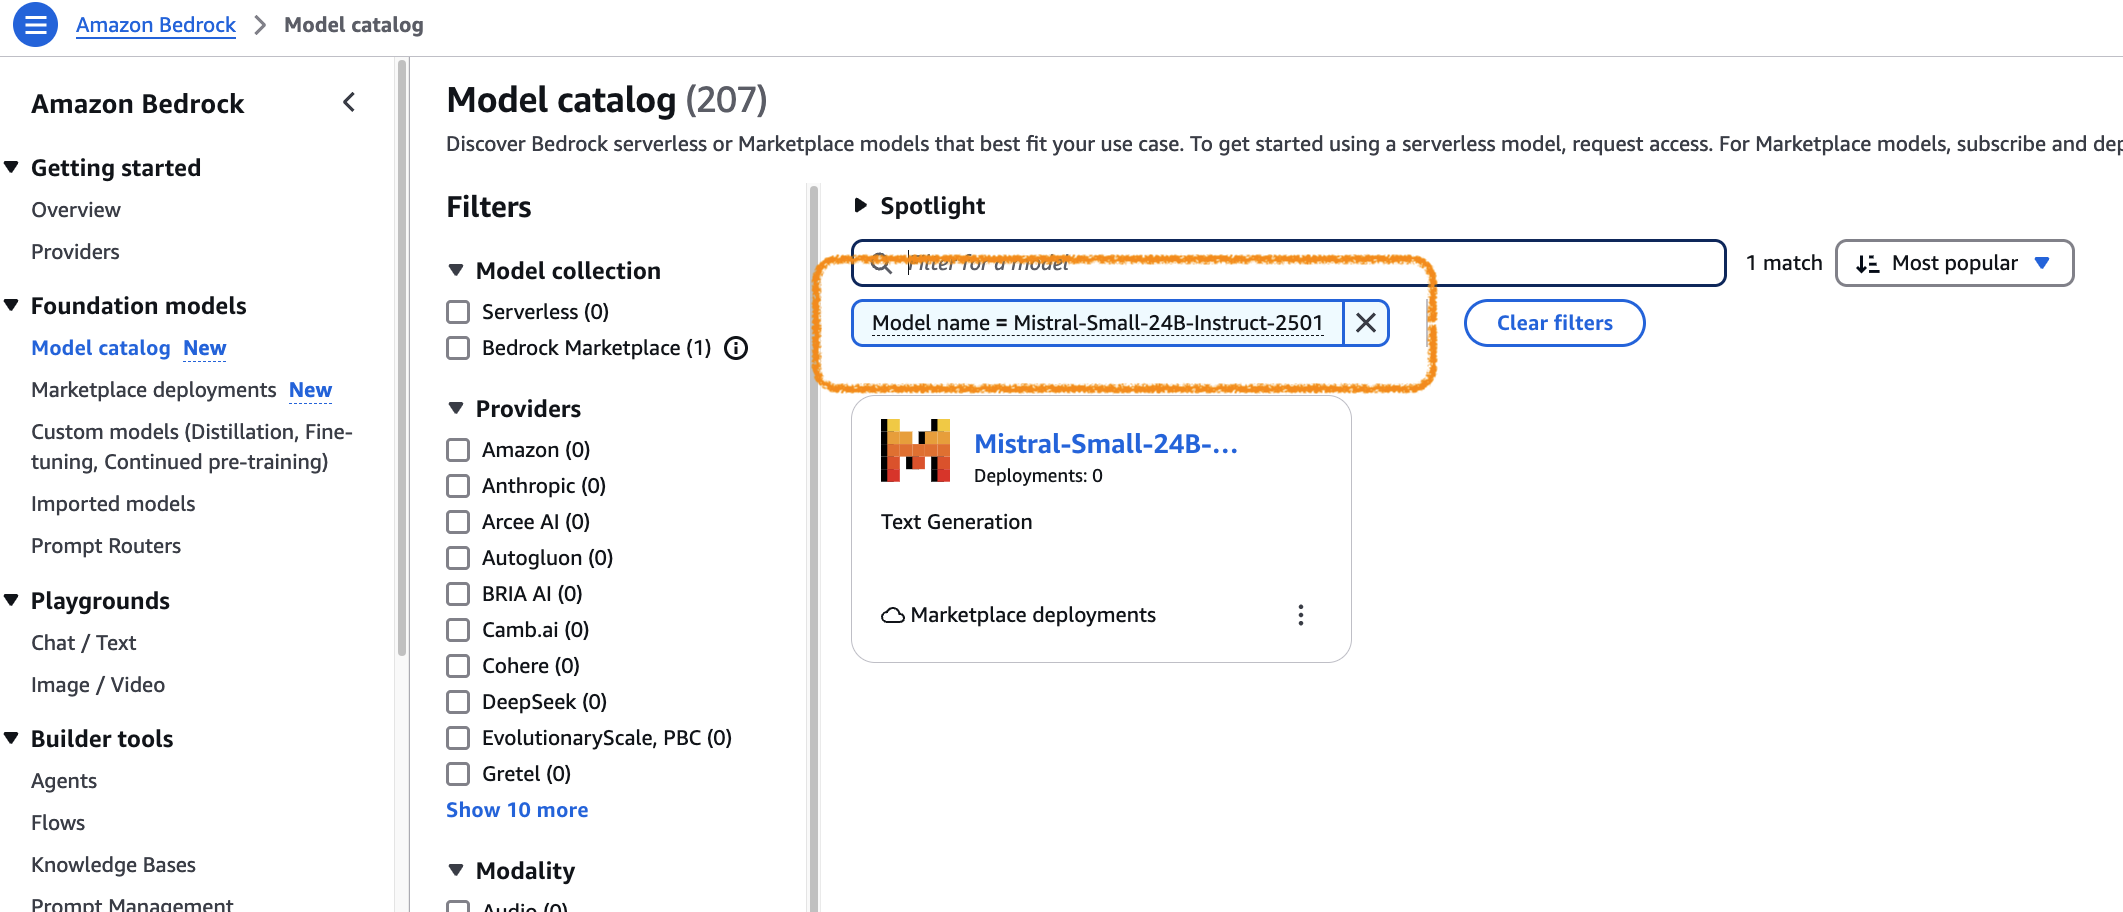
- Select the model and select Deploy.
- In the configuration page, you can keep all fields as default. This endpoint requires an instance type ml.g6.12xlarge. Check service quotas under the Amazon SageMaker service to make sure you have more than two instances available for endpoint usage (you’ll use another instance for Amazon SageMaker JumpStart deployment). If you don’t have more than two instances, request a quota increase for this instance type. Then choose Deploy. The model deployment might take a few minutes.
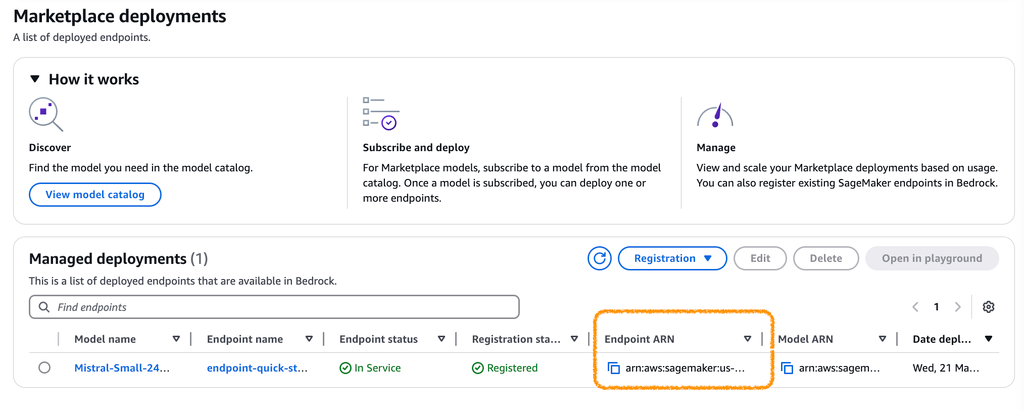
- When the model is in service, copy the endpoint Amazon Resource Name (ARN), as shown in the following screenshot, and add it to the config.py file in the
model_idfield. Then you can test the solution with the Gradio web-based app. - The Mistral-Small-24B-Instruct-25-1 model doesn’t support image input, so only text-based Q&A is supported.
Amazon SageMaker JumpStart (Mistral-Small-24B-Instruct-2501)
To enable this model, follow these steps:
- Go to the Amazon SageMaker console
- Create a domain and user profile
- Under the created user profile, launch Studio
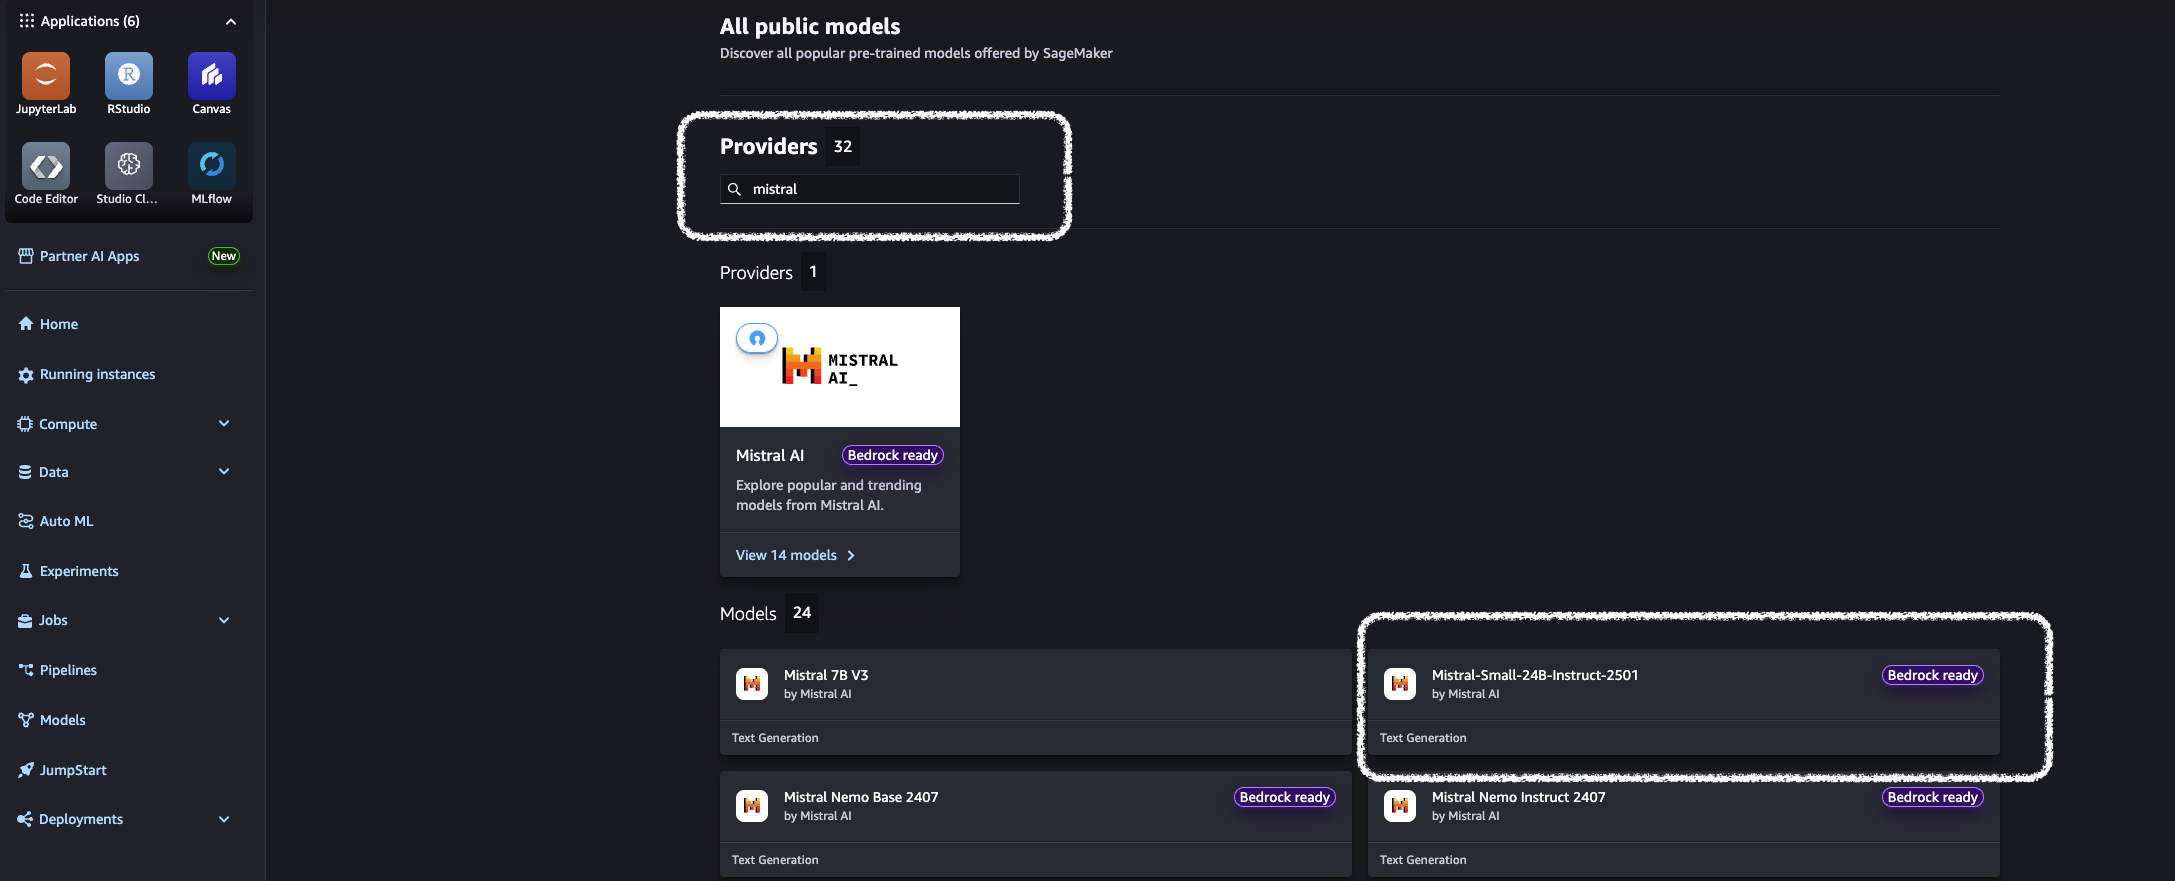
- In the left navigation pane, select JumpStart, then search for “Mistral”
- Select Mistral-Small-24B-Instruct-2501, then choose Deploy
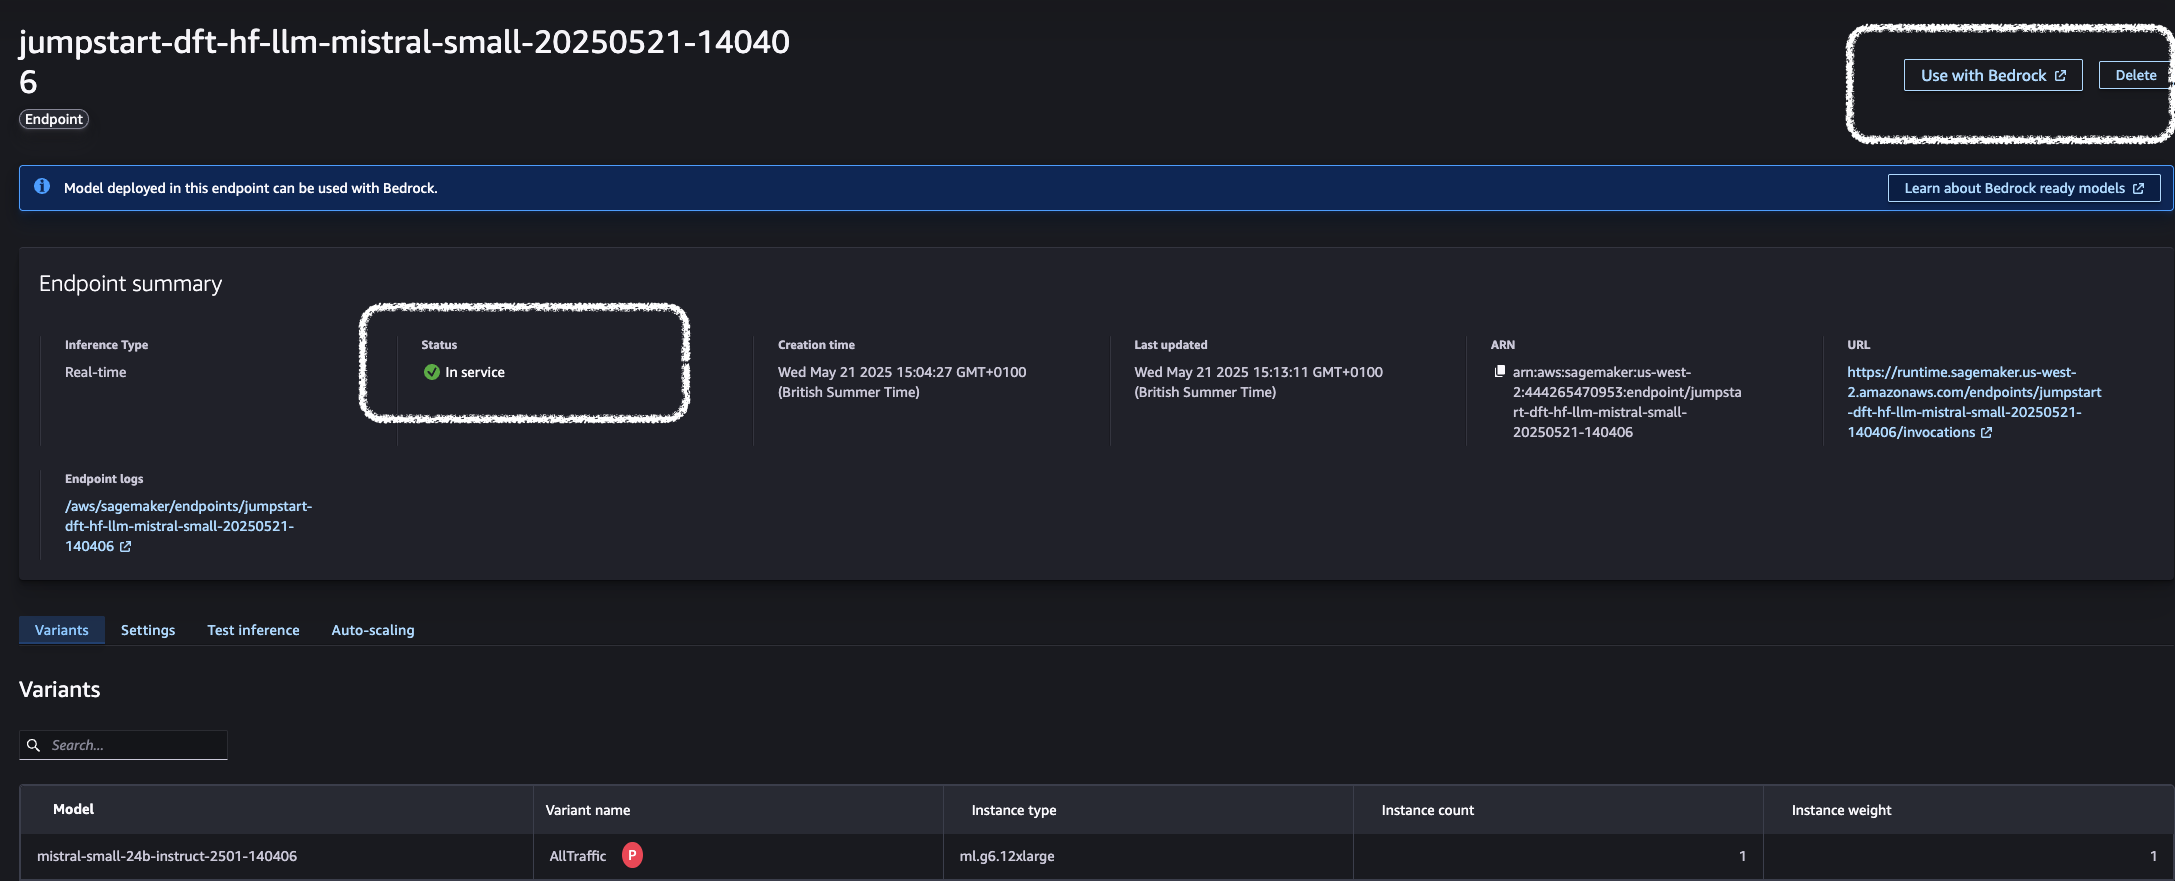
This deployment might take a few minutes. The following screenshot shows that this model is marked as Bedrock ready. This means you can register this model as an Amazon Bedrock Marketplace deployment and use Amazon Bedrock APIs to invoke this Amazon SageMaker endpoint.
- After the model is in service, copy its endpoint ARN from the Amazon Bedrock Marketplace deployment, as shown in the following screenshot, and provide it to the config.py file in the
model_idfield. Then you can test the solution with the Gradio web-based app.
The Mistral-Small-24B-Instruct-25-1 model doesn’t support image input, so only text-based Q&A is supported.
Build an MCP application with Mistral models on AWS
The following sections provide detailed insights into building MCP applications from the ground up using a component-level approach. We explore how to implement the three core MCP components, MCP host, MCP client, and MCP servers, giving you complete control and understanding of the underlying architecture.
MCP host component
The MCP is designed to facilitate seamless interaction between AI models and external tools, systems, and data sources. In this architecture, the MCP host plays a pivotal role in managing the lifecycle and orchestration of MCP clients and servers, enabling AI applications to access and utilize external resources effectively. The MCP host is responsible for integration with FMs, providing context, capabilities discovery, initialization, and MCP client management. In this solution, we have three files to provide this capability.
The first file is agent.py. The BedrockConverseAgent class in agent.py is the core component that manages communication with the Amazon Bedrock service and provides the FM models integration. The constructor initializes the agent with model settings and sets up the AWS Bedrock client.
Then, the agent intelligently handles multimodal inputs with its image processing capabilities. This method validates image URLs provided by the user, downloads images, detects and normalizes image formats, resizes large images to meet API constraints, and converts incompatible formats to JPEG.
When users enter a prompt, the agent detects whether it contains an uploaded image or an image URL and processes it accordingly in the invoke_with_prompt function. This way, users can paste an image URL in their query or upload an image from their local device and have it analyzed by the AI model.
The most powerful feature is the agent’s ability to use external tools provided by MCP servers. When the model wants to use a tool, the agent detects the tool_use stop reason from Amazon Bedrock and extracts tool request details, including names and inputs. It then executes the tool through the UtilityHelper, and the tool use results are returned back to the model. The MCP host then continues the conversation with the tool results incorporated.
The second file is utility.py. The UtilityHelper class in utility.py serves as a bridge between Amazon Bedrock and external tools. It manages tool registration, formatting tool specifications for Bedrock compatibility, and tool execution.
For Amazon Bedrock to understand available tools from MCP servers, the utility module generates tool specifications by providing name, description, and inputSchema in the following function:
When the model requests a tool, the utility module executes it and formats the result:
The final component in the MCP host is the gradio_app.py file, which implements a web-based interface for our AI assistant using Gradio. First, it initializes the model configurations and the agent, then connects to MCP servers and retrieves available tools from the MCP servers.
When a user sends a message, the app processes it through the agent invoke_with_prompt() function. The response from the model is displayed on the Gradio GUI:
MCP client implementation
MCP clients serve as intermediaries between the AI model and the MCP server. Each client maintains a one-to-one session with a server, managing the lifecycle of interactions, including handling interruptions, timeouts, and reconnections. MCP clients route protocol messages bidirectionally between the host application and the server. They parse responses, handle errors, and make sure that the data is relevant and appropriately formatted for the AI model. They also facilitate the invocation of tools exposed by the MCP server and manage the context so that the AI model has access to the necessary resources and tools for its tasks.
The following function in the mcpclient.py file is designed to establish connections to MCP servers and manage connection sessions.
After it’s connected with MCP servers, the client lists available tools from each MCP server with their specifications:
When a tool is defined and called, the client first validates the session is active, then executes the tool through the MCP session that is established between client and server. Finally, it returns the structured response.
MCP server configuration
The server_configs.py file defines the MCP tool servers that our application will connect to. This configuration sets up Google Maps MCP server with an API key, adds a time server for date and time operations, and includes a memory server for storing conversation context. Each server is defined as a StdioServerParameters object, which specifies how to launch the server process using Node.js (using npx). You can add or remove MCP server configurations based on your application objectives and requirements.
Alternative implementation: Strands Agent framework
For developers seeking a more streamlined approach to building MCP-powered applications, the Strands Agents framework provides an alternative that significantly reduces implementation complexity while maintaining full MCP compatibility. This section demonstrates how the same functionality can be achieved with substantially less code using Strands Agents. The code sample is available in this Git repository.
First, initialize the model and provide the Mistral model ID on Amazon Bedrock.
The following code creates multiple MCP clients from server configurations, automatically manages their lifecycle using context managers, collects available tools from each client, and initializes an AI agent with the unified set of tools.
The following function processes user messages with optional image inputs by formatting them for multimodal AI interaction, sending them to an agent that handles tool routing and response generation, and returning the agent’s text response:
The Strands Agents approach streamlines MCP integration by reducing code complexity, automating resource management, and unifying tools from multiple servers into a single interface. It also offers built-in error handling and native multimodal support, minimizing manual effort and enabling more robust, efficient development.
Demo
This demo showcases an intelligent food recognition application with integrated location services. Users can submit an image of a dish, and the AI assistant:
-
- Accurately identifies the cuisine from the image
- Provides restaurant recommendations based on the identified food
- Offers route planning powered by the Google Maps MCP server
The application demonstrates sophisticated multi-server collaboration to answer complex queries such as “Is the restaurant open when I arrive?” To answer this, the system:
- Determines the current time in the user’s location using the time MCP server
- Retrieves restaurant operating hours and calculates travel time using the Google Maps MCP server
- Synthesizes this information to provide a clear, accurate response
We encourage you to modify the solution by adding additional MCP server configurations tailored to your specific personal or business requirements.
Clean up
When you finish experimenting with this example, delete the SageMaker endpoints that you created in the process:
- Go to Amazon SageMaker console
- In the left navigation pane, choose Inference and then choose Endpoints
- From the endpoints list, delete the ones that you created from Amazon Bedrock Marketplace and SageMaker JumpStart.
Conclusion
This post covers how integrating MCP with Mistral AI models on AWS enables the rapid development of intelligent applications that interact seamlessly with external systems. By standardizing tool use, developers can focus on core logic while keeping AI reasoning and tool execution cleanly separated, improving maintainability and scalability. The Strands Agent framework enhances this by streamlining implementation without sacrificing MCP compatibility. With AWS offering flexible deployment options, from Amazon Bedrock to Amazon Bedrock Marketplace and SageMaker, this approach balances performance and cost. The solution demonstrates how even lightweight setups can connect AI to real-time services.
We encourage developers to build upon this foundation by incorporating additional MCP servers tailored to their specific requirements. As the landscape of MCP-compatible tools continues to expand, organizations can create increasingly sophisticated AI assistants that effectively reason over external knowledge and take meaningful actions, accelerating the adoption of practical, agentic AI systems across industries while reducing implementation barriers.
Ready to implement MCP in your own projects? Explore the official AWS MCP server repository for examples and reference implementations. For more information about the Strands Agents framework, which simplifies agent building with its intuitive, code-first approach to data source integration, visit Strands Agent. Finally, dive deeper into open protocols for agent interoperability in the recent AWS blog post: Open Protocols for Agent Interoperability, which explores how these technologies are shaping the future of AI agent development.
About the authors
 Ying Hou, PhD, is a Sr. Specialist Solution Architect for Gen AI at AWS, where she collaborates with model providers to onboard the latest and most intelligent AI models onto AWS platforms. With deep expertise in Gen AI, ASR, computer vision, NLP, and time-series forecasting models, she works closely with customers to design and build cutting-edge ML and GenAI applications.
 Siddhant Waghjale, is an Applied AI Engineer at Mistral AI, where he works on challenging customer use cases and applied science, helping customers achieve their goals with Mistral models. He’s passionate about building solutions that bridge AI capabilities with actual business applications, specifically in agentic workflows and code generation.
 Samuel Barry is an Applied AI Engineer at Mistral AI, where he helps organizations design, deploy, and scale cutting-edge AI systems. He partners with customers to deliver high-impact solutions across a range of use cases, including RAG, agentic workflows, fine-tuning, and model distillation. Alongside engineering efforts, he also contributes to applied research initiatives that inform and strengthen production use cases.
 Preston Tuggle is a Sr. Specialist Solutions Architect with the Third-Party Model Provider team at AWS. He focuses on working with model providers across Amazon Bedrock and Amazon SageMaker, helping them accelerate their go-to-market strategies through technical scaling initiatives and customer engagement.
Source: Read MoreÂ

