
The Agent-to-Agent (A2A) protocol is a new standard by Google that enables AI agents—regardless of their underlying framework or developer—to communicate and collaborate seamlessly. It works by using standardized messages, agent cards (which describe what an agent can do), and task-based execution, allowing agents to interact via HTTP without custom integration logic. A2A makes it easier to build scalable, interoperable multi-agent systems by abstracting away the complexities of communication.
In this tutorial, we’ll implement a simple demo agent that returns a random number, helping you understand the core structure and flow of the A2A protocol through hands-on code.
Setting up the dependencies
We will first set up our environment and start with installing the uv package manager. For Mac or Linux:
curl -LsSf https://astral.sh/uv/install.sh | sh For Windows (PowerShell):
powershell -ExecutionPolicy ByPass -c "irm https://astral.sh/uv/install.ps1 | iex"We will then create a new project directory and initialize it with uv
uv init a2a-demo
cd a2a-demo
We can now create and activate a virtual environment. For Mac or Linux:
uv venv
source .venv/bin/activate
For Windows:
uv venv
.venvScriptsactivate
We will now install the required dependencies
uv add a2a-sdk python-a2a uvicornImplementing the Core Building Blocks
Agent Executor (agent_executor.py)
In this step, we implement the core logic of our agent by creating an Agent Executor, which is responsible for handling incoming requests and returning responses in the A2A format. The RandomNumberAgentExecutor wraps a simple RandomNumberAgent that generates a random number between 1 and 100. When a request comes in, the execute method calls the agent’s logic and pushes the result into the event queue as a standardized A2A message. This setup forms the backend logic that A2A clients can interact with. Check out the Full Codes on GitHub
import random
from a2a.server.agent_execution import AgentExecutor
from a2a.server.agent_execution.context import RequestContext
from a2a.server.events.event_queue import EventQueue
from a2a.utils import new_agent_text_message
from pydantic import BaseModel


class RandomNumberAgent(BaseModel):
    """Generates a random number between 1 and 100"""

    async def invoke(self) -> str:
        number = random.randint(1, 100)
        return f"Random number generated: {number}"


class RandomNumberAgentExecutor(AgentExecutor):

    def __init__(self):
        self.agent = RandomNumberAgent()

    async def execute(self, context: RequestContext, event_queue: EventQueue):
        result = await self.agent.invoke()
        await event_queue.enqueue_event(new_agent_text_message(result))

    async def cancel(self, context: RequestContext, event_queue: EventQueue):
        raise Exception("Cancel not supported")
Setting Up the A2A Server and Agent Card (main.py)
In this section, we define the metadata that describes what our agent can do — this is called the Agent Card. Think of it as the agent’s business card, containing information like its name, description, available skills, input/output types, and version.
We also register the agent’s skills, which define the kind of tasks it can handle. In our case, it includes a skill to generate a random number, tagged appropriately and with example prompts.
Once the metadata is ready, we configure the A2A server using A2AStarletteApplication. We provide the agent card and connect it with our custom agent logic using a DefaultRequestHandler, which uses the RandomNumberAgentExecutor we implemented earlier. Finally, we run the server using uvicorn so the agent can start listening for incoming A2A messages on port 9999.
This setup enables our agent to receive standardized A2A messages, process them, and respond in a structured way — following the A2A protocol. Check out the Full Codes on GitHub
import uvicorn
from a2a.server.apps import A2AStarletteApplication
from a2a.server.request_handlers import DefaultRequestHandler
from a2a.server.tasks import InMemoryTaskStore
from a2a.types import AgentCapabilities, AgentCard, AgentSkill
from agent_executor import RandomNumberAgentExecutor


def main():
    # Define the skill metadata
    skill = AgentSkill(
        id="random_number",
        name="Random Number Generator",
        description="Generates a random number between 1 and 100",
        tags=["random", "number", "utility"],
        examples=["Give me a random number", "Roll a number", "Random"],
    )

    # Define the agent metadata
    agent_card = AgentCard(
        name="Random Number Agent",
        description="An agent that returns a random number between 1 and 100",
        url="http://localhost:9999/",
        defaultInputModes=["text"],
        defaultOutputModes=["text"],
        skills=[skill],
        version="1.0.0",
        capabilities=AgentCapabilities(),
    )

    # Configure the request handler with our custom agent executor
    request_handler = DefaultRequestHandler(
        agent_executor=RandomNumberAgentExecutor(),
        task_store=InMemoryTaskStore(),
    )

    # Create the A2A app server
    server = A2AStarletteApplication(
        http_handler=request_handler,
        agent_card=agent_card,
    )

    # Run the server
    uvicorn.run(server.build(), host="0.0.0.0", port=9999)


if __name__ == "__main__":
    main()
Interacting with the Agent Using A2AClient (client.py)
Next, we create the client that will interact with our A2A agent. This client script performs three main tasks:
- Fetch the Agent Card: We start by resolving the agent’s public metadata using A2ACardResolver. This fetches the agent.json file from the .well-known endpoint, which contains essential details like the agent’s name, description, skills, and communication capabilities.
- Initialize the A2A Client: Using the fetched AgentCard, we set up an A2AClient, which handles the communication protocol. This client will be responsible for sending structured messages to the agent and receiving responses.
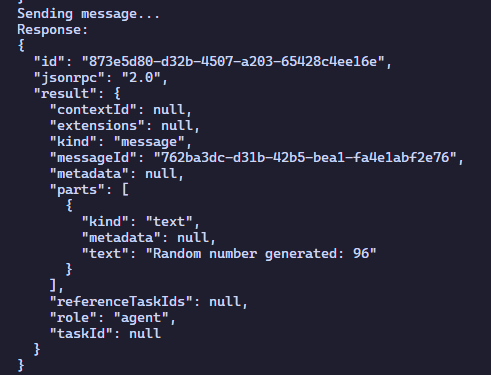
Send a Message and Receive a Response: We construct a message with the text “Give me a random number” using A2A’s message structure (Message, Part, TextPart). The message is sent as part of a SendMessageRequest, which wraps it with a unique request ID. Once the message is sent, the agent processes it and responds with a generated random number, which is then printed in JSON format. Check out the Full Codes on GitHub
import uuid
import httpx
from a2a.client import A2ACardResolver, A2AClient
from a2a.types import (
    AgentCard,
    Message,
    MessageSendParams,
    Part,
    Role,
    SendMessageRequest,
    TextPart,
)

PUBLIC_AGENT_CARD_PATH = "/.well-known/agent.json"
BASE_URL = "http://localhost:9999"


async def main() -> None:
    async with httpx.AsyncClient() as httpx_client:
        # Fetch the agent card
        resolver = A2ACardResolver(httpx_client=httpx_client, base_url=BASE_URL)
        try:
            print(f"Fetching public agent card from: {BASE_URL}{PUBLIC_AGENT_CARD_PATH}")
            agent_card: AgentCard = await resolver.get_agent_card()
            print("Agent card fetched successfully:")
            print(agent_card.model_dump_json(indent=2))
        except Exception as e:
            print(f"Error fetching public agent card: {e}")
            return

        # Initialize A2A client with the agent card
        client = A2AClient(httpx_client=httpx_client, agent_card=agent_card)

        # Build message
        message_payload = Message(
            role=Role.user,
            messageId=str(uuid.uuid4()),
            parts=[Part(root=TextPart(text="Give me a random number"))],
        )
        request = SendMessageRequest(
            id=str(uuid.uuid4()),
            params=MessageSendParams(message=message_payload),
        )

        # Send message
        print("Sending message...")
        response = await client.send_message(request)

        # Print response
        print("Response:")
        print(response.model_dump_json(indent=2))


if __name__ == "__main__":
    import asyncio
    asyncio.run(main())
Running the Agent and querying the same
To test our A2A setup, we’ll start by running the agent server. This is done by executing the main.py file, which initializes the agent, exposes its agent card, and starts listening for incoming requests on port 9999. Check out the Full Codes on GitHub
uv run main.pyOnce the agent is up and running, we’ll move to the client script. The client will fetch the agent’s metadata, send a structured query using the A2A protocol, and receive a response. In our case, the query is a simple message like “Give me a random number”, and the agent will return a number between 1 and 100.
uv run client.py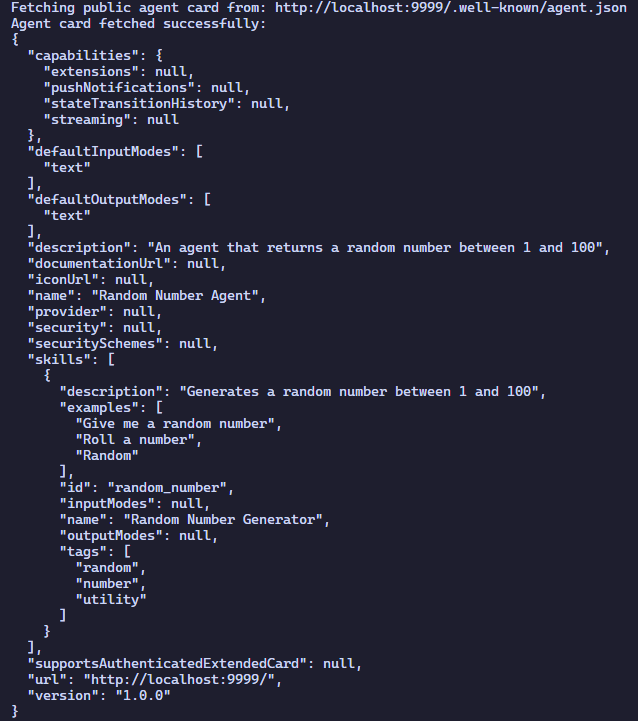
Check out the Full Codes on GitHub. All credit for this research goes to the researchers of this project. Also, feel free to follow us on Twitter and don’t forget to join our 100k+ ML SubReddit and Subscribe to our Newsletter.
The post Building an A2A-Compliant Random Number Agent: A Step-by-Step Guide to Implementing the Low-Level Executor Pattern with Python appeared first on MarkTechPost.
Source: Read MoreÂ

