Close Menu
    DevStackTipsDevStackTips
    • Home
    • News & Updates
      1. Tech & Work
      2. View All

      Sunshine And March Vibes (2025 Wallpapers Edition)

      May 16, 2025

      The Case For Minimal WordPress Setups: A Contrarian View On Theme Frameworks

      May 16, 2025

      How To Fix Largest Contentful Paint Issues With Subpart Analysis

      May 16, 2025

      How To Prevent WordPress SQL Injection Attacks

      May 16, 2025

      Microsoft has closed its “Experience Center” store in Sydney, Australia — as it ramps up a continued digital growth campaign

      May 16, 2025

      Bing Search APIs to be “decommissioned completely” as Microsoft urges developers to use its Azure agentic AI alternative

      May 16, 2025

      Microsoft might kill the Surface Laptop Studio as production is quietly halted

      May 16, 2025

      Minecraft licensing robbed us of this controversial NFL schedule release video

      May 16, 2025
    • Development
      1. Algorithms & Data Structures
      2. Artificial Intelligence
      3. Back-End Development
      4. Databases
      5. Front-End Development
      6. Libraries & Frameworks
      7. Machine Learning
      8. Security
      9. Software Engineering
      10. Tools & IDEs
      11. Web Design
      12. Web Development
      13. Web Security
      14. Programming Languages
        • PHP
        • JavaScript
      Featured

      The power of generators

      May 16, 2025
      Recent

      The power of generators

      May 16, 2025

      Simplify Factory Associations with Laravel’s UseFactory Attribute

      May 16, 2025

      This Week in Laravel: React Native, PhpStorm Junie, and more

      May 16, 2025
    • Operating Systems
      1. Windows
      2. Linux
      3. macOS
      Featured

      Microsoft has closed its “Experience Center” store in Sydney, Australia — as it ramps up a continued digital growth campaign

      May 16, 2025
      Recent

      Microsoft has closed its “Experience Center” store in Sydney, Australia — as it ramps up a continued digital growth campaign

      May 16, 2025

      Bing Search APIs to be “decommissioned completely” as Microsoft urges developers to use its Azure agentic AI alternative

      May 16, 2025

      Microsoft might kill the Surface Laptop Studio as production is quietly halted

      May 16, 2025
    • Learning Resources
      • Books
      • Cheatsheets
      • Tutorials & Guides
    Home»Development»Machine Learning»A Code Implementation for Advanced Human Pose Estimation Using MediaPipe, OpenCV and Matplotlib

    A Code Implementation for Advanced Human Pose Estimation Using MediaPipe, OpenCV and Matplotlib

    March 25, 2025

    Human pose estimation is a cutting-edge computer vision technology that transforms visual data into actionable insights about human movement. By utilizing advanced machine learning models like MediaPipe’s BlazePose and powerful libraries such as OpenCV, developers can track body key points with unprecedented accuracy. In this tutorial, we explore the seamless integration of these, demonstrating how Python-based frameworks enable sophisticated pose detection across various domains, from sports analytics to healthcare monitoring and interactive applications. 

    First, we install the essential libraries:

    Copy CodeCopiedUse a different Browser
    !pip install mediapipe opencv-python-headless matplotlib

    Then, we import the important libraries needed for our implementation:

    Copy CodeCopiedUse a different Browser
    import cv2
    import mediapipe as mp
    import matplotlib.pyplot as plt
    import numpy as np

    We initialize the MediaPipe Pose model in static image mode with segmentation enabled and a minimum detection confidence of 0.5. It also imports utilities for drawing landmarks and applying drawing styles.

    Copy CodeCopiedUse a different Browser
    mp_pose = mp.solutions.pose
    mp_drawing = mp.solutions.drawing_utils
    mp_drawing_styles = mp.solutions.drawing_styles
    
    
    pose = mp_pose.Pose(
        static_image_mode=True,
        model_complexity=1,
        enable_segmentation=True,
        min_detection_confidence=0.5
    )
    

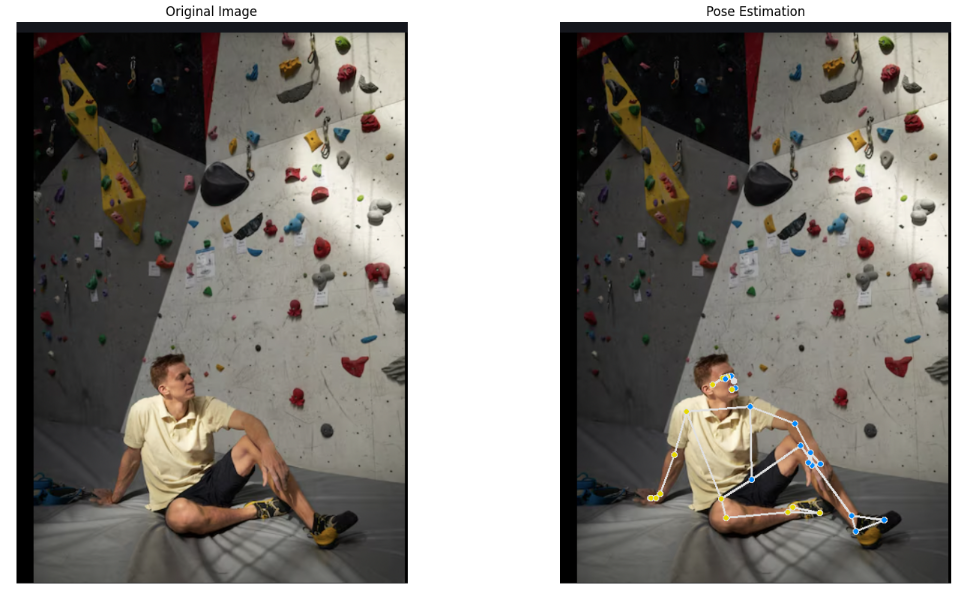
    Here, we define the detect_pose function, which reads an image, processes it to detect human pose landmarks using MediaPipe, and returns the annotated image along with the detected landmarks. If landmarks are found, they are drawn using default styling.

    Copy CodeCopiedUse a different Browser
    def detect_pose(image_path):
        image = cv2.imread(image_path)
        image_rgb = cv2.cvtColor(image, cv2.COLOR_BGR2RGB)
    
    
        results = pose.process(image_rgb)
    
    
        annotated_image = image_rgb.copy()
        if results.pose_landmarks:
            mp_drawing.draw_landmarks(
                annotated_image,
                results.pose_landmarks,
                mp_pose.POSE_CONNECTIONS,
                landmark_drawing_spec=mp_drawing_styles.get_default_pose_landmarks_style()
            )
    
    
        return annotated_image, results.pose_landmarks

    We define the visualize_pose function, which displays the original and pose-annotated images side by side using matplotlib. The extract_keypoints function converts detected pose landmarks into a dictionary of named keypoints with their x, y, z coordinates and visibility scores.

    Copy CodeCopiedUse a different Browser
    def visualize_pose(original_image, annotated_image):
        plt.figure(figsize=(16, 8))
    
    
        plt.subplot(1, 2, 1)
        plt.title('Original Image')
        plt.imshow(cv2.cvtColor(original_image, cv2.COLOR_BGR2RGB))
        plt.axis('off')
    
    
        plt.subplot(1, 2, 2)
        plt.title('Pose Estimation')
        plt.imshow(annotated_image)
        plt.axis('off')
    
    
        plt.tight_layout()
        plt.show()
    
    
    def extract_keypoints(landmarks):
        if landmarks:
            keypoints = {}
            for idx, landmark in enumerate(landmarks.landmark):
                keypoints[mp_pose.PoseLandmark(idx).name] = {
                    'x': landmark.x,
                    'y': landmark.y,
                    'z': landmark.z,
                    'visibility': landmark.visibility
                }
            return keypoints
        return None

    Finally, we load an image from the specified path, detect and visualize human pose landmarks using MediaPipe, and then extract and print the coordinates and visibility of each detected keypoint.

    Copy CodeCopiedUse a different Browser
    image_path = '/content/Screenshot 2025-03-26 at 12.56.05 AM.png'
    original_image = cv2.imread(image_path)
    annotated_image, landmarks = detect_pose(image_path)
    
    
    visualize_pose(original_image, annotated_image)
    
    
    keypoints = extract_keypoints(landmarks)
    if keypoints:
        print("Detected Keypoints:")
        for name, details in keypoints.items():
            print(f"{name}: {details}")
    Sample Processed Output

    In this tutorial, we explored human pose estimation using MediaPipe and OpenCV, demonstrating a comprehensive approach to body keypoint detection. We implemented a robust pipeline that transforms images into detailed skeletal maps, covering key steps including library installation, pose detection function creation, visualization techniques, and keypoint extraction. Using advanced machine learning models, we showcased how developers can transform raw visual data into meaningful movement insights across various domains like sports analytics and healthcare monitoring.


    Here is the Colab Notebook. Also, don’t forget to follow us on Twitter and join our Telegram Channel and LinkedIn Group. Don’t Forget to join our 85k+ ML SubReddit.

    The post A Code Implementation for Advanced Human Pose Estimation Using MediaPipe, OpenCV and Matplotlib appeared first on MarkTechPost.

    Source: Read More 

    Facebook Twitter Reddit Email Copy Link
    Previous ArticleEnhance deployment guardrails with inference component rolling updates for Amazon SageMaker AI inference
    Next Article RWKV-7: Advancing Recurrent Neural Networks for Efficient Sequence Modeling

    Related Posts

    Machine Learning

    Salesforce AI Releases BLIP3-o: A Fully Open-Source Unified Multimodal Model Built with CLIP Embeddings and Flow Matching for Image Understanding and Generation

    May 16, 2025
    Machine Learning

    How to Evaluate Jailbreak Methods: A Case Study with the StrongREJECT Benchmark

    May 16, 2025
    Leave A Reply Cancel Reply

    Continue Reading

    Usability and Experience (UX) in Universal Design Series: Auditory Disabilities – 2

    Development

    GTA 5 is coming back to Xbox Game Pass apparently, this time with PC and Cloud in tow

    News & Updates

    5 Simple Ways to Fix Windows 11 Not Playing YouTube HDR videos

    Development

    Majority of Browser Extensions Can Access Sensitive Enterprise Data, New Report Finds

    Development

    Highlights

    Development

    Meet Fume: An AI-Powered Software Platform SWE that Solves Bugs within Slack

    July 11, 2024

    Complex tasks are common in software development. The quality of the user experience suffers because…

    Designing a World-Class Investing Experience

    December 2, 2024

    Overwatch 2 is fighting back against Marvel Rivals with a crazy third-person mode, ability perks, loot boxes, and more

    February 12, 2025

    CVE-2025-43549 – Substance3D Use After Free Arbitrary Code Execution Vulnerability

    May 13, 2025
    © DevStackTips 2025. All rights reserved.
    • Contact
    • Privacy Policy

    Type above and press Enter to search. Press Esc to cancel.