Today, we are announcing that DeepSeek AI’s first-generation frontier model, DeepSeek-R1, is available through Amazon SageMaker JumpStart and Amazon Bedrock Marketplace to deploy for inference. You can now use DeepSeek-R1 to build, experiment, and responsibly scale your generative AI ideas on AWS.
In this post, we demonstrate how to get started with DeepSeek-R1 on Amazon Bedrock and SageMaker JumpStart.
Overview of DeepSeek-R1
DeepSeek-R1 is a large language model (LLM) developed by DeepSeek-AI that uses reinforcement learning to enhance reasoning capabilities through a multi-stage training process from a DeepSeek-V3-Base foundation. A key distinguishing feature is its reinforcement learning (RL) step, which was used to refine the model’s responses beyond the standard pre-training and fine-tuning process. By incorporating RL, DeepSeek-R1 can adapt more effectively to user feedback and objectives, ultimately enhancing both relevance and clarity. In addition, DeepSeek-R1 employs a chain-of-thought (CoT) approach, meaning it’s equipped to break down complex queries and reason through them in a step-by-step manner. This guided reasoning process allows the model to produce more accurate, transparent, and detailed answers. This model combines RL-based fine-tuning with CoT capabilities, aiming to generate structured responses while focusing on interpretability and user interaction. With its wide-ranging capabilities DeepSeek-R1 has captured the industry’s attention as a versatile text-generation model that can be integrated into various workflows such as agents, logical reasoning and data interpretation tasks
DeepSeek-R1 uses a Mixture of Experts (MoE) architecture and is 671 billion parameters in size. The MoE architecture allows activation of 37 billion parameters, enabling efficient inference by routing queries to the most relevant expert “clusters.” This approach allows the model to specialize in different problem domains while maintaining overall efficiency. DeepSeek-R1 requires at least 800 GB of HBM memory in FP8 format for inference. In this post, we will use an ml.p5e.48xlarge instance to deploy the model. ml.p5e.48xlarge comes with 8 Nvidia H200 GPUs providing 1128 GB of GPU memory.
You can deploy DeepSeek-R1 model either through SageMaker JumpStart or Bedrock Marketplace. Because DeepSeek-R1 is an emerging model, we recommend deploying this model with guardrails in place. In this blog, we will use Amazon Bedrock Guardrails to introduce safeguards, prevent harmful content, and evaluate models against key safety criteria. At the time of writing this blog, for DeepSeek-R1 deployments on SageMaker JumpStart and Bedrock Marketplace, Bedrock Guardrails supports only the ApplyGuardrail API. You can create multiple guardrails tailored to different use cases and apply them to the DeepSeek-R1 model, improving user experiences and standardizing safety controls across your generative AI applications.
Prerequisites
To deploy the DeepSeek-R1 model, you need access to an ml.p5e instance. To check if you have quotas for P5e, open the Service Quotas console and under AWS Services, choose Amazon SageMaker, and confirm you’re using ml.p5e.48xlarge for endpoint usage. Make sure that you have at least one ml.P5e.48xlarge instance in the AWS Region you are deploying. To request a limit increase, create a limit increase request and reach out to your account team.
Because you will be deploying this model with Amazon Bedrock Guardrails, make sure you have the correct AWS Identity and Access Management (IAM) permissions to use Amazon Bedrock Guardrails. For instructions, see Set up permissions to use guardrails for content filtering.
Implementing guardrails with the ApplyGuardrail API
Amazon Bedrock Guardrails allows you to introduce safeguards, prevent harmful content, and evaluate models against key safety criteria. You can implement safety measures for the DeepSeek-R1 model using the Amazon Bedrock ApplyGuardrail API. This allows you to apply guardrails to evaluate user inputs and model responses deployed on Amazon Bedrock Marketplace and SageMaker JumpStart. You can create a guardrail using the Amazon Bedrock console or the API. For the example code to create the guardrail, see the GitHub repo.
The general flow involves the following steps: First, the system receives an input for the model. This input is then processed through the ApplyGuardrail API. If the input passes the guardrail check, it’s sent to the model for inference. After receiving the model’s output, another guardrail check is applied. If the output passes this final check, it’s returned as the final result. However, if either the input or output is intervened by the guardrail, a message is returned indicating the nature of the intervention and whether it occurred at the input or output stage. The examples showcased in the following sections demonstrate inference using this API.
Deploy DeepSeek-R1 in Amazon Bedrock Marketplace
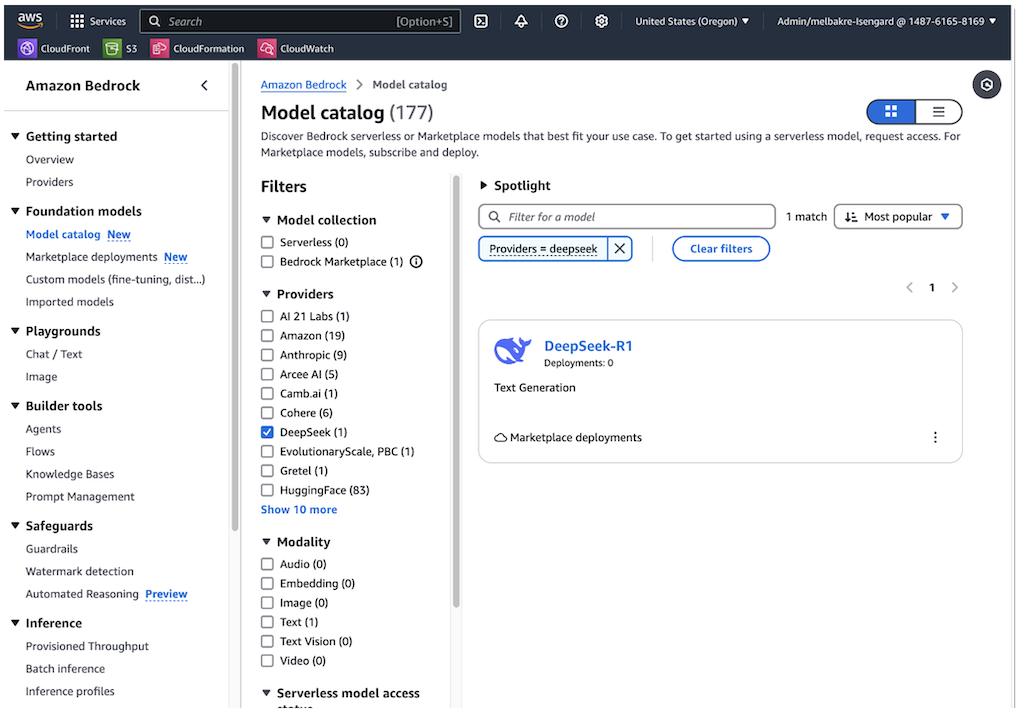
Amazon Bedrock Marketplace gives you access to over 100 popular, emerging, and specialized foundation models (FMs) through Amazon Bedrock. To access DeepSeek-R1 in Amazon Bedrock, complete the following steps:
- On the Amazon Bedrock console, choose Model catalog under Foundation models in the navigation pane.
At the time of writing this post, you can use theInvokeModelAPI to invoke the model. It doesn’t support Converse APIs and other Amazon Bedrock tooling. - Filter for DeepSeek as a provider and choose the DeepSeek-R1 model.

The model detail page provides essential information about the model’s capabilities, pricing structure, and implementation guidelines. You can find detailed usage instructions, including sample API calls and code snippets for integration. The model supports various text generation tasks, including content creation, code generation, and question answering, using its reinforcement learning optimization and CoT reasoning capabilities.
The page also includes deployment options and licensing information to help you get started with DeepSeek-R1 in your applications. - To begin using DeepSeek-R1, choose Deploy.

You will be prompted to configure the deployment details for DeepSeek-R1. The model ID will be pre-populated. - For Endpoint name, enter an endpoint name (between 1–50 alphanumeric characters).
- For Number of instances, enter a number of instances (between 1–100).
- For Instance type, choose your instance type. For optimal performance with DeepSeek-R1, a GPU-based instance type like ml.p5e.48xlarge is recommended.
Optionally, you can configure advanced security and infrastructure settings, including virtual private cloud (VPC) networking, service role permissions, and encryption settings. For most use cases, the default settings will work well. However, for production deployments, you might want to review these settings to align with your organization’s security and compliance requirements. - Choose Deploy to begin using the model.

When the deployment is complete, you can test DeepSeek-R1’s capabilities directly in the Amazon Bedrock playground. - Choose Open in playground to access an interactive interface where you can experiment with different prompts and adjust model parameters like temperature and maximum length.
When using R1 with Bedrock’s InvokeModel and Playground Console, use DeepSeek’s chat template for optimal results. For example,<|begin▁of▁sentence|><|User|>content for inference<|Assistant|>.
This is an excellent way to explore the model’s reasoning and text generation abilities before integrating it into your applications. The playground provides immediate feedback, helping you understand how the model responds to various inputs and letting you fine-tune your prompts for optimal results.

You can quickly test the model in the playground through the UI. However, to invoke the deployed model programmatically with any Amazon Bedrock APIs, you need to get the endpoint ARN.
Run inference using guardrails with the deployed DeepSeek-R1 endpoint
The following code example demonstrates how to perform inference using a deployed DeepSeek-R1 model through Amazon Bedrock using the invoke_model and ApplyGuardrail API. You can create a guardrail using the Amazon Bedrock console or the API. For the example code to create the guardrail, see the GitHub repo. After you have created the guardrail, use the following code to implement guardrails. The script initializes the bedrock_runtime client, configures inference parameters, and sends a request to generate text based on a user prompt.
Deploy DeepSeek-R1 with SageMaker JumpStart
SageMaker JumpStart is a machine learning (ML) hub with FMs, built-in algorithms, and prebuilt ML solutions that you can deploy with just a few clicks. With SageMaker JumpStart, you can customize pre-trained models to your use case, with your data, and deploy them into production using either the UI or SDK.
Deploying DeepSeek-R1 model through SageMaker JumpStart offers two convenient approaches: using the intuitive SageMaker JumpStart UI or implementing programmatically through the SageMaker Python SDK. Let’s explore both methods to help you choose the approach that best suits your needs.
Deploy DeepSeek-R1 through SageMaker JumpStart UI
Complete the following steps to deploy DeepSeek-R1 using SageMaker JumpStart:
- On the SageMaker console, choose Studio in the navigation pane.
- First-time users will be prompted to create a domain.
- On the SageMaker Studio console, choose JumpStart in the navigation pane.

The model browser displays available models, with details like the provider name and model capabilities.

- Search for DeepSeek-R1 to view the DeepSeek-R1 model card.
Each model card shows key information, including:- Model name
- Provider name
- Task category (for example, Text Generation)
- Bedrock Ready badge (if applicable), indicating that this model can be registered with Amazon Bedrock, allowing you to use Amazon Bedrock APIs to invoke the model
- Choose the model card to view the model details page.

The model details page includes the following information:- The model name and provider information
- Deploy button to deploy the model
- About and Notebooks tabs with detailed information
The About tab includes important details, such as:
- Model description
- License information
- Technical specifications
- Usage guidelines
Before you deploy the model, it’s recommended to review the model details and license terms to confirm compatibility with your use case.
- Choose Deploy to proceed with deployment.

- For Endpoint name, use the automatically generated name or create a custom one.
- For Instance type¸ choose an instance type (default: ml.p5e.48xlarge).
- For Initial instance count, enter the number of instances (default: 1).
Selecting appropriate instance types and counts is crucial for cost and performance optimization. Monitor your deployment to adjust these settings as needed.Under Inference type, Real-time inference is selected by default. This is optimized for sustained traffic and low latency. - Review all configurations for accuracy. For this model, we strongly recommend adhering to SageMaker JumpStart default settings and making sure that network isolation remains in place.
- Choose Deploy to deploy the model.
The deployment process can take several minutes to complete.

When deployment is complete, your endpoint status will change to InService. At this point, the model is ready to accept inference requests through the endpoint. You can monitor the deployment progress on the SageMaker console Endpoints page, which will display relevant metrics and status information. When the deployment is complete, you can invoke the model using a SageMaker runtime client and integrate it with your applications.
Deploy DeepSeek-R1 using the SageMaker Python SDK
To get started with DeepSeek-R1 using the SageMaker Python SDK, you will need to install the SageMaker Python SDK and make sure you have the necessary AWS permissions and environment setup. The following is a step-by-step code example that demonstrates how to deploy and use DeepSeek-R1 for inference programmatically. The code for deploying the model is provided in the Github here . You can clone the notebook and run from SageMaker Studio.
You can run additional requests against the predictor:
Implement guardrails and run inference with your SageMaker JumpStart predictor
Similar to Amazon Bedrock, you can also use the ApplyGuardrail API with your SageMaker JumpStart predictor. You can create a guardrail using the Amazon Bedrock console or the API, and implement it as shown in the following code:
Clean up
To avoid unwanted charges, complete the steps in this section to clean up your resources.
Delete the Amazon Bedrock Marketplace deployment
If you deployed the model using Amazon Bedrock Marketplace, complete the following steps:
- On the Amazon Bedrock console, under Foundation models in the navigation pane, choose Marketplace deployments.
- In the Managed deployments section, locate the endpoint you want to delete.
- Select the endpoint, and on the Actions menu, choose Delete.
- Verify the endpoint details to make sure you’re deleting the correct deployment:
- Endpoint name
- Model name
- Endpoint status
- Choose Delete to delete the endpoint.
- In the deletion confirmation dialog, review the warning message, enter
confirm, and choose Delete to permanently remove the endpoint.

Delete the SageMaker JumpStart predictor
The SageMaker JumpStart model you deployed will incur costs if you leave it running. Use the following code to delete the endpoint if you want to stop incurring charges. For more details, see Delete Endpoints and Resources.
Conclusion
In this post, we explored how you can access and deploy the DeepSeek-R1 model using Bedrock Marketplace and SageMaker JumpStart. Visit SageMaker JumpStart in SageMaker Studio or Amazon Bedrock Marketplace now to get started. For more information, refer to Use Amazon Bedrock tooling with Amazon SageMaker JumpStart models, SageMaker JumpStart pretrained models, Amazon SageMaker JumpStart Foundation Models, Amazon Bedrock Marketplace, and Getting started with Amazon SageMaker JumpStart.
About the Authors
 Vivek Gangasani is a Lead Specialist Solutions Architect for Inference at AWS. He helps emerging generative AI companies build innovative solutions using AWS services and accelerated compute. Currently, he is focused on developing strategies for fine-tuning and optimizing the inference performance of large language models. In his free time, Vivek enjoys hiking, watching movies, and trying different cuisines.
 Niithiyn Vijeaswaran is a Generative AI Specialist Solutions Architect with the Third-Party Model Science team at AWS. His area of focus is AWS AI accelerators (AWS Neuron). He holds a Bachelor’s degree in Computer Science and Bioinformatics.
 Jonathan Evans is a Specialist Solutions Architect working on generative AI with the Third-Party Model Science team at AWS.
 Banu Nagasundaram leads product, engineering, and strategic partnerships for Amazon SageMaker JumpStart, SageMaker’s machine learning and generative AI hub. She is passionate about building solutions that help customers accelerate their AI journey and unlock business value.
Source: Read MoreÂ


