Integrating Jenkins with Tricentis Tosca is a practical step for teams looking to bring more automation testing and consistency into their CI/CD pipelines. This setup allows you to execute Tosca test cases automatically from Jenkins, helping ensure smoother, more reliable test cycles with less manual intervention. In this blog, we’ll guide you through the process of setting up the Tosca Jenkins Integration using the Tricentis CI Plugin and ToscaCIClient. Whether you’re working with Remote Execution or Distributed Execution (DEX), the integration supports both, giving your team flexibility depending on your infrastructure. We’ll cover the prerequisites, key configuration steps, and some helpful tips to ensure a successful setup. If your team is already using Jenkins for builds and deployments, this integration can help extend automation to your testing layer, making automation testing a seamless part of your pipeline and keeping your workflow unified and efficient.
Necessary prerequisites for integration
To connect Jenkins with Tricentis Tosca successfully, organizations need to have certain tools and conditions ready. First, you must have the Jenkins plugin for Tricentis Tosca. This plugin helps link the automation features of both systems. Make sure the plugin works well with your version of Jenkins because updates might change how it performs.
Next, it is important to have a set up Tricentis test automation environment. This is necessary for running functional and regression tests correctly within the pipeline. Check that the Tosca Execution Client is installed and matches your CI requirements. For the best results, your Tosca Server should also be current and operational.
Finally, prepare your GitHub repository for configuration. This allows Jenkins to access the code, run test cases, and share results smoothly. With these steps completed, organizations can build effective workflows that improve testing results and development efforts.
Related Blogs
Step-by-step guide to configuring Tosca in Jenkins
Achieving the integration requires systematic configuration of Tosca within Jenkins. Below is a simple guide:
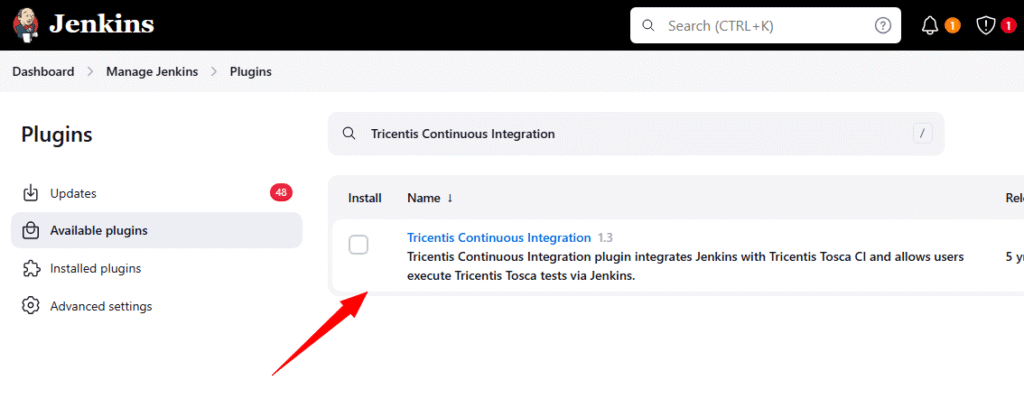
Step 1: Install Jenkins Plugin – Tricentis Continuous Integration
1. Go to Jenkins Dashboard → Manage Jenkins → Manage Plugins.
2. Search for Tricentis Continuous Integration in the Available tab.
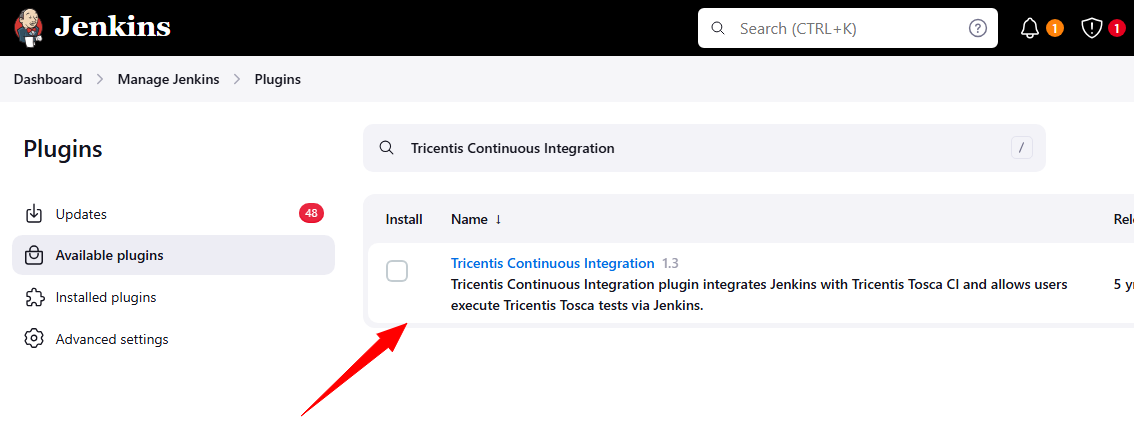
3. Install the plugin and restart Jenkins if prompted.
Step 2: Configure Jenkins Job with Tricentis Continuous Integration
Once you’ve installed the plugin, follow these steps to add it to your Jenkins job:
- Go to your Jenkins job or create a new Freestyle project.
- Click on Configure.
- Scroll to Build Steps section.
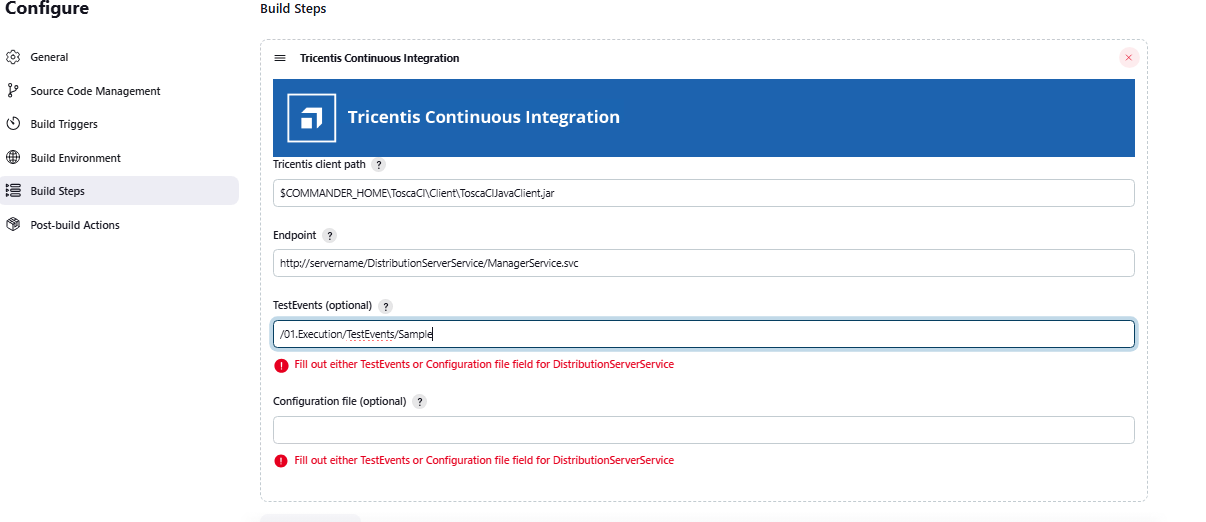
- Click Add build step → Select Tricentis Continuous Integration from the dropdown.
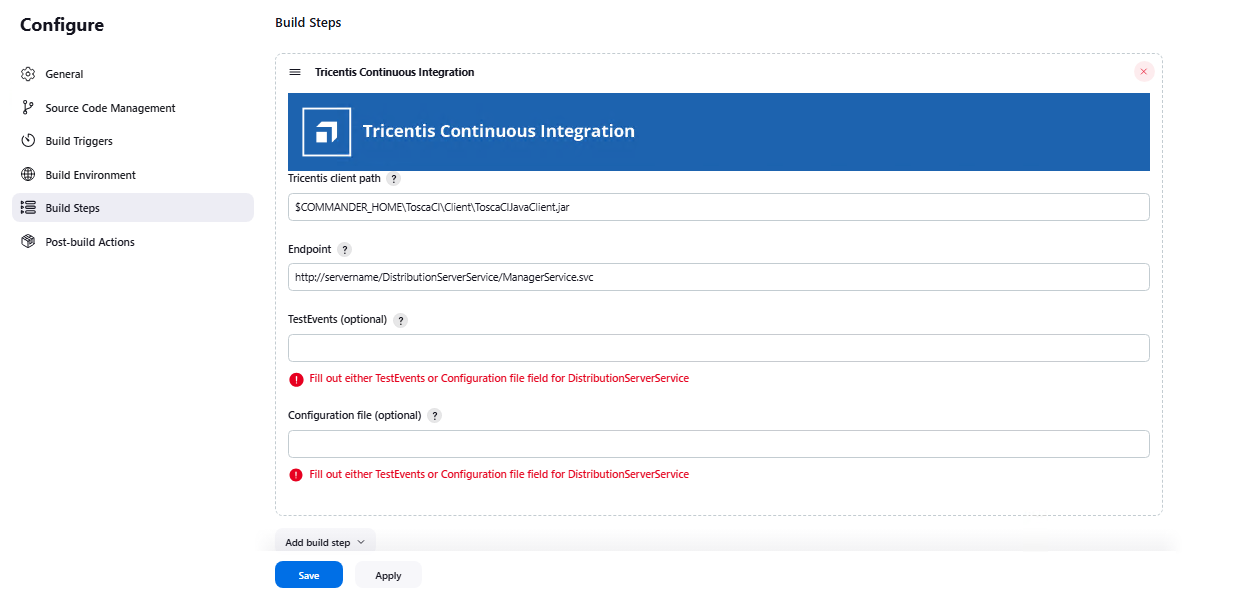
Configure the Plugin Parameters
Once the plugin is installed, configure the Build Step in your Jenkins job using the following fields:
| S. No | Field Name | Pipeline Property | Required | Description |
|---|---|---|---|---|
| 1 | Tricentis client path | tricentisClientPath | Yes | Path to ToscaCIClient.exe or ToscaCIJavaClient.jar. If using .jar, make sure JRE 1.7+ is installed and JAVA_HOME is set on Jenkins agent. |
| 2 | Endpoint | endpoint | Yes | Webservice URL that triggers execution. Remote: http://servername:8732/TOSCARemoteExecutionService/ DEX: http://servername:8732/DistributionServerService/ManagerService.svc |
| 3 | TestEvents | testEvents | Optional | Only for Distributed Execution. Enter TestEvents (names or system IDs) separated by semicolons. Leave the Configuration File empty if using this. |
| 4 | Configuration file | configurationFilePath | Optional | Path to a .xml test configuration file (for detailed execution setup). Leave TestEvents empty if using this. |
Step 3: Create a Tosca Agent (Tosca Server)
Create an Agent (from Tosca Server)
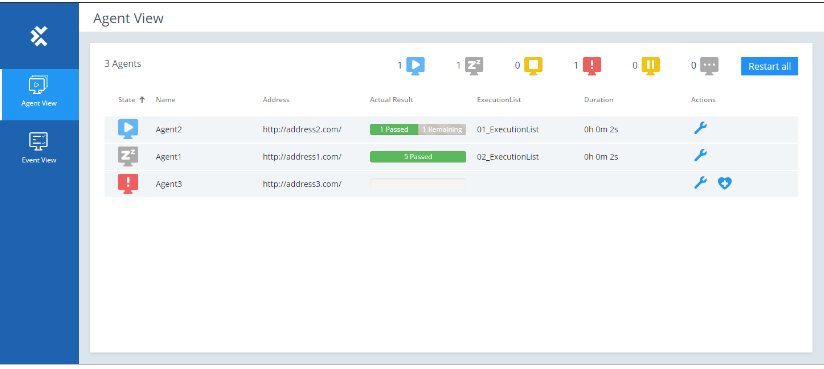
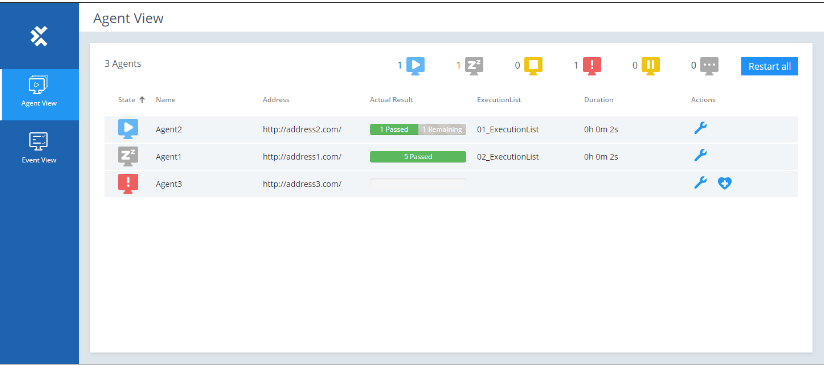
You can open the DEX Monitor in one of the following ways:
- In your browser, by entering the address http://:/Monitor/.
Directly from Tosca Commander. - To do so, right-click a TestEvent and select one of the following context menu entries:
Open Event View takes you to the TestEvents overview page.
Open Agent View takes you to the Agents overview page.
Navigate the DEX Monitor
The menu bar on the left side of the screen allows you to switch between views:
- The Agent View, where you can monitor, recover, configure, and restart your Agents.
- The Event View, where you can monitor and cancel the execution of your TestEvents.
Enter:
- Agent Name (e.g., Agent2)
- Assign a Machine Name
This agent will be responsible for running your test event.
Related Blogs
Step 4: Create and Configure a TestEvent (Tosca Commander)
- Open Tosca Commander
- Navigate to: Project > Execution > TestEvents
- Click Create TestEvent
- Provide a name like Sample
- Step 4.1: Assign Required ExecutionList
- Select the ExecutionList (this is where you define which test cases will run)
- Select an Execution Configuration
- Assign the Agent created in Step 3
- Save the TestEvent

- TestEvent → Copy Node Path

- Paste this into the TestEvents field in Jenkins build step

Step 5: How the Integration Works
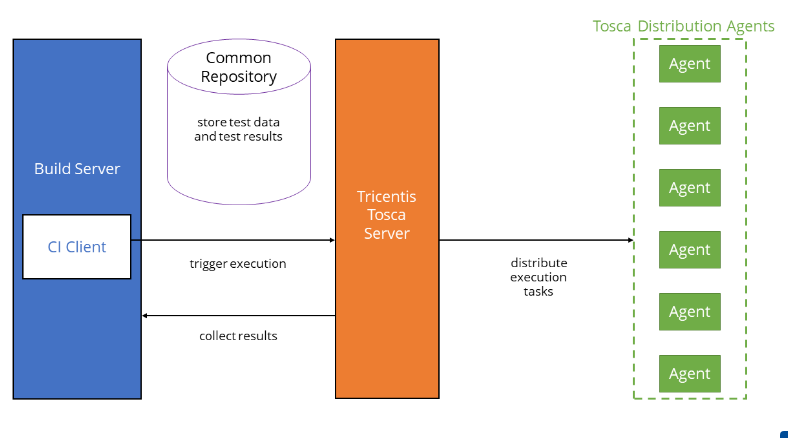
Execution Flow:
- Jenkins triggers test execution using ToscaCIClient.
- The request reaches the Tosca Distribution Server (ManagerService).
- Tosca Server coordinates with AOS to retrieve test data from the Common Repository.
- The execution task is distributed to a DEX Agent.
- DEX Agent runs the test cases and sends the results back.
- Jenkins build is updated with the execution status (Success/Failure).
Step 6: Triggering Execution via Jenkins
Once you’ve entered all required fields:
- Save the Jenkins job
- Click Build Now in Jenkins
What Happens Next:
- The configured DEX Agent will be triggered.
- You’ll see a progress bar and test status directly in the DEX Monitor.

- Upon completion, the Jenkins build status (Pass or failure) reflects the outcome of the test execution.

Step 7: View Test Reports in Jenkins
To visualize test results:
- Go to Manage Jenkins > Manage Plugins > Available
- Search and install Test Results Analyzer
- Once installed, configure Jenkins to collect results (e.g., via JUnit or custom publisher if using Tosca XML outputs)
Conclusion:
Integrating Tosca with Jenkins enhances your CI/CD workflow by automating test execution and reducing manual effort. This integration streamlines your development process and supports the delivery of reliable, high-quality software. By following the steps outlined in this guide, you can set up a smooth and efficient test automation pipeline that saves time and improves productivity. With testing seamlessly built into your workflow, your team can focus more on innovation and delivering value to end users.
Found this guide helpful? Feel free to leave a comment below and share it with your team or network who might benefit from this integration.
Frequently Asked Questions
-
Why should I integrate Tosca with Jenkins?
Integrating Tosca with Jenkins enables continuous testing, reduces manual effort, and ensures faster, more reliable software delivery.
-
Can I use Tosca Distributed Execution (DEX) with Jenkins?
Yes, Jenkins supports both Remote Execution and Distributed Execution (DEX) using the ToscaCIClient.
-
Do I need to install a plugin for Tosca Jenkins Integration?
Yes, you need to install the Tricentis Continuous Integration plugin from the Jenkins Plugin Manager to enable integration.
-
What types of test cases can be executed via Jenkins?
You can execute any automated Tosca test cases, including UI, API, and end-to-end tests, configured in Tosca Commander.
-
Is Tosca Jenkins Integration suitable for Agile and DevOps teams?
Absolutely. This integration supports Agile and DevOps practices by enabling faster feedback and automated testing in every build cycle.
-
How do I view Tosca test results in Jenkins?
Install the Test Results Analyzer plugin or configure Jenkins to read Tosca’s test output via JUnit or a custom result publisher.
The post Tosca Jenkins Integration: Boost Your CI/CD Workflow Today appeared first on Codoid.
Source: Read More
