
Artificial intelligence is changing how we work with images. What once took hours in Photoshop can now happen in seconds with AI-powered tools. You can take a blurry picture, enlarge it without losing sharpness, fix the lighting, remove unwanted noise, or even bring color to a black-and-white photo, all with a single click.
The magic you see in these tools is powered by algorithms which are trained AI models that understand how images should look and then reconstruct them accordingly. These models have studied millions of examples to learn patterns, textures, and details, so they can “predict” what’s missing and fill it in naturally.
For developers, photographers, and content creators, knowing the basics of these algorithms can help you pick the right tools for your workflow. Even if you never plan to code an AI model yourself, this knowledge will help you make better choices for image processing, web apps, or creative projects.
Let’s look at five of the most important algorithms used in AI image enhancement today. Along the way, you’ll see real-world tools that use these algorithms and how you can try them yourself.
Table of Contents
Image Colorization
Automatic image colorization might be the most visually dramatic AI enhancement of all. It takes a black-and-white image and predicts the colors that should be there, often producing results that look like the photo was taken in full color.
The AI behind this uses convolutional neural networks (CNNs) trained on huge datasets of color images. The model sees both the grayscale and the color versions during training, so it learns how certain objects typically appear. For example, it might learn that grass is usually green, the sky is often blue, and human skin falls within a certain range of tones.
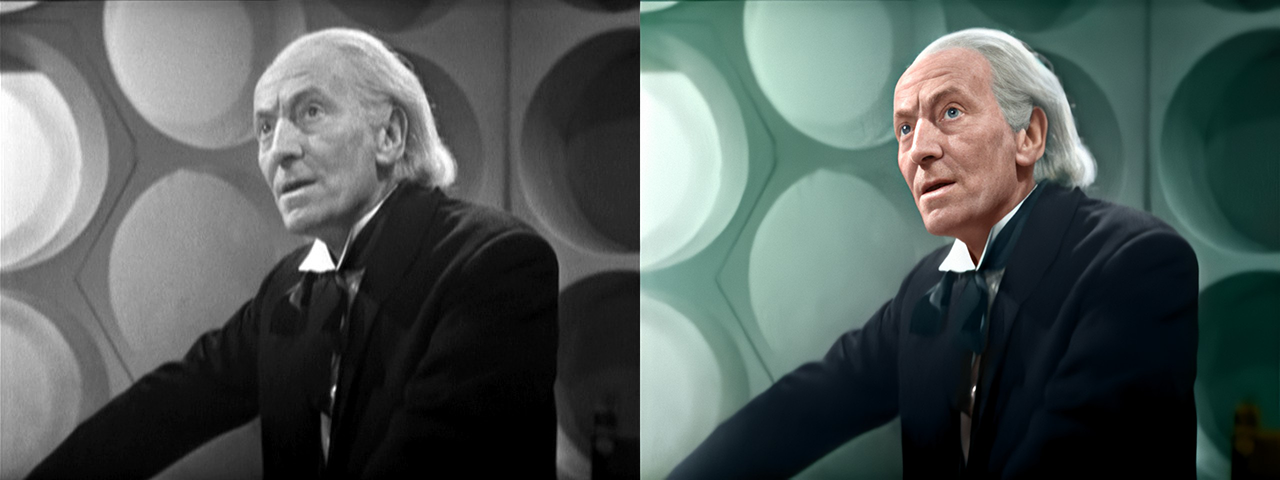
One of the most famous models is DeOldify, which combines CNNs with GANs. The GAN setup helps refine the results, making colors more natural and avoiding strange or overly bright tones.
Colorization has practical uses beyond restoring old family photos. It’s used in film restoration, historical projects, digital storytelling, and even concept art.
See Image Colorization in action.
GAN-Based Image Enhancement
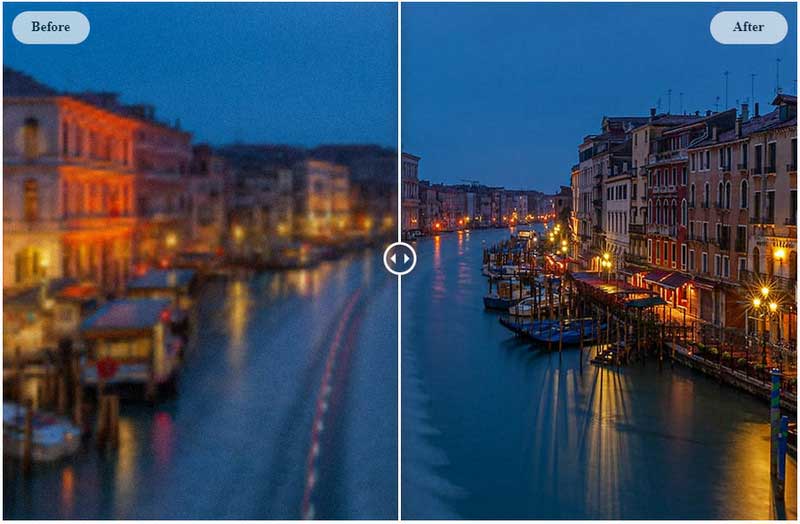
GANs, or Generative Adversarial Networks, are one of the most powerful AI techniques in image enhancement. They consist of two neural networks: the generator, which tries to create realistic-looking images, and the discriminator, which evaluates them. Over many iterations, the generator becomes extremely good at producing images that pass as real.

In image retouching, GANs can handle many tasks at once, like fixing lighting, improving sharpness, enhancing textures, and even subtly changing elements to make the picture more appealing. Because GANs learn from real-world images, the results often feel more natural than traditional editing filters.
GAN-based retouching is used in professional portrait editing, e-commerce product photos, real estate listings, and even game asset creation. It’s also behind many “one-click enhance” buttons you see in modern apps.
See a GAN powered photo enhancer here.
Noise Reduction (Denoising Autoencoders)
Noise in images looks like random specks of color or brightness that shouldn’t be there. It often happens in low-light photos or in images taken with high ISO settings. Noise makes photos look grainy and less professional.
Traditional noise removal methods simply blurs the image to hide the noise, but this also destroyed fine details. AI noise reduction works differently.
Denoising Autoencoders, one of the most common approaches, learn from pairs of images—one clean and one noisy. The AI studies how noise distorts details, then learns to reverse the process.

When you pass a noisy photo through a denoising autoencoder, it removes the noise while preserving edges, textures, and important small details.
Noise reduction isn’t just for photography. It’s also used in document scanning to make text easier to read, medical imaging to clarify scans, cleaning up screenshots or UI mockups for presentations
See Noise Reduction in action here.
Image Upscaling using Super-Resolution
Super-resolution is the process of increasing the resolution of an image to make it sharper and larger without simply stretching the pixels.
In the past, enlarging a small image just made it blurry. AI super-resolution works differently. It studies the image, detects patterns, and then generates new pixels that match what would have been there in a higher-quality original.
One of the first big breakthroughs was SRCNN (Super-Resolution Convolutional Neural Network). SRCNN works by breaking the image into patches, analyzing them, and then predicting what higher-resolution patches should look like. This early approach was effective but sometimes produced overly smooth images.
Then came ESRGAN (Enhanced Super-Resolution Generative Adversarial Network), which took things further. ESRGAN uses a GAN architecture, a generator creates enhanced images, while a discriminator judges how real they look. Through this back-and-forth training, the generator learns to produce fine textures like hair strands, fabric weaves, or building details that look realistic to the human eye.
Super-resolution is widely used in e-commerce (for clearer product photos), printing (turning web images into high-resolution posters), and web apps (making user-uploaded images look professional).
See Super resolution powered image upscaler in action.
Artifact Removal
When a JPEG image is heavily compressed, it develops blocky patches, fuzzy edges, and strange halos around lines. These are called compression artifacts, and they appear because JPEG reduces file size by removing fine detail. Traditional fixes blur the image to hide these defects, but that also softens important edges and textures.

FBCNN, or Flexible Blind Convolutional Neural Network, takes a smarter approach. Instead of needing to know the exact compression level beforehand, FBCNN is trained to handle a wide range of artifact severities without extra input. This is what makes it “blind”, it doesn’t require metadata about how the JPEG was compressed. It can adapt its restoration process on the fly.
FBCNN works in two main steps. First, it extracts features from the image, analyzing patterns in edges, textures, and flat areas to identify where artifacts are most likely. Then, it applies a learned mapping to reconstruct what those regions should look like without the damage.
Because it can estimate the compression quality itself, FBCNN avoids the common problem of over-smoothing lightly compressed images or under-restoring heavily compressed ones.
This flexibility makes FBCNN useful in many scenarios: cleaning up low-quality images from social media, restoring graphics and text in screenshots, or preparing old compressed web images for printing. Modern AI tools often integrate FBCNN-style processing as a first step before applying super-resolution or general enhancement.
FBCNN’s ability to adapt without manual tuning makes it one of the most practical and developer-friendly models for real-world JPEG restoration today.
See artifact removal in action.
Why These Algorithms Matter to Developers
Even if you have never trained your own AI model, understanding these algorithms gives you a better sense of what’s possible and how to apply it. Many of the tools mentioned here offer APIs, which means developers can build them into their own apps and websites.
If you run a social platform, you can automatically enhance user-uploaded images before they appear in feeds. If you build e-commerce platforms, you can clean and upscale product images for better sales conversions. If you work in media archiving, you can restore and preserve images without spending hours on manual edits.
The real value comes from knowing which algorithm is right for the problem you’re solving. Super-resolution for enlarging, denoising for cleaning, colorization for restoration, artifact removal for fixing compression, and GAN retouching for overall beautification.
Conclusion
AI image enhancement has moved from research labs to everyday tools, making it possible for anyone to transform low-quality images into something sharp, vibrant, and professional. The algorithms behind these tools like super-resolution, denoising, colorization, artifact removal, and GAN retouching are the building blocks of modern visual AI.
Whether you’re a developer looking to integrate image processing into your app or a creator who wants to improve your visuals, knowing how these algorithms work will help you get the most out of AI. This is only the beginning and future models will be even more precise, faster, and capable of things we haven’t yet imagined. Developers who understand these foundations will be ready to make the most of the next wave of AI-powered creativity.
Hope you enjoyed this article. Signup for my free AI newsletter TuringTalks.ai for more hands-on tutorials on AI. You can also visit my website.
Source: freeCodeCamp Programming Tutorials: Python, JavaScript, Git & MoreÂ

