
GitHub Actions is a CI/CD (Continuous Integration and Continuous Deployment) tool built directly into GitHub. It allows developers to define workflows, which are sequences of automated steps triggered by events such as pushing code, opening pull requests, or creating releases.
For Flutter developers, GitHub Actions is a powerful way to automate testing, builds, and deployment across multiple platforms.
This guide will walk you through setting up GitHub Actions for a Flutter project, covering everything from prerequisites to detailed explanations of the workflow.
Table of Contents
Why Use GitHub Actions in Flutter Development?
GitHub Actions automated testing ensures that all code changes are validated with unit and integration tests. Continuous integration builds Flutter apps automatically to confirm that new code integrates correctly.
Code analysis and linting can run automatically to enforce style and maintain code quality. Automated releases streamline the process of packaging and distributing apps. Custom workflows can be tailored to fit project-specific needs. Collaboration is also improved because developers can see workflow results directly in pull requests.
By introducing GitHub Actions, Flutter projects become more reliable, maintainable, and efficient.
Prerequisites
Before setting up GitHub Actions for your Flutter project, make sure you have:
-
Flutter SDK installed locally so you can create and test the project before pushing to GitHub.
-
Git installed to manage version control and push your project to GitHub.
-
A GitHub account and a new repository created for your Flutter project.
-
Basic understanding of YAML syntax, since workflows are defined in
.ymlfiles. -
A GitHub personal access token (PAT) for releasing builds, which will be stored as a repository secret.
Step 1: Create a New Flutter Project
Start by creating a new Flutter project and navigating into it:
flutter create gh_flutter
<span class="hljs-built_in">cd</span> gh_flutter
Replace gh_flutter with your preferred project name. This initializes a Flutter project with the default structure and dependencies.
Step 2: Push the Project to GitHub
Initialize Git inside your project and push it to GitHub:
git init
git add .
git commit -m <span class="hljs-string">"Initial commit"</span>
git remote add origin <repository_url>
git push -u origin main
Replace <repository_url> with the repository URL you created on GitHub. This links your local Flutter project to GitHub, allowing GitHub Actions to run on your repository.
Step 3: Create a GitHub Actions Workflow
Inside your project, create a workflow configuration file. Workflows must be placed inside .github/workflows/. Create a file named ci.yml:
<span class="hljs-attr">name:</span> <span class="hljs-string">CI</span>

<span class="hljs-attr">on:</span>
  <span class="hljs-attr">push:</span>
    <span class="hljs-attr">branches:</span>
      <span class="hljs-bullet">-</span> <span class="hljs-string">main</span>
  <span class="hljs-attr">pull_request:</span>
    <span class="hljs-attr">branches:</span>
      <span class="hljs-bullet">-</span> <span class="hljs-string">main</span>

<span class="hljs-attr">jobs:</span>
  <span class="hljs-attr">flutter_test:</span>
    <span class="hljs-attr">name:</span> <span class="hljs-string">Run</span> <span class="hljs-string">Flutter</span> <span class="hljs-string">Test</span>
    <span class="hljs-attr">runs-on:</span> <span class="hljs-string">ubuntu-latest</span>
    <span class="hljs-attr">steps:</span>
      <span class="hljs-bullet">-</span> <span class="hljs-attr">uses:</span> <span class="hljs-string">actions/checkout@v3</span>
      <span class="hljs-bullet">-</span> <span class="hljs-attr">uses:</span> <span class="hljs-string">actions/setup-java@v3</span>
        <span class="hljs-attr">with:</span>
          <span class="hljs-attr">distribution:</span> <span class="hljs-string">'temurin'</span>
          <span class="hljs-attr">java-version:</span> <span class="hljs-string">'17'</span>
      <span class="hljs-bullet">-</span> <span class="hljs-attr">uses:</span> <span class="hljs-string">subosito/flutter-action@v2</span>
        <span class="hljs-attr">with:</span>
          <span class="hljs-attr">channel:</span> <span class="hljs-string">'stable'</span>
      <span class="hljs-bullet">-</span> <span class="hljs-attr">run:</span> <span class="hljs-string">flutter</span> <span class="hljs-string">pub</span> <span class="hljs-string">get</span>
      <span class="hljs-bullet">-</span> <span class="hljs-attr">run:</span> <span class="hljs-string">flutter</span> <span class="hljs-string">--version</span>
      <span class="hljs-bullet">-</span> <span class="hljs-attr">run:</span> <span class="hljs-string">flutter</span> <span class="hljs-string">analyze</span>
      <span class="hljs-bullet">-</span> <span class="hljs-attr">run:</span> <span class="hljs-string">flutter</span> <span class="hljs-string">test</span>

  <span class="hljs-attr">build_iOSApp:</span>
    <span class="hljs-attr">name:</span> <span class="hljs-string">Build</span> <span class="hljs-string">Flutter</span> <span class="hljs-string">App</span> <span class="hljs-string">(iOS)</span>
    <span class="hljs-attr">needs:</span> [<span class="hljs-string">flutter_test</span>]
    <span class="hljs-attr">runs-on:</span> <span class="hljs-string">macos-latest</span>
    <span class="hljs-attr">steps:</span>
      <span class="hljs-bullet">-</span> <span class="hljs-attr">uses:</span> <span class="hljs-string">actions/checkout@v3</span>
      <span class="hljs-bullet">-</span> <span class="hljs-attr">uses:</span> <span class="hljs-string">actions/setup-java@v3</span>
        <span class="hljs-attr">with:</span>
          <span class="hljs-attr">distribution:</span> <span class="hljs-string">'temurin'</span>
          <span class="hljs-attr">java-version:</span> <span class="hljs-string">'17'</span>
      <span class="hljs-bullet">-</span> <span class="hljs-attr">uses:</span> <span class="hljs-string">subosito/flutter-action@v2</span>
        <span class="hljs-attr">with:</span>
          <span class="hljs-attr">flutter-version:</span> <span class="hljs-string">'3.19.0'</span>
          <span class="hljs-attr">dart-verion:</span> <span class="hljs-string">'3.3.4'</span>
          <span class="hljs-attr">channel:</span> <span class="hljs-string">'stable'</span>
      <span class="hljs-bullet">-</span> <span class="hljs-attr">run:</span> <span class="hljs-string">flutter</span> <span class="hljs-string">pub</span> <span class="hljs-string">get</span>
      <span class="hljs-bullet">-</span> <span class="hljs-attr">run:</span> <span class="hljs-string">flutter</span> <span class="hljs-string">clean</span>
      <span class="hljs-bullet">-</span> <span class="hljs-attr">run:</span> <span class="hljs-string">|
          flutter build ios --no-codesign
          cd build/ios/iphoneos
          mkdir Payload
          cd Payload
          ln -s ../Runner.app
          cd ..
          zip -r app.ipa Payload
</span>
  <span class="hljs-attr">build_androidApk:</span>
    <span class="hljs-attr">name:</span> <span class="hljs-string">Build</span> <span class="hljs-string">Flutter</span> <span class="hljs-string">App</span> <span class="hljs-string">(Android)</span>
    <span class="hljs-attr">needs:</span> [<span class="hljs-string">flutter_test</span>]
    <span class="hljs-attr">runs-on:</span> <span class="hljs-string">ubuntu-latest</span>
    <span class="hljs-attr">steps:</span>
      <span class="hljs-bullet">-</span> <span class="hljs-attr">uses:</span> <span class="hljs-string">actions/checkout@v3</span>
      <span class="hljs-bullet">-</span> <span class="hljs-attr">uses:</span> <span class="hljs-string">actions/setup-java@v3</span>
        <span class="hljs-attr">with:</span>
          <span class="hljs-attr">distribution:</span> <span class="hljs-string">'temurin'</span>
          <span class="hljs-attr">java-version:</span> <span class="hljs-string">'17'</span>
      <span class="hljs-bullet">-</span> <span class="hljs-attr">uses:</span> <span class="hljs-string">subosito/flutter-action@v2</span>
        <span class="hljs-attr">with:</span>
          <span class="hljs-attr">channel:</span> <span class="hljs-string">'stable'</span>
      <span class="hljs-bullet">-</span> <span class="hljs-attr">run:</span> <span class="hljs-string">flutter</span> <span class="hljs-string">pub</span> <span class="hljs-string">get</span>
      <span class="hljs-bullet">-</span> <span class="hljs-attr">run:</span> <span class="hljs-string">flutter</span> <span class="hljs-string">clean</span>
      <span class="hljs-bullet">-</span> <span class="hljs-attr">run:</span> <span class="hljs-string">flutter</span> <span class="hljs-string">build</span> <span class="hljs-string">apk</span> <span class="hljs-string">--debug</span>
      <span class="hljs-bullet">-</span> <span class="hljs-attr">uses:</span> <span class="hljs-string">ncipollo/release-action@v1</span>
        <span class="hljs-attr">with:</span>
          <span class="hljs-attr">artifacts:</span> <span class="hljs-string">"build/app/outputs/apk/debug/*"</span>
          <span class="hljs-attr">tag:</span> <span class="hljs-string">v1.0.${{</span> <span class="hljs-string">github.run_number}}</span>
          <span class="hljs-attr">token:</span> <span class="hljs-string">${{</span> <span class="hljs-string">secrets.TOKEN}}</span>
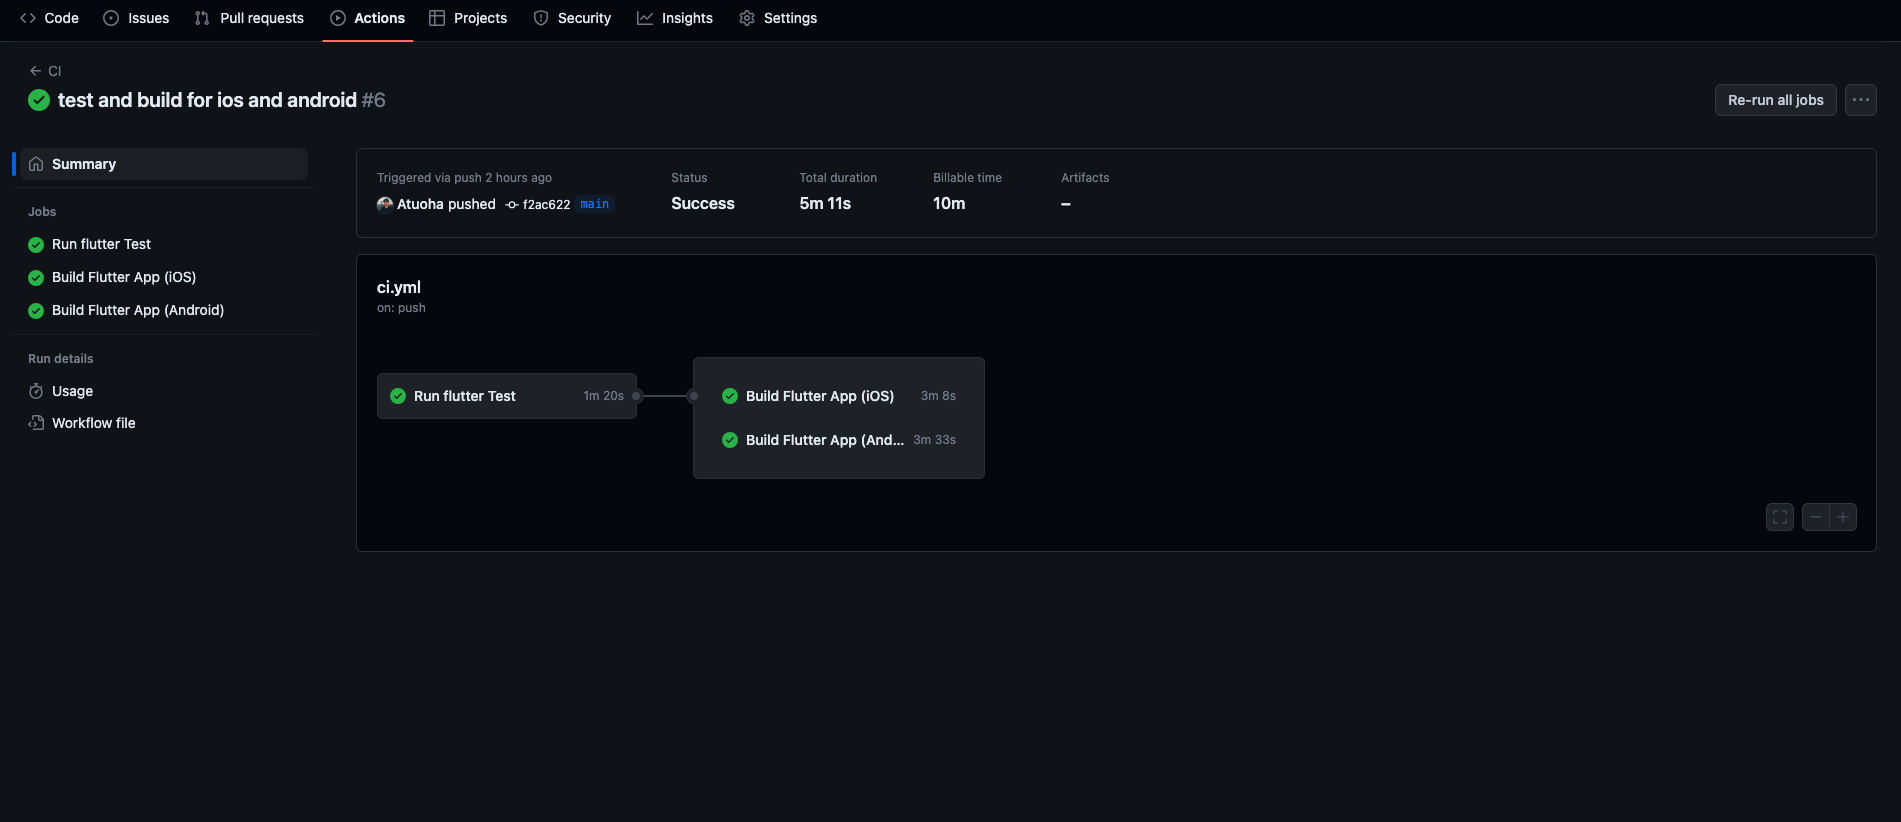
This workflow is named CI and is meant for Continuous Integration (running tests and building apps automatically whenever code is pushed or a pull request is created).
Triggers
In GitHub Actions, triggers define the events that cause a workflow to run. For this workflow, it runs automatically when certain events happen in the repository. Specifically, it listens to:
-
push: Whenever new code is pushed to themainbranch, the workflow will start. -
pull_request: Whenever a pull request is opened or updated that targets themainbranch, the workflow will also start.
This ensures that both direct updates to the main branch and contributions through pull requests are validated and tested.
<span class="hljs-attr">on:</span>
  <span class="hljs-attr">push:</span>
    <span class="hljs-attr">branches:</span>
      <span class="hljs-bullet">-</span> <span class="hljs-string">main</span>
  <span class="hljs-attr">pull_request:</span>
    <span class="hljs-attr">branches:</span>
      <span class="hljs-bullet">-</span> <span class="hljs-string">main</span>
This code runs the workflow when:
-
You push commits to the
mainbranch. -
A pull request is opened or updated targeting
main.
Jobs
There are 3 jobs in the workflow:
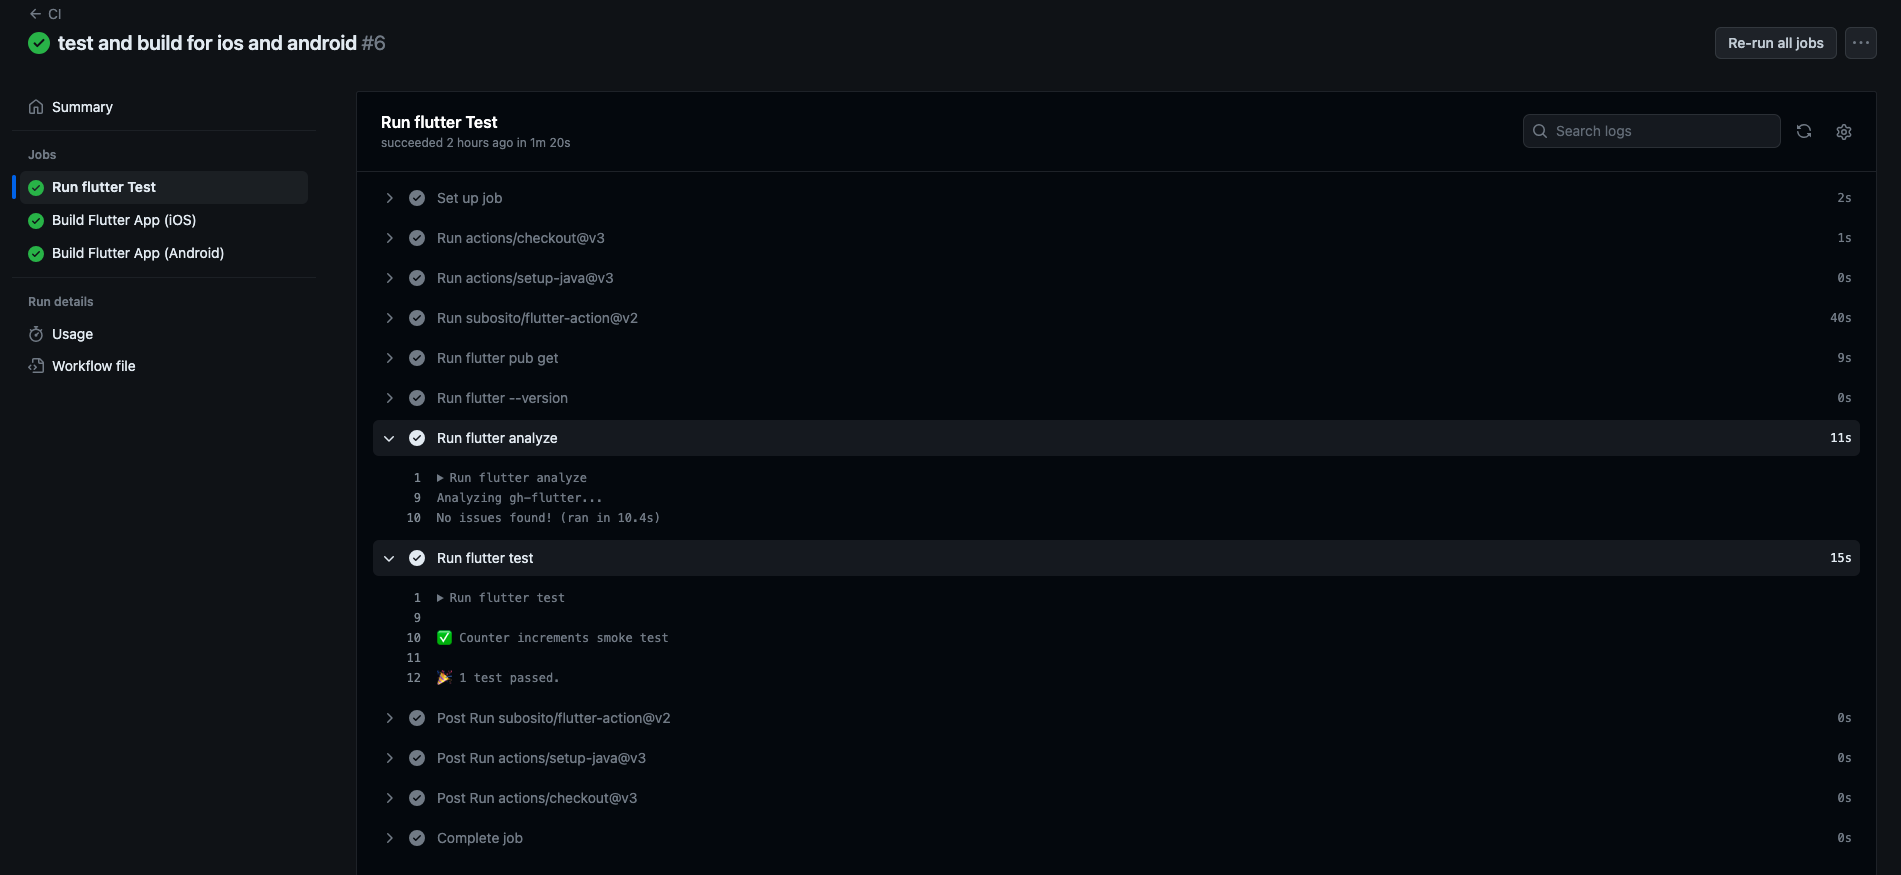
Job 1: flutter_test runs unit tests and analysis.
<span class="hljs-attr">jobs:</span>
  <span class="hljs-attr">flutter_test:</span>
    <span class="hljs-attr">runs-on:</span> <span class="hljs-string">ubuntu-latest</span>
It uses Ubuntu as the runner.
Here are the steps it follows:
-
Checks out code:
<span class="hljs-bullet">-</span> <span class="hljs-attr">uses:</span> <span class="hljs-string">actions/checkout@v3</span>Downloads your repo into the runner.
-
Sets up Java (needed for Flutter Android builds):
<span class="hljs-bullet">-</span> <span class="hljs-attr">uses:</span> <span class="hljs-string">actions/setup-java@v3</span> <span class="hljs-attr">with:</span> <span class="hljs-attr">distribution:</span> <span class="hljs-string">'temurin'</span> <span class="hljs-attr">java-version:</span> <span class="hljs-string">'17'</span> -
Sets up Flutter SDK:
 <span class="hljs-bullet">-</span> <span class="hljs-attr">uses:</span> <span class="hljs-string">subosito/flutter-action@v2</span>
   <span class="hljs-attr">with:</span>
     <span class="hljs-attr">channel:</span> <span class="hljs-string">'stable'</span>
This installs the Flutter stable channel.
-
Runs commands:
-
flutter pub getinstalls dependencies. -
flutter --versionchecks installed Flutter version. -
flutter analyzeanalyzes Dart code for errors. -
flutter testruns unit/widget tests.
-
If this job fails, later jobs won’t run.
Job 2: build_iOSApp builds an iOS .ipa file.
  <span class="hljs-attr">build_iOSApp:</span>
    <span class="hljs-attr">needs:</span> [<span class="hljs-string">flutter_test</span>]
    <span class="hljs-attr">runs-on:</span> <span class="hljs-string">macos-latest</span>

  <span class="hljs-attr">steps:</span>
  <span class="hljs-bullet">-</span> <span class="hljs-attr">uses:</span> <span class="hljs-string">actions/checkout@v3</span>

  <span class="hljs-bullet">-</span> <span class="hljs-attr">uses:</span> <span class="hljs-string">subosito/flutter-action@v2</span>
    <span class="hljs-attr">with:</span>
      <span class="hljs-attr">flutter-version:</span> <span class="hljs-string">'3.22.0'</span>

  <span class="hljs-bullet">-</span> <span class="hljs-attr">name:</span> <span class="hljs-string">Install</span> <span class="hljs-string">CocoaPods</span> <span class="hljs-string">dependencies</span>
    <span class="hljs-attr">run:</span> <span class="hljs-string">|
      cd ios
      pod install
</span>
  <span class="hljs-bullet">-</span> <span class="hljs-attr">name:</span> <span class="hljs-string">Build</span> <span class="hljs-string">iOS</span> <span class="hljs-string">App</span>
    <span class="hljs-attr">run:</span> <span class="hljs-string">flutter</span> <span class="hljs-string">build</span> <span class="hljs-string">ipa</span> <span class="hljs-string">--release</span> <span class="hljs-string">--no-codesign</span>
This runs only after flutter_test succeeds and uses macOS runner (needed for iOS builds).
After installing CocoaPods dependencies, the workflow executes flutter build ipa --release --no-codesign. This shell command tells Flutter to package your iOS app into an .ipa file inside the runner’s build directory. The --no-codesign flag allows building without signing credentials, which is convenient for CI pipelines.
Here are the steps it follows:
-
Checks out repo + sets up Java (same as before).
-
Sets up Flutter but this time pins:
<span class="hljs-attr">flutter-version:</span> <span class="hljs-string">'3.19.0'</span> <span class="hljs-attr">dart-verion:</span> <span class="hljs-string">'3.3.4'</span> <span class="hljs-comment"># typo: should be `dart-version`</span> <span class="hljs-attr">channel:</span> <span class="hljs-string">'stable'</span> -
Runs build:
-
flutter pub getfetches packages. -
flutter cleancleans old builds. -
flutter build ios --no-codesignbuilds iOS app without signing. -
After building:
-
Goes into
build/ios/iphoneos -
Creates a
Payloadfolder (needed for IPA structure). -
Symlinks the generated
Runner.appintoPayload. -
Zips the folder to
app.ipa.
-
-
Result: An unsigned .ipa file.
Job 3: build_androidApk builds a debug Android .apk and uploads it as a release artifact.
  <span class="hljs-attr">build_androidApk:</span>
    <span class="hljs-attr">needs:</span> [<span class="hljs-string">flutter_test</span>]
    <span class="hljs-attr">runs-on:</span> <span class="hljs-string">ubuntu-latest</span>

  <span class="hljs-attr">steps:</span>
  <span class="hljs-bullet">-</span> <span class="hljs-attr">uses:</span> <span class="hljs-string">actions/checkout@v3</span>

  <span class="hljs-bullet">-</span> <span class="hljs-attr">uses:</span> <span class="hljs-string">subosito/flutter-action@v2</span>
    <span class="hljs-attr">with:</span>
      <span class="hljs-attr">flutter-version:</span> <span class="hljs-string">'3.22.0'</span>

  <span class="hljs-bullet">-</span> <span class="hljs-attr">name:</span> <span class="hljs-string">Build</span> <span class="hljs-string">Android</span> <span class="hljs-string">APK</span>
    <span class="hljs-attr">run:</span> <span class="hljs-string">flutter</span> <span class="hljs-string">build</span> <span class="hljs-string">apk</span> <span class="hljs-string">--release</span>
This runs only after tests pass.
For Android, after setting up the Flutter environment, the workflow calls flutter build apk --release. This command compiles and packages the Android app into an .apk file ready for distribution. The resulting file is placed inside the build/app/outputs/flutter-apk directory of the project.
Here are the steps it follows:
-
Checks out repo, sets up Java, and sets up Flutter.
-
Runs:
-
flutter pub get -
flutter clean -
flutter build apk --debugcreates a debug APK.
-
-
Uploads APK using
ncipollo/release-action@v1:<span class="hljs-attr">artifacts:</span> <span class="hljs-string">"build/app/outputs/apk/debug/*"</span> <span class="hljs-attr">tag:</span> <span class="hljs-string">v1.0.${{</span> <span class="hljs-string">github.run_number</span> <span class="hljs-string">}}</span> <span class="hljs-attr">token:</span> <span class="hljs-string">${{</span> <span class="hljs-string">secrets.TOKEN</span> <span class="hljs-string">}}</span>-
Uploads all debug APKs as release artifacts.
-
Tags release as
v1.0.<run_number>(e.g.,v1.0.5). -
Uses a GitHub Personal Access Token (
TOKEN) stored in repo secrets.
-
Step 4: Generate and Add a GitHub Token
The Android build job releases APKs using the release-action. To authenticate, you must provide a GitHub personal access token. To do this, go to GitHub Settings → Developer settings → Personal access tokens.
Generate a new token with repo permissions and copy the token immediately. Then go to your repository → Settings → Secrets → New repository secret. Add the token with the name TOKEN.
Now the workflow can use ${{ secrets.TOKEN }} securely.
Step 5: Understanding the Workflow
This workflow is triggered when code is pushed to the main branch or when a pull request is opened against it. Let’s break it down:
Flutter Test Job
- Environment: Runs on
ubuntu-latest.
Steps:
-
actions/checkout@v3fetches the source code. -
actions/setup-java@v3installs Java, required for some Flutter tools. -
subosito/flutter-action@v2installs Flutter on the runner. -
flutter pub getinstalls dependencies. -
flutter analyzechecks for code issues. -
flutter testruns test cases.
This job ensures your code compiles, passes linting, and has no failing tests.
iOS App Build Job
-
Environment: Runs on
macos-latestbecause iOS builds require macOS. -
Dependencies: This job runs only if
flutter_testpasses (needs: [flutter_test]).
Steps: Similar setup as before, but after cleaning old builds with flutter clean, it runs flutter build ios --no-codesign to build an iOS app without requiring a signing certificate. The shell commands package the app into an .ipa file.
Android APK Build Job
-
Environment: Runs on
ubuntu-latest. -
Dependencies: Also depends on
flutter_test.
Steps:
-
Installs Flutter.
-
Runs
flutter cleanand then builds the Android APK. -
Uses
ncipollo/release-action@v1to upload the APK as a GitHub release, tagged automatically with a version likev1.0.<run_number>.
Step 6: Push and Enable the Workflow
Save your file as .github/workflows/ci.yml and push the changes:
git add .
git commit -m <span class="hljs-string">"Add GitHub Actions workflow"</span>
git push
When you push your changes to GitHub, the workflow file is picked up automatically. To confirm that it is running, open your repository on GitHub and click on the Actions tab at the top of the page. You will see a list of workflow runs, each tied to the commit message that triggered them.
Click on the most recent run to expand the details. Inside, you’ll find separate jobs for Android and iOS builds. Each job will show its status in real time:
-
A yellow dot with “In progress” indicates the job is still running.
-
A green check mark with “Success” means the job finished successfully.
-
A red cross with “Failed” means something went wrong.
This way, you can immediately tell whether your Android and iOS builds passed or if one of them needs attention.


Final Notes
With this setup, you now have:
-
Automated testing whenever you push or open a pull request.
-
Automatic iOS builds on macOS runners.
-
Automatic Android builds with APKs released to GitHub.
This ensures that every change is tested and that builds are consistently generated without manual steps.
For more details, see the official GitHub Actions documentation: https://docs.github.com/en/actions.
Source: freeCodeCamp Programming Tutorials: Python, JavaScript, Git & MoreÂ