
Sign and symbol languages, like Makaton and American Sign Language (ASL), are powerful communication tools. However, they can create challenges when communicating with people who don’t understand them.
As a researcher working on AI for accessibility, I wanted to explore how machine learning and computer vision could bridge that gap. The result was a real-time gesture-to-text translator built with Python and Mediapipe, capable of detecting hand gestures and instantly converting them to text.
In this tutorial, you’ll learn how to build your own version from scratch, even if you’ve never used Mediapipe before.
By the end, you’ll know how to:
-
Detect and track hand movements in real time.
-
Classify gestures using a simple machine learning model.
-
Convert recognized gestures into text output.
-
Extend the system for accessibility-focused applications.
Prerequisites
Before following along with this tutorial, you should have:
-
Basic Python knowledge – You should be comfortable writing and running Python scripts.
-
Familiarity with the command line – You’ll use it to run scripts and install dependencies.
-
A working webcam – This is required for capturing and recognizing gestures in real time.
-
Python installed (3.8 or later) – Along with
pipfor installing packages. -
Some understanding of machine learning basics – Knowing what training data and models are will help, but I’ll explain the key parts along the way.
-
An internet connection – To install libraries such as Mediapipe and OpenCV.
If you’re completely new to Mediapipe or OpenCV, don’t worry, I will walk through the core parts you need to know to get this project working.
Table of Contents
Why This Matters
Accessible communication is a right, not a privilege. Gesture-to-text translators can:
-
Help non-signers communicate with sign/symbol language users.
-
Assist in educational contexts for children with communication challenges.
-
Support people with speech impairments.
Note: This project is a proof-of-concept and should be tested with diverse datasets before real-world deployment.
Tools and Technologies
We’ll be using:
| Tool | Purpose |
| Python | Primary programming language |
| Mediapipe | Real-time hand tracking and gesture detection |
| OpenCV | Webcam input and video display |
| NumPy | Data processing |
| Scikit-learn | Gesture classification |
Step 1: How to Install the Required Libraries
Before installing the dependencies, ensure you have Python version 3.8 or higher installed (for example, Python 3.8, 3.9, 3.10, or newer). You can check your current Python version by opening a terminal (Command Prompt on Windows, or Terminal on macOS/Linux) and typing:
python --version
or
python3 --version
You have to confirm that your Python version is 3.8 or higher because Mediapipe and some dependencies require modern language features and binary wheels. If the commands above print a version older than/before 3.8, then you’ll have to install a newer Python version before you continue.
Windows:
-
Press Windows Key + R
-
Type
cmdand press Enter to open Command Prompt -
Type one of the above commands and press Enter
macOS/Linux:
-
Open your Terminal application
-
Type one of the above commands and press Enter
If your Python version is older than 3.8, you’ll need to download and install a newer version from the official Python website.
Once Python is ready, you can install the required libraries using pip:
pip install mediapipe opencv-python numpy scikit-learn pandas
This command installs all the libraries you’ll need for the project:
-
Mediapipe – real-time hand tracking and landmark detection.
-
OpenCV – reading frames from your webcam and drawing overlays.
-
Pandas – storing our collected landmark data in a CSV for training.
-
Scikit-learn – training and evaluating the gesture classification model.
Step 2: How Mediapipe Tracks Hands
Mediapipe’s Hand Tracking solution detects 21 key landmarks for each hand including fingertips, joints, and the wrist, at up to 30+ FPS even on modest hardware.
Here’s a conceptual diagram of the landmarks:

And here’s what real‑time tracking looks like:
![]()
Each landmark has (x, y, z) coordinates relative to the image size, making it easy to measure angles and positions for gesture classification.
Step 3: Project Pipeline
Here’s how the system works, from webcam to text output:

-
Capture: Webcam frames are captured using OpenCV.
-
Detection: Mediapipe locates hand landmarks.
-
Vectorization: Landmarks are flattened into a numeric vector.
-
Classification: A machine learning model predicts the gesture.
-
Output: The recognized gesture is displayed as text.
Basic hand detection example:
<span class="hljs-keyword">import</span> cv2
<span class="hljs-keyword">import</span> mediapipe <span class="hljs-keyword">as</span> mp

mp_hands = mp.solutions.hands
mp_draw = mp.solutions.drawing_utils

cap = cv2.VideoCapture(<span class="hljs-number">0</span>)

<span class="hljs-keyword">with</span> mp_hands.Hands(max_num_hands=<span class="hljs-number">1</span>) <span class="hljs-keyword">as</span> hands:
    <span class="hljs-keyword">while</span> <span class="hljs-literal">True</span>:
        ret, frame = cap.read()
        <span class="hljs-keyword">if</span> <span class="hljs-keyword">not</span> ret:
            <span class="hljs-keyword">break</span>

        results = hands.process(cv2.cvtColor(frame, cv2.COLOR_BGR2RGB))

        <span class="hljs-keyword">if</span> results.multi_hand_landmarks:
            <span class="hljs-keyword">for</span> hand_landmarks <span class="hljs-keyword">in</span> results.multi_hand_landmarks:
                mp_draw.draw_landmarks(frame, hand_landmarks, mp_hands.HAND_CONNECTIONS)

        cv2.imshow(<span class="hljs-string">"Hand Tracking"</span>, frame)
        <span class="hljs-keyword">if</span> cv2.waitKey(<span class="hljs-number">1</span>) & <span class="hljs-number">0xFF</span> == ord(<span class="hljs-string">"q"</span>):
            <span class="hljs-keyword">break</span>

cap.release()
cv2.destroyAllWindows()
The code above opens the webcam and processes each frame with Mediapipe’s Hands solution. The frame is then converted to RGB (as Mediapipe expects), runs detection, and if a hand is found, it draws the 21 landmarks and their connections on top of the frame. You can press q to close the window. This piece verifies your setup and helps you see that landmark tracking works before moving on.
Step 4: How to Collect Gesture Data
Before we can train our model, we need a dataset of labelled gestures. Each gesture will be stored in a CSV file (gesture_data.csv) containing the 3D landmark coordinates for all detected hand points.
For example, we’ll collect data for three gestures:
-
thumbs_up – the classic thumbs-up pose.
-
open_palm – a flat hand, fingers extended (like a “high five”).
-
ok – the “OK” sign, made by touching the thumb and index finger.
You can collect samples for each gesture by running:
python src/collect_data.py --label thumbs_up --samples 200
python src/collect_data.py --label open_palm --samples 200
python src/collect_data.py --label ok --samples 200
Explanation of the command:
-
--label→ the name of the gesture you’re recording. This label will be stored alongside each row of coordinates in the CSV. -
--samples→ the number of frames to capture for that gesture. More samples generally lead to better accuracy.
How the process works:
-
When you run a command, your webcam will open.
-
Make the specified gesture in front of the camera.
-
The script will use MediaPipe Hands to detect 21 hand landmarks (each with
x,y,zcoordinates). -
These 63 numbers (21 × 3) are stored in a row of the CSV file, along with the gesture label.
-
The counter at the top will track how many samples have been collected.
-
When the sample count reaches your target (
--samples), the script will close automatically.
Example of what the CSV looks like:
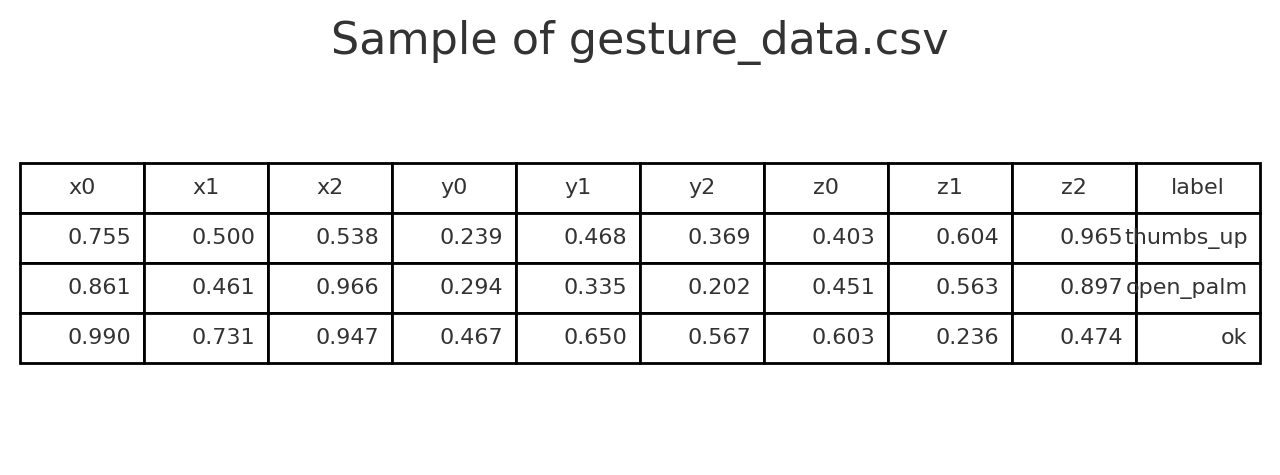
Each row contains:
-
x0, y0, z0 … x20, y20, z20 → coordinates of each hand landmark.
-
label → the gesture name.
Example of data collection in progress:

In the above screenshot, the script is capturing 10 out of 10 thumbs_up samples.
📌 Tip: Make sure your hand is clearly visible and well-lit. Repeat the process for all gestures you want to train.
Step 5: How to Train a Gesture Classifier
Once you have enough samples for each gesture, train a model:
python src/train_model.py --data data/gesture_data.csv --label palm_open
This script:
-
Loads the CSV dataset.
-
Splits into training and testing sets.
-
Trains a Random Forest Classifier.
-
Prints accuracy and a classification report.
-
Saves the trained model.
Core training logic:
<span class="hljs-keyword">import</span> pandas <span class="hljs-keyword">as</span> pd
<span class="hljs-keyword">from</span> sklearn.ensemble <span class="hljs-keyword">import</span> RandomForestClassifier
<span class="hljs-keyword">import</span> pickle

<span class="hljs-comment"># Load the dataset</span>
df = pd.read_csv(<span class="hljs-string">"data/gesture_data.csv"</span>)

<span class="hljs-comment"># Separate features and labels</span>
X = df.drop(<span class="hljs-string">"label"</span>, axis=<span class="hljs-number">1</span>)
y = df[<span class="hljs-string">"label"</span>]

<span class="hljs-comment"># Initialize and train the Random Forest Classifier</span>
model = RandomForestClassifier()
model.fit(X, y)

<span class="hljs-comment"># Save the trained model to a file</span>
<span class="hljs-keyword">with</span> open(<span class="hljs-string">"data/gesture_model.pkl"</span>, <span class="hljs-string">"wb"</span>) <span class="hljs-keyword">as</span> f:
    pickle.dump(model, f)
This block loads the gesture dataset from data/gesture_data.csv and splits it into:
-
X– the input features (the 3D landmark coordinates for each gesture sample). -
y– the labels (gesture names likethumbs_up,open_palm,ok).
We then created a Random Forest Classifier, which is well-suited for numerical data and works reliably without much tuning. The model learns patterns in the landmark positions that correspond to each gesture.
Finally, we saved the trained model as data/gesture_model.pkl so it can be loaded later for real-time gesture recognition without retraining.
Step 6: Real-Time Gesture-to-Text Translation
Load the model and run the translator:
python src/gesture_to_text.py --model data/gesture_model.pkl
This command runs the real-time gesture recognition script.
-
The
--modelargument tells the script which trained model file to load — in this case,gesture_model.pklthat we saved earlier. -
Once running, the script opens your webcam, detects your hand landmarks, and uses the model to predict the gesture.
-
The predicted gesture name appears as text on the video feed.
-
Press
qto exit the window when you’re done.
Core prediction logic:
<span class="hljs-keyword">with</span> open(<span class="hljs-string">"data/gesture_model.pkl"</span>, <span class="hljs-string">"rb"</span>) <span class="hljs-keyword">as</span> f:
    model = pickle.load(f)

<span class="hljs-keyword">if</span> results.multi_hand_landmarks:
    <span class="hljs-keyword">for</span> hand_landmarks <span class="hljs-keyword">in</span> results.multi_hand_landmarks:
        coords = []
        <span class="hljs-keyword">for</span> lm <span class="hljs-keyword">in</span> hand_landmarks.landmark:
            coords.extend([lm.x, lm.y, lm.z])
        gesture = model.predict([coords])[<span class="hljs-number">0</span>]
        cv2.putText(frame, gesture, (<span class="hljs-number">10</span>, <span class="hljs-number">50</span>), cv2.FONT_HERSHEY_SIMPLEX, <span class="hljs-number">1</span>, (<span class="hljs-number">0</span>, <span class="hljs-number">255</span>, <span class="hljs-number">0</span>), <span class="hljs-number">2</span>)
This code loads the trained gesture recognition model from gesture_model.pkl.
If any hands are detected (results.multi_hand_landmarks), it loops through each detected hand and:
-
Extracts the coordinates – for each of the 21 landmarks, it appends the
x,y, andzvalues to thecoordslist. -
Makes a prediction – passes
coordsto the model’spredictmethod to get the most likely gesture label. -
Displays the result – uses
cv2.putTextto draw the predicted gesture name on the video feed.
This is the real-time decision-making step that turns raw Mediapipe landmark data into a readable gesture label.
You should see the recognized gesture at the top of the video feed:

Step 7: Extending the Project
You can take this project further by:
-
Adding Text-to-Speech: Use
pyttsx3to speak recognized words. -
Supporting More Gestures: Expand your dataset.
-
Deploying in the Browser: Use TensorFlow.js for web-based recognition.
-
Testing with Real Users: Especially in accessibility contexts.
Ethical and Accessibility Considerations
Before deploying:
-
Dataset Diversity: Train with gestures from different skin tones, hand sizes, and lighting conditions.
-
Privacy: Store only landmark coordinates unless you have consent for video storage.
-
Cultural Context: Some gestures have different meanings in different cultures.
Conclusion
In this tutorial, we explored how to use Python, Mediapipe, and machine learning to build a real-time gesture-to-text translator. This technology has exciting potential for accessibility and inclusive communication, and with further development, could become a powerful tool for breaking down language barriers.
You can find the full code and resources here:
GitHub Repo – Gesture_Article
Source: freeCodeCamp Programming Tutorials: Python, JavaScript, Git & MoreÂ