Amazon ElastiCache is a fully managed, Valkey-, Memcached-, and Redis OSS-compatible service that delivers real-time, cost-optimized performance for modern applications with 99.99% SLA availability. ElastiCache speeds up application performance, scaling to millions of operations per second with microsecond response time.
Spring Boot provides a quick and straightforward way of building production-grade Spring Framework based applications. To accomplish this, Spring Boot comes prepackaged with auto configuration modules for most libraries typically used with Spring Framework. Open source Spring Boot adds auto-configuration on top of Spring Framework by following convention over configuration.
In this post, we explore the basics of integrating a Spring Boot application with ElastiCache to enable caching.
Solution overview
Spring Framework supports transparently implementing caching in an application by providing an abstraction layer. The following code demonstrates a simple example of adding caching to a method by including the @Cacheable annotation. Before invoking the getCacheableValue method, Spring Framework looks for an entry in a cache named myTestCache that matches the myKey argument. If an entry is found, the content in the cache is immediately returned to the caller, and the method is not invoked. Otherwise, the method is invoked, and the cache is updated before returning the value.
Spring Boot provides modules to automatically integrate with a set of providers using convention over configuration. In the following example, adding two module dependencies to the project’s Maven POM file will implement caching:
The spring-boot-starter-cache dependency adds basic caching to the application, whilst the spring-boot-starter-data-redis adds integration with Redis OSS or Valkey and declares that by default, all caches will exist here.
For configurable values, the Spring Framework application.properties file is updated. In the following example, the endpoint address of a Serverless ElastiCache cache is provided, with all cached entries configured to have a Time-to-Live (TTL) of 10 minutes:
All Valkey or Redis OSS serverless caches have in-transit encryption enabled. To configure Spring Framework to use in-transit encryption, we add a configuration value to the application.properties file:
The demo code provided in this post implements this in a simple AWS Command Line Interface (AWS CLI) application. We demonstrate how to build and run this application in the next sections.
Prerequisites
You will build and run the demo application on an Amazon Elastic Compute Cloud (Amazon EC2) Linux instance, running Linux from AWS. To create an EC2 instance and connect to it using Session Manager, a capability of AWS Systems Manager, refer to Connect to an Amazon EC2 instance by using Session Manager. After you create the instance, note the following information:
- The IDs of the subnets for the virtual private cloud (VPC) your EC2 instance lives in
- The ID of the security group assigned to the instance
- The ID of the EC2 instance
To build the application, you must have the following prerequisites:
- Java 17 – To install the Java Development Kit (JDK) 17, run
sudo yum install -y java-17-amazon-corretto-develon your EC2 instance - Maven – To install Apache Maven, run
sudo yum install -y apache-mavenon your EC2 instance
To run the demo application, you also need an ElastiCache cache. We will create this in the next section of this post.
Create ElastiCache Serverless cache
We use the ElastiCache Serverless option because it allows you to create a cache in under a minute and instantly scale capacity based on application traffic patterns. We begin with the Redis OSS engine, then later upgrade to Valkey to demonstrate that Valkey is a drop-in replacement for Redis OSS with no alterations to the application parameters or code. The demo application will not require any additional changes if you choose to use a self-designed ElastiCache cluster instead of serverless.
To create a serverless cache using the AWS CLI run the following command in AWS CloudShell, replacing <your VPC subnet IDs> with a comma separated list of the subnet IDs for the VPC containing your EC2 instance created earlier:
Obtain and note the endpoint address for the cache:
The cache will have a security group. Obtain and note this security group ID:
Your EC2 instance and ElastiCache cache exist in the same VPC. To allow access to the cache from the EC2 instance, you must permit this in the associated ElastiCache security group. To do this, add a rule to the ElastiCache security group permitting access to port 6379 from the EC2 instance security group:
Download and run the demo application
On your EC2 instance, run the following commands:
Using your preferred editor on the Linux instance, update the src/main/resources/application.properties file to include the endpoint address for the spring-boot-demo cache. For example:
Now run the demo application with the following command:
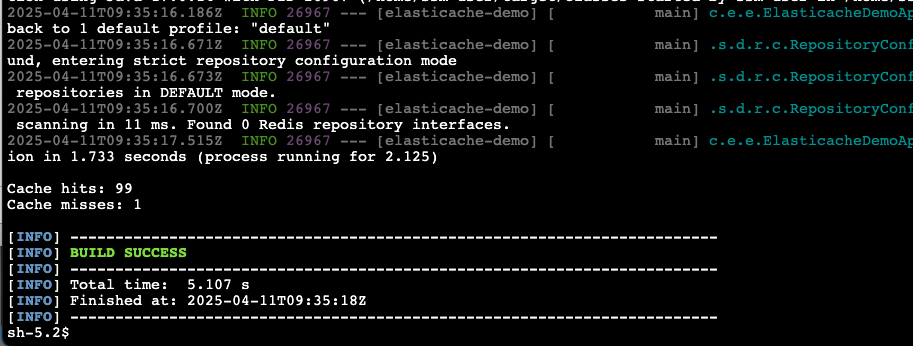
The demo application will build and run. You will see output on the console. An example is shown in the following screenshot.

The output shows that for 100 attempts to invoke the getCacheableValue method, the first was a cache miss, causing the method to be invoked. The following 99 attempts were cache hits, returning the value from the cache without invoking the method. You can run the demo application again and see that there are now 100 cache hits and 0 misses (the cache is still populated from the previous run).
Upgrade the cache to Valkey
Valkey is an open source, in-memory, high performance, key-value datastore designed to be a drop-in replacement for Redis OSS. Existing Elasticache Redis OSS caches can be upgraded, in-place, to use the Valkey engine by following a simple process.
The cache will have a major version. Obtain and note this value:
Start the upgrade to Valkey:
The cache will continue to operate throughout the upgrade. You can run the demo application again with mvn spring-boot:run at any time to see the same results as using the Redis OSS cache.
We can check the status of the upgrade with the following command:
Once the status changes from modifying to available, the upgrade is complete.
Run the demo application one more time with mvn spring-boot:run. You will see the same results as using the Redis OSS cache. Valkey is a drop-in replacement for Redis OSS—there are no changes needed to the application code or libraries to use Valkey.
Cleaning up
To avoid incurring future costs, you can delete the chargeable resources created as part of this post.
Delete the ElastiCache serverless cache:
Delete the EC2 instance:
Conclusion
In this post, we showed how to integrate a Spring Boot application with ElastiCache to enable caching. You can choose between Redis OSS and Valkey engines without having to make any application code or module dependency changes.
Adding caching to your application with ElastiCache can speed up application performance, enabling scaling to millions of operations per second with microsecond response time.
To get started with ElastiCache, see the Amazon ElastiCache User Guide.
About the Author
 Chris Gillespie is a UK-based Senior Solutions Architect. He spends most of his work with fast-moving “born in the cloud” customers. Outside of work, he fills his time with family and trying to get fit.
Source: Read More


