
Virtualization is a game-changer for developers, hobbyists, and IT enthusiasts. It lets you run multiple operating systems on one machine, which is perfect for testing apps, hosting servers, or learning new tech. If you want to take it further, clustering ties multiple machines together for more power and flexibility. And you can use Proxmox Virtual Environment (VE) to build a cluster for free – no expensive licenses required.
In this tutorial, you’ll set up a 3-node Proxmox cluster using three computers (or virtual machines for practice). By the end, you’ll have a working cluster ready to host virtual machines (VMs) and experiment with cool features like guest migration and VM replication etc.
Let’s dive in!
Prerequisites: What You’ll Need to Know
This guide is beginner-friendly for clustering, but you’ll need some basic skills to follow along. You should be comfortable with:
Installing an OS from a USB drive (don’t worry, I’ll walk you through the steps).
Using a terminal for simple commands like
pingornano.Setting up a home network with static IPs (for example, knowing your router’s IP range). No advanced virtualization or clustering experience is required—I’ll explain the key concepts as we go.
What You’ll Need
Three computers (or VMs): Start with at least 8GB RAM and 100GB storage per machine, plus a virtualization-capable CPU (most modern ones work). These specs are a baseline—actual RAM and storage depend on how many VMs you want to host (e.g., more VMs need more resources).
Proxmox VE: Free and open-source. Grab the ISO from proxmox.com.
Network connection: All three must be on the same network and be able to ping each other.
A web browser: For Proxmox’s web interface.
30–60 minutes: Depending on your setup pace.
Why Proxmox and Clustering?
Proxmox VE is a free, open-source virtualization platform built on Debian Linux. It uses KVM for VMs (fully virtualized systems) and LXC for containers (lightweight app environments), all managed via a slick web interface.
Clustering means linking multiple Proxmox machines—called nodes—so they act as one system. Think of it like a team: each node shares the workload, and you control them from a single dashboard. This setup lets you move (migrate) VMs between nodes, boost reliability, and experiment with high availability (HA)—where VMs auto-restart (on healthy node) if a node fails.
Plus, Proxmox offers a handy replication feature: it can sync VM data between nodes automatically, keeping backups ready if something goes wrong.
It’s a must-have skill for DevOps, app testing, or IT tinkering.
2 Nodes vs. 3 Nodes: Which Should You Choose?
Before we build your 3-node cluster, let’s explore your options. Clustering can start with 2 nodes or go to 3 (or more). Here’s why you might pick one over the other:
2-Node Cluster:
Pros: Easier setup with just two machines. Great for learning basics or small projects. Uses less hardware.
Cons: No quorum—a voting majority to keep the cluster running if a node fails—so HA isn’t reliable. You’d need an extra trick (like a quorum device) to avoid stalling.
Best For: Learning, Testing clustering, or limited resources.
3-Node Cluster:
Pros: Built-in quorum—two out of three nodes keep things going if one crashes. Ideal for HA practice. More stable and scalable.
Cons: Needs an extra machine and a bit more setup time.
Best For: Serious learners or small production setups.
We’ll go with 3 nodes—it’s the sweet spot for stability and real-world skills.
Step 1: Install Proxmox VE on All Three Machines
First, download the Proxmox VE ISO from proxmox.com. Make a bootable USB with Rufus (Windows), dd (Linux/macOS), or Raspberry Pi Imager (available for all platforms).
For dd, use this command (replace placeholders with your ISO and USB device):
sudo dd if=proxmox-ve.iso of=/dev/sdX bs=1M status=progress oflag=sync
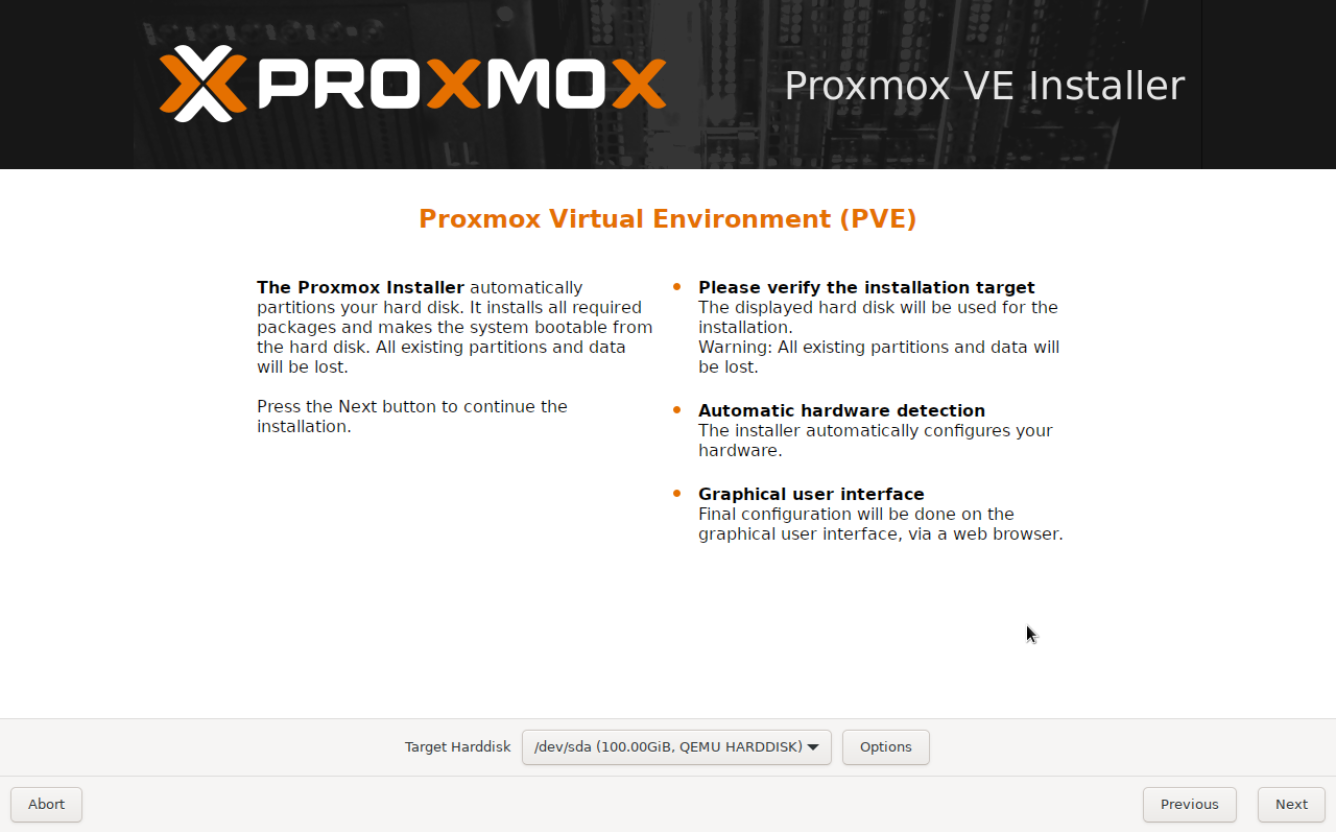
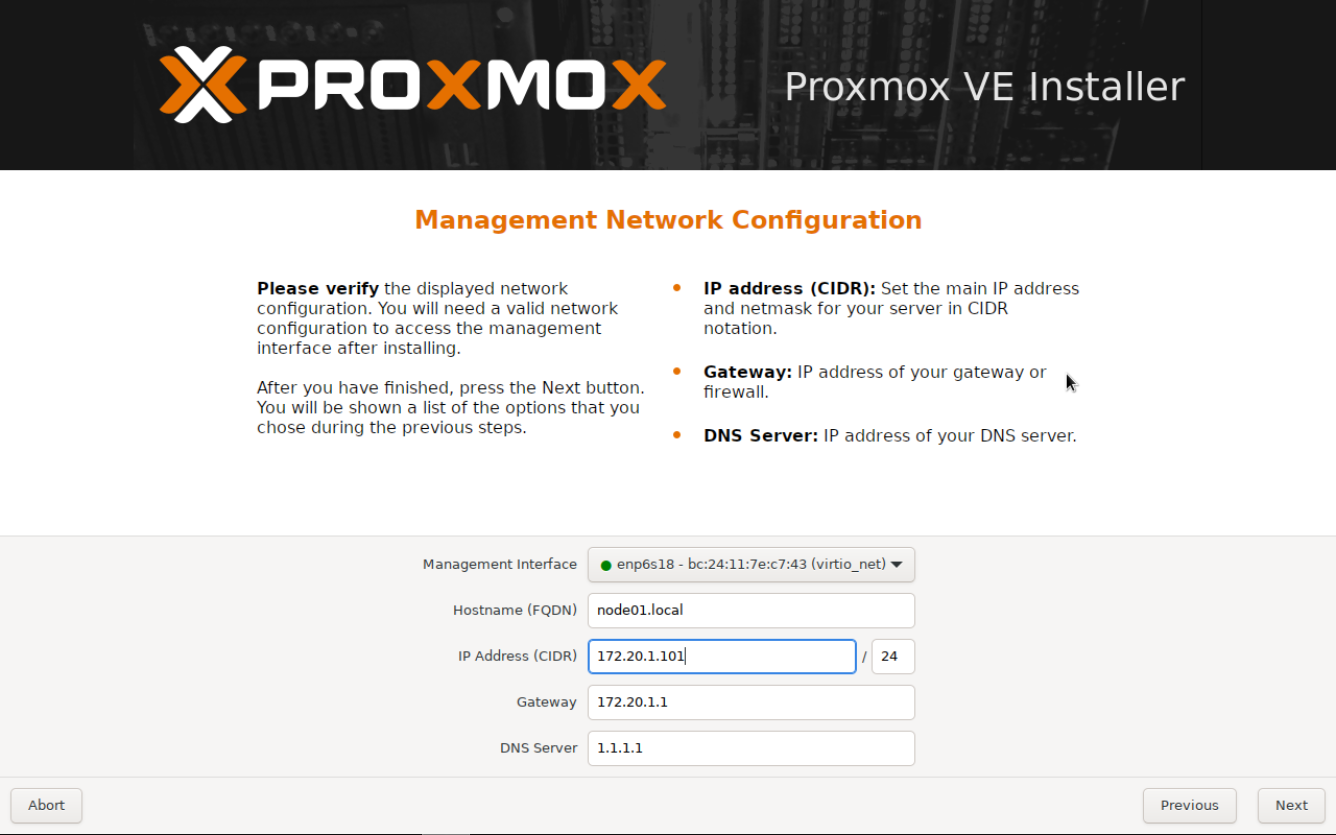
Boot each machine from the USB and follow the installer. Stick with the default partitioning scheme (it uses EXT4 filesystem) and set static IPs and hostnames as follows (or you can use your own IPs knowing your router’s IP range):
Node 1:
172.20.1.101[hostname:node01.local]Node 2:
172.20.1.102[hostname:node02.local]Node 3:
172.20.1.103[hostname:node03.local]
After installation, each node displays its IP on the console (for example, https://172.20.1.101:8006). Test it by opening a browser, visiting each IP, and logging in with root and your password. You’ll see the Proxmox dashboard.
Step 2: Prepare Your Nodes
Now, let’s get your nodes ready to talk to each other—a crucial step for clustering. Without this, they won’t recognize each other properly.
Update /etc/hosts on all three nodes to map IPs to hostnames (since we’re not using a DNS server). Open the file with:
nano /etc/hosts
Add these lines (IPs and hostnames) on each node:
172.20.1.101 node01.local node01
172.20.1.102 node02.local node02
172.20.1.103 node03.local node03
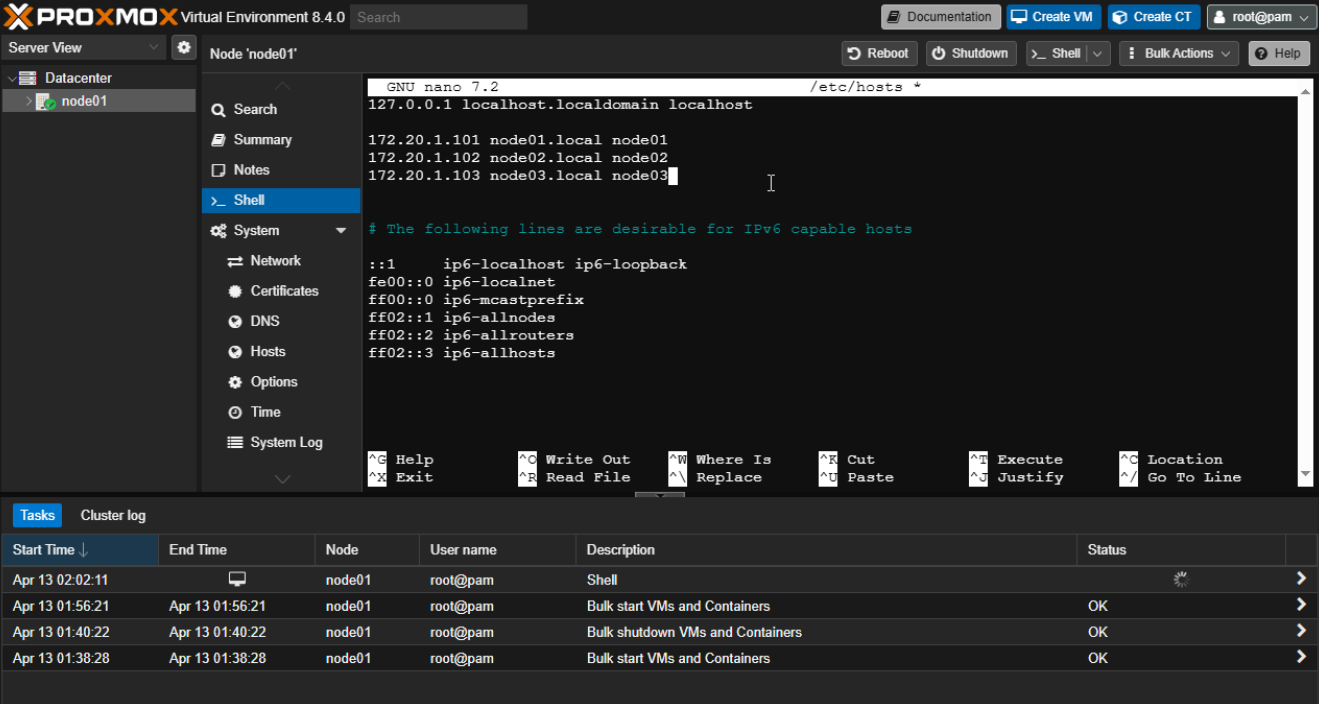
Save and exit (Ctrl+O, Enter, Ctrl+X). This ensures nodes can resolve each other’s names (for example, node01 pings node02.local).
Next, check connectivity. From Node 1’s console (or SSH), ping the others:
ping 172.20.1.102
ping 172.20.1.103
Repeat from Node 2 and Node 3. If pings fail, check your network or firewall.
Finally, sync their clocks—clusters need precise time to coordinate. On each node, run:
ntpdate pool.ntp.org
All three nodes are now primed for clustering.
Step 3: Create the Cluster on Node 1
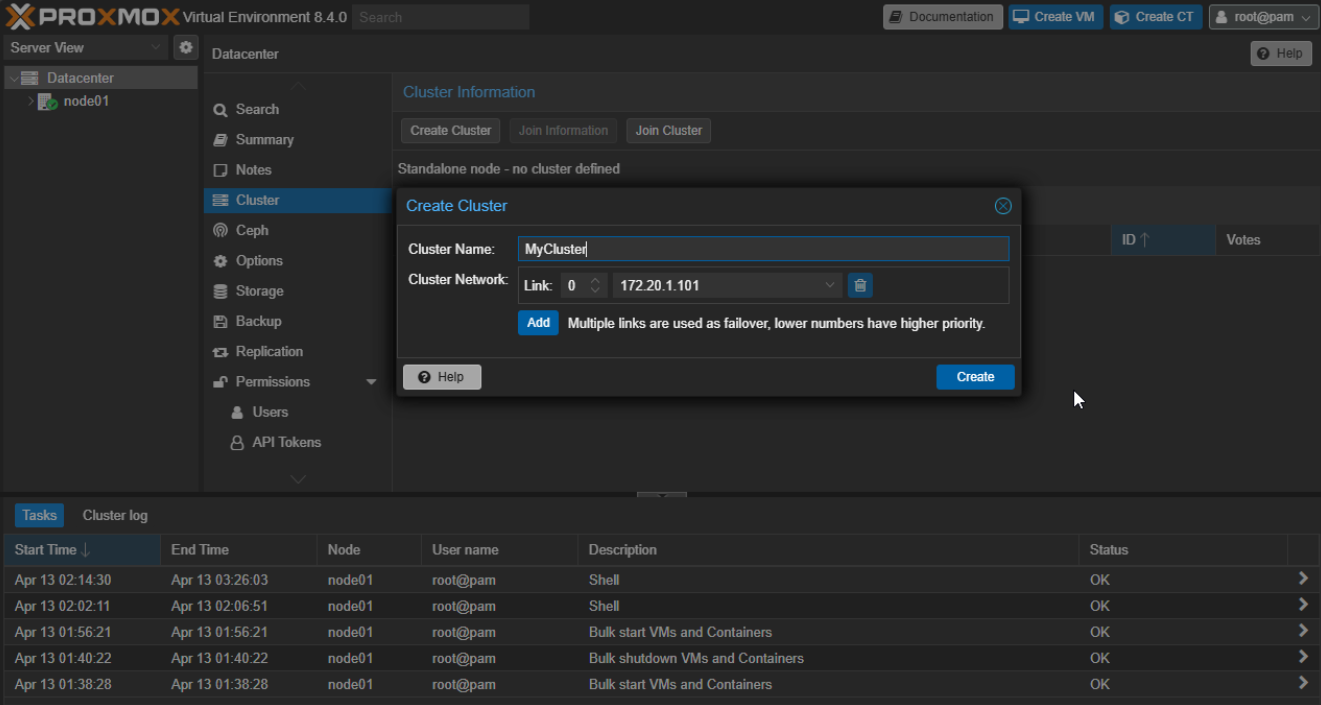
Let’s set up the cluster starting with Node 1. Log into its web interface at https://172.20.1.101:8006. On the left sidebar, click Datacenter, then Cluster. Hit the Create Cluster button, and a dialog pops up. Name your cluster—let’s call it MyCluster and click Create. A task window will appear, showing the process. Wait a few seconds until you see “TASK OK”—that means your cluster is live and Node 1 is its first member. Now we can add the other nodes!
Step 4: Join Node 2 and Node 3 to the Cluster
With the cluster created, let’s bring in Node 2 and Node 3. On Node 1’s cluster page, click Join Information, then Copy Information—this copies a key you’ll need.
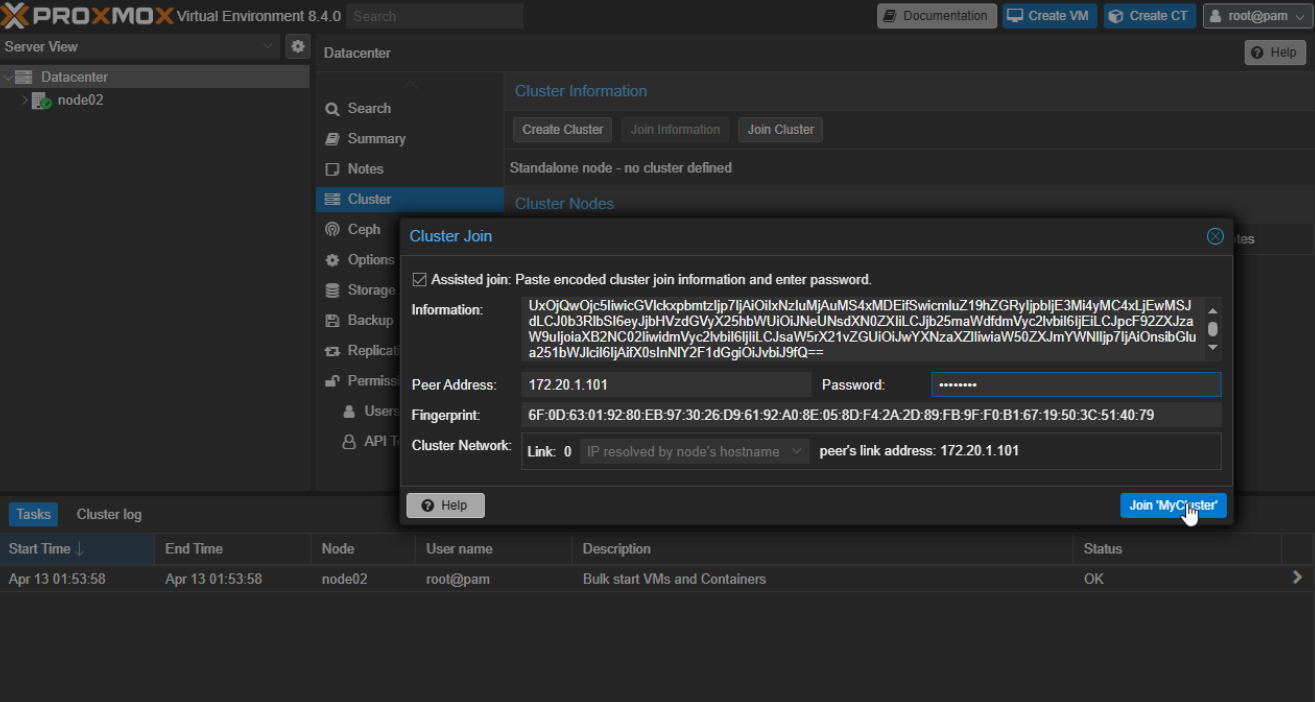
Open Node 2’s web interface (https://172.20.1.102:8006), go to Datacenter > Cluster > Join Cluster, paste the key into the Information field, enter Node 1’s root password, and click Join MyCluster.
Repeat this process on Node 3’s interface (https://172.20.1.103:8006). Refresh Node 1’s dashboard—under Datacenter, you’ll see all three nodes with green checkmarks.
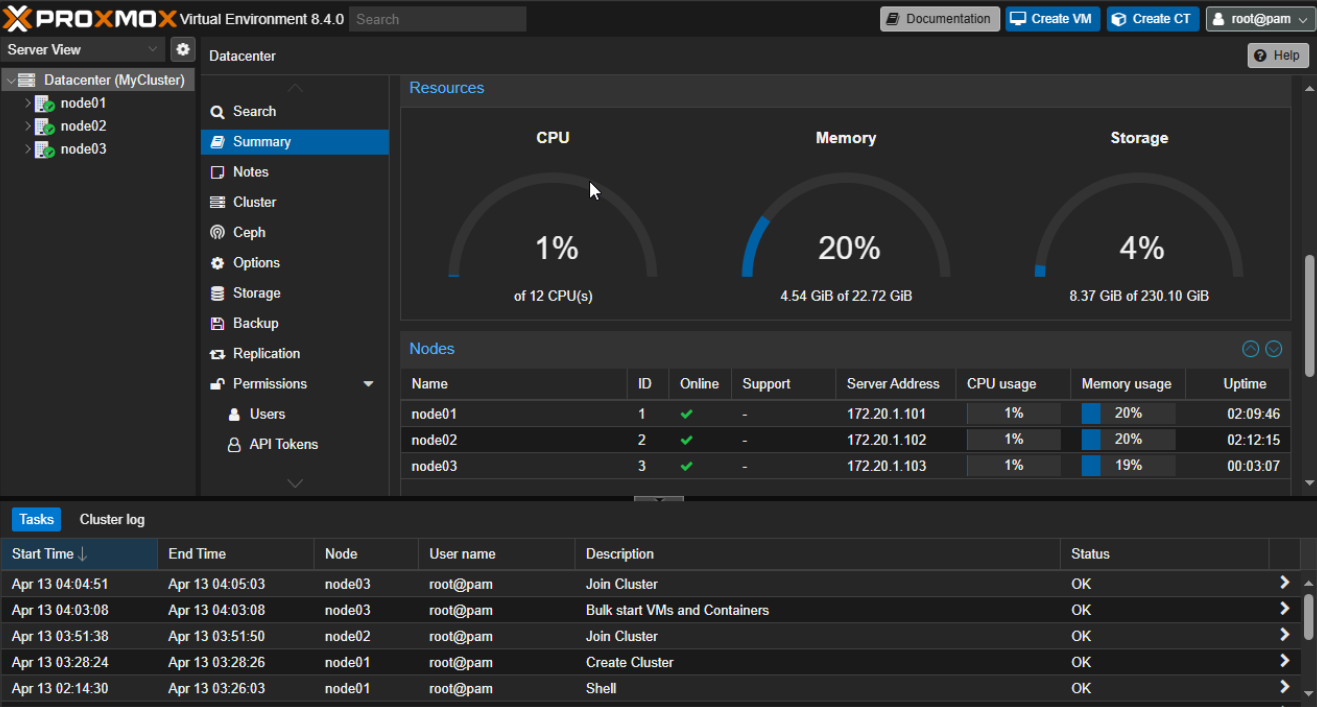
Your 3-node cluster is up!
Step 5: Test Your Cluster
Let’s verify it works by creating and moving a test VM. On Node 1, click Create VM, name it TestVM, skip the ISO, and finish with defaults (no disk content needed). Hit the Start button to boot it up.
Now, let’s migrate it around—migration means moving the VM from one node to another to test your cluster’s flexibility. Right-click TestVM, select Migrate, choose Node 2, and click Migrate. The VM stops briefly, copies to Node 2, and restarts (normal without shared storage).
Repeat this, migrating it from Node 2 to Node 3. If it hops between nodes successfully, your cluster’s rocking! With three nodes, you’ve got quorum—try shutting down Node 3 to see the others stay active.
What’s Next?
You’ve built a 3-node Proxmox cluster for free—congrats! Take it further with:
Shared storage: Add NFS or a spare drive for live VM migration (no stopping/shutdown needed).
High Availability: Enable HA—VMs auto-restart on a healthy node if one fails.
VM Replication: Configure Replication—Sync VM data between nodes automatically, keeping backups ready if something goes wrong.
Scale up: Add more nodes or try LXC containers.
Check your cluster’s health anytime (from console) with:
pvecm status
Wrapping Up
You’ve just set up a 3-node Proxmox cluster at no cost. It’s a playground for virtualization, DevOps practice, or even hosting small projects. Share your thoughts with me – I’d love to hear how you liked it.
Source: freeCodeCamp Programming Tutorials: Python, JavaScript, Git & MoreÂ

