
If you’re curious and passionate about technology like I am, and you’re looking for clarity in your code, you’ve likely already experienced the limitations of conventional tools for documenting and modeling APIs.
Tools such as Swagger, JSON Schema, or OpenAPI are powerful, but they can be verbose, inflexible, or not conducive to reuse.
Well, I recently discovered TypeSpec. In this guide, I’ll show you how to take advantage of TypeSpec to create modern, maintainable, and well-documented REST APIs.
We’ll take a look at:
Prerequisites
Before we dive into using TypeSpec to document and model APIs, here are a few things you’ll need to familiarize yourself with and/or have:
Node.js (version 18 or higher)
npm for dependency management
Visual Studio Code (recommended to take advantage of the official TypeSpec extension). For an optimal experience, to create your project easily, it provides syntax highlighting, validation, autocompletion, navigation, and more.
TypeSpec Extension in VS Code (You can install the extension via Visual Studio Marketplace)
An understanding of how to use and create APIs
What is TypeSpec?
TypeSpec is an open-source declarative language, developed by Microsoft, designed to describe APIs in an explicit, reusable, scalable, and standards-based way. It’s designed to model REST, gRPC, GraphQL, and other types of APIs, and offers a modern syntax close to TypeScript.
It can automatically generate:
OpenAPI, JSON Schema, or Protobuf specifications
server and client code
API documentation
and other interface-related artifacts
TypeSpec isn’t just a language – it’s an API design platform that favors abstraction, encourages code reuse, and integrates with modern tools like Visual Studio Code via a dedicated extension. You can install the extension via the VS Code Visual Studio Marketplace.
Why use TypeSpec?
Before diving into the code, let’s take a minute to understand the TypeSpec philosophy. Microsoft uses TypeSpec internally to deliver high-quality API services to millions of customers, across tens of thousands of endpoints, while ensuring code quality, governance, and scalability.
Unlike generators such as Swagger, Codegen, or Postman, which start from an OpenAPI file to generate code, TypeSpec does the opposite: you first write your API design in a DSL (Domain Specific Language), then generate everything you need.
TypeSpec has been designed to meet the major challenges of large-scale API design and governance:
Simplification: clear, concise syntax to focus on business logic.
Reusability: encapsulates types, request/response models, and directives in modular components.
Productivity: automatically generates the necessary resources from a single source definition.
Consistency: maintains compliance with internal standards thanks to shared libraries.
Interoperability: integrates with the OpenAPI ecosystem and supports multi-format generation.
Scalability: designed to handle thousands of endpoints like those used by Microsoft Azure.
Let’s take a look at how to install and configure the development environment
How to Install and Configure TypeSpec
Before you can start writing your first API with TypeSpec, you need to set up your development environment. Here’s how to install TypeSpec on your machine.
Requirements:
Node.js (version 18 or higher)
npm for dependency management
Visual Studio Code (recommended to take advantage of the official TypeSpec extension). For an optimal experience, it provides syntax highlighting, validation, autocompletion, navigation, and more.
TypeSpec CLI global installation:
npm install -g @typespec/compiler
How to Create a TypeSpec Project
The easiest way to create a project is to use Visual Studio Code via the TypeSpec extension you’ve installed (if you’re not comfortable with the command line (CMD)).
Create a folder containing the project and open it with Visual Studio Code. Then click on the View tab, and next on Comment Palette .
In the search bar that appears, enter TypeSpec: Create TypeSpec Project.
Follow the quick selections to select the root folder of the project you’ve just created. Then choose the Template – for our case this will be Generic REST API – and enter the project name. Leave the emitter OpenAPI 3.1 document (3.1 is the current version at the time of writing) selected by default. This will put us @typespec/http@typespec/openapi3. Finally, wait for the project configuration to finish.
You should have a basic TypeSpec project configuration with a structure that looks like this:
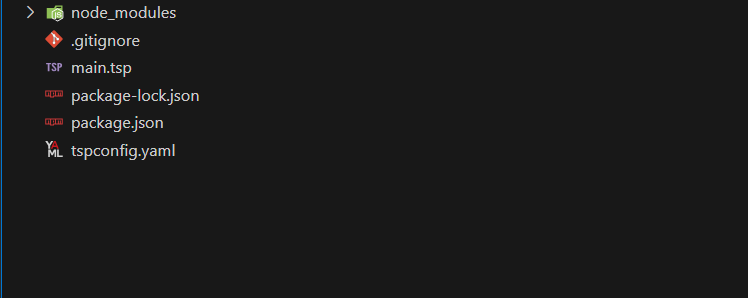
node_modules/: Directory where npm installs project dependencies.
main.tsp: the entry point for your TypeSpec build. This file generally contains the main definitions of your models, services, and operations.
package.json: Contains project metadata, including dependencies, scripts, and other project-related information.
tspconfig.yaml: TypeSpec compiler configuration file, specifying options and parameters for the generation process.
You can also run tsp compile . to compile the project, but it’s better to run tsp compile . --watch to automatically compile changes during development each time you save.
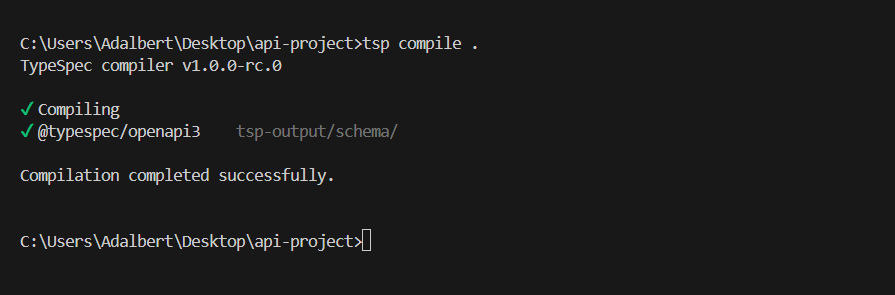
Once the project has been compiled, you’ll see the tsp-output and schema folders generated and a file added openai.yaml.
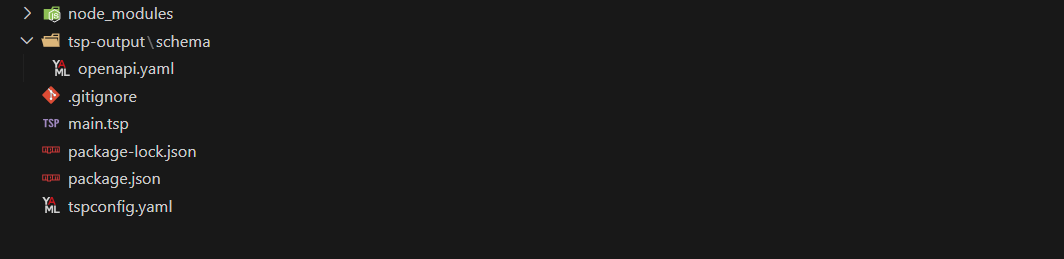
tsp-output/: Directory where the TypeSpec compiler generates files.
openapi.yaml: OpenAPI specification file generated for your API, detailing API endpoints, templates, and operations. Output may vary depending on the target format specified in the
tspconfig.yamlfile.
<span class="hljs-attr">emit:</span>
  <span class="hljs-bullet">-</span> <span class="hljs-string">"@typespec/openapi3"</span>
<span class="hljs-attr">options:</span>
  <span class="hljs-string">"@typespec/openapi3"</span><span class="hljs-string">:</span>
    <span class="hljs-attr">emitter-output-dir:</span> <span class="hljs-string">"{output-dir}/schema"</span>
    <span class="hljs-attr">openapi-versions:</span>
      <span class="hljs-bullet">-</span> <span class="hljs-number">3.1</span><span class="hljs-number">.0</span>
Thanks to this configuration of the tspconfig.yaml file, one of TypeSpec’s major assets is its ability to automatically generate OpenAPI specifications from clear, typed, and modular source code. This means you can write your API as you would in TypeScript (or a well-structured DSL), and get output in .yaml files compatible with the whole OpenAPI ecosystem: Swagger UI, Postman, Redoc, and so on.
In the next section, we’ll look at the basic syntax of TypeSpec.
TypeSpec Basic Syntax
Now that you’ve got a clear idea of what TypeSpec is and what its benefits are in the world of API design, it’s time to get to the heart of the matter: the basic syntax.
TypeSpec is a declarative language, inspired by TypeScript, that lets you model the resources, routes, data structures, and behaviors of an API in an explicit, readable, and modular way. Its syntax is based on simple keywords and clear file organization, making it easy to learn yet powerful.
Language Basics
Here’s a very simple example of defining a model with TypeSpec:
model Book {
  id: <span class="hljs-built_in">string</span>;
  title: <span class="hljs-built_in">string</span>;
  author: <span class="hljs-built_in">string</span>;
}
This block defines a Book resource with three typed fields. The model keyword is used to describe the JSON objects manipulated by the API. It is equivalent to schemas in JSON Schema or type definitions in OpenAPI.
Defining an HTTP operation
TypeSpec lets you bind operations to models using the @route keyword. Here’s a minimal example of an endpoint:
<span class="hljs-meta">@route</span>(<span class="hljs-string">"/books"</span>)
op listBooks(): Book[];
This syntax declares a REST operation that returns a list of books. @route indicates the URL path, op introduces an operation, and Book[] is the return type.
You can also define path, query, or body parameters very easily.
<span class="hljs-meta">@route</span>(<span class="hljs-string">"/books/{id}"</span>)
op getBook(<span class="hljs-meta">@path</span> id: <span class="hljs-built_in">string</span>): Book;
In this example, we declare that id is a URL parameter (path parameter).
Fundamental Concepts
model Defining data structures
A model represents an API entity, like a JSON object. Models are the basis of your information exchanges.
model User {
  id: <span class="hljs-built_in">string</span>;
  email: <span class="hljs-built_in">string</span>;
  age?: int32;
}
interface Group operations
An interface groups together a set of logically linked operations. This is useful for structuring large API sets.
<span class="hljs-keyword">interface</span> BookOperations {
  <span class="hljs-meta">@get</span> op listBooks(): Book[];
  <span class="hljs-meta">@get</span> op getBook(<span class="hljs-meta">@path</span> id: <span class="hljs-built_in">string</span>): Book;
}
service Entry point of the API
A service defines publicly exposed interfaces, their version, and the basic path.
<span class="hljs-meta">@service</span>({ title: <span class="hljs-string">"Book API"</span>, version: <span class="hljs-string">"1.0.0"</span> })
<span class="hljs-keyword">namespace</span> BookApi {
  <span class="hljs-keyword">interface</span> BookOperations;
}
Import and Organize Your Code with Namespaces
TypeSpec provides clear organization through namespaces, similar to modules or packages.
<span class="hljs-keyword">namespace</span> CommonModels {
  model <span class="hljs-built_in">Error</span> {
    message: <span class="hljs-built_in">string</span>;
  }
}
Then you can import them into another file like this:
<span class="hljs-keyword">import</span> CommonModels <span class="hljs-keyword">from</span> <span class="hljs-string">"./common.tsp"</span>;
Complete Example of a REST Service
Let’s take a complete example of a REST service in TypeSpec.
<span class="hljs-meta">@service</span>({ title: <span class="hljs-string">"Book Service"</span>, version: <span class="hljs-string">"1.0.0"</span> })

<span class="hljs-meta">@route</span>(<span class="hljs-string">"/books"</span>)

<span class="hljs-keyword">namespace</span> BookService {

  model Book {
    id: <span class="hljs-built_in">string</span>;
    title: <span class="hljs-built_in">string</span>;
    author: <span class="hljs-built_in">string</span>;
    publishedYear?: int32;
  }

  <span class="hljs-meta">@get</span>()
  op listBooks(): Book[];

  <span class="hljs-meta">@post</span>()
  op createBook(<span class="hljs-meta">@body</span> book: Book): Book;

  <span class="hljs-meta">@get</span>(<span class="hljs-string">"/{id}"</span>)
  op getBook(<span class="hljs-meta">@path</span> id: <span class="hljs-built_in">string</span>): Book;

  <span class="hljs-meta">@put</span>(<span class="hljs-string">"/{id}"</span>)
  op updateBook(<span class="hljs-meta">@path</span> id: <span class="hljs-built_in">string</span>, <span class="hljs-meta">@body</span> book: Book): Book;

  <span class="hljs-meta">@delete</span>(<span class="hljs-string">"/{id}"</span>)
  op deleteBook(<span class="hljs-meta">@path</span> id: <span class="hljs-built_in">string</span>): <span class="hljs-built_in">void</span>;
}
Here’s what’s going on:
@service({ title, version }): Defines service metadata (name, version), useful for generated documentation (for example, Swagger UI).@route("/books"): Defines the basic path for all operations of this API.namespace BookService { ... }: Encapsulates all models and operations linked to this service under a single logical name.
Next come the operations:
@get() op listBooks(): EndpointGET /booksqui retourne un tableau de livres.@post() op createBook(): EndpointPOST /bookswhich accepts aBookobject in the request body (@body) and returns the created book.@get("/{id}"): EndpointGET /books/{id}which retrieves a book via its identifier (@path).@put("/{id}"): EndpointPUT /books/{id}which updates a book’s data.@delete("/{id}"): Deletes a book via itsid. Thevoidtype means that no data is returned.
With just a few lines, you get a complete, well-organized, easily readable REST service, ready to be automatically converted into OpenAPI documentation, a client SDK, or backend code.
Add Validation Annotations
TypeSpec makes it easy to add validation annotations to your models using:
model Book {
  id: <span class="hljs-built_in">string</span>;
  title: <span class="hljs-built_in">string</span> <span class="hljs-meta">@minLength</span>(<span class="hljs-number">3</span>);
  author: <span class="hljs-built_in">string</span> <span class="hljs-meta">@minLength</span>(<span class="hljs-number">3</span>);
  publishedYear?: int32 <span class="hljs-meta">@minValue</span>(<span class="hljs-number">1800</span>);
}
This adds validation rules directly to the schema, which will be taken into account during OpenAPI generation.
Comparison with Other Tools (OpenAPI / Swagger)
So you might wonder – why should you use TypeSpec rather than writing directly in OpenAPI?
Let’s take the example of OpenAPI 3 (YAML):
<span class="hljs-attr">paths:</span>
  <span class="hljs-string">/books:</span>
    <span class="hljs-attr">get:</span>
      <span class="hljs-attr">summary:</span> <span class="hljs-string">Get</span> <span class="hljs-string">list</span> <span class="hljs-string">of</span> <span class="hljs-string">books</span>
      <span class="hljs-attr">responses:</span>
        <span class="hljs-attr">'200':</span>
          <span class="hljs-attr">description:</span> <span class="hljs-string">OK</span>
          <span class="hljs-attr">content:</span>
            <span class="hljs-attr">application/json:</span>
              <span class="hljs-attr">schema:</span>
                <span class="hljs-attr">type:</span> <span class="hljs-string">array</span>
                <span class="hljs-attr">items:</span>
                  <span class="hljs-string">$ref:</span> <span class="hljs-string">'#/components/schemas/Book'</span>
    <span class="hljs-attr">post:</span>
      <span class="hljs-attr">summary:</span> <span class="hljs-string">Create</span> <span class="hljs-string">a</span> <span class="hljs-string">new</span> <span class="hljs-string">book</span>
      <span class="hljs-attr">requestBody:</span>
        <span class="hljs-attr">content:</span>
          <span class="hljs-attr">application/json:</span>
            <span class="hljs-attr">schema:</span>
              <span class="hljs-string">$ref:</span> <span class="hljs-string">'#/components/schemas/Book'</span>
      <span class="hljs-attr">responses:</span>
        <span class="hljs-attr">'201':</span>
          <span class="hljs-attr">description:</span> <span class="hljs-string">Created</span>
  <span class="hljs-string">/books/{id}:</span>
    <span class="hljs-attr">get:</span>
      <span class="hljs-attr">parameters:</span>
        <span class="hljs-bullet">-</span> <span class="hljs-attr">name:</span> <span class="hljs-string">id</span>
          <span class="hljs-attr">in:</span> <span class="hljs-string">path</span>
          <span class="hljs-attr">required:</span> <span class="hljs-literal">true</span>
          <span class="hljs-attr">schema:</span>
            <span class="hljs-attr">type:</span> <span class="hljs-string">string</span>
      <span class="hljs-attr">responses:</span>
        <span class="hljs-attr">'200':</span>
          <span class="hljs-attr">description:</span> <span class="hljs-string">OK</span>
    <span class="hljs-attr">put:</span>
      <span class="hljs-attr">parameters:</span>
        <span class="hljs-bullet">-</span> <span class="hljs-attr">name:</span> <span class="hljs-string">id</span>
          <span class="hljs-attr">in:</span> <span class="hljs-string">path</span>
          <span class="hljs-attr">required:</span> <span class="hljs-literal">true</span>
          <span class="hljs-attr">schema:</span>
            <span class="hljs-attr">type:</span> <span class="hljs-string">string</span>
      <span class="hljs-attr">requestBody:</span>
        <span class="hljs-attr">content:</span>
          <span class="hljs-attr">application/json:</span>
            <span class="hljs-attr">schema:</span>
              <span class="hljs-string">$ref:</span> <span class="hljs-string">'#/components/schemas/Book'</span>
    <span class="hljs-attr">delete:</span>
      <span class="hljs-attr">parameters:</span>
        <span class="hljs-bullet">-</span> <span class="hljs-attr">name:</span> <span class="hljs-string">id</span>
          <span class="hljs-attr">in:</span> <span class="hljs-string">path</span>
          <span class="hljs-attr">required:</span> <span class="hljs-literal">true</span>
          <span class="hljs-attr">schema:</span>
            <span class="hljs-attr">type:</span> <span class="hljs-string">string</span>
<span class="hljs-attr">components:</span>
  <span class="hljs-attr">schemas:</span>
    <span class="hljs-attr">Book:</span>
      <span class="hljs-attr">type:</span> <span class="hljs-string">object</span>
      <span class="hljs-attr">properties:</span>
        <span class="hljs-attr">id:</span>
          <span class="hljs-attr">type:</span> <span class="hljs-string">string</span>
        <span class="hljs-attr">title:</span>
          <span class="hljs-attr">type:</span> <span class="hljs-string">string</span>
        <span class="hljs-attr">author:</span>
          <span class="hljs-attr">type:</span> <span class="hljs-string">string</span>
        <span class="hljs-attr">publishedYear:</span>
          <span class="hljs-attr">type:</span> <span class="hljs-string">integer</span>
As you can see, the OpenAPI definition is much more verbose. Relationships between paths, methods, schemas, and parameters are scattered, which complicates reading and maintenance. Also, it’s less typed, given that OpenAPI remains YAML (or JSON), without the typing security or modularity of a real language.
Why TypeSpec is useful here
With TypeSpec, everything is centralized in a declarative, modular, typed, and intuitive format.
Greater legibility: less noise, more intent.
Reusability: you can create modular components and share them between projects.
Productivity: you write less code and generate more (OpenAPI, client, server, doc).
Consistency: errors are detected early thanks to strong typing.
| Criteria | OpenAPI / Swagger | TypeSpec |
| Syntax | Verbose (YAML/JSON) | Declarative, typed, concise |
| Organization | Fragmented | Modular (namespace, import) |
| Modular | Limited | High (models, services) |
| Built-in validation | Separate or manual | Decorators (@minLength, and so on) |
| Automatic generation | Manual | Integrated (OpenAPI, SDK, and so on) |
Note: TypeSpec doesn’t replace OpenAPI, but complements it: you write to TypeSpec, then automatically generate OpenAPI files, SDKs, specs and so on. It gives you a source language for accurately describing your API.
In the next section, we’ll look at how to create a REST API template.
How to Create a REST API Model
To deepen our understanding of REST API creation with TypeSpec, let’s continue with the example of managing books. In this example, we’ll create a Book model, define a service to manage the books, and add validations to ensure that the data respects the right constraints.
Define a Data Model for Book
First, we’ll define a data model for the Book resource. A book can have the following properties:
id: A unique identifier for the book.title: The title of the book.author: The author of the book.publicationYear: The book’s year of publication.isbn: The book’s ISBN number.
Book model in TypeSpec
model Book {
  id: integer;
  <span class="hljs-meta">@minLength</span>(<span class="hljs-number">1</span>)
  title: <span class="hljs-built_in">string</span>;
  <span class="hljs-meta">@minLength</span>(<span class="hljs-number">1</span>)
  author: <span class="hljs-built_in">string</span>;
  publicationYear: integer;
  <span class="hljs-meta">@pattern</span>(<span class="hljs-string">"^\d{3}-\d{1,5}-\d{1,7}-\d{1,7}-\d{1}$"</span>)
  isbn: <span class="hljs-built_in">string</span>;
}
id: Unique book identifier (integertype).titleandauthor: Character strings representing the book’s title and author, validated by@minLength(1)to ensure they are not empty.publicationYear: The book’s year of publication (integertype).isbn: The book’s ISBN number, validated with a regular expression that matches the standard format of an ISBN.
Define a REST Service to Manage Books
Now that we have a Book model, we’ll create a service to manage CRUD operations on this resource. This service will contain methods for retrieving a book by its identifier, creating a new book, updating an existing book, and deleting a book.
BooksService service in TypeSpec
service BooksService {

  <span class="hljs-meta">@get</span>(<span class="hljs-string">"/books/{id}"</span>)
  getBook(id: integer): Book;

  <span class="hljs-meta">@post</span>(<span class="hljs-string">"/books"</span>)
  createBook(book: Book): Book;

  <span class="hljs-meta">@put</span>(<span class="hljs-string">"/books/{id}"</span>)
  updateBook(id: integer, book: Book): Book;

  <span class="hljs-meta">@delete</span>(<span class="hljs-string">"/books/{id}"</span>)
  deleteBook(id: integer): <span class="hljs-built_in">void</span>;
}
The BooksService contains four methods for performing actions on books:
@get("/books/{id}"): Method for retrieving a book by itsid.@post("/books"): Method for creating a new book.@put("/books/{id}"): Method for updating an existing book by itsid.@delete("/books/{id}"): Method for deleting a book based on itsid.
These methods use HTTP annotations to indicate the type of operation they perform (GET, POST, PUT, DELETE).
Add Additional Validations for the Book Model
As in the previous example for users, we can add additional validations on Book template properties.
Example of validation on publicationYear and isbn
model Book {
  id: integer;
  <span class="hljs-meta">@minLength</span>(<span class="hljs-number">1</span>)
  title: <span class="hljs-built_in">string</span>;
  <span class="hljs-meta">@minLength</span>(<span class="hljs-number">1</span>)
  author: <span class="hljs-built_in">string</span>;
  <span class="hljs-meta">@minValue</span>(<span class="hljs-number">1000</span>)
  publicationYear: integer;
  <span class="hljs-meta">@pattern</span>(<span class="hljs-string">"^\d{3}-\d{1,5}-\d{1,7}-\d{1,7}-\d{1}$"</span>)
  isbn: <span class="hljs-built_in">string</span>;
}
@minValue(1000)guarantees that the year of publication is greater than or equal to 1000.Validation of the
isbnremains the same, using a regular expression to validate a standard ISBN format.
A Complete Service for Managing Books
Now that we have the Book model and the necessary validations, here’s a complete service for managing books, with all the essential operations.
Complete BooksService in TypeSpec
model Book {
  id: integer;
  <span class="hljs-meta">@minLength</span>(<span class="hljs-number">1</span>)
  title: <span class="hljs-built_in">string</span>;
  <span class="hljs-meta">@minLength</span>(<span class="hljs-number">1</span>)
  author: <span class="hljs-built_in">string</span>;
  <span class="hljs-meta">@minValue</span>(<span class="hljs-number">1000</span>)
  publicationYear: integer;
  <span class="hljs-meta">@pattern</span>(<span class="hljs-string">"^\d{3}-\d{1,5}-\d{1,7}-\d{1,7}-\d{1}$"</span>)
  isbn: <span class="hljs-built_in">string</span>;
}

service BooksService {
  <span class="hljs-meta">@get</span>(<span class="hljs-string">"/books/{id}"</span>)
  getBook(id: integer): Book;

  <span class="hljs-meta">@post</span>(<span class="hljs-string">"/books"</span>)
  createBook(book: Book): Book;

  <span class="hljs-meta">@put</span>(<span class="hljs-string">"/books/{id}"</span>)
  updateBook(id: integer, book: Book): Book;

  <span class="hljs-meta">@delete</span>(<span class="hljs-string">"/books/{id}"</span>)
  deleteBook(id: integer): <span class="hljs-built_in">void</span>;
}
The
Bookmodel defines properties and validations for a book.The
BooksServiceprovides endpoints for retrieving, creating, updating, and deleting a book.Each service method is correctly annotated with the corresponding HTTP verbs (
GET,POST,PUT,DELETE).
And here’s a summary of everything we’ve done:
We created a
Bookmodel with properties such as title, author, year of publication, and ISBN number.We defined a
BooksServiceto provide CRUD operations on books.We added validations to ensure that the data respected specified constraints (for example, ISBN and year of publication).
We designed a complete REST API to manage books with TypeSpec, using a minimum amount of code and staying true to standards.
This example shows just how quickly and efficiently TypeSpec can be used to model a REST API, while ensuring a clear structure and robust validations.
How to Build the API in Express and ASP.NET Core
Now that we’ve defined a book management REST service with TypeSpec, let’s see how we’d implement this same API using two popular frameworks:
ExpressJS (Node.js / TypeScript)
ASP.NET Core (C#)
This will allow us to better compare TypeSpec’s conciseness and readability with traditional implementations.
Manual implementation with ExpressJS (Node.js / TypeScript):
<span class="hljs-comment">//server.ts</span>
<span class="hljs-keyword">import</span> express <span class="hljs-keyword">from</span> <span class="hljs-string">'express'</span>;

<span class="hljs-keyword">const</span> app = express();
app.use(express.json());

<span class="hljs-keyword">interface</span> Book {
  id: <span class="hljs-built_in">number</span>;
  title: <span class="hljs-built_in">string</span>;
  author: <span class="hljs-built_in">string</span>;
  publicationYear: <span class="hljs-built_in">number</span>;
  isbn: <span class="hljs-built_in">string</span>;
}

<span class="hljs-keyword">const</span> books: Book[] = [];

<span class="hljs-comment">// GET /books/:id</span>
app.get(<span class="hljs-string">'/books/:id'</span>, <span class="hljs-function">(<span class="hljs-params">req, res</span>) =></span> {
  <span class="hljs-keyword">const</span> id = <span class="hljs-built_in">parseInt</span>(req.params.id);
  <span class="hljs-keyword">const</span> book = books.find(<span class="hljs-function"><span class="hljs-params">b</span> =></span> b.id === id);
  <span class="hljs-keyword">if</span> (!book) <span class="hljs-keyword">return</span> res.status(<span class="hljs-number">404</span>).send({ message: <span class="hljs-string">'Book not found'</span> });
  res.send(book);
});

<span class="hljs-comment">// POST /books</span>
app.post(<span class="hljs-string">'/books'</span>, <span class="hljs-function">(<span class="hljs-params">req, res</span>) =></span> {
  <span class="hljs-keyword">const</span> newBook: Book = req.body;
  books.push(newBook);
  res.status(<span class="hljs-number">201</span>).send(newBook);
});

<span class="hljs-comment">// PUT /books/:id</span>
app.put(<span class="hljs-string">'/books/:id'</span>, <span class="hljs-function">(<span class="hljs-params">req, res</span>) =></span> {
  <span class="hljs-keyword">const</span> id = <span class="hljs-built_in">parseInt</span>(req.params.id);
  <span class="hljs-keyword">const</span> index = books.findIndex(<span class="hljs-function"><span class="hljs-params">b</span> =></span> b.id === id);
  <span class="hljs-keyword">if</span> (index === <span class="hljs-number">-1</span>) <span class="hljs-keyword">return</span> res.status(<span class="hljs-number">404</span>).send({ message: <span class="hljs-string">'Book not found'</span> });

  books[index] = req.body;
  res.send(books[index]);
});

<span class="hljs-comment">// DELETE /books/:id</span>
app.delete(<span class="hljs-string">'/books/:id'</span>, <span class="hljs-function">(<span class="hljs-params">req, res</span>) =></span> {
  <span class="hljs-keyword">const</span> id = <span class="hljs-built_in">parseInt</span>(req.params.id);
  <span class="hljs-keyword">const</span> index = books.findIndex(<span class="hljs-function"><span class="hljs-params">b</span> =></span> b.id === id);
  <span class="hljs-keyword">if</span> (index === <span class="hljs-number">-1</span>) <span class="hljs-keyword">return</span> res.status(<span class="hljs-number">404</span>).send({ message: <span class="hljs-string">'Book not found'</span> });

  books.splice(index, <span class="hljs-number">1</span>);
  res.status(<span class="hljs-number">204</span>).send();
});

app.listen(<span class="hljs-number">3000</span>, <span class="hljs-function">() =></span> {
  <span class="hljs-built_in">console</span>.log(<span class="hljs-string">'Server is running on port 3000'</span>);
});
Observations:
A lot of repetitive logic.
No automatic validation.
Routes must be maintained manually.
No automatically generated API documentation.
Manual implementation with ASP.NET Core (C#):
<span class="hljs-comment">// Book.cs</span>
<span class="hljs-keyword">public</span> <span class="hljs-keyword">class</span> <span class="hljs-title">Book</span>
{
    <span class="hljs-keyword">public</span> <span class="hljs-keyword">int</span> Id { <span class="hljs-keyword">get</span>; <span class="hljs-keyword">set</span>; }

    [<span class="hljs-meta">Required</span>]
    <span class="hljs-keyword">public</span> <span class="hljs-keyword">string</span> Title { <span class="hljs-keyword">get</span>; <span class="hljs-keyword">set</span>; } = <span class="hljs-keyword">string</span>.Empty;

    [<span class="hljs-meta">Required</span>]
    <span class="hljs-keyword">public</span> <span class="hljs-keyword">string</span> Author { <span class="hljs-keyword">get</span>; <span class="hljs-keyword">set</span>; } = <span class="hljs-keyword">string</span>.Empty;

    [<span class="hljs-meta">Range(1000, int.MaxValue)</span>]
    <span class="hljs-keyword">public</span> <span class="hljs-keyword">int</span> PublicationYear { <span class="hljs-keyword">get</span>; <span class="hljs-keyword">set</span>; }

    [<span class="hljs-meta">RegularExpression(@<span class="hljs-meta-string">"^d{3}-d{1,5}-d{1,7}-d{1,7}-d{1}$"</span>)</span>]
    <span class="hljs-keyword">public</span> <span class="hljs-keyword">string</span> Isbn { <span class="hljs-keyword">get</span>; <span class="hljs-keyword">set</span>; } = <span class="hljs-keyword">string</span>.Empty;
}
<span class="hljs-comment">// BooksController.cs</span>
[<span class="hljs-meta">ApiController</span>]
[<span class="hljs-meta">Route(<span class="hljs-meta-string">"books"</span>)</span>]
<span class="hljs-keyword">public</span> <span class="hljs-keyword">class</span> <span class="hljs-title">BooksController</span> : <span class="hljs-title">ControllerBase</span>
{
    <span class="hljs-keyword">private</span> <span class="hljs-keyword">static</span> <span class="hljs-keyword">readonly</span> List<Book> books = <span class="hljs-keyword">new</span>();

    [<span class="hljs-meta">HttpGet(<span class="hljs-meta-string">"{id}"</span>)</span>]
    <span class="hljs-function"><span class="hljs-keyword">public</span> IActionResult <span class="hljs-title">GetBook</span>(<span class="hljs-params"><span class="hljs-keyword">int</span> id</span>)</span>
    {
        <span class="hljs-keyword">var</span> book = books.FirstOrDefault(b => b.Id == id);
        <span class="hljs-keyword">if</span> (book == <span class="hljs-literal">null</span>) <span class="hljs-keyword">return</span> NotFound(<span class="hljs-string">"Book not found"</span>);
        <span class="hljs-keyword">return</span> Ok(book);
    }

    [<span class="hljs-meta">HttpPost</span>]
    <span class="hljs-function"><span class="hljs-keyword">public</span> IActionResult <span class="hljs-title">CreateBook</span>(<span class="hljs-params">[FromBody] Book book</span>)</span>
    {
        books.Add(book);
        <span class="hljs-keyword">return</span> CreatedAtAction(<span class="hljs-keyword">nameof</span>(GetBook), <span class="hljs-keyword">new</span> { id = book.Id }, book);
    }

    [<span class="hljs-meta">HttpPut(<span class="hljs-meta-string">"{id}"</span>)</span>]
    <span class="hljs-function"><span class="hljs-keyword">public</span> IActionResult <span class="hljs-title">UpdateBook</span>(<span class="hljs-params"><span class="hljs-keyword">int</span> id, [FromBody] Book updatedBook</span>)</span>
    {
        <span class="hljs-keyword">var</span> index = books.FindIndex(b => b.Id == id);
        <span class="hljs-keyword">if</span> (index == <span class="hljs-number">-1</span>) <span class="hljs-keyword">return</span> NotFound(<span class="hljs-string">"Book not found"</span>);

        books[index] = updatedBook;
        <span class="hljs-keyword">return</span> Ok(updatedBook);
    }

    [<span class="hljs-meta">HttpDelete(<span class="hljs-meta-string">"{id}"</span>)</span>]
    <span class="hljs-function"><span class="hljs-keyword">public</span> IActionResult <span class="hljs-title">DeleteBook</span>(<span class="hljs-params"><span class="hljs-keyword">int</span> id</span>)</span>
    {
        <span class="hljs-keyword">var</span> book = books.FirstOrDefault(b => b.Id == id);
        <span class="hljs-keyword">if</span> (book == <span class="hljs-literal">null</span>) <span class="hljs-keyword">return</span> NotFound(<span class="hljs-string">"Book not found"</span>);

        books.Remove(book);
        <span class="hljs-keyword">return</span> NoContent();
    }
}
Observations:
More formal and structured than Express, thanks to C# annotations (
[HttpPost],[Required], and so on).Validation is handled automatically via Data Annotations.
Once again, no automatic OpenAPI generation or SDK client without additional configuration.
Comparison with TypeSpec:
| Aspect | TypeSpec | ExpressJS | ASP.NET Core |
| Syntax | Declarative | Imperative | Structured |
| Validation | Automatic | Manual | Data Annotations |
| Documentation | Automatic | Manual | Generated(Swashbuckle) |
| Reusability | High | Low | Medium |
| Generation | OpenAPI/SDK | Non-native | Possible |
Best Practices for Structuring TypeSpec Projects and Components
When you start writing API definitions in TypeSpec, it’s easy to put everything in a single file. But as with any software project, as the application grows, a good structure becomes essential to guarantee the readability, reusability and maintainability of the code.
Here’s a set of best practices I strongly recommend:
Organize by Functional Area
Use namespaces to group models, interfaces, and operations by business domain: book, user, auth, payment, and so on.
<span class="hljs-keyword">namespace</span> MyApi.Books;
Create a /books folder with the following files:
<span class="hljs-string">src/</span>
<span class="hljs-string">├──</span> <span class="hljs-string">books/</span>
<span class="hljs-string">│</span>   <span class="hljs-string">├──</span> <span class="hljs-string">models.tsp</span>
<span class="hljs-string">│</span>   <span class="hljs-string">├──</span> <span class="hljs-string">routes.tsp</span>
<span class="hljs-string">│</span>   <span class="hljs-string">└──</span> <span class="hljs-string">service.tsp</span>
This ensures a clear separation of responsibilities, just like in a well-structured Node.js project.
A Single main.tsp Entry Point
This is the main file that orchestrates:
<span class="hljs-comment">// main.tsp</span>
<span class="hljs-keyword">import</span> <span class="hljs-string">"./books/service.tsp"</span>;
<span class="hljs-keyword">import</span> <span class="hljs-string">"./users/service.tsp"</span>;
<span class="hljs-keyword">import</span> <span class="hljs-string">"./auth/service.tsp"</span>;
This allows you to compile the entire project from a single point.
Create Reusable Components
Define common models and types in a shared file. Example:
<span class="hljs-comment">// common/models.tsp</span>
model ErrorResponse {
  code: <span class="hljs-built_in">string</span>;
  message: <span class="hljs-built_in">string</span>;
}

<span class="hljs-meta">@defaultResponse</span>
op <span class="hljs-built_in">Error</span>(): ErrorResponse;
Then import them into your other files:
<span class="hljs-keyword">import</span> <span class="hljs-string">"../common/models.tsp"</span>;
This is handy for centralizing errors, standard answers, pagination types, and so on.
Use Decorators to Enrich Your Components
Decorators such as @doc, @minLength, @server, @route or @tag can be used to generate valid, documented APIs without any extra effort:
<span class="hljs-meta">@route</span>(<span class="hljs-string">"/books"</span>)
<span class="hljs-meta">@doc</span>(<span class="hljs-string">"Get all books"</span>)
op listBooks(): Book[];
A well-annotated API is one that is ready for automatic generation of documentation or clients.
Define Servers in the Right Place
Add your @server directive to a service.tsp or global api.tsp file:
<span class="hljs-meta">@server</span>(<span class="hljs-string">"Production"</span>, <span class="hljs-string">"https://api.mysite.com"</span>)
<span class="hljs-meta">@server</span>(<span class="hljs-string">"Staging"</span>, <span class="hljs-string">"https://staging.mysite.com"</span>)
This allows you to target different environments without duplicating definitions.
Validate Regularly
Integrate tsp compile into your CI/CD to ensure that your definitions are always valid. Example with an npm script:
npm run tsp compile src/main.tsp --emit=./dist
This avoids last-minute errors and guarantees the consistency of your API over time.
Example of a recommended complete structure:
<span class="hljs-string">project-root/</span>
<span class="hljs-string">├──</span> <span class="hljs-string">src/</span>
<span class="hljs-string">│</span>   <span class="hljs-string">├──</span> <span class="hljs-string">books/</span>
<span class="hljs-string">│</span>   <span class="hljs-string">│</span>   <span class="hljs-string">├──</span> <span class="hljs-string">models.tsp</span>
<span class="hljs-string">│</span>   <span class="hljs-string">│</span>   <span class="hljs-string">├──</span> <span class="hljs-string">routes.tsp</span>
<span class="hljs-string">│</span>   <span class="hljs-string">│</span>   <span class="hljs-string">└──</span> <span class="hljs-string">service.tsp</span>
<span class="hljs-string">│</span>   <span class="hljs-string">├──</span> <span class="hljs-string">users/</span>
<span class="hljs-string">│</span>   <span class="hljs-string">│</span>   <span class="hljs-string">├──</span> <span class="hljs-string">models.tsp</span>
<span class="hljs-string">│</span>   <span class="hljs-string">│</span>   <span class="hljs-string">└──</span> <span class="hljs-string">service.tsp</span>
<span class="hljs-string">│</span>   <span class="hljs-string">├──</span> <span class="hljs-string">common/</span>
<span class="hljs-string">│</span>   <span class="hljs-string">│</span>   <span class="hljs-string">└──</span> <span class="hljs-string">models.tsp</span>
<span class="hljs-string">│</span>   <span class="hljs-string">└──</span> <span class="hljs-string">main.tsp</span>
<span class="hljs-string">├──</span> <span class="hljs-string">tspconfig.yaml</span>
<span class="hljs-string">├──</span> <span class="hljs-string">package.json</span>
<span class="hljs-string">└──</span> <span class="hljs-string">README.md</span>
In summary:
| Good practice | Why it’s important |
Use namespaces | Clear organization, readability |
| Dividing files by domain | Reusability, modularity |
| Centralize shared components | DRY (Don’t Repeat Yourself) |
| Use decorators | Enrich documentation and validation |
| Integrate with CI/CD | Continuous quality, no surprises |
Have a clear input file (main.tsp) | Simple, centralized compilation |
Conclusion
TypeSpec represents a real evolution in the way we design, document and maintain APIs. By adopting a declarative, modular, and typed approach, it simplifies the definition of APIs while enhancing their quality, readability, and consistency on a large scale.
Whether you’re a front-end developer consuming APIs, a software architect looking to standardize your team’s practices, or a technical documentation enthusiast, TypeSpec offers you a robust, modern, and extensible solution.
The TypeSpec ecosystem is still young but very promising, supported by Microsoft and used internally on a large scale. So now’s the time to start exploring and adopting it for your projects.
Ressources
TypeSpec official website
https://typespec.io
Full documentation, guides, syntax references and APIs.TypeSpec GitHub repository (Microsoft)
https://github.com/microsoft/typespec
Source code, examples and community discussions.Playground TypeSpec (essayer dans le navigateur)
https://typespec.io/playground
Quickly test your models without installing anything.TypeSpec documentation — Microsoft Learn
https://learn.microsoft.com/en-us/azure/developer/typespec/overview
Learn how to use TypeSpec to create consistent, high-quality APIs efficiently and integrate them seamlessly with existing toolchains.OpenAPI Specification
https://swagger.io/specification
To compare with current API description standards.TypeSpec 101 by Mario Guerra Product Manager for TypeSpec at Microsoft
https://www.youtube.com/playlist?list=PLYWCCsom5Txglkl_I1XvwzrzM5G3SuVsR
A tutorial series, hosted by Mario Guerra, TypeSpec product manager at Microsoft, will guide you through the process of building a REST API using TypeSpec, and generating an OpenAPI specification from our code.APIs at Scale with TypeSpec
https://youtu.be/yfCYrKaojDo
A talk given by Mandy Whaley from Microsoft at the 2024 Austin API Summit in Austin, Texas.
Thanks for reading. You can find me on LinkedIn, and follow me on all socials @AdalbertPungu.
Source: freeCodeCamp Programming Tutorials: Python, JavaScript, Git & MoreÂ

