
Being able to communicate by sending emails through web applications is important these days. It helps businesses stay connected with their potential customers.
In this article, you’ll learn how to implement the Send Email function in your web app using Nodemailer.
Let’s dive right in.
Table of Contents
Prerequisites
To get the absolute most out of this project, it’s important to have some basic knowledge of the following:
JavaScript: Having a good fundamental understanding of how JS works will make it easier to follow along with the project.
React.js and Chakra UI: You should have a good understanding of how
usestateworks and how you can apply it in a project. It’s also important that you’re familiar with Chakra Ui and know how to use it to style your web application.A little background on Nodemailer would be helpful as well.
Tools We’ll Be Using
In one of my recent projects, I created a mailer function in Node.js using Nodemailer. This function ensured that users’ emails would be delivered efficiently. And now that I know how it works, I wanted to share it with you all.
Nodemailer and SMTP
So what is Nodemailer?
Nodemailer is a popular Node.js module that lets you send emails efficiently using different methods such as SMTP (Simple Mail Transfer Protocol), OAuth2, and so on.
SMTP acts like a postal service – or rather, it’s a postal service that sorts your emails and routes your messages on different mail servers until they reach their final destination. This helps ensure that your messages reach the right inbox all the time.
But it’s important to note that SMTP only handles the sending of emails, meaning that it doesn’t handle retrieval of already sent emails. But protocols like IMAP (Internet Message Access Protocol) and POP3 (Post Office Protocol version 3) let you retrieve emails. We won’t be using these tools here, but I just wanted you to be aware of them in case you want to implement retrieval functionality in your own projects.
OAuth2
OAuth2, short for Open Authorization, simplifies the process of authentication and authorization. With OAuth2, users don’t have to go through the hassle of repeatedly signing in or logging in. Instead, web applications can securely access private user data from other websites—only with the user’s permission.
But don’t worry, OAuth2 only grants requesting applications limited access, typically just enough to create a basic profile. Chances are, you’ve already used OAuth2 without even realizing what’s happening behind the scenes. Pretty cool, right?
Now that you know a bit more about the tools we’ll be using, let’s move on.
Frontend Setup
First things first, you have to set up your environment. When setting up my environment, I used React.js and Chakra UI (for my styling).
Install Node.js
Before starting this process, make that Node is installed on your computer. If it’s not, head to their website to download and install it from there.
You can also use your command line to install Node by running the command nvm install –lts.
Or you could use the newest method recommended on the Node.js website, which is simply to run fnm.
Here is how you can go about it: on your command line, run the following commands:
winget install Schniz.fnm // this command downloads and installs fnm into your operating system.

fnm install 22 // this downloads and installs node.js.

node -v // this displays the version of node.js currently installed in your operating system.

npm – v // this verifies the version of npm currently installed.
Next, let’s set up your frontend interface.
Contact Form Setup
As I mentioned above, I’m using React for my front-end and Chakra UI for styling. I won’t be going over how to install React here, but if you need help with that for your project, check out my article on it.
Next, make sure you have Chakra UI set up. You can do this by following the steps on the Chakra Ui official website.
Note: The web application is a full web application, which consists of various pages like Home, Services, Pricing, Contact, and so on. But for the sake of this article, we’ll focus on only the contact page.
Here is what the contact page will look like:
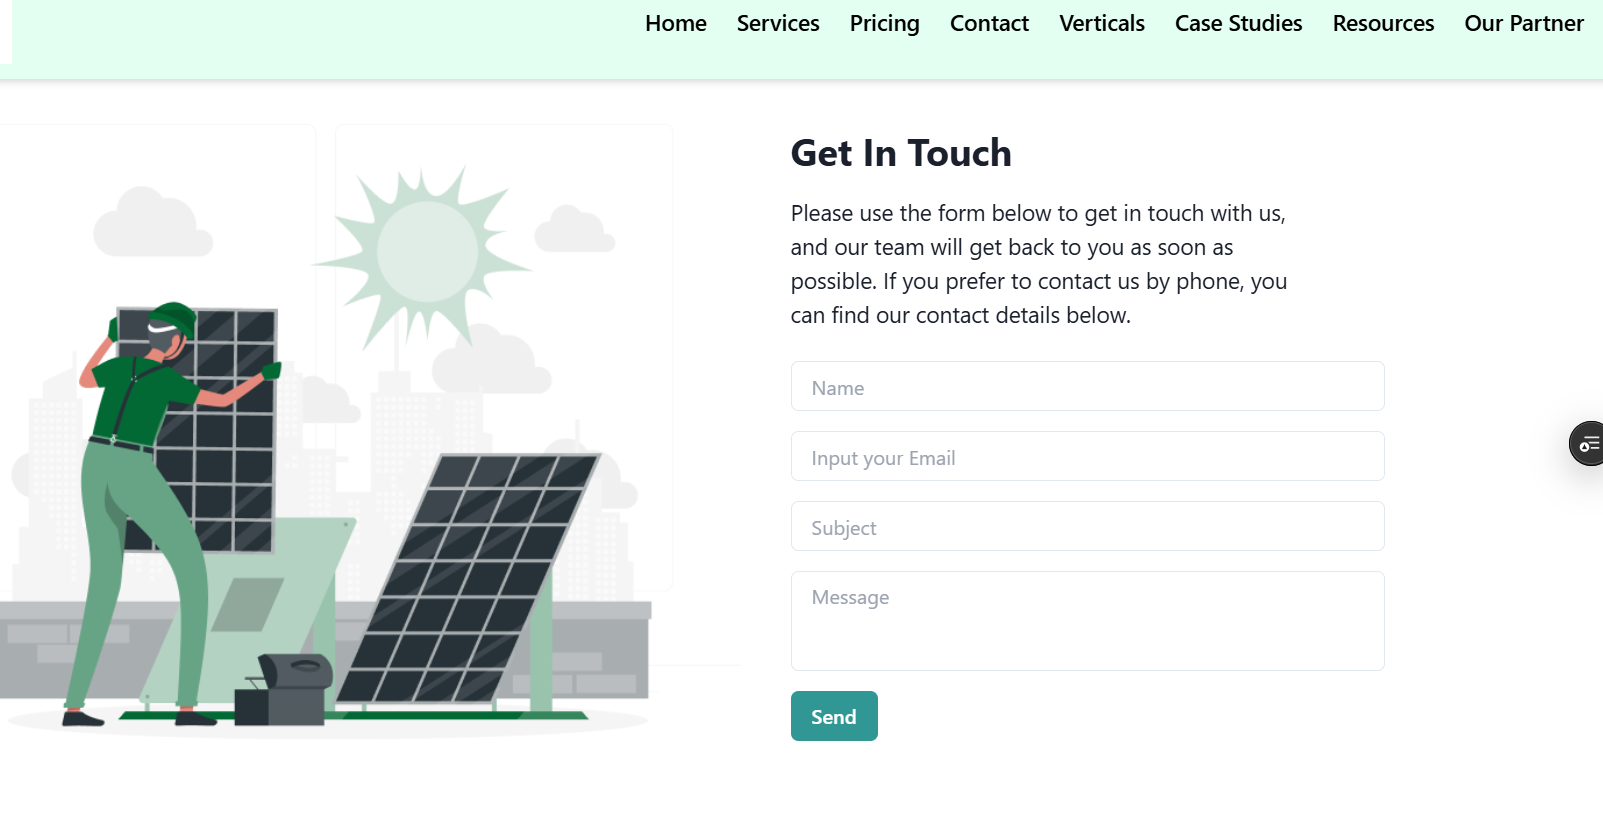
The first step in building this contact form is to create your form input. Here is how you can do that:
import { Box, Button, Flex, Image, Input, Text, Textarea } from '@chakra-ui/react';
 return (
    <Flex
      flexDir={{ lg: 'row', md: 'row', sm: 'column', base: 'column' }}
      pt="10%"
      w={{ lg: '80%' }}
      gap={10}
      justify="center"
      align="center"
      m="auto"
    >
      <Box w="100%">
        <Image src="Images/Contact_Bg.png" alt="Contact Background" />
      </Box>

      <Box w="80%">
        <Text
          as="h1"
          fontSize={{ base: '2xl', md: '3xl', sm: '3xl' }}
          fontWeight="bold"
          mb={3}
        >
          Get In Touch
        </Text>
        <Text
          as="p"
          w={{ base: '100%', md: '80%' }}
          mt={5}
          fontSize={{ base: 'sm', md: 'md', lg: 'lg' }}
          mb={6}
        >
          Please use the form below to get in touch with us, and our team will
          get back to you as soon as possible. If you prefer to contact us by
          phone, you can find our contact details below.
        </Text>

        <Box w={{ base: '100%', md: '90%' }}>
          <Input
            required
            value={name}
            placeholder="Name"
            mb={4}
            aria-label="Name"
          />
          <Input
            required
            value={email}
            placeholder="Input your Email"
            mb={4}
            aria-label="Email"
          />
          <Input
            required
            value={subject}
            placeholder="Subject"
            mb={4}
            aria-label="Subject"
          />
          <Textarea
            value={message}
            placeholder="Message"
            mb={4}
            aria-label="Message"
            resize="none"
          />
        </Box>

        <Button
          mb={4}
          isLoading={isLoading}
          isDisabled={isLoading}
          onClick={handleSubmit}
          colorScheme="teal"
        >
          Send
        </Button>
      </Box>
    </Flex>
  );
}
In the code above, we’re importing the various UI components from the Charkra UI library which we’ll use for building the form input.
Now that we’ve created the form inputs, let’s focus on the logical aspect: making the form input functional. Here’s how you can do this:
import { useState } from 'react';
You import the useState hook (which is a React hook) which lets you effectively declare/add states and manage states in a functional component.
The useState hook declaring states and managing states might sound a bit off to you – but I have an article that’ll help you understand how the useState hook functions: Here you go.
Next, you’ll need to declare your state variables. Here’s how you can do that:
const [name, setName] = useState('');
const [email, setEmail] = useState('');
const [subject, setSubject] = useState('');
const [message, setMessage] = useState('');
const [isLoading, setIsLoading] = useState(false);
const [error, setError] = useState('');
In the code above, the state variable includes the likes of name, email, subject, message, and so on which we’re using to store user inputs from the contact form. Then we’re using setName, setEmail, setSubject, setMessage and so on to manage and update the state in case the initial value changes at some point later.
Next, create a function to handle the form submission:
const handleSubmit = async (e) => {
  e.preventDefault();
  setIsLoading(true);
  setError('');
Here, e.preventDefault() helps prevent the page from reloading when the form is submitted. SetIsLoading(true) shows that the form submission is in progress. And setError(‘ ‘) clears any previous error messages that might have occurred during submission.
Next, create a form validation function to validate the input forms and seek out any errors before the form is finally submitted.
if (!name || !email || !subject || !message) {
  setError('All fields are required.');
  setIsLoading(false);
  return;
}

if (!/S+@S+.S+/.test(email)) {
  setError('Invalid email format.');
  setIsLoading(false);
  return;
}
Before the form is finally submitted, the code above first checks if all the input fields are filled out. If any field is found empty, it displays an error and immediately the form submission is stopped. The same goes for the email. Emails are arranged and typed out in a specific syntax, and if the email field doesn’t follow that syntax, an error is displayed as well.
Next, create an object which stores the information given by the user when they fill out the form. This information will be sent to the backend.
Const formData = {name, email, subject, message };
Now, create a function that sends your data to the backend:
try {
  const response = await fetch(" YOUR API LINK GOES HERE", {
    method: 'POST',
    headers: { 'Content-Type': 'application/json' },
    body: JSON.stringify(formData),
  });

  const result = await response.json();
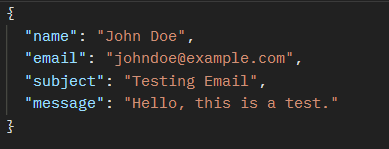
The fetch response sends the data to the backend API. It uses the post method. When the data is sent to the backend, it’s sent out as a JSON file. Then the data inside the JSON file are all converted into a string.
This is what it looks like when sent:
At this point, let’s work on the response handling from the API as well as error handling:
if (response.ok) {
      alert(result.message || 'Email sent successfully!');
      setName('');
      setEmail('');
      setSubject('');
      setMessage('');
    } else {
      setError(result.error || 'Failed to send email.');
    }
  } catch (error) {
    setError('An unexpected error occurred. Please try again later.');
  } finally {
    setIsLoading(false);
  }
In the code above, after the user types in their information correctly and submits it, if the message is sent successfully, an alert will be displayed with the message Email sent Successfully. But if the message wasn’t successful – maybe due to how the user typed in their information or due to a failed request – an alert will be displayed as well an error message Failed to send email..
For handling server errors that might occur due to network issues or due to the API being down, an error message will be displayed An unexpected error occurred. Please try again later..
At this point, we have successfully built out the frontend aspect of the form. So now we can fully dive into the backend. Let’s get on with it.
Backend Setup
For the backend, we’ll use Node.js, Dotenv, CORS, Nodemailer, and oAuth2.
Backend Libraries Setup
Let’s start by setting up your Node.js server. To do this, you’ll want to create a file inside your backend folder with the name send-email.js. Then in your backend folder, you’ll create a package.json file and install all the dependencies you’ll need.
Start by running npm init -y in your terminal. This creates the Package.json file which manages your project and stores all the dependencies.
Next, let’s go ahead and install the libraries you’ll be using:
Nodemailerenables email sending, as you now know.dotenvloads an environment where you’ll store your.envfile.corsallows requests between the frontend and the backend.googleapisprovides OAuth2 authentication support for sending emails securely.
You can install these one by one by running the commands npm install nodemailer, npm install dotenv, npm install cors, and npm install googleapis. Or you can install them all at once with:
npm install nodemailer dotenv cors googleapis
Note that cors plays an important role in ensuring effective communication between your frontend server and the backend. You can learn more about CORS here.
OAuth2 Configuration Setup
Now before you finish setting up the send email function, you first need to configure OAuth2 to get access to the tokens and keys you’re using, such as CLIENT_ID, CLIENT_SECRET, REFRESH_TOKEN, and so on.
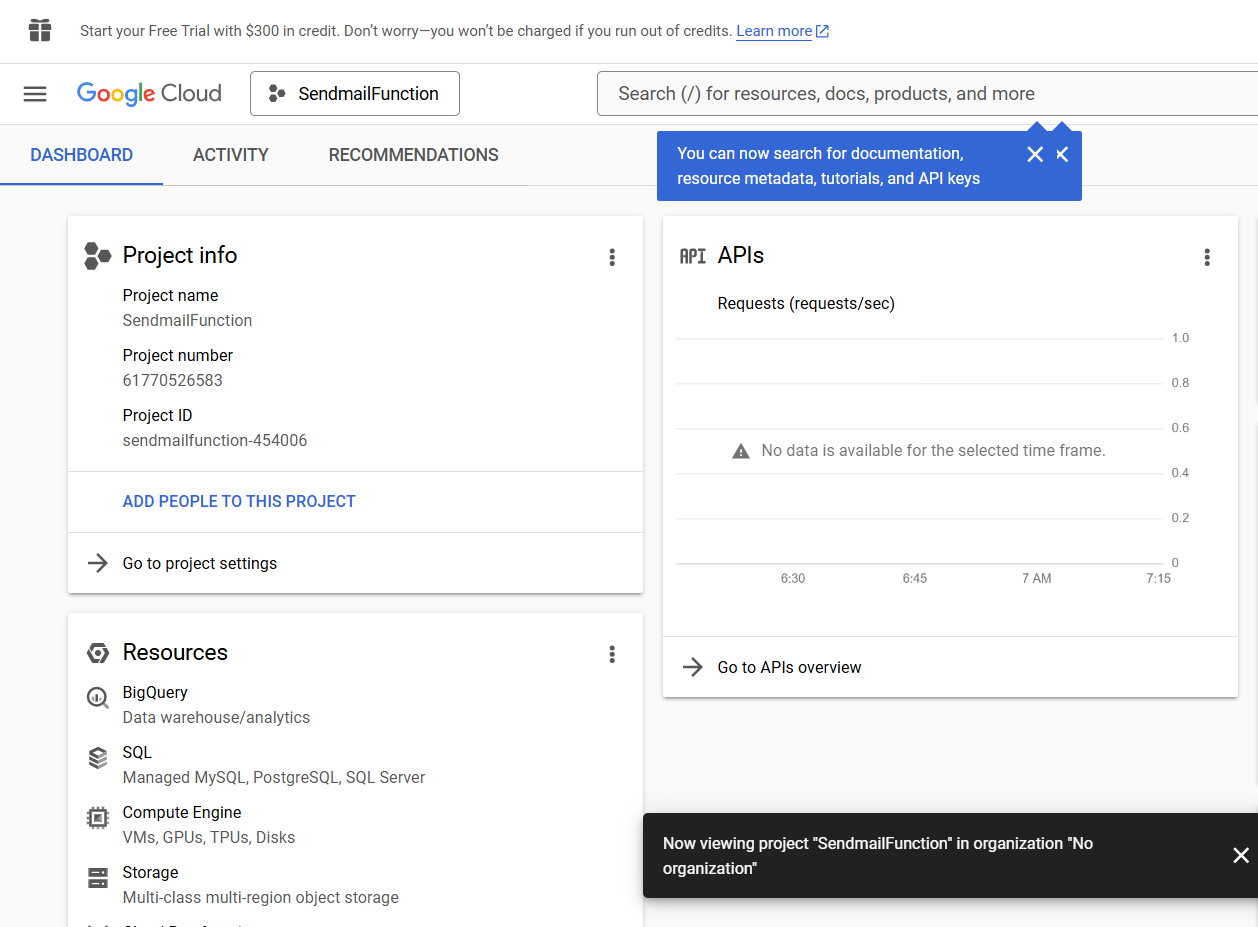
To set up OAuth2, go here to visit your Google Cloud dashboard. Once it opens, it should look like this:
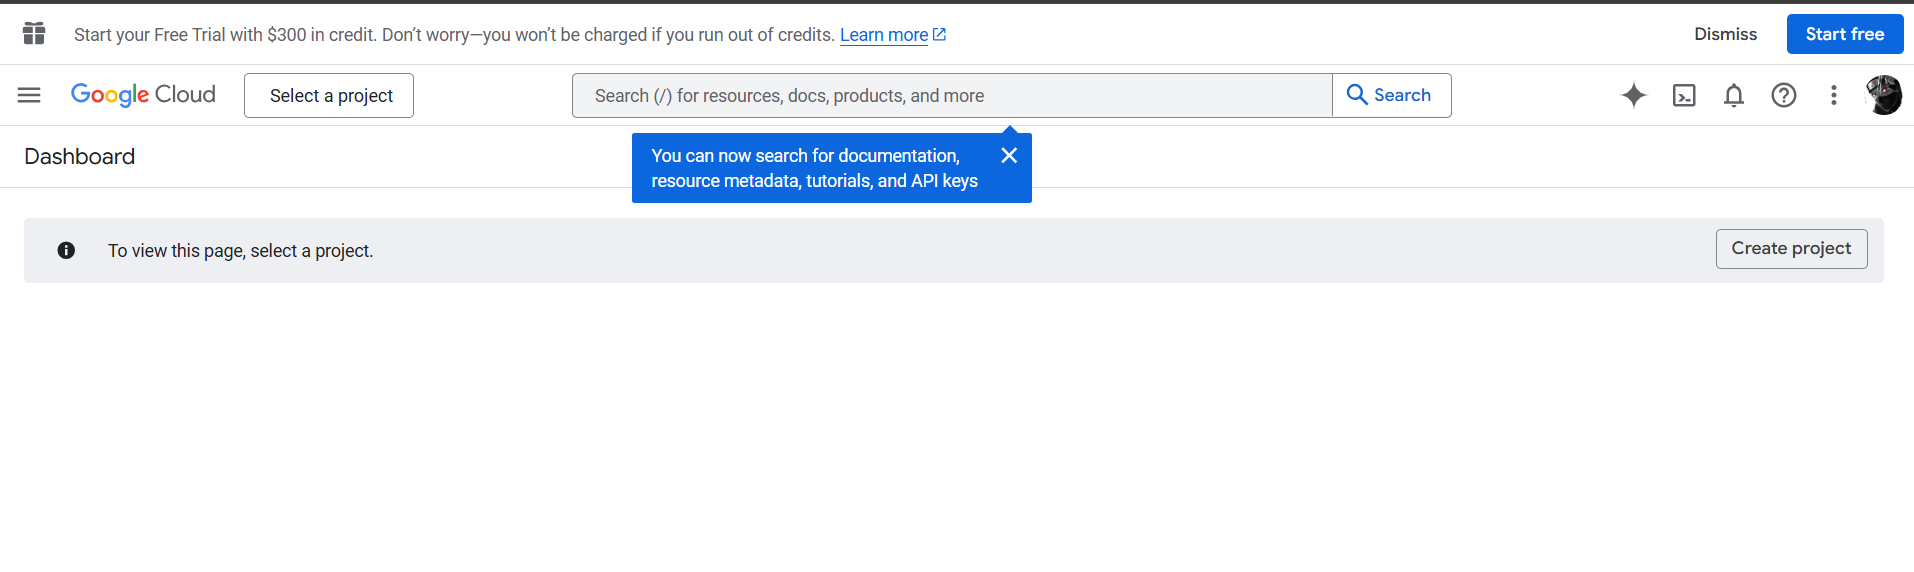
On the screen, click on “create project” and it’ll take you to a place where you can create your project. It should look like this:
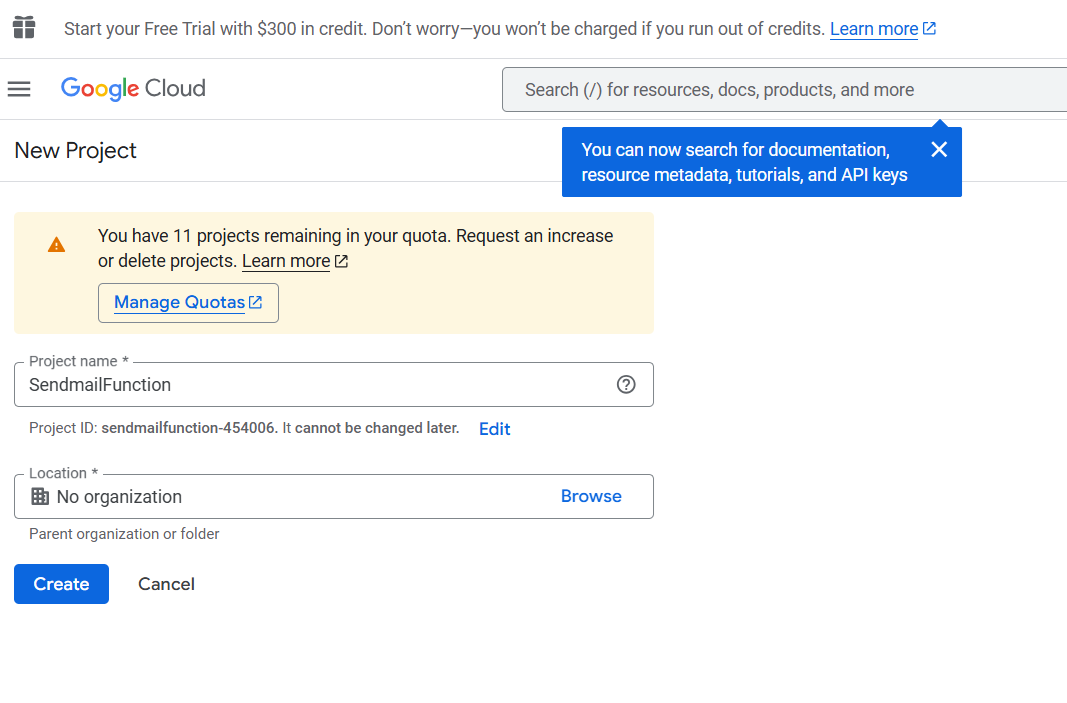
After you create your project, it’ll take you to your dashboard with your project name displayed at the top right left corner of the screen. This shows that you have successfully created your project.
After creating the account, click the toggle button at the top left-hand corner of your screen. When it opens, click on the APIs & Services button. A dropdown should then be displayed. Then click on the OAuth consent screen.
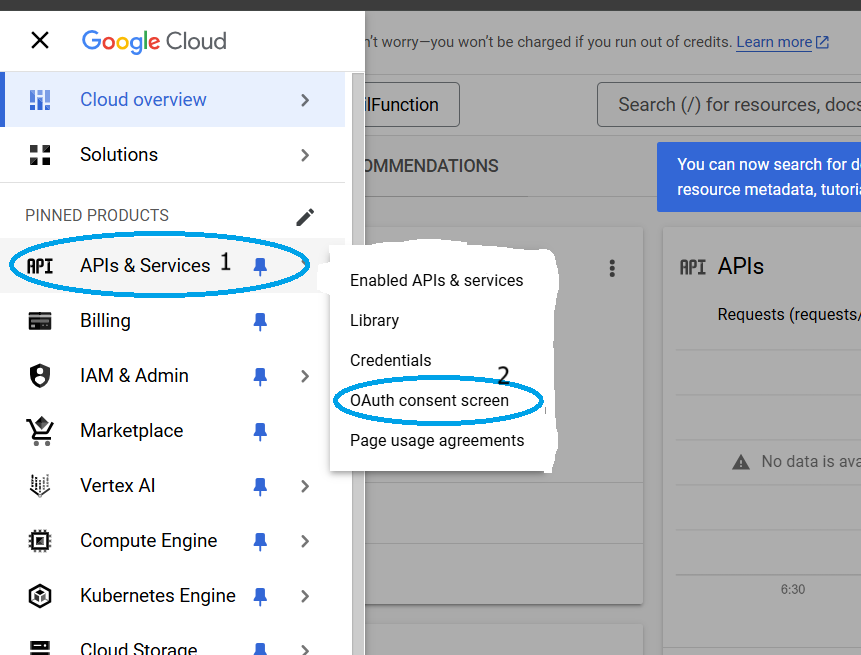
After that, it should direct you to a new page where you can then configure your project.
The configuration process has four steps, which we’ll go through now.
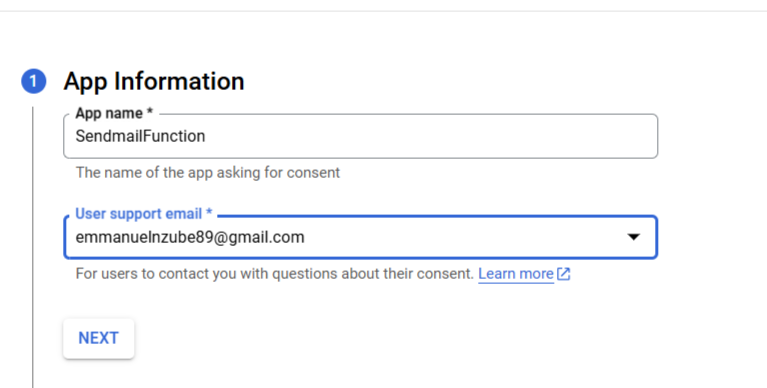
Step 1: Add app information
First, you’ll need to add your app’s information, which includes your app name and user support email. For the app name, go ahead and add your project name there. For the support email, add your email address and click on the ‘Next’ button. It should look like this:
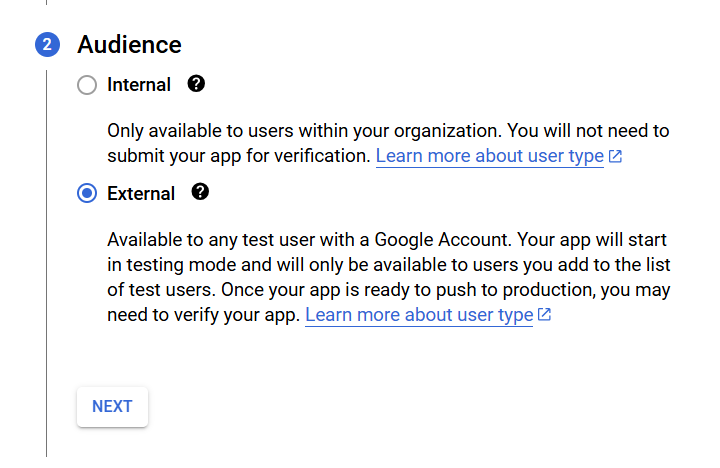
Step 2: Set up the audience section
Next, you’ll need to set up the Audience section. In this section, choose the ‘External’ options, which means that others (not only those within the organization) can send messages with the web application.
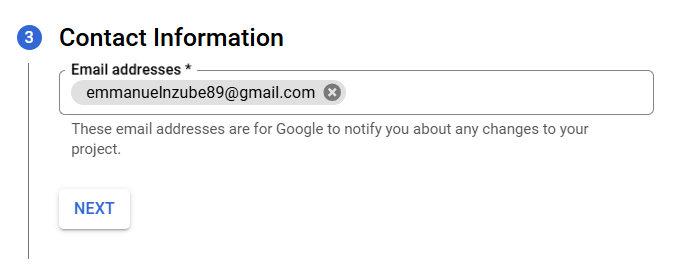
Step 3: Add contact information
Now you’ll come to the contact information section, where you’ll need to add your email address.
Step 4: Agree to Google API Services
Finally, you’ll need to agree to the Google API Services. After that, you can finish the configuration of your project by clicking on the ‘create’ button.
After you’ve completely configured your project, it’ll take you to a page where you can create your client ID. To create it, click on the ‘Create Oauth Client’ button on the screen.
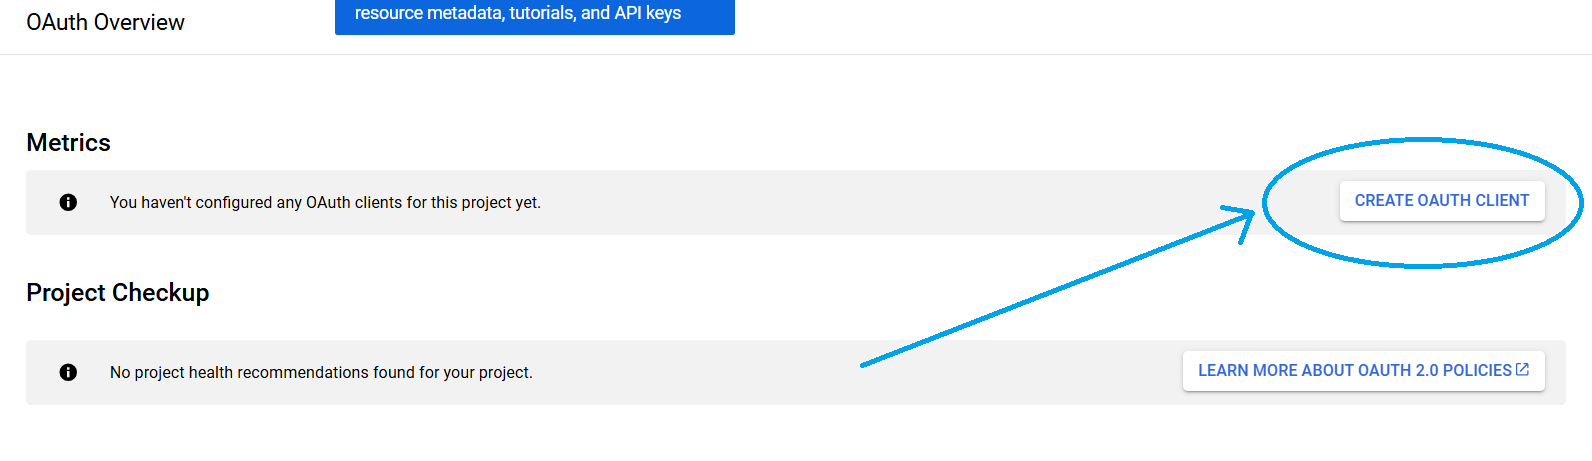
This takes you to a place where you’ll add the information about your project. For the “project type/Application type”, choose Web application, and then scroll down and click on the Create button.
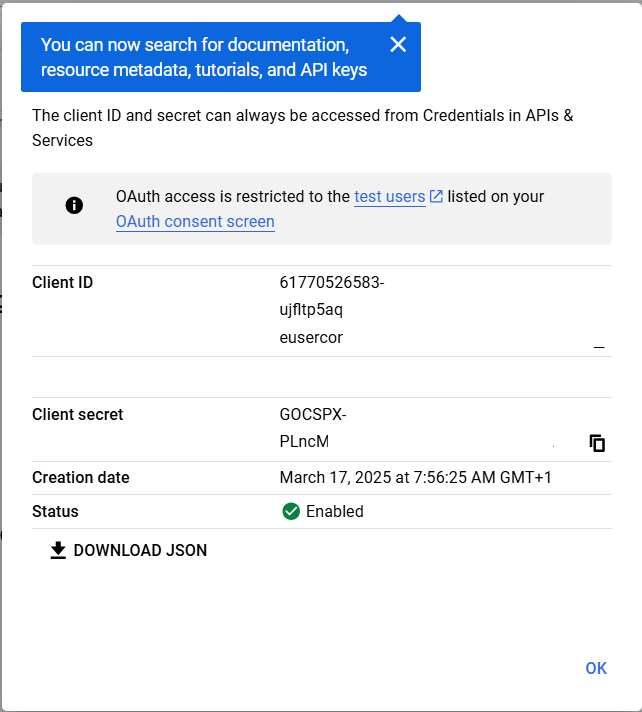
After that, your Client ID and Client Secret token should finally be generated. Here is what it looks like:
Next, head to the OAuth Playground where you’ll complete the final setup. Once there, click on the gear button at the top right of the screen. There, just add your client ID and Client Secret which you generated before.

Then on the left, scroll down to ‘Gmail API v1’, click on it, and select the first dropdown option which was ‘https://mail.google.com/’. Then click on ‘Authorize APIs’.
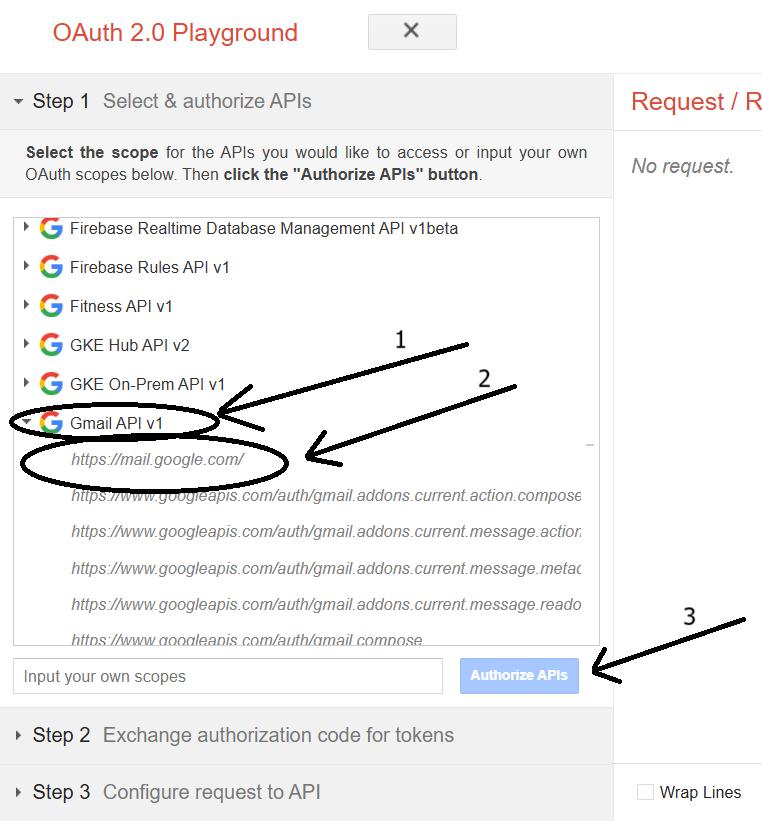
This’ll take you to a sign-in with Google page, where you can choose your email account and continue.
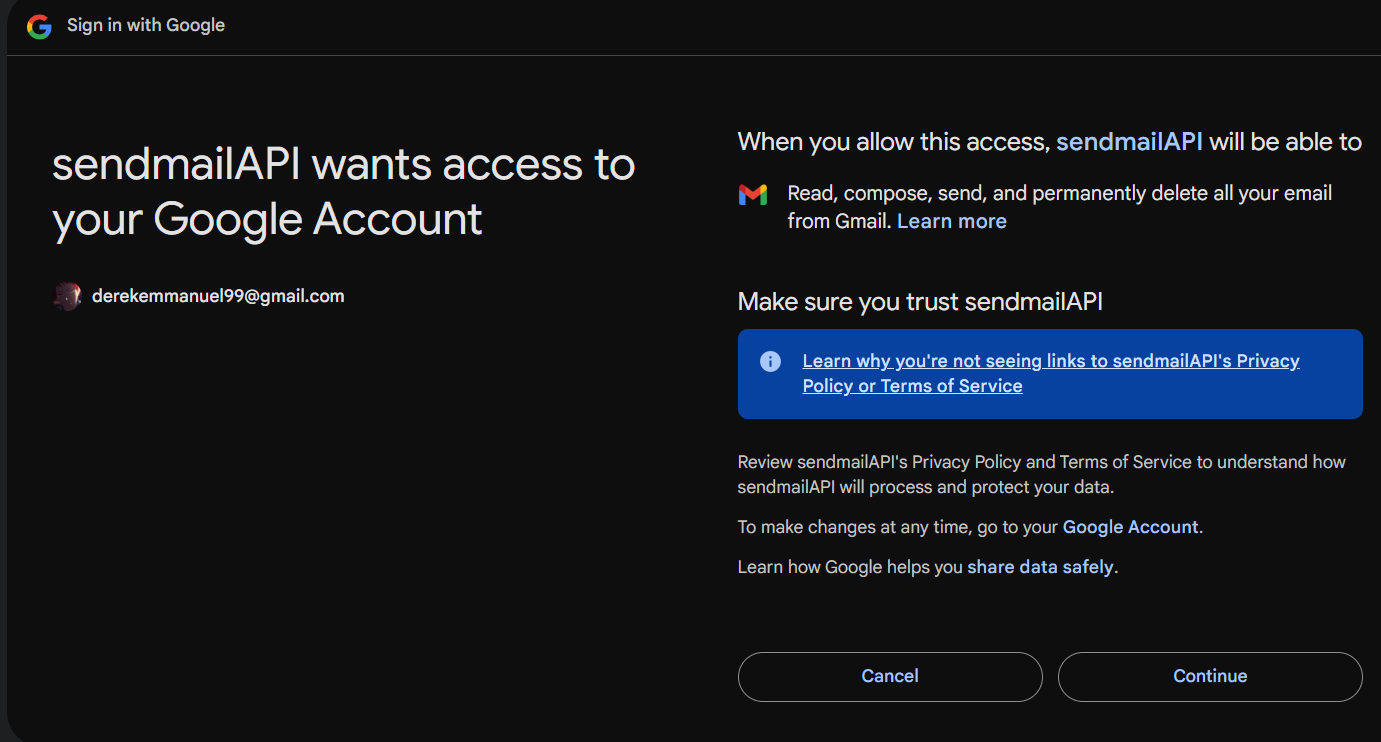
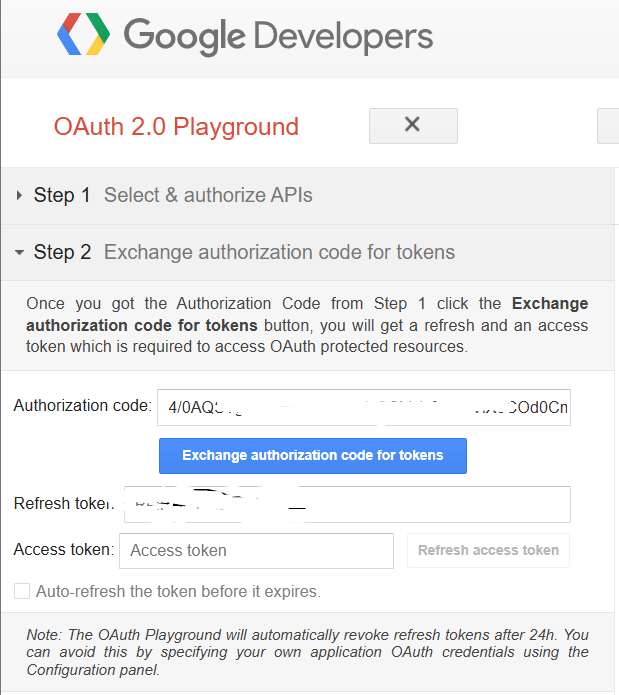
Then you’ll be redirected back to the OAuth Playground dashboard. At this point, your Authorization code has been generated for you, but what you really need is the Refresh token. So to get it, click on Exchange authorization code for tokens. After that your refresh token should be generated.
At this point, your OAuth2 configuration is done! Now what’s left is to store all the tokens you generated in an .env file you’ve created. You’ll also need to set up your send email function using NodeMailer.
Nodemailer Setup
Now, that you’ve gotten all the tokens you need to create your mailer function, all that remains is to start putting your backend code together.
First, start by loading your .env file into process.env so you can easily access all the tokens you generated. Also, import the libraries you initially installed.
require("dotenv").config();
const nodemailer = require("nodemailer");
const cors = require("cors");
const { google } = require("googleapis");
Next on the line, you’ll need to set up OAuth2. Here, the client ID, and client Secret which you initially generated will be used to authenticate the application and securely request and create access tokens. These will be used for seamlessly sending emails through Google APIs.
You’ll also need to configure the refresh token which lets the application obtain new access tokens automatically without requiring user interaction.
const oAuth2Client = new google.auth.OAuth2(
  process.env.CLIENT_ID,
  process.env.CLIENT_SECRET,
  process.env.REDIRECT_URI
);

//setting up refresh token.
oAuth2Client.setCredentials({
  refresh_token: process.env.OAUTH_REFRESH_TOKEN,
});
Since we want the frontend to interact properly with the backend, you’ll want to configure a CORS Middleware. This allows requests from any origin (`*`) as well as allowing POST requests from that origin. Here is how you can do that:
const corsMiddleware = cors({ origin: "*", methods: ["POST"] });
Next, create a function to handle CORS and the Request Method. This function applies the CORS middleware to the request in such a way that if the request method is OPTIONS, it responds with a 200 status (“preflight OK”). This means that your request has been approved/allowed by the server because it met the server’s set rules. If the request method is not POST, a response of 405 status (“Method not allowed”) will be displayed, showing that your request does not meet the server’s set rule.
Here’s how it’s done:
corsMiddleware(req, res, async () => {
  if (req.method === "OPTIONS") {
    return res.status(200).send("Preflight OK");
  }

  if (req.method !== "POST") {
    return res.status(405).json({ error: "Method not allowed" });
  }
Next, create a function that extracts and validates the input request. This request contains the senders name, email, subject, and message. This function ensures that all the input fields must be filled out and the email must also be written properly. If not, it responds with a 400 status error.
const { name, email, subject, message } = req.body;

// Validate input
if (!name || !email || !subject || !message) {
  return res.status(400).json({ error: "All fields are required." });
}

if (!/^[^s@]+@[^s@]+.[^s@]+$/.test(email)) {
  return res.status(400).json({ error: "Invalid email address." });
}
Up next, you’ll create a function that helps retrieve new access tokens. You’ll also create a Nodemailer transporter function. This transporter was configured to use Gmail’s SMTP service with OAuth2 authentication.
This means whenever a user sends an email, the transporter function first verifies if the Gmail’s SMTP service is ready. If it is, the mail will be verified first with OAuth2, and if the authentication check is successful, the mail will be delivered successfully.
//Function to retrieve new access token
const accessToken = await oAuth2Client.getAccessToken();
if (!accessToken || !accessToken.token) {
  throw new Error("Failed to retrieve access token.");
}
console.log("Access token retrieved successfully.");

/// Creating the Nodemailer Transporter function
const transporter = nodemailer.createTransport({
  service: "gmail",
  auth: {
    type: "OAuth2",
    user: process.env.EMAIL_HOST,
    clientId: process.env.CLIENT_ID,
    clientSecret: process.env.CLIENT_SECRET,
    refreshToken: process.env.OAUTH_REFRESH_TOKEN,
    accessToken: accessToken.token,
  },
  debug: true,
  logger: true,
});

///The function verifying if SMTP server is ready
await transporter.verify();
console.log("SMTP server is ready to send emails.");
Lastly, you’ll want to structure your mail in the format it should be displayed in the mailbox of the receiver. You’ll also create an error handling function which displays whenever a mail is sent successfully or whenever an error occurs.
const mailOptions = {
        from: `"${name}" <${email}>`,
        to: process.env.EMAIL_RECEIVE,
        replyTo: email,
        subject,
        html: `
          <h1>Name: ${name}</h1>
          <p>Email: ${email}</p>
          <p>Subject: ${subject}</p>
          <p>Message: ${message}</p>
          <p><i>Message from Exesenergy Website</i></p>
        `,
      };
      console.log("Mail options:", mailOptions);

      // Send email
      await transporter.sendMail(mailOptions);
      console.log("Email sent successfully.");

      return res
        .status(200)
        .json({ status: "success", message: "Email sent successfully." });
    } catch (error) {
      console.error("Error details:", error);
      return res
        .status(500)
        .json({ error: "Internal Server Error", details: error.message });
    }
At this point, you have successfully set up both your frontend and backend applications. Now you may want to host them. I decided to host both applications using Vercel and link their URLs together.
Here is the source code to access both the frontend and the backend.
Here is the final result:
Conclusion
Nodemailer is a popular Node.js module that enables its users to send emails efficiently using different methods like SMTP and OAuth2.
If you’ve made it this far, I hope I’ve successfully shown you the importance of Nodemailer and how you can use it to send email messages directly from your website.
Thank you for reading!
Source: freeCodeCamp Programming Tutorials: Python, JavaScript, Git & MoreÂ

