


GitHub Actions are one of the most helpful features of GitHub. Actions help you automate, build, test, and deploy your app from your GitHub. They also help you perform code reviews and tests, manage branches, triage issues, and more.
In simple terms, the GitHub workflow creates an environment (virtual machine-based on the runner) to test, build, and deploy your code into the cloud based on the action that you describe in the GitHub Action file.
This tutorial teaches you how to add a GitHub Action, providing an example and step-by-step guidance. It is suitable for both beginners and intermediate developers.
Table of Contents:
Prerequisites
To get the most out of this article, you should have at least a basic knowledge of how to use GitHub and YAML. If you don’t know GitHub fundamentals, check out this in-depth tutorial on Git and GitHub. And here’s an introduction to YAML.
You’ll also need to understand the main concepts behind events, workflows, jobs, and runners and why they’re important when creating a GitHub Action.
These are the key ingredients of GitHub actions, so we’ll go through them one by one before diving into the primary part of the tutorial.
Key GitHub Actions Concepts
Workflows
A workflow is a configurable automated process that runs one or more jobs. It is created with a YAML file in your repository and runs when an event triggers it. Workflows can also be triggered manually or on a defined schedule.
Workflows are defined in the .github/workflows directory in a repository. In the repository, you can create multiple workflows that perform different tasks, such as:
-
Building and testing pull requests
-
Deploying your application on the cloud
-
Running a test on every pull request
Events
An event is a specific activity in a repository that triggers or runs a workflow in your GitHub repository. For example, when you push code to the repository, it triggers the push event. The same happens when you create a new issue – it triggers the issues event. And when somebody makes a pull request in your repository, it triggers the pull_request event.
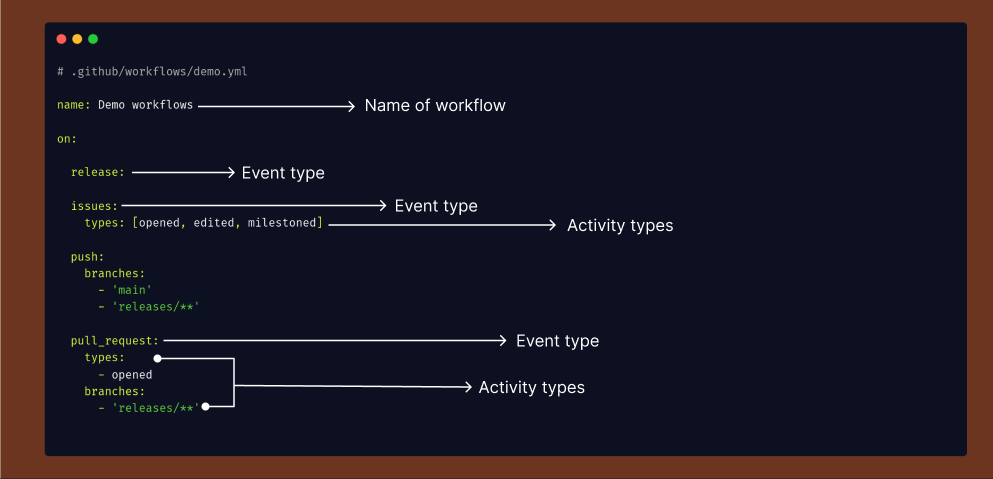
These are some common GitHub Action events:
-
Push
-
pull_request
-
release
-
label
-
issues
-
milestone
-
label
The push, release, and pull_request events are the most common events. To read more about events, you can check out the GitHub documentation.
It’s a good idea to specify the event type in a GitHub Action. For example, specifying the pull_request event will trigger the action whenever any user creates a pull request in the GitHub repository.
# .github/workflows/demo.yml

on:
  issues:
    types: [opened, edited, milestoned]

  pull_request:
    types:
      - opened
    branches:
      - 'releases/**'
This is helpful because, if you don’t declare a specific event activity type in your event type, it can lead to unnecessary resources getting used. The GitHub Action will be triggered with every new pull request – so it’s best to define which type of event you’re using.
Jobs
GitHub Action jobs run in parallel by default. A GitHub Action workflow runs one or more jobs, each containing a set of steps that execute commands or actions. Here’s an example:
# .github/workflows/demo.yml

name: Demo Workflows

on:
   push:

# A workflow run is made up of one or more jobs that can run sequentially or in parallel
jobs:

jobs:
You can set one job to depend on (an)other job(s). If jobs don’t have dependencies, they’ll run in parallel. When one job depends on another, it will wait for that job to finish before it starts.
# .github/workflows/demo.yml

jobs:
  build:
    name: Build
    needs: [ Development ]
    steps:
      - name: Build and deploy on Cloud
  dev:
    name: Development
    steps:
      - name: Run the developer

  Test:
    needs: [ build, dev ]
    name: Testing
    steps:
      - name: Testing the application
Runners
Runners are servers that execute workflows when triggered. Each runner can handle only one job at a time. GitHub offers runners for Ubuntu Linux, Microsoft Windows, and MacOS to run your workflows.
# .github/workflows/demo.yml

name: Demo workflows

on:
  # Triggers the workflow on push or pull request events but only for the "main" branch
   push:
    branches: [ "main" ]

# A workflow run is made up of one or more jobs that can run sequentially or in parallel
jobs:
  # This workflow contains a single job called "build"
  build:
    # The type of runner that the job will run on
    runs-on: ubuntu-latest
To define the runners, specify the runner value in the runs-on option. You can provide it as a single string or an array of strings.
# .github/workflows/demo.yml

# String
runs-on: ubuntu-latest
# Array of string
runs-on: [ ubuntu-latest, windows-latest, macos-latest ]
Now that you’re familiar with the key elements of GitHub Actions and how they work, let’s see how to use Actions in practice.
How to Create a GitHub Action in Your Repository
You can create a GitHub Action in GitHub very easily. There are two ways to do it:
-
Using the Github UI
-
Locally with your IDE
Many developers use the GitHub UI to create an Action. This is a common way to create an Action. You don’t need to create a .github/workflow folder when you use the GitHub UI. GitHub automatically creates this folder for you. On the other hand, for complex Github actions, you’ll typically use your IDE.
Let’s look at each approach now.
Create a GitHub Action Using the GitHub UI
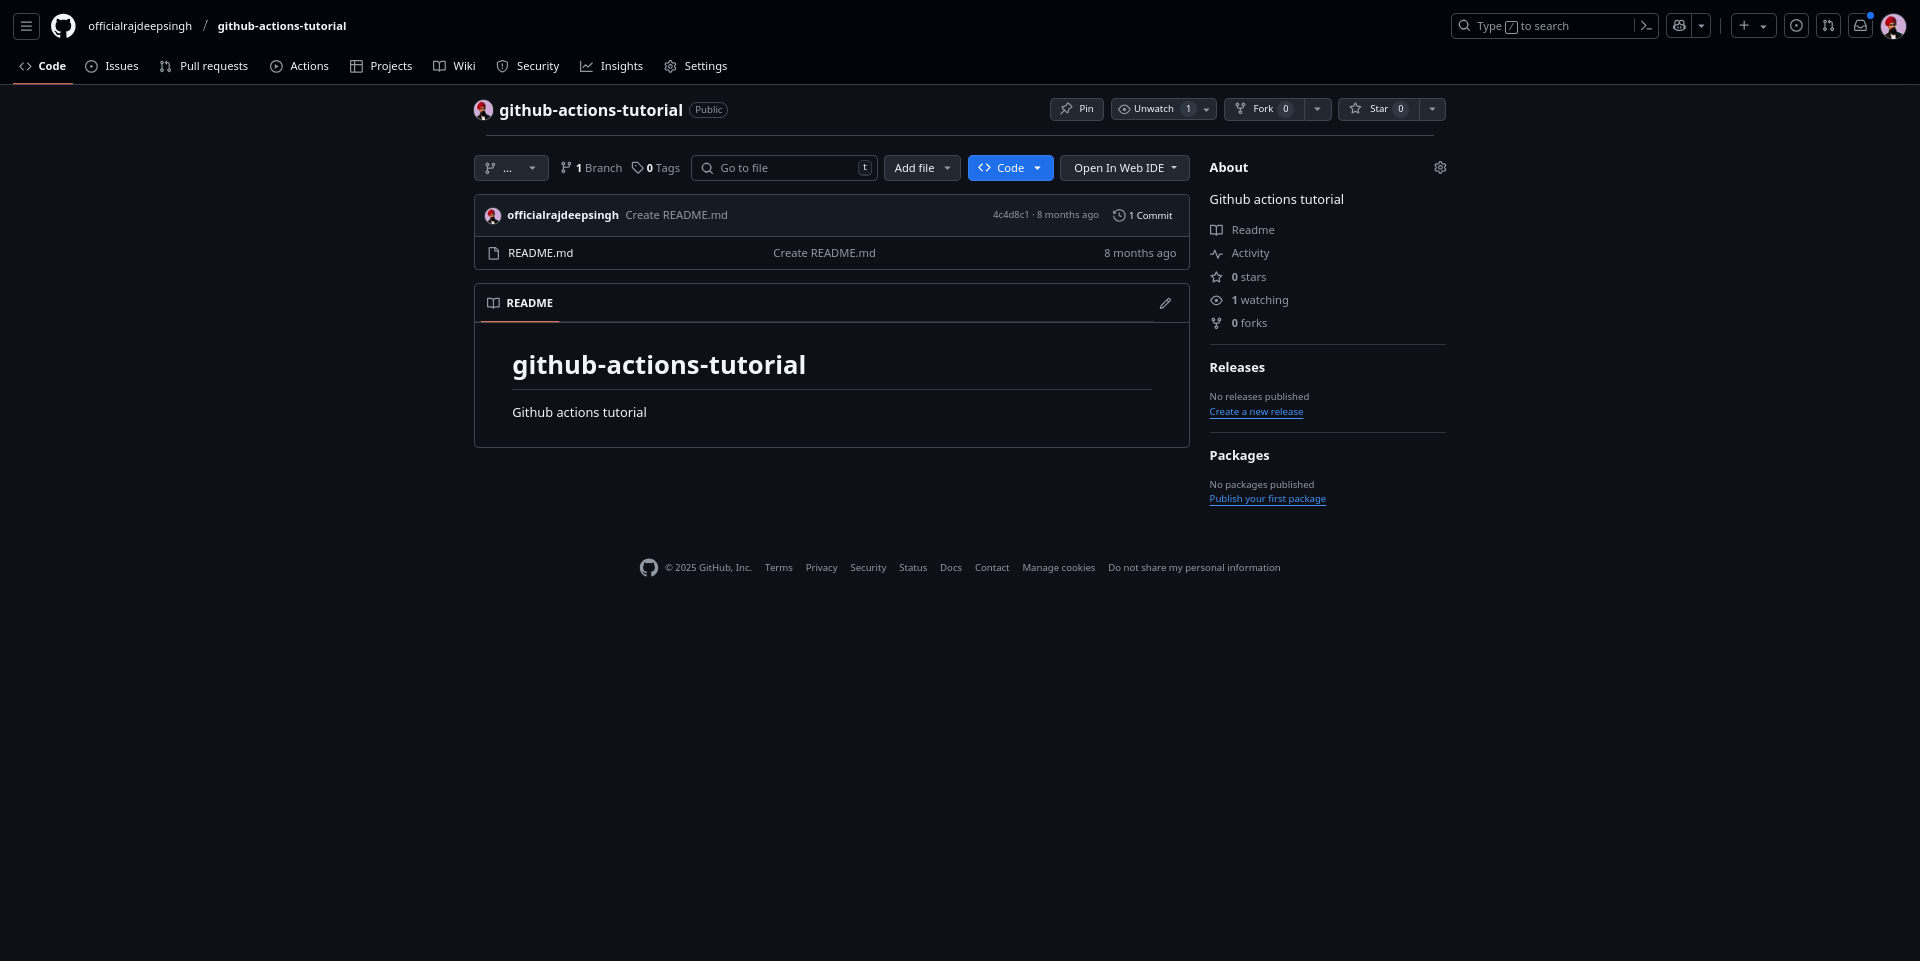
First, go to the GitHub repository where you want to create your GitHub Action.
To create the action, follow these steps:
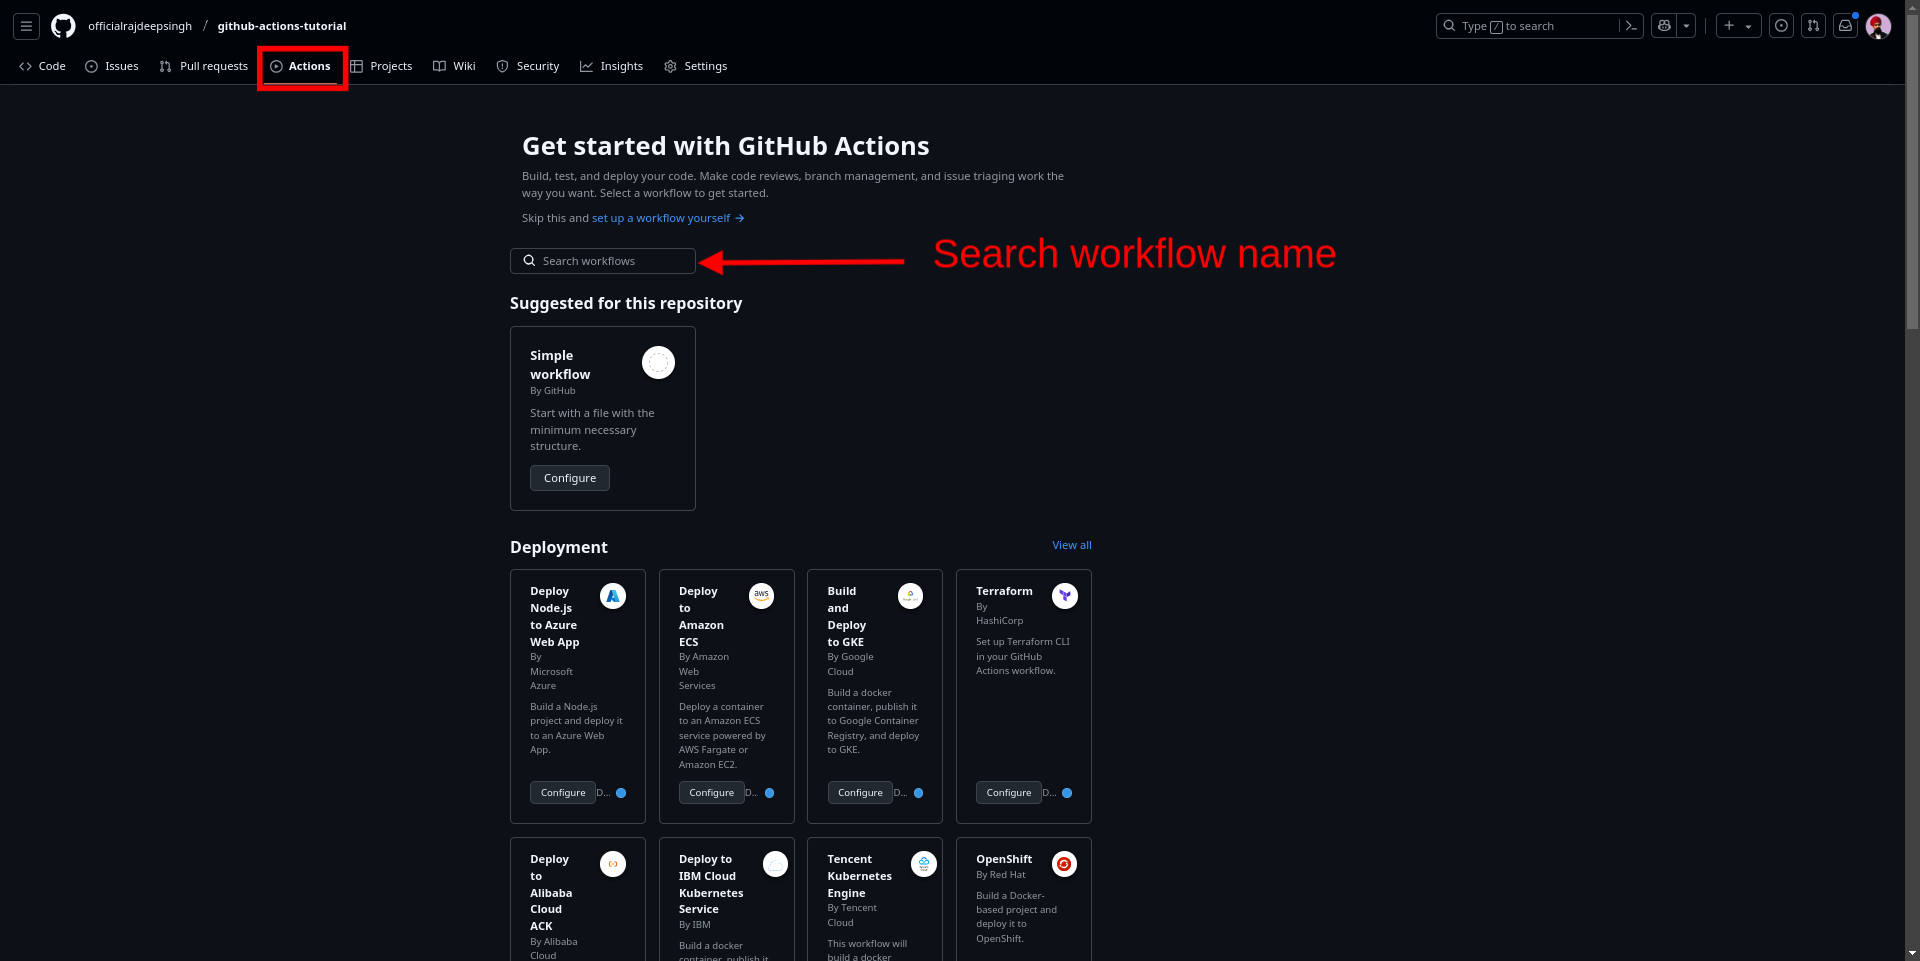
1. Click on the Action Tab
Click on the Action tab to create a GitHub Action. You’ll see the following page:
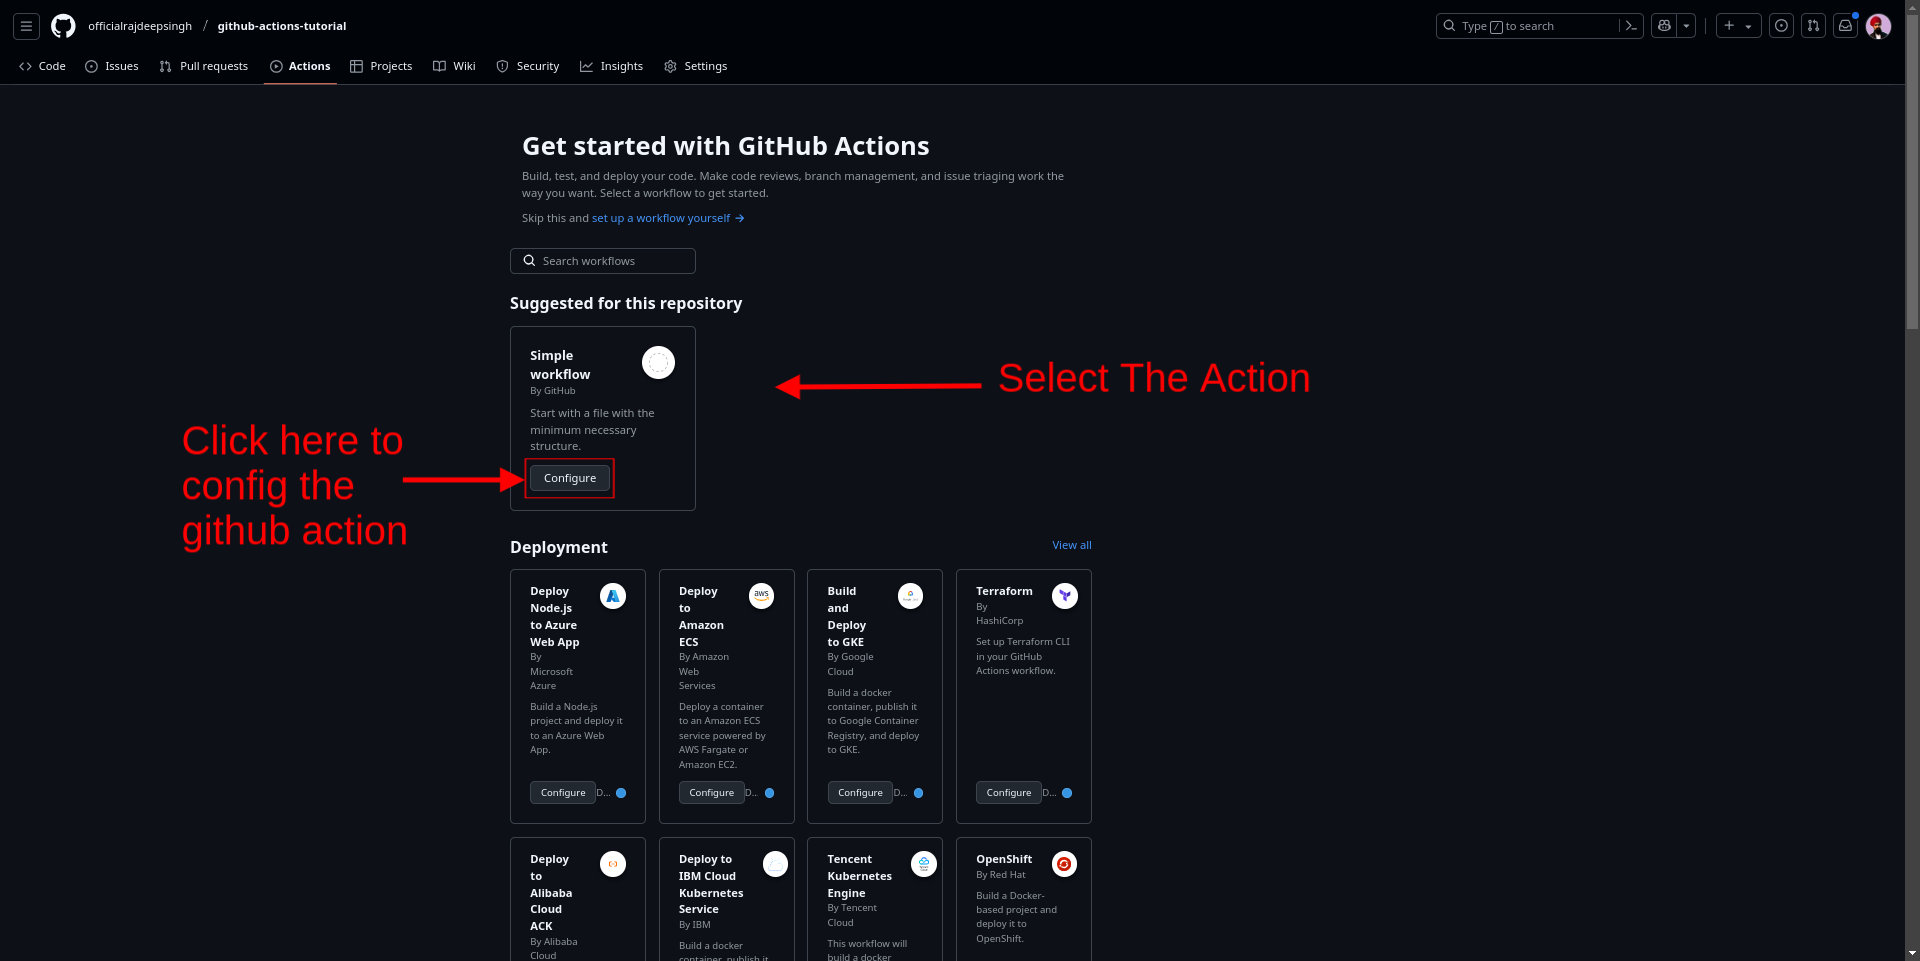
2. Select the workflow action
GitHub suggestions automatically work according to the nature of your project. Select the GitHub workflow and click on the configure button to create your action.
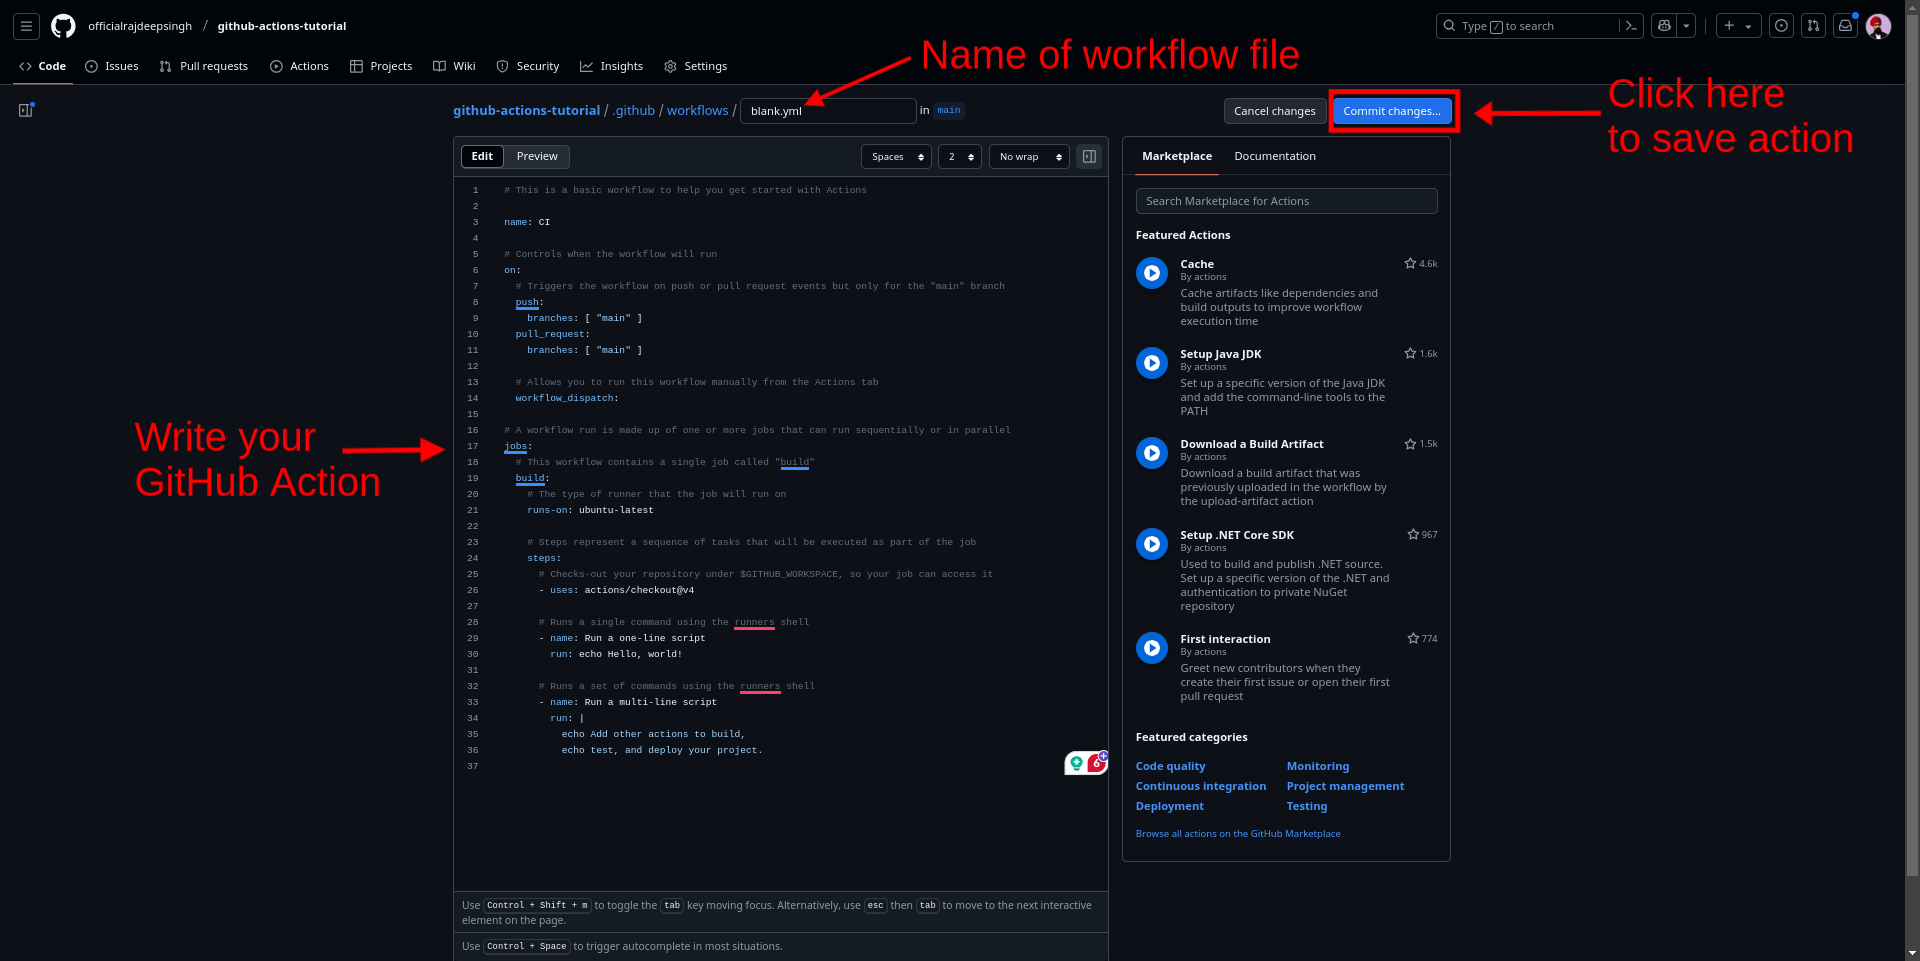
3. Create the GitHub workflow
You’ll see the following page where you can edit and create your action. Click on the commit change button to save the action.
And that’s it – you’ve created your GitHub Action.
Create a GitHub Action Locally with Your IDE
First, open your project in your current IDE, such as VS Code, Neovim, Vim, or whatever. Then, create a .github/workflow/name-of-workflow.yml file in your project. Copy and paste the following code and save and push your local code into the GitHub repository.
Following the GitHub workflow action example code is printed a hello world message.
# .github/workflows/demo.yml

name: CI

# Controls when the workflow will run
on:
  # Triggers the workflow on push or pull request events but only for the "main" branch
  push:
    branches: [ "main" ]

# A workflow run is made up of one or more jobs that can run sequentially or in parallel
jobs:
  # This workflow contains a single job called "build"
  build:
    # The type of runner that the job will run on
    runs-on: ubuntu-latest

    # Steps represent a sequence of tasks that will be executed as part of the job
    steps:
      # Checks out your repository under $GITHUB_WORKSPACE, so your job can access it
      - uses: actions/checkout@v4

      # Runs a single command using the runners shell
      - name: Run a one-line script
        run: echo Hello, world!
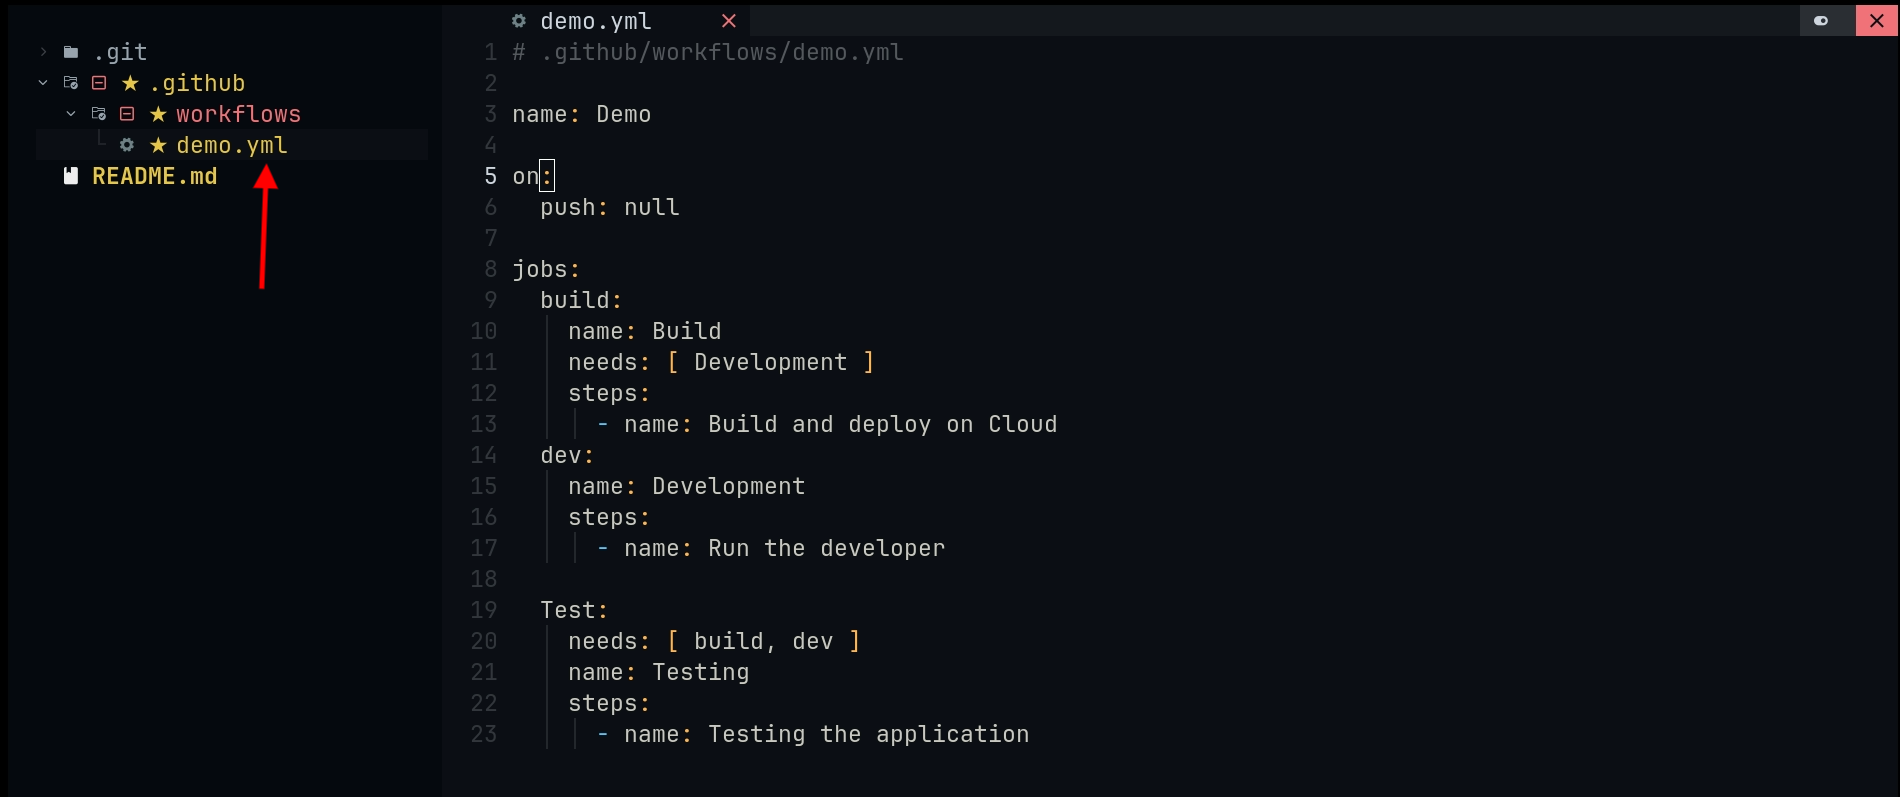
I’m using the Neovim IDE to create a .github/workflow/demo.yml file. It looks like this.
GitHub Actions Syntax
To create a GitHub Action, it’s important to understand the GitHub Action syntax. In this section, you’ll learn some of the most common syntax you’ll use to create your Actions.
We’ll work with this example Action and go through it part by part below:
# .github/workflows/demo.yml

name: Github Action Template

on:

  pull_request:
    branches: [ "main" ]

  schedule:
    - cron:  '30 5,17 * * *'

  workflow_call:
    inputs:
      username:
        description: 'A username passed from the caller workflow'
        default: 'john-doe'
        required: false
        type: string

  permissions:
    actions: read|write|none

  # permissions : read|write|none

# A workflow run is made up of one or more jobs that can run sequentially or in parallel
jobs:

  # This workflow contains a single job called "build"

  build:

    runs-on: ubuntu-latest

    # Steps represent a sequence of tasks that will be executed as part of the job

    steps:

      # Checks-out your repository under $GITHUB_WORKSPACE, so your job can access it
      - uses: actions/checkout@v4
        if: ${{ github.event_name == 'pull_request' && github.event.action == 'unassigned' }}
        shell: zsh
        name: NPM Install Package
        run: npm install
        with:
          GITHUB_TOKEN: ${{ secrets.GITHUB_TOKEN }}
          first_name: Github
          last_name: Action
          args: The ${{ github.event_name }} event triggered this step.
          entrypoint: /bin/echo
Now, let’s understand each option that you can see in this GitHub Action example workflow:
-
name: The name describes the workflow name. -
pull_request: The pull request is part of the event type. It means somebody added a pull request in your repository and the following workflow was run. -
schedule: With a schedule, you can define the time schedule in your workflows. You can schedule a workflow to run at certain tasks on specific UTC times or based on intervals after five minutes, and so on. -
workflow_call: This defines the inputs and outputs for a reusable workflow. -
permissions: In GitHub, certain tasks need special permissions when working with the GitHub app and GitHub API. For example, for issues,writepermission permits a user to add a comment to an issue. For other permissions, you can check out the documentation. -
jobs: Thejobsoption runs one or more jobs in your GitHub Action, each containing a set of steps that execute commands or actions. -
runs-on: Theruns-onoption defines the type of machine to run the job on. -
steps: The jobs contain a sequence of tasks calledsteps. Steps can run commands, set tasks, or an action in your repository. -
name: The name option is used to set the name of the job, which is displayed in the GitHub UI. -
if: theifoption works similarly to an if conditional. It prevents a step from running unless a condition is met. -
shell: Theshelloption allows you to define a custom shell. -
run: Therunoption helps run commands in the operating system’s shell. For example,run : ls,run : pwd, and so on. -
uses: With theusesoption, you can run reusable units of code or other packages. You usually use it to run a GitHub package published by another developer on the GitHub marketplace. Most package developers use JavaScript or Docker container files. -
with: thewithoption accepts a value as a map with a key/value pair. It has two sub-options:argsand anentrypoint. The entrypoint is used to define the entry file for Dockerfile. The args option will be passed to the container’s entrypoint.
You’ll typically use this syntax to create your GitHub Actions. In the next section, you’ll learn how to use it to actually build a GitHub Action.
For advanced GitHub Action syntax, you can check out the Github documentation.
GitHub Actions Examples
To better understand how GitHub Actions work, let’s build four examples of a GitHub Action workflow. These are common examples that many developers use and will teach you how GitHub Actions work.
Node Setup
In the following GitHub Action, we’ll set up a Node.js environment for our application. Once you’ve done that, you can test and deploy your Node.js application.
# .github/workflows/nodejs.yml

name: Setup Node.js Env

on:
  push:
    branches: [ "main" ]

jobs:
  build:
    runs-on: ubuntu-latest
    steps:
    - uses: actions/checkout@v4
    - name: Use Node.js ${{ matrix.node-version }}
      uses: actions/setup-node@v4
      with:
        node-version:  21
        cache: 'npm'
    - run: npm ci
    - run: npm run build --if-present
    - run: npm test
For our example, we’re running our action on an Ubuntu machine. The GitHub action is triggered whenever you (or someone) push code into the repository. The actions/checkout@v4 extension sets the $GITHUB_WORKSPACE environment variable to your working directory.
The actions/setup-node@v4 extension sets up the Node.js environment, and the GitHub run option executes the Linux command.
Deno Setup
In the following GitHub Action, we’ll set up a Deno environment for our application. You can test and analyse (using deno lint) the code for errors, stylistic issues, and so on.
name: Deno

on:
  push:
    branches: ["main"]

permissions:
  contents: read

jobs:
  test:
    runs-on: ubuntu-latest

    steps:
      - name: Setup repo
        uses: actions/checkout@v4

      - name: Setup Deno
        uses: denoland/setup-deno@v2
        with:
          deno-version: v2.1.5

      - name: Run linter
        run: deno lint

      - name: Run tests
        run: deno test -A
For this example, we’re running our action on an Ubuntu machine. The GitHub action is triggered whenever you (or someone) push code into the repository. The actions/checkout@v4 extension sets the $GITHUB_WORKSPACE environment variable to your working directory.
The denoland/setup-deno@v2 extension sets up the Deno environment and the GitHub run option executes the Linux command.
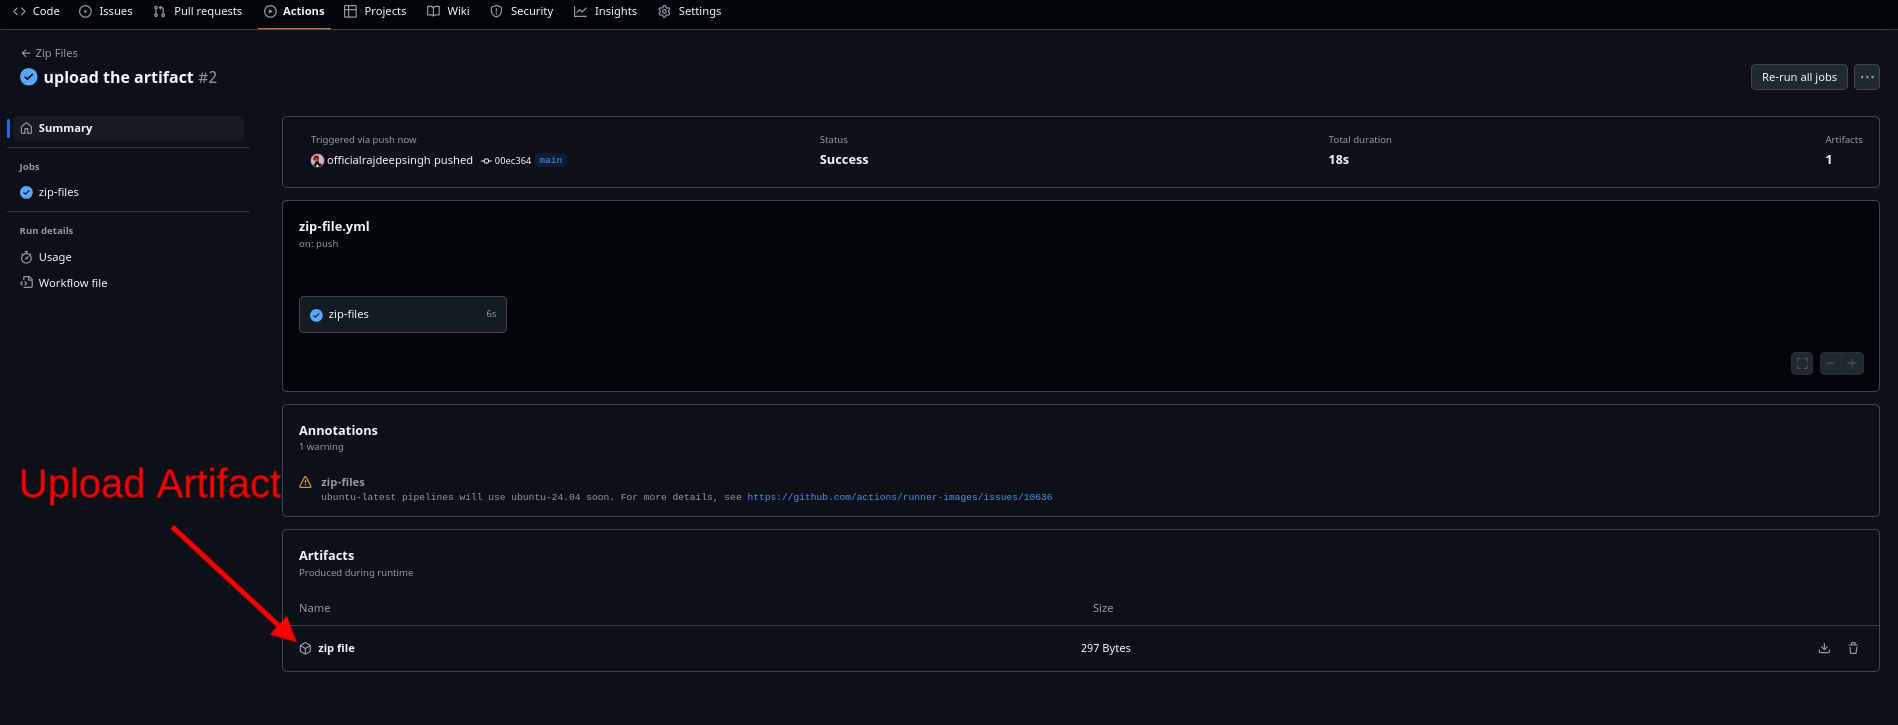
Zip Files
In the following example, we’ll combine the dist folder and the manifest.json file into a zip archive. Then we’ll save the zipped file as an artifact for later use or download:
name: Zip Files

on:
  release:
    types: [published]

jobs:
  zip-files:
    runs-on: ubuntu-latest
    steps:
      - uses: actions/checkout@v4

      - uses: vimtor/action-zip@v1.2
        with:
          files: dist/ manifest.json
          dest: build.zip

       - uses: actions/upload-artifact@v4
         with:
           name: zip file
           path: ${{ github.workspace }}/build.zip
For this example, we’re running our action on an Ubuntu machine. The GitHub Action is triggered whenever someone pushes code into the repository. The actions/checkout@v4 extension sets the $GITHUB_WORKSPACE environment variable to your working directory.
The vimtor/action-zip@v1.2 extension or package converts files into a zip folder. The actions/upload-artifact@v4 package uploads artifacts during a workflow run.
Deploy a Static Website
The following GitHub Actions example demonstrates how to deploy an HTML website to GitHub Pages.
# Simple workflow for deploying static content to GitHub Pages
name: Deploy static content to Pages

on:
  # Runs on pushes targeting the default branch
  push:
    branches: ["main"]

# Sets permissions of the GITHUB_TOKEN to allow deployment to GitHub Pages
permissions:
  contents: read
  pages: write
  id-token: write

# Allow only one concurrent deployment, skipping runs queued between the run in-progress and latest queued.
# However, do NOT cancel in-progress runs as we want to allow these production deployments to complete.
concurrency:
  group: "pages"
  cancel-in-progress: false

jobs:

  # Single deploy job since we're just deploying
  deploy:
    environment:
      name: github-pages
      url: ${{ steps.deployment.outputs.page_url }}
    runs-on: ubuntu-latest
    steps:

      - name: Checkout
        uses: actions/checkout@v4

      - name: Setup Pages
        uses: actions/configure-pages@v5

      - name: Upload artifact
        uses: actions/upload-pages-artifact@v3
        with:
          # Upload entire repository
          path: '.'

      - name: Deploy to GitHub Pages
        id: deployment
        uses: actions/deploy-pages@v4
For this example, we’re running our action on an Ubuntu machine. The GitHub action is triggered whenever you push code to the repository. The actions/checkout@v4 extension sets the $GITHUB_WORKSPACE environment variable to your working directory.
The actions/configure-pages@v5 package helps you configure GitHub Pages and allows you to gather metadata about your website. For more detail, refer to the configure-pages action documentation.
The actions/upload-pages-artifact@v3 package helps you to package and upload artifacts that can be deployed to GitHub Pages.
The actions/deploy-pages@v4 package is used to deploy your website to GitHub Pages.
Conclusion
Github Actions is a large topic. To more fully understand them, you can start with a basic Action example and then move on to more advanced Actions.
When you’re using Github Actions, the biggest problem is waiting for the results. For example, creating and updating the date on which the GitHub Action file pushes code into GitHub and then waiting for the GitHub Action result. It can be a time-consuming task, so you can use the act CLI tool instead of running GitHub Actions Locally on a laptop or computer.
I have published an in-depth article on freeCodeCamp on how to use the Act CLI tool if you want to read more about that.
Thanks for reading!
Source: freeCodeCamp Programming Tutorials: Python, JavaScript, Git & MoreÂ

