


You can highlight text in the browser by clicking and dragging through the desired text. And sometimes this works fine. But there are times when you’ll want to programmatically highlight some text in an HTML document.
In this article, I’ll discuss a couple ways you can do this. The first is using the <mark> element, and the second is using the CSS Custom Highlight API. We’ll go through examples, and I’ll explain the issues with <mark>. Then you’ll learn how the Custom Highlight API solves these challenges.
Here’s what we’ll cover:
What We Want to Do
We want to apply highlighting effects to some text in a document, without needing to manually select the text. Typically, we’d do this by giving the text a background color that calls attention to the highlighted text. You can see what this looks like in the following screenshot.

Reasons for Highlighting Text
There are several use cases for programmatically highlighting text. Before we talk about how to highlight, let’s talk about why we might want to highlight.
-
Highlighting search results or matches: If the user reaches this page by searching, it may help them to call out the matching search text by applying highlighting.
-
Emphasizing information: We might want to call out some important text on the page.
-
User defined highlighting: An example would be in an e-reading app like Amazon’s Kindle app. Here, users can select and save highlighted regions of a book. Later, when returning to a page, the user’s previous highlights are shown.
How to Highlight Text Using the <mark> Element
One way you can highlight text is by using the HTML <mark> element. This has the benefit of being an HTML semantic element.
To highlight text using <mark>, you can wrap the text to highlight in a <mark> element. The browser will apply a highlight style to any text inside a <mark> element.
Consider the following HTML containing a <mark> element which surrounds the text you want to highlight.
Here is some <mark>text to highlight</mark>.
<mark> can be styled with CSS like any other HTML element, so you can customize the color and style of the highlighted text.
Using the <mark> element has some drawbacks, though. You have to modify the DOM and insert nodes whenever you want to add highlighting. This can cause side effects such as a layout recalculation that can affect the page’s performance.
It’s also harder to highlight text that might span multiple HTML elements. Since <mark> is an HTML element, you have to use it in such a way that it produces valid HTML.
For the rest of this article, we’ll use some example HTML markup that we want to highlight parts of. Consider this HTML markup containing an introductory paragraph and some list items. We want to apply highlighting to some of the content, but let’s show the base HTML first.
<p>Some introductory text.</p>

<ul>
  <li>Item one</li>
  <li>Item two</li>
</ul>
Now, suppose we want to highlight “Some introductory text.” and “Item one” together. We can’t use a single <mark> element, because it would be invalid HTML.
The closing tag would be nested inside a <li> element, which is not valid HTML. The following code shows what that might look like:
<p><mark>Some introductory text.</p>

<ul>
  <li>Item one</mark></li>
  <li>Item two</li>
</ul>
Instead, to achieve the desired effect, we would have to insert multiple <mark> elements as shown in the following code. Note that there are two <mark> elements: one in the introduction, and one in the first list item. If you wanted to highlight multiple list items, you’d need to add even more <mark> elements.
Here’s some example code with multiple <mark> elements:
<p><mark>Some introductory text.</mark></p>

<ul>
  <li><mark>Item one</mark></li>
  <li>Item two</li>
</ul>
This works, but it’s cumbersome and does not result in a single continuous highlight.
Introducing the CSS Custom Highlight API
The solution to our problem is the CSS Custom Highlight API, a newer API that lets you create highlight regions and style them with CSS. Highlights are tied to ranges, which can span multiple HTML elements and do not add any markup or elements to the document.
There are several concepts you’ll need to know when using this API:
-
Range: ARangeis an object representing part of a document between two nodes. These can be element nodes or text nodes. -
Highlight: AHighlightis an object that defines a custom highlight around one or moreRangeobjects. These objects are registered with the CSS engine under a unique name. -
CSS highlight registry: A global object where
Highlightobjects are registered under unique names. -
The
::highlightpseudo-element: This is used in a CSS stylesheet to define the highlighting style. Each::highlightpseudo-element references aHighlightobject name that was registered with the CSS highlight registry.
How to Apply a Custom Highlight
Let’s return to the earlier highlighting example and use the CSS Custom Highlight API to highlight the introductory text and the first list item.
First, let’s add some IDs so we can select the relevant elements more easily. Consider this updated code where we have added IDs to some of the elements.
<p id="intro">Introductory text.</p>

<ul>
  <li id="item1">Item one</li>
  <li id="item2">Item two</li>
</ul>
Let’s walk through the steps to create the highlight.
Create the Range
First, we’ll create a Range object that spans the desired elements. This will represent a range of elements that spans the introduction and first list item without having to modify the DOM.
const range = new Range();
range.setStartBefore(document.getElementById('intro'));
range.setEndAfter(document.getElementById('item1'));
This Range object will start at the beginning of the <p> element, and will end at the end of the <li> with ID item1.
Create and Register the Highlight Object
Now that we have a Range, we can create a Highlight for that Range. We do this by calling the Highlight constructor, passing the Range object as its argument.
const highlight = new Highlight(range);
This creates the Highlight object, but we can’t do anything with it yet. First, we’ll need to register it with the CSS highlight registry with the CSS.highlights.set method.
The following code shows how you can use CSS.highlights.set to register a Highlight object under the name my-custom-highlight. We’ll reference this name in the CSS when we apply styling in the next step.
CSS.highlights.set('my-custom-highlight', highlight);
Style the Highlight
We’ve created and registered the Highlight around a given Range, but at this point, we still won’t see anything in the document. We need to use a CSS rule to define the highlight style.
To do this, we’ll use the ::highlight pseudo-element. We pass the name of the custom highlight used in the previous step to this pseudo-element. This allows us to set CSS styles that are applied to the text within the highlighted range.
::highlight(my-custom-highlight) {
  background-color: yellow;
}
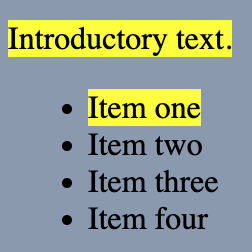
Now, the introductory text and the first list item will be highlighted in yellow, as shown in this screenshot.
How to Modify a Highlighted Range
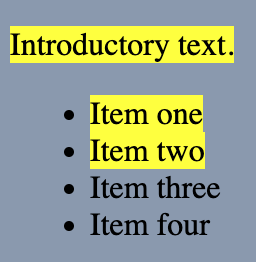
When we create a Highlight object around a Range object, the Highlight will be dynamically updated with any changes made to the Range. In our example, let’s say we now want to extend the highlight to the second list item.
We don’t need to create a new Highlight or Range – rather, we can just set the Range‘s end position to the new element.
range.setEndAfter(document.getElementById('item2'));
As soon as the Range is modified, the new text will be highlighted as shown in this screenshot.
How to Highlight Multiple Ranges
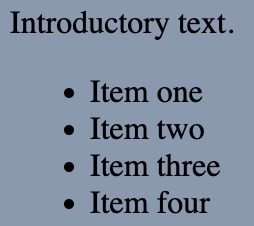
For even more flexibility, a single Highlight can cover multiple Ranges. Let’s update our example HTML to include four list items.
<p id="intro">Introductory text.</p>

<ul>
  <li id="item1">Item one</li>
  <li id="item2">Item two</li>
  <li id="item3">Item three</li>
  <li id="item4">Item four</li>
</ul>
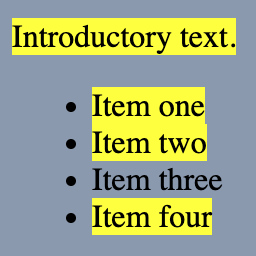
So far, we’re highlighting the introductory text and the first two list items. Suppose we now want to also highlight the fourth list item. We can’t do this with our existing Range object, since it wouldn’t represent a contiguous range of nodes. We’ll need to create a second Range. This new Range spans the fourth list item.
const item4 = document.getElementById('item4');
const range2 = new Range();
range2.setStartBefore(item4);
range2.setEndAfter(item4);
Now, we can add this new Range to our existing Highlight object by calling its add method. This will let us apply highlighting to the second Range.
highlight.add(range2);
Once we do this, the fourth list item will be highlighted as well, as shown in this screenshot.
How to Remove Highlights
There are two ways that you can remove highlights from the document.
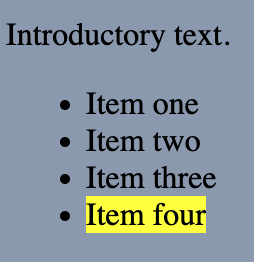
First, let’s suppose we want to remove the highlight from the introductory text and first two list items, but keep the last list item highlighted. We can use the Highlight object’s delete method to remove the first Range from the Highlight object.
highlight.delete(range);
After we delete this Range, only the last list item will remain highlighted, as shown in this screenshot.
The other way to remove highlights is to un-register a Highlight object from the CSS highlight registry by calling CSS.highlights.delete with the unique name we gave the Highlight. This removes the Highlight object that we registered previously.
CSS.highlights.delete('my-custom-highlight');
Now, nothing will remain highlighted, as shown in this screenshot.
Browser Support
As of January 2025, at the time of writing, the CSS Custom Highlight API is supported in Chrome, Edge, and Safari. Firefox support is starting to show up in nightly builds, so you should expect Firefox to have improved support soon. For the latest compatibility data, see https://caniuse.com/mdn-api_highlight.
To test if the browser supports CSS custom highlighting, you can check for the existence of the highlights property of the CSS object:
if (!('highlights' in CSS)) {
  // highlight API is not supported
}
Wrapping Up
The CSS Custom Highlight API lets you programmatically highlight regions of text in an HTML document without having to modify the DOM or worry about inserting invalid HTML markup. Its flexible and dynamic nature lets you add, modify, and remove highlights at runtime.
Further Reading
-
Range(MDN): API documentation for theRangeinterface. -
CSS Custom Highlight API (MDN): More details about the CSS Custom Highlight API.
Source: freeCodeCamp Programming Tutorials: Python, JavaScript, Git & MoreÂ

 Exposes Systems to Remote Code Execution Risks")