


In our fast-paced digital era, real-time data exchange has become critical in creating responsive and dynamic user experiences. It’s especially important in applications like live news updates, chat systems, AI generative platforms, and so on.
In this article, you’ll learn about WebSockets and Server-Sent Events (SSE), two powerful communication protocols that ensure seamless, real-time interactions in modern web applications.
By examining their differences, advantages, and use cases, you’ll gain a clear understanding of how to choose the right protocol to optimize scalability and performance. This article also includes simple example implementations using Node.js, allowing you to see these technologies in action.
To help you solidify your knowledge further, we’ll conclude with practical project recommendations, offering hands-on opportunities to apply what you’ve learned.
Table Of Contents
What is a WebSocket?
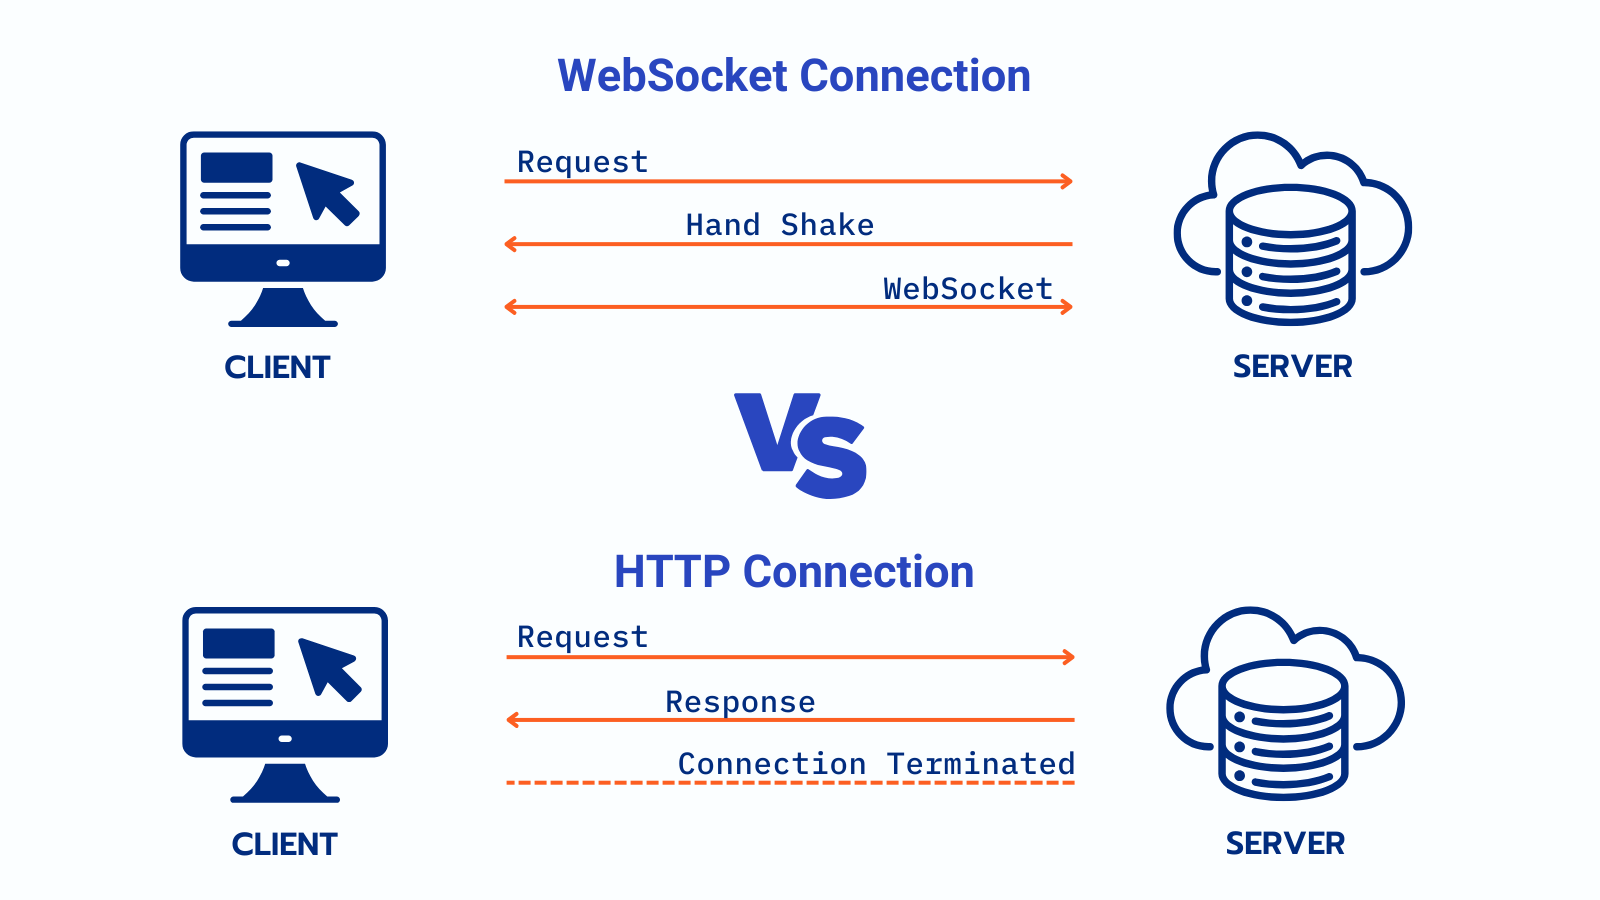
In short, a WebSocket is a communication protocol that enables full-duplex, low-latency, event-driven connections between the server and the browser. In case you’re not familiar, full-duplex refers to the ability to send and receive data simultaneously between a client (like a web browser) and a server over a single connection.
Unlike HTTP, which operates in a request-response model, WebSockets enable persistent and continuous data exchange. This means that the data is exchanged in real-time, and pulling it from the server is unnecessary each time.
The WebSockets protocol was formalized in 2011 by the IETF through RFC 6455 and is now supported by all major browsers (Chrome, Edge, Safari, and so on).
Although WebSockets differ from HTTP, both protocols operate on the OSI model’s Application Layer (layer 7) and rely on TCP/IP at the Transport Layer (layer 4). The OSI (Open Systems Interconnection) model is a conceptual framework used to understand network communication. It divides the network into 7 layers, each responsible for a specific function, from physical data transmission to application-level interactions.
Similar to HTTP and HTTPS, WebSockets have a unique set of prefixes:
-
ws: indicates an unencrypted connection without TLS and should not be opened from HTTPS-secured sites.
-
wss: indicates an encrypted connection secured by TLS and shouldn’t be opened from HTTP (non-secure) sites.
How Do WebSockets Work?
As I mentioned earlier, WebSockets establish a persistent, bidirectional connection between the client and the server. The process begins with an HTTP handshake initiated by the client, where the client requests a WebSocket connection by sending a specific header to the server. If the server accepts the request, it responds with a status code 101 confirming the upgrade to a WebSocket connection.
Once the connection is established, the WebSocket protocol takes over, and both the client and the server can send and receive data at any time without the need for repeated handshakes. This continuous connection allows real-time communication with minimal latency, as data is exchanged immediately without waiting for additional requests.
The WebSocket connection remains open until either the client or server decides to close it. This ensures efficient and fast data exchange, making it ideal for real-time applications like chat systems, online gaming, or live data feeds.
Advantages of WebSockets
-
Full-duplex connection: both client and server can send and receive data simultaneously.
-
Low latency: since WebSockets maintain an open connection, they ensure minimal delay in data transfer by eliminating the overhead of repeatedly establishing and tearing down connections, ensuring minimal delay in data transfer.
-
Reduced bandwidth usage: unlike HTTP requests, which include headers for every request, WebSockets only require a single handshake, resulting in smaller data packets and reduced bandwidth consumption.
-
Cross-Platform Compatibility: as stated earlier, WebSockets are supported by most modern browsers and programming frameworks, which ensures broad applicability.
Disadvantages of WebSockets
-
Complexity in implementation: WebSockets require a dedicated server and a special protocol.
-
Vulnerability to attacks: Without proper security (wss prefix) and authentication mechanisms, WebSockets are susceptible to cross-site WebSocket hijacking (CSWSH) and man-in-the-middle (MITM) attacks.
-
No built-in security: Unlike HTTP, WebSockets do not inherently support request-response headers for additional security. Thus, it’s necessary to implement token-based authentication or other secure methods manually.
Use Cases for WebSockets
WebSockets have revolutionized how applications deliver real-time communication. This protocol powers various industries by enabling low-latency, bidirectional data flow. Let’s talk about some good use cases for WebSockets:
1. Chat Applications
WebSockets’ full-duplex connection ensures that messages are delivered instantly and without interruptions, making them the perfect choice for real-time communication. This technology powers platforms like Slack, Discord, and various live customer support chat systems, providing seamless and efficient interactions.
2. Online Gaming
WebSockets are essential for fast-paced online games like Clash Royal, where real-time communication between players and servers is crucial. By maintaining a persistent, two-way connection, WebSockets allow immediate transmission of actions, such as moves or attacks, ensuring that all players experience seamless gameplay without lag.
3. Real-Time Dashboards
Tools like Datadog and e-commerce platforms use WebSockets to ensure system metrics, sales, and inventory data are always current, eliminating manual refreshes and enhancing user experience.
WebSockets also excel at handling big data, streaming, and visualizing large volumes of information with low latency. This makes them the perfect choice for industries such as finance, healthcare, and logistics, where real-time insights are essential for effective decision-making.
An example is DataTableDev, a grid prototype capable of working with massive data volumes, demonstrating WebSockets’ potential in real-time data processing.
How to Create a WebSocket Server with Node.js
Before setting up a simple WebSocket server with Node.js to handle secure connections, you’ll need a TLS certificate to ensure the communication is encrypted. You can acquire one from a trusted Certificate Authority (CA) like Let’s Encrypt or use a self-signed certificate for testing.
Below is the complete implementation of a WebSocket Secure (WSS) server using Node.js:
We’ll start on the server-side. Firstly, let’s import the required modules:
const https = require('https');  // Module for creating an HTTPS server
const fs = require('fs');        // Module to read files (used to load TLS certificates)
const WebSocket = require('ws'); // WebSocket library to handle WebSocket connections
Next, we’ll load TLS certificates for secure communication (wss://).
const serverOptions = {
  cert: fs.readFileSync('cert.pem'), // Load the TLS certificate for HTTPS encryption
  key: fs.readFileSync('key.pem'),   // Load the private key associated with the certificate
};
serverOptions reads the TLS certificate and private key from files (cert.pem and key.pem) and holds them. These are essential for establishing secure communication using the wss:// protocol since they enable encryption for data transmitted between the server and the client.
Since the WebSocket server runs on top of the HTTPS server, we first create and initialize the HTTPS server using the serverOptions, and then set up the WebSocket server.
// Create the HTTPS server with the loaded certificates and initialize it with TLS options
const httpsServer = https.createServer(serverOptions);
// Create a WebSocket server that runs on top of the HTTPS server
const wss = new WebSocket.Server({ server: httpsServer });
Now it’s time to define the behavior when a new WebSocket connection is established. You’ll need to handle incoming messages from the WebSocket client, send a response back, and manage the disconnection process. In this tutorial, we’ll keep it simple by printing the received data to the console.
// Define the behavior when a new WebSocket connection is established
wss.on('connection', (ws) => {
  console.log('Client connected');

  // Handle incoming messages from the WebSocket client
  ws.on('message', (message) => {
    console.log(`Received: ${message}`);
    ws.send(`Server received: ${message}`); // Send a response back to the client
  });

  // Handle when a client disconnects
  ws.on('close', () => {
    console.log('Client disconnected');

  // Send an initial message to the client when the connection is established
  ws.send('Welcome to the secure WebSocket server!');
});
Last but not least, you need to define the port where the HTTPS WebSocket server will listen for incoming connections. In this example, we use a port 8080. After that, we start the HTTPS server and make it listen on the specified port. Once the server is up and running a log message will be printed to confirm that the secure WebSocket server is ready.
// Define the port where the HTTPS WebSocket server will listen for incoming connections
const PORT = 8080;

// Start the HTTPS server and begin listening on the specified port
httpsServer.listen(PORT, () => {
  console.log(`Secure WebSocket server running at wss://localhost:${PORT}`); // Log a message when the server starts
});
And that’s it for the server-side part. Your full code should look like this:
// Import required modules
const https = require('https');  // Module for creating an HTTPS server
const fs = require('fs');        // Module to read files (used to load TLS certificates)
const WebSocket = require('ws'); // WebSocket library to handle WebSocket connections

// Load TLS certificates for secure communication (wss://)
const serverOptions = {
  cert: fs.readFileSync('cert.pem'), // Load the TLS certificate for HTTPS encryption
  key: fs.readFileSync('key.pem'),   // Load the private key associated with the certificate
};

// Create the HTTPS server with the loaded certificates and initialize it with TLS options
const httpsServer = https.createServer(serverOptions);
// Create a WebSocket server that runs on top of the HTTPS server
const wss = new WebSocket.Server({ server: httpsServer });

// Define the behavior when a new WebSocket connection is established
wss.on('connection', (ws) => {
  console.log('Client connected');

  // Handle incoming messages from the WebSocket client
  ws.on('message', (message) => {
    console.log(`Received: ${message}`);
    ws.send(`Server received: ${message}`); // Send a response back to the client
  });

  // Handle when a client disconnects
  ws.on('close', () => {
    console.log('Client disconnected');
  });
  // Send an initial message to the client when the connection is established
  ws.send('Welcome to the secure WebSocket server!');
});

// Define the port where the HTTPS WebSocket server will listen for incoming connections
const PORT = 8080;

// Start the HTTPS server and begin listening on the specified port
httpsServer.listen(PORT, () => {
  console.log(`Secure WebSocket server running at wss://localhost:${PORT}`); // Log a message when the server starts
});
To run the created server with Node.js, type the following line into Command Prompt / Terminal:
node wss-server.js
Connect to the server using a WebSocket client or browser console at wss://localhost:8080.
Once the connection is established, the client can send and receive messages. Now well look at a simple example of how to receive and send messages on the client side.
To start, let’s define a basic HTML structure:
<!DOCTYPE html>
<html lang="en">
<head>
  <meta charset="UTF-8">
  <meta name="viewport" content="width=device-width, initial-scale=1.0">
  <title>WebSocket Client</title>
</head>
<body>
  <h1>WebSocket Client</h1>
  <div id="messages"></div>
  <input type="text" id="messageInput" placeholder="Type a message">
  <button onclick="sendMessage()">Send Message</button>

  <script>
    <!-- JS code goes here -->
  </script>
</body>
</html>
The <button> element has an onclick event that triggers the sendMessage() function when clicked. Before we dive into the function, let’s first establish a WebSocket connection to the server. We’ll also define event listeners to handle the following:
-
When the WebSocket connection is successfully established.
-
When a message is received from the server.
These event listeners will ensure that we can interact with the server and handle incoming data in real time.
    // Establish a WebSocket connection to the server
    const socket = new WebSocket('wss://localhost:8080');

    // Event listener for when the WebSocket connection is established
    socket.addEventListener('open', () => {
      displayMessage('Connected to the WebSocket server');

    // Event listener for when a message is received from the server
    socket.addEventListener('message', (event) => {
      displayMessage(`Server: ${event.data}`); // Display the message received from the server
    });
To display the message on the user interface, we’ve created a function called displayMessage. Here’s how it’s defined:
// Function to display messages in the message container
function displayMessage(message) {
      const messageDiv = document.getElementById('messages'); // Get the div where messages will be displayed
      const newMessage = document.createElement('p'); // Create a new paragraph element for the new message
      newMessage.textContent = message; // Set the text content of the paragraph to the message
      messageDiv.appendChild(newMessage); // Add the new paragraph to the message container
}
Now, it’s time to define the sendMessage() function. Firstly, we retrieve a message and then send it to the WebSocket server using the socket.send() method. This transmits the message over the WebSocket connection established earlier, allowing the server to receive it. Next, on the UI, we display the message and clear the input field.
Thus, the code looks the following way:
    // Function to send a message to the server
    function sendMessage() {
      const message = document.getElementById('messageInput').value; // Get the message from the input field
      socket.send(message); // Send the message over the WebSocket connection
      displayMessage(`You: ${message}`); // Display the message in the UI as sent by the user
      document.getElementById('messageInput').value = ''; // Clear the input field after sending the message
    }
The final step is to set the event listener for when the WebSocket connection closes. To keep it simple, we will log a message to the console.
 socket.addEventListener('close', () => {
      console.log('Disconnected from the WebSocket server');
 });
This is what the client-side part looks like:
<!DOCTYPE html>
<html lang="en">
<head>
  <meta charset="UTF-8">
  <meta name="viewport" content="width=device-width, initial-scale=1.0">
  <title>WebSocket Client</title>
</head>
<body>
  <h1>WebSocket Client</h1>
  <div id="messages"></div>
  <input type="text" id="messageInput" placeholder="Type a message">
  <button onclick="sendMessage()">Send Message</button>

  <script>
    // Establish a WebSocket connection to the server
    const socket = new WebSocket('wss://localhost:8080'); // Connect to WebSocket server

    // Event listener for when the WebSocket connection is established
    socket.addEventListener('open', () => {
      displayMessage('Connected to the WebSocket server');

    // Event listener for when a message is received from the server
    socket.addEventListener('message', (event) => {
      displayMessage(`Server: ${event.data}`); // Display the message received from the server
    });

    // Function to send a message to the server
    function sendMessage() {
      const message = document.getElementById('messageInput').value; // Get the message from the input field
      socket.send(message); // Send the message over the WebSocket connection
      displayMessage(`You: ${message}`); // Display the message in the UI as sent by the user
      document.getElementById('messageInput').value = ''; // Clear the input field after sending the message
    }

    // Function to display messages in the message container
    function displayMessage(message) {
      const messageDiv = document.getElementById('messages'); // Get the div where messages will be displayed
      const newMessage = document.createElement('p'); // Create a new paragraph element for the new message
      newMessage.textContent = message; // Set the text content of the paragraph to the message
      messageDiv.appendChild(newMessage); // Add the new paragraph to the message container
    }

    // Event listener for when the WebSocket connection is closed
    socket.addEventListener('close', () => {
      console.log('Disconnected from the WebSocket server');
    });
  </script>
</body>
</html>
What are Server-Sent Events (SSE)?
Server-Sent Events (SSE) is a technology that enables a web server to push updates to a web page. As part of the HTML5 specification, it functions similarly to WebSockets by using a single, long-lived HTTP connection to deliver data in real-time.
The concept of SSE originated in 2004, with the Opera team taking the first steps towards implementation in 2006. One of the main limitations of SSE in the early stages was the connection cap imposed by HTTP/1.1, which restricted the number of simultaneous connections a client could establish with a server. But with the introduction of HTTP/2, this limitation was removed. HTTP/2 allows multiple data streams to flow over a single connection through multiplexing, enabling more efficient and scalable communication for SSE.
Server-sent events (SSE) rely on two fundamental components:
- EventSource: An interface defined by the WHATWG specification and implemented by modern browsers. It enables the client (typically a browser) to subscribe to server-sent events.
- EventStream: A protocol that specifies the plain-text format servers must use to send events, ensuring compatibility with the EventSource client for seamless communication.
As the specification outlines, events can include arbitrary text data and an optional ID and are separated by newlines. Also, SSE events have a dedicated MIME type: text/event-stream. A MIME type (Multipurpose Internet Mail Extensions type) is a standard that indicates the nature and format of a file or data, allowing the browser or server to properly interpret and handle it.
How do Server-Sent Events Work?
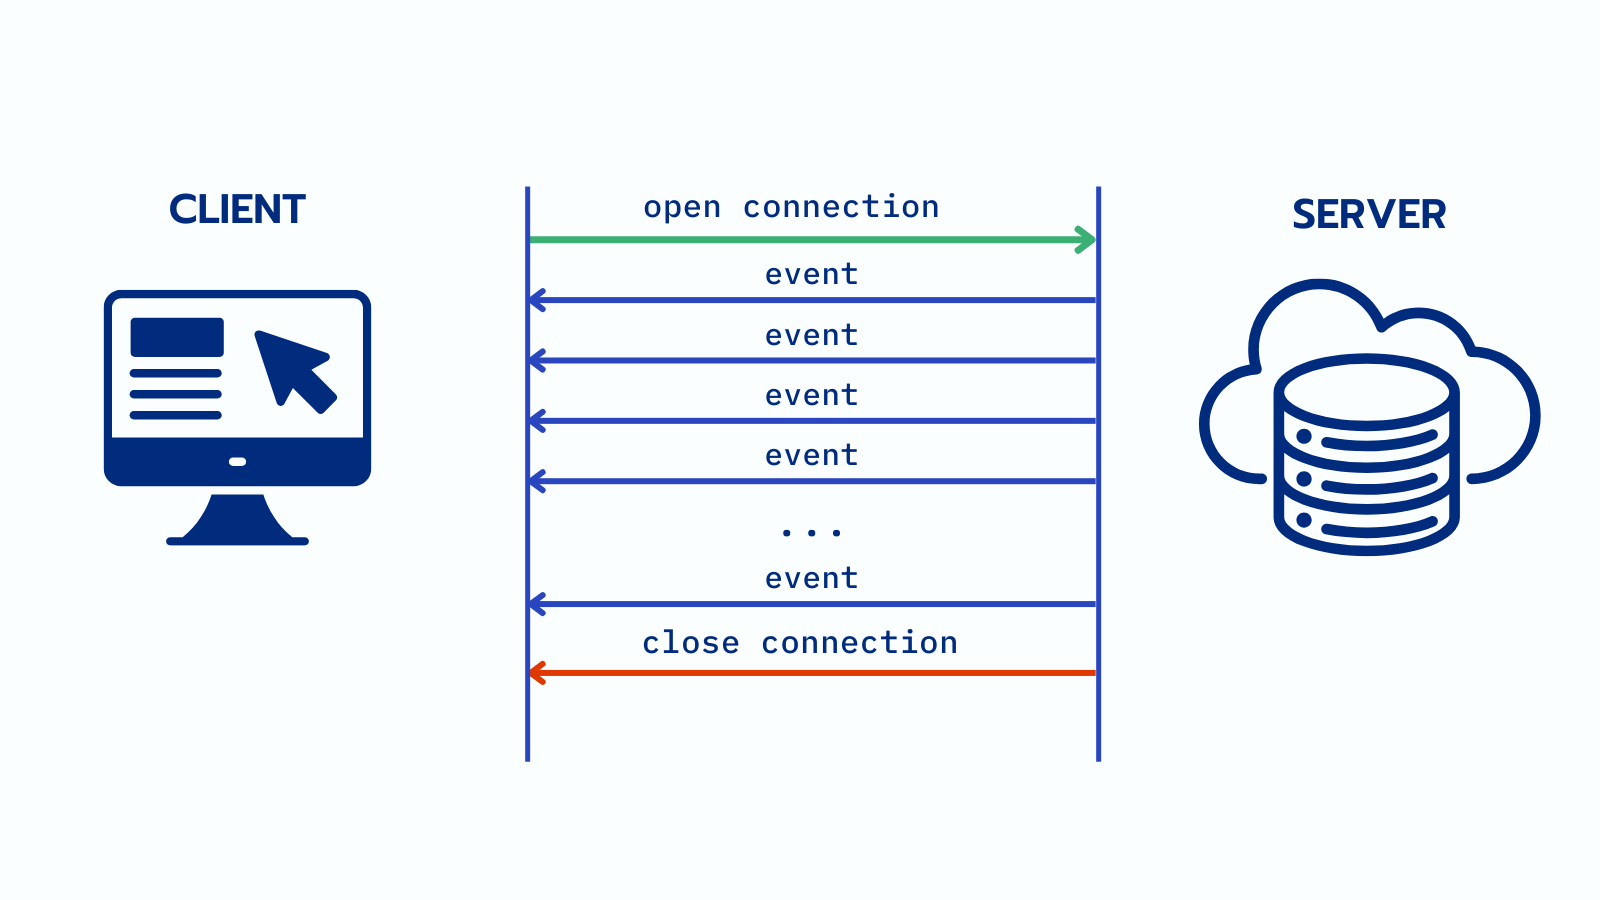
Server-sent events (SSE) work by establishing a persistent, one-way communication channel from the server to the client over a standard HTTP connection. The client initiates the connection by creating an EventSource object, which sends a request to the server to start streaming data. Once the server receives this request, it responds by sending a continuous stream of updates in a specific text/event-stream format. The client listens for these events, automatically handling any reconnections if the connection is lost.
SSE is ideal for applications that require real-time updates from the server, such as live news feeds or notifications, as it ensures a constant flow of information with minimal overhead.
Advantages of Server-Sent Events
-
Polyfill capability: Server-sent events (SSE) can be implemented using JavaScript in browsers that don’t natively support them. This ensures backward compatibility by leveraging the standard SSE interface instead of creating a custom alternative.
-
Automatic reconnection: SSE connections are designed to reconnect automatically after interruption. Thus, they reduce the need for extra code to handle this essential functionality.
-
Firewall-friendly: SSEs work seamlessly with corporate firewalls that perform packet inspection, making them a reliable choice for enterprise applications.
Disadvantages of Server-Sent Events
-
Data format restrictions: SSE is restricted to transmitting messages in UTF-8 format, as it does not support binary data.
-
Connection limits: Browsers cap the number of simultaneous SSE connections to six per client. This limitation becomes problematic when multiple tabs require active SSE connections. For more details and potential workarounds, refer to this StackOverflow thread: Server-Sent Events and browser limits.
-
One-way communication: SSE supports only server-to-client messaging, making it ideal for read-only real-time applications like stock tickers. However, this unidirectional nature can be a constraint for more interactive real-time applications.
Use Cases for SSE
Server-sent events are widely used in applications where real-time data delivery is crucial. SSE enables the server to push updates to the client automatically, making it ideal for applications that require live information streams. From news feeds to financial dashboards, SSE ensures that users receive the latest content without constant page refreshes.
Here are some common use cases for using SSE:
1. Social Media Feeds
Social media platforms leverage SSE to push new posts instantly, likes, and comments to users’ feeds, providing a more dynamic and engaging user experience. A great example is Twitter’s (X’s) real-time feed implementation, which allows them to push real-time updates to the browser.
2. Enterprise Monitoring System
SSE enables financial monitoring systems and other real-time applications to deliver live data updates efficiently. For instance, Netflix’s open-source Hystrix, a well-known component for microservice monitoring and circuit breaking, includes a web dashboard that displays real-time performance metrics and circuit status. This dashboard uses SSE to push performance data in real-time, ensuring that users can monitor the health and performance of microservices as they happen. The dashboard leveraging SSE provides an efficient, low-latency solution for updating performance data without needing constant manual refreshing or polling.
3. Generative AI
SSE technology plays a key role behind the scenes when interacting with Generative AI chatbots like ChatGPT and Gemini. For instance, when a user requests ChatGPT to write an article on a specific topic, the server starts processing the request and generates the article progressively, often in chunks rather than all at once.
During this process, ChatGPT’s server utilizes SSE to push each part of the article to the client in real-time, allowing the user to see the content appear as it is being generated.
How to Implement Server-Sent Events using Node.js
In this section, we’ll explore how to implement SSE using Node.js, a popular JavaScript runtime, to push updates to the client in real-time. We’ll set up a basic server and send live data to the browser using SSE.
We’ll start with the client-side (HTML/JavaScript). First, we’ll create a new EventSource object to listen for events from the server.
const evtSource = new EventSource("sse-demo.js");
The URL "sse-demo.js" is the path to the server-side script that will generate the events. But if the event generator script were hosted on a different origin, we would need to provide an additional configuration for cross-origin requests.
// If the event generator script is hosted on a different origin (cross-origin request):
const evtSource = new EventSource("//api.example.com/sse-demo.js", {
  withCredentials: true,  // Sends cookies, authorization headers with the request to the server
});
This version ensures that cookies and authorization headers are sent with the request, enabling secure communication and making sure that credentials can be included in cross-origin requests. withCredentials: true ensures that authentication is handled correctly if needed.
Next, let’s set up an event listener to handle the message when it is received. To keep things simple, we will display the message on the user interface by adding it as a new list item.
// When a message event is received
evtSource.onmessage = (event) => {
  // Create a new list item element to display the message
  const newElement = document.createElement("li");

  // Get the reference to the unordered list element where messages will be displayed
  const eventList = document.getElementById("list");

  // Set the text content of the new list item to the message received
  newElement.textContent = `message: ${event.data}`;

  // Append the new list item to the event list (ul) in the HTML
  eventList.appendChild(newElement);
};
Let’s also add an event listener for a custom “ping” event. Again, we will simply add new data to the list and display it on the page. Thus, when the custom event is received, a new list item (<li>) is created.
The event data, which contains a time property, is parsed from JSON, and the time is displayed in the list item. This new list item is then appended to an unordered list (<ul>) in the HTML, allowing the “ping” event data to be shown on the user interface.
// Add an event listener for a custom event type, "ping"
evtSource.addEventListener("ping", (event) => {
  // Create a new list item element to display the ping event
  const newElement = document.createElement("li");

  // Get the reference to the unordered list element where ping events will be displayed
  const eventList = document.getElementById("list");

  // Parse the event data as JSON (assuming it contains a time property)
  const time = JSON.parse(event.data).time;

  // Set the text content of the new list item to display the ping time
  newElement.textContent = `ping at ${time}`;

  // Append the new list item to the event list (ul) in the HTML
  eventList.appendChild(newElement);
});
Make sure that your code for the client-side part looks like this:
// Create a new EventSource to listen for events from the server
const evtSource = new EventSource("sse-demo.js");

/* If the event generator script is hosted on a different origin (cross-origin request):
const evtSource = new EventSource("//api.example.com/sse-demo.js", {
  withCredentials: true,  // Sends cookies, authorization headers with the request to the server
});
*/
// When a message event is received
evtSource.onmessage = (event) => {
  // Create a new list item element to display the message
  const newElement = document.createElement("li");

  // Get the reference to the unordered list element where messages will be displayed
  const eventList = document.getElementById("list");

  // Set the text content of the new list item to the message received
  newElement.textContent = `message: ${event.data}`;

  // Append the new list item to the event list (ul) in the HTML
  eventList.appendChild(newElement);
};

// Add an event listener for a custom event type, "ping"
evtSource.addEventListener("ping", (event) => {
  // Create a new list item element to display the ping event
  const newElement = document.createElement("li");

  // Get the reference to the unordered list element where ping events will be displayed
  const eventList = document.getElementById("list");

  // Parse the event data as JSON (assuming it contains a time property)
  const time = JSON.parse(event.data).time;

  // Set the text content of the new list item to display the ping time
  newElement.textContent = `ping at ${time}`;

  // Append the new list item to the event list (ul) in the HTML
  eventList.appendChild(newElement);
});
Now, let’s code the server-side part with Node.js and Express.js. Express is a minimal and flexible web application framework for Node.js. It simplifies the creation of server-side applications by providing robust features like routing, middleware support, and handling HTTP requests and responses. It helps streamline the development of web APIs and websites, making it perfect for our tutorial.
Note that you’ll need to go to the official Express.js documentation and install it on your machine if you don’t have it installed already.
Then, head over to the IDE and import the Express module, which allows us to create an instance of the Express application.
// Import the Express module
const express = require('express');
// Create an instance of the Express application
const app = express();
It is considered good practice to specify the port number at the top of the file to make it easy to configure and modify later. This approach improves code readability and maintainability, allowing you to quickly change the port number without searching through the entire file. It also enables better flexibility when deploying the application in different environments (for example, development, staging, production).
For this tutorial, we have set the port number to 3000.
// Define the port number for the server to listen on
const port = 3000;
Now, let’s set up the server-side part with Node.js and Express to handle SSE requests. We define a route (/sse) that will send a continuous stream of events to the client.
// Define a route that handles requests to /sse endpoint
app.get('/sse', (req, res) => {
//....
});
For the server to communicate with the client using SSE, we need to set specific HTTP headers:
-
Content-Type: We specify
'text/event-stream'to let the client know that the response is an SSE stream. -
Cache-Control: Setting it to
'no-cache'ensures the client gets fresh data each time, without caching. -
Connection: This is set to
'keep-alive'to maintain the connection open for continuous data transmission.
app.get('/sse', (req, res) => {
  // Set the Content-Type header to 'text/event-stream' to indicate that
  // the response will be an SSE stream
  res.setHeader('Content-Type', 'text/event-stream');

  // Prevent caching of the stream (important to ensure real-time updates)
  res.setHeader('Cache-Control', 'no-cache');

  // Keep the connection alive to continuously send events
  res.setHeader('Connection', 'keep-alive');
});
You can use res.flushHeaders() to send the headers immediately. Thus, the client can begin listening for events without delay.
To add a bit of flair, let’s send a new SSE message every second, including the number of the message being sent. For this, we will initialize a variable counter , as well as to use setInterval to send a new message every second (1000ms).
app.get('/sse', (req, res) => {
  // Set the Content-Type header to 'text/event-stream' to indicate that
  // the response will be an SSE stream
  res.setHeader('Content-Type', 'text/event-stream');

  // Prevent caching of the stream (important to ensure real-time updates)
  res.setHeader('Cache-Control', 'no-cache');

  // Keep the connection alive to continuously send events
  res.setHeader('Connection', 'keep-alive');

  // Send the headers immediately, so the client starts listening for events
  res.flushHeaders();

  // Initialize a counter variable for the messages
  let counter = 0;

  // Use setInterval to send a new message every second (1000ms)
  setInterval(() => {
    // Send a new SSE message, incrementing the counter each time
    // Each message is prefixed with 'data: ' and followed by the message content
    res.write(`data: This is message ${counter++}nn`);
  }, 1000); // This interval runs every 1000 milliseconds (1 second)
});
The last step is to start the Express server the following way:
app.listen(port, () => {
  console.log(`Server running at http://localhost:${port}`);
});
And that’s it! Make sure your server-sent code looks like this:
// Import the Express module
const express = require('express');
// Create an instance of the Express application
const app = express();

// Define the port number for the server to listen on
const port = 3000;

// Define a route that handles requests to /sse endpoint
app.get('/sse', (req, res) => {
  // Set the Content-Type header to 'text/event-stream' to indicate that
  // the response will be an SSE stream
  res.setHeader('Content-Type', 'text/event-stream');

  // Prevent caching of the stream (important to ensure real-time updates)
  res.setHeader('Cache-Control', 'no-cache');

  // Keep the connection alive to continuously send events
  res.setHeader('Connection', 'keep-alive');

  // Send the headers immediately, so the client starts listening for events
  res.flushHeaders();

  // Initialize a counter variable for the messages
  let counter = 0;

  // Use setInterval to send a new message every second (1000ms)
  setInterval(() => {
    // Send a new SSE message, incrementing the counter each time
    // Each message is prefixed with 'data: ' and followed by the message content
    res.write(`data: This is message ${counter++}nn`);
  }, 1000); // This interval runs every 1000 milliseconds (1 second)
});

// Start the Express server and listen on the specified port
app.listen(port, () => {
  console.log(`Server running at http://localhost:${port}`);
});
WebSockets vs Server-Sent Events
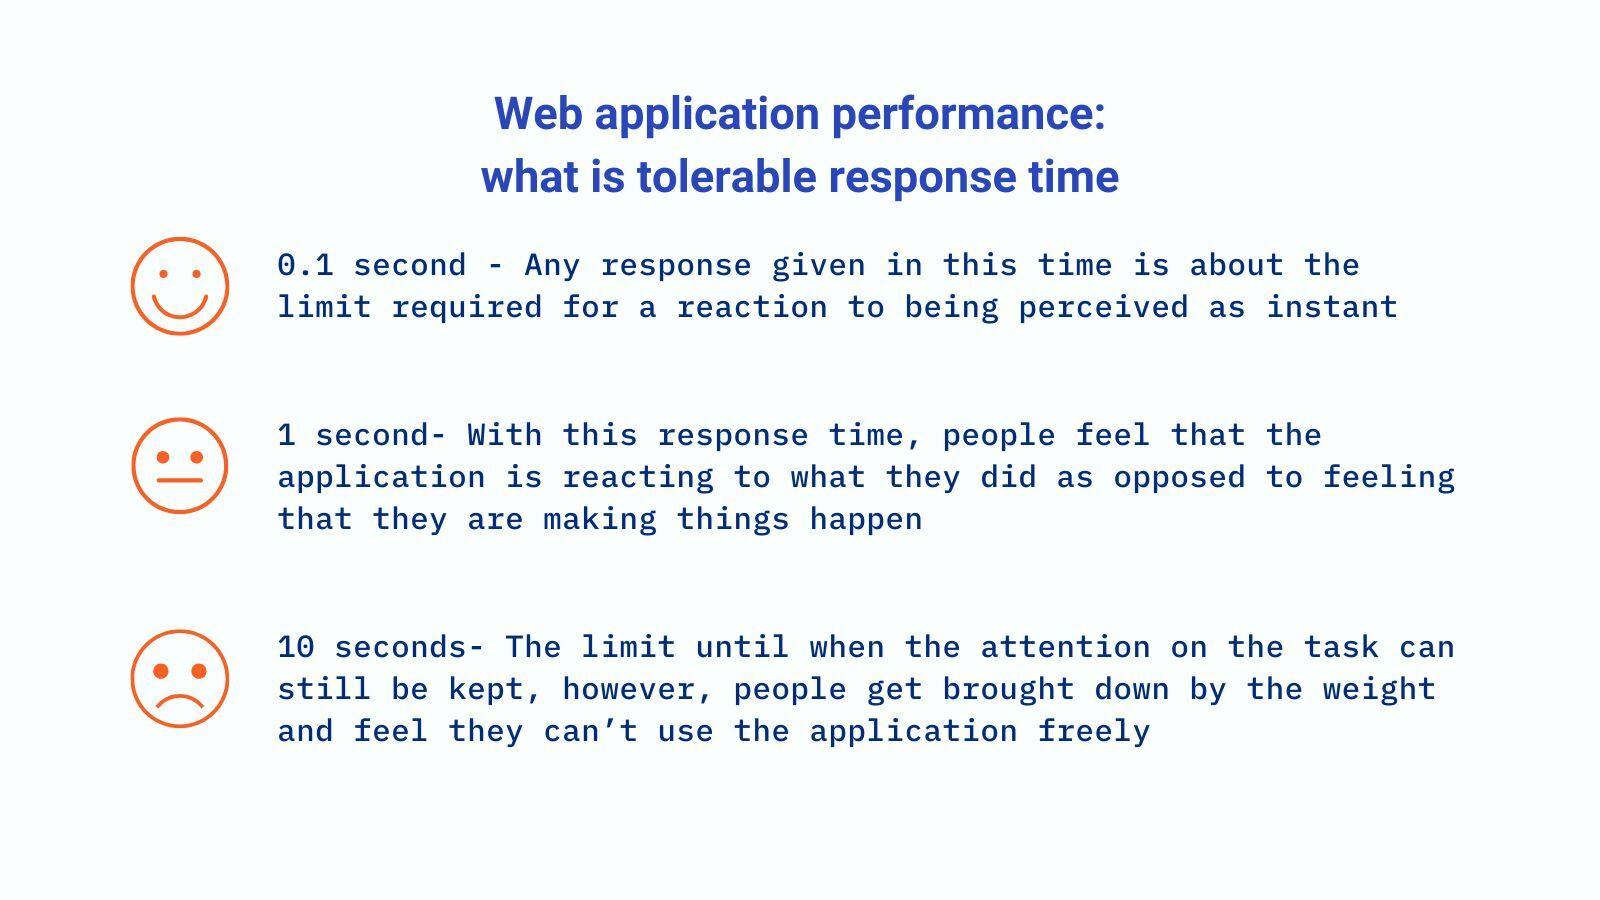
The goal of data transfer methods is to load and display large datasets as quickly as possible. This ensures that the user perceives the response as instant and provides smooth navigation and a pleasant user experience.
Jakob Nielsen, a retired principal and co-founder of the Nielsen Norman Group, outlined three key time limits that developers should consider when optimizing web and application performance in his book Usability Engineering. In short, 0.1 seconds is the threshold for users to feel that the system is responding instantaneously, meaning that no special feedback is required other than simply displaying the result.
Vera Didenko, Software Architect and Developer at Flexmonster conducted research to identify the most efficient data transfer protocol and, based on the 100-millisecond constraint, calculated the time budget for each process, ultimately choosing WebSockets as the optimal method for loading and updating the data.
For research purposes, Vera created an application using .NET Core and SignalR to test and visually compare the performance of WebSockets and Server-Sent Events to discover which data transfer approach is the most performance-efficient. SignalR is an open-source library that simplifies real-time web functionality.
After running several tests for all methods simultaneously while increasing the number of calls each time, the test results were gathered in JSON format and fed to the amCharts library. Below are the test results for 100, 1000, and 10000 calls:
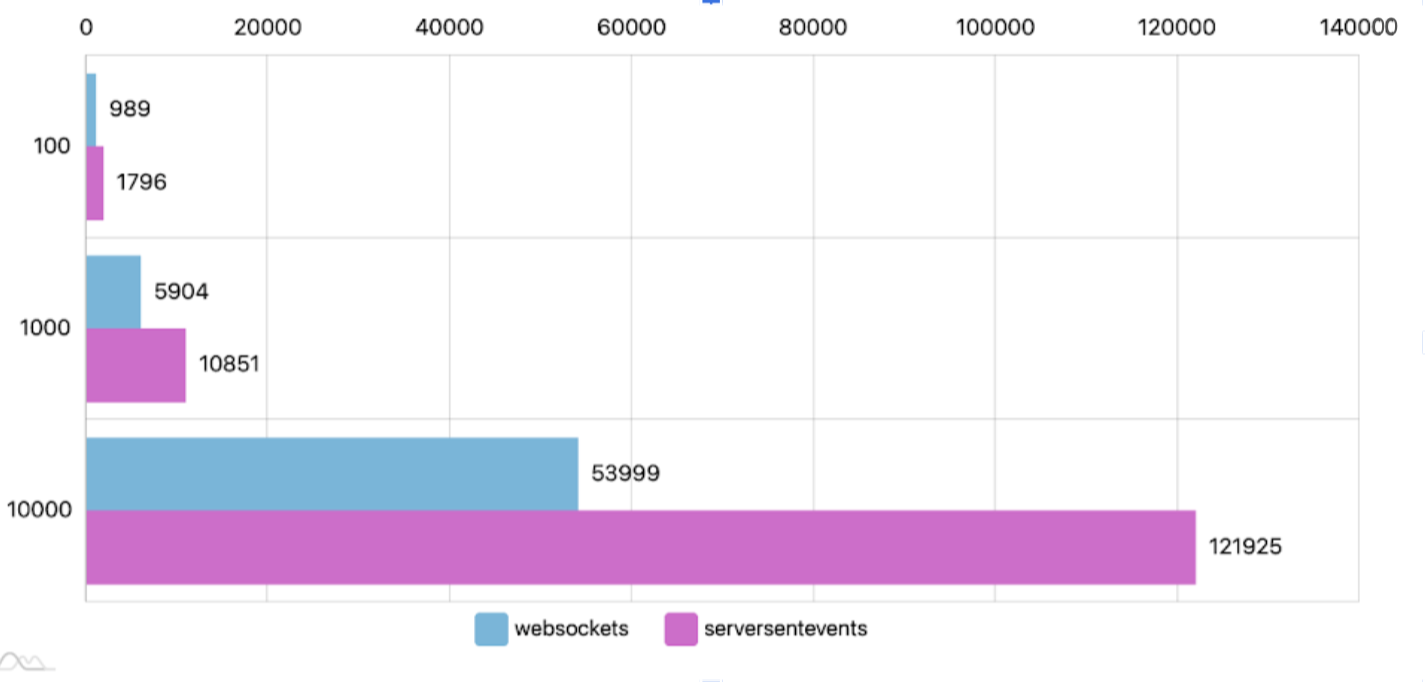
The experiment results show that WebSockets perform best for this task, emerging as the most performance-efficient data transfer technology in the simulated scenarios.
Which is Better: Server-Sent Events or WebSockets?
SSE is a simpler solution, but it isn’t extensible: if your web application requirements were to change, it would likely need to be refactored using WebSockets. Also, with AI integration SSE becomes even more powerful and secure.
Although WebSocket technology presents more upfront work, it’s a more versatile and extensible framework, so it’s a better option for complex applications that are likely to add new features over time.
|
Feature |
WebSockets |
Server-Sent Events |
|
Communication |
Full-duplex (two-way) |
One-way (server-to-client) |
|
Data Type Support |
Binary and text |
Text (UTF-8 encoded only) |
|
Connection Limits |
Limited by server resources |
Limited by browser (e.g. 6 tabs) |
|
Reconnection |
Requires manual handling |
Automatic |
|
Protocol |
Custom, low-level protocol |
Built on HTTP |
|
Firewall Handling |
May face problems |
Work seamlessly |
|
Use Case Examples |
real-time, event-driven communication between clients and servers, such as online games, chats, etc |
streaming data uni-directionally (i.e., “one direction”) from server to client for streaming data like stock quotes, bitcoin prices, etc |
In practice, many developers prefer WebSockets even for scenarios requiring receiving information rather than opting for SSE. This preference is not solely due to the limitations of SSE—such as its reliance on keeping a connection open for continuous data flow—but also because WebSockets offer greater versatility and are often considered more future-proof.
For instance, popular platforms like Reddit and Trello choose WebSockets to receive data (Reddit and Trello only send information to users when they are offered to subscribe to another person).
From personal experience, I can point out that SSE data often doesn’t appear in the developer tools, making it harder to debug and inspect. You can verify this by checking a web application like ChatGPT, where no SSE data sent by the server is visible in the developer tools network tab. This lack of transparency can make working with SSE more challenging than the more straightforward, visible data flow provided by WebSockets.
Wrapping Up
I hope this article was both interesting and useful to you! If you want to further strengthen your knowledge and take your skills to the next level, I highly recommend diving into real-life projects.
Personally, I found these on freeCodeCamp to be really useful and even a bit challenging: How to Build a Logging Web App with Server-Sent Events, RxJS, and Express and Learn WebSockets with Socket.IO. Not only will these projects give you hands-on experience, but they will also provide you with valuable new insights and skills that you can apply to future development challenges.
Happy coding, and keep learning!
Source: freeCodeCamp Programming Tutorials: Python, JavaScript, Git & MoreÂ

 Exposes Systems to Remote Code Execution Risks")