


Over the years, cloud development has seen a major paradigm shift. Newer and more complex applications are deployed rapidly to the cloud to minimize downtime. And through all of this, the concept of Infrastructure-as-Code and various tools have emerged to simplify the process of application development.
You might be wondering: what is Infrastructure-as-Code? How does it improve the development process and experience, and where does Terraform come into the picture? Well, we’ll explore all this and more in this guide. But before we start, here are some pre-requisites:
-
Basic knowledge of the cloud and cloud terminologies
-
Access to a PC to implement code examples
-
A GCP account
With this, let’s get started.
Here’s what we’ll cover:
Overview of Infrastructure as Code (IaC)
Infrastructure as code refers to generating cloud infrastructure tools and applications with a code-based configuration document. This process, when running, automates the sequence and process of creating databases, virtual machines, and servers. This improves the user experience by reducing the frequency of manual cloud service deployments, especially for multiple identical services.
There are two distinct approaches to infrastructure as code: the Imperative approach and the Declarative approach.
When you’re using the Declarative approach to infrastructure generation, you simply detail your expected/desired outputs for the Infrastructure to be generated, and then the IaC tool you’re using figures out how to produce that output.
On the other hand, the Imperative approach involves specifying the exact steps needed to achieve the desired infrastructure state. While the Imperative approach seems more suited for complex infrastructure setups, the Declarative approach can work just as well.
Some tools are capable of both approaches while others are only suited to one or the other. Examples of some of the popular IaC tools used globally include Terraform IaC, AWS Cloud Formation, Ansible, and Pulumi, Chef, among others.
Like the name implies – infrastructure as code – the code creating the infrastructure is written in various template languages within the IaC space. Popular template languages include JSON, YAML, ARM template, HCL, Heat Scripts, and so on.
You can also use scripting tools to execute cloud infrastructure. Some popular ones include Bash and PowerShell. These sometimes come preinstalled on most personal computers.
Out of all these tools, though, Terraform is distinct for various reasons – and it’s the one we’ll be examining in this article.
What is Terraform?
Terraform is an open source tool developed by HashiCorp in 2014. It has evolved over the years and now serves as a cloud agnostic infrastructure tool that allows you to create infrastructure across multiple cloud service providers.
Terraform also offers Terraform Cloud, a cloud-based software as a service tool. It allows for cloud-based deployment of cloud tools, instead of using the old local-based methods we had in the defunct Terraform CLI tool.
Also, like other IaC tools which utilize template languages, the template framework used to create infrastructure in Terraform is the HashiCorp template language (HCL).
Benefits of Terraform
Now I’ll highlight some of the benefits of using Terraform as a cloud engineer, along with the tool’s key role in the cloud ecosystem.
1. Declarative Approach
This approach to cloud infrastructure automation ensures that all required infrastructure to be deployed (databases, servers, and so on) is stated explicitly and executed accordingly. This helps avoid conflicts.
2. Conflict Handling
In addition to its efficient cloud tool automation capabilities, Terraform has some robust conflict detection and handling properties. One of the ways it handles conflicts is via the Terraform plan function. This function highlights any perceived or potential conflicts of infrastructure orchestration which allows for easy correction before deployment. I’ll discuss this further in subsequent sections.
3. Cloud Agnostic
Terraform is a multipurpose, multi-cloud automation service provider with efficient infrastructure automation capabilities across the major cloud service providers (AWS, GCP and Azure). It also allows for hybrid and inter-provider automation.
4. User-friendly
Terraform is one of the largest cloud automation tools with the largest user communities out there. It has extensive beginner-friendly tutorials that help you get a quick hang of the tool. Here is a link to its documentation so you can dive in deeper.
5. File Management Capabilities
Terraform automatically creates a local backup of the automation states on your local computer to ensure immediate recall and file handling in case anything goes wrong. It also offers remote backup options to remote cloud service providers where necessary.
6. Version Control
Just like the Git version control system, Terraform has a built-in version control system which lets you track changes to a Terraform file. It also lets you go back to previous versions of your code if there are errors in the present version, for example.
7. Code Reusability
Terraform offers a wide variety of code templates for easy reuse on its developer documentation page.
Now that we’ve highlighted the benefits of Terraform, let’s learn some common terminologies used in Terraform and what they mean.
Common Terms Used in Terraform
Before you start using Terraform, you should be familiar with some key terms that come up a lot. Here’s what you need to know:
-
Providers: in Terraform, a Provider is a programming interface that lets Terraform interact with various APIs and cloud services. For example, you’d use a provider to interface with a cloud service provider like GCP or Azure.
-
Modules: Modules are specifically created within the Terraform framework and serve as reusable components that let you easily orchestrate cloud services. You can also store key information regarding cloud services in a module, and then modify it to ensure uniqueness using module variables.
-
Resources: Resources in Terraform refer to the cloud infrastructure components to be created. Examples include cloud networks, virtual machines, availability zones, and other infrastructures.
-
State: The concept of state in Terraform forms the basis for its efficiency. State keeps track of the current configuration of your infrastructure resources, and contains details about every resource Terraform has created, modified, or deleted. Terraforms version control system uses it to track any changes you make to a code file and uses that information to destroy and provision infrastructure as necessary.
-
Workspace: a Workspace functions sort of similarly to a version control system, as it creates a sort of constraint around a work file. Workspaces let you manage multiple instances of a single infrastructure configuration in a clean and isolated way within the same backend. You can use workspaces to separate environments like development, staging, and production while using the same Terraform configuration.
Demo Project: How to Write a Terraform Configuration
In this section, we’ll be diving deeper into writing our first Terraform file to orchestrate a Google Cloud program virtual machine with just a few lines of code. But before we begin, we’ll discuss the various commands that you should understand before we implement the demo project.
Common Terraform Commands
-
Terraform init: This command initializes the Terraform tool and downloads essential cloud provider-specific files. It also establishes a connection between Terraform and the cloud provider in question. In our case, it’s between GCP and the Terraform provider. -
Terraform fmt: This command automatically ensures optimal code formatting and indentation. It ensures orderly execution of the code and minimizes any errors. -
Terraform plan: This command outlines the steps of execution of the Terraform code, and detects any errors that may occur during the process of execution. It also highlights any errors in the Terraform code that may hinder execution. Lastly, it works alongside Terraform state management to detect any change of state and de-provision or generate any additional cloud services if necessary. -
Terraform apply: This command executes the planned Terraform state implemented by theTerraform plancommand. -
Terraform destroy: This command is the final command in the Terraform scheme which is used to deactivate or destroy all the cloud services created using the Terraform apply command. It’s important to note that you should execute the commands listed above sequentially to ensure that your infrastructure gets created properly.
Creating an IaC-Powered GCP Virtual Machine
Now that you’ve learned these important commands, let’s test them all out by creating our first-ever IaC-powered GCP virtual machine.
In your code editor, type the following code:
provider "google" {
  project = "your-gcp-project-id"  # Replace with your GCP Project ID
  region  = "us-central1"
  zone    = "us-central1-a"
}
This code highlights the cloud provider we’re using to generate the cloud resources we need. In our case, it’s the Google cloud program. The name assigned to it is just “google”. Other cloud providers like AWS and Azure are “aws” and “azure” respectively.
The second line identifies the GCP subscription identifier, which is unique to each GCP account (and helps facilitate accurate integration). You should use yours in the space provided.
You’ll also need to include a suitable resource region and resource availability zone. This serves as the physical base for the virtual machine we’ll create so we can run it. In this scenario, I chose the USA central region and 1-a availability zone, respectively. You can read more here about cloud regions and availability zones.
resource "google_compute_instance" "vm_instance" {
  name         = "example-vm"
  machine_type = "e2-medium"

  boot_disk {
    initialize_params {
      image = "debian-cloud/debian-11"
    }
  }
The code snippet above specifies the exact compute resource that’ll be orchestrated, which in our case is a virtual machine instance coded as “vm_instance”. 'example-vm’ is the name we want to assign to the virtual machine we will be creating for this project. It is important to note that the virtual machine name must be unique too. The type of the virtual machine we opted for was the E2 (General purpose)-medium type VM. You can get more information on Virtual machine types here.
Going further, we also specify the expected booted Operating system (“boot_disk”) which is an image of the Debian Linux Operating system version 11 in my case.
  network_interface {
    network = "default"  # Attach to the default VPC network
    access_config {

    }
  }

output "instance_ip" {
  value = google_compute_instance.vm_instance.network_interface[0].access_config[0].nat_ip
}
To complete the creation of our virtual machine, we need to set up a Virtual Network to allow remote access to the VM. The network interface block connects the virtual machine to the default VPC (Virtual Private Cloud) network provided by GCP. We won’t be able to interface with our virtual machine without the VPC network. The output block also displays the default access IP address in the terminal, which we can use to connect to the virtual machine.
Here is the final expected code:
provider "google" {
  project = "your-gcp-project-id"  # Replace with your GCP Project ID
  region  = "us-central1"
  zone    = "us-central1-a"
}

resource "google_compute_instance" "vm_instance" {
  name         = "example-vm"
  machine_type = "e2-medium"

  boot_disk {
    initialize_params {
      image = "debian-cloud/debian-11"
    }
  }

  network_interface {
    network = "default"  # Attach to the default VPC network
    access_config {

    }
  }

output "instance_ip" {
  value = google_compute_instance.vm_instance.network_interface[0].access_config[0].nat_ip
}
Going on from there, we’ll now be executing this code using the commands highlighted in the image below:

The command terraform -v confirms that Terraform has been successfully installed on the terminal. The expected output will be the version of the Terraform tool installed.
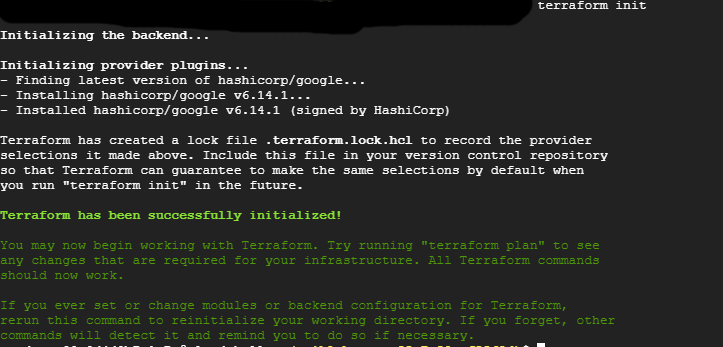
The next command executed is the terraform init function which initializes a communication with the cloud service provider, which in our case is GCP. All needed dependencies are also installed.
![]()
The terraform fmt command is also run to ensure adequate code formatting and indentation. Then the terraform plan command is sequentially executed.
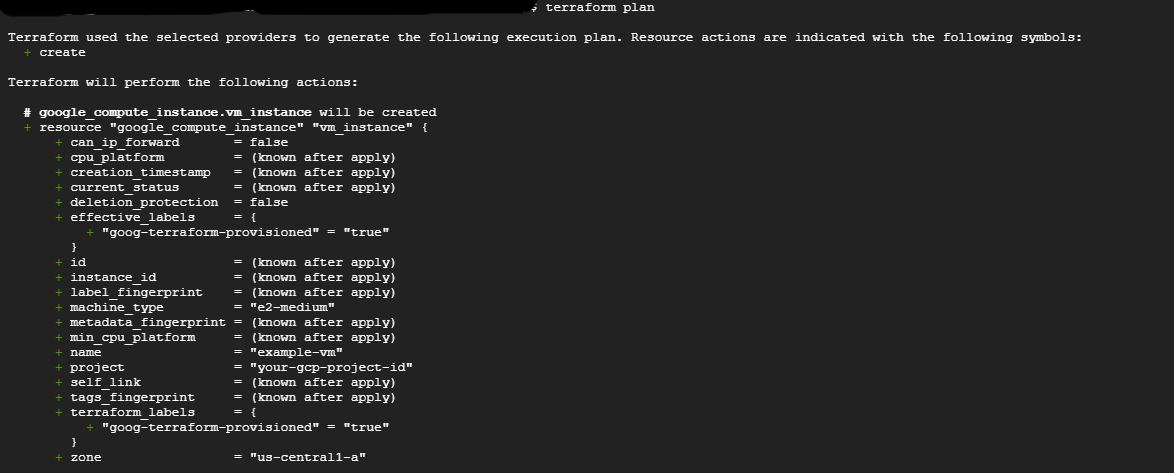
From the image above, you can see the steps Terraform intends to use to generate the expected Virtual machine.
On successful execution of Terraform plan, we will then execute the terraform apply function to execute the steps outlined by Terraform plan.

This will generate a prompt asking for a confirmation of the Terraform execution as shown above. Typing “Yes” will allow the operation to proceed smoothly.
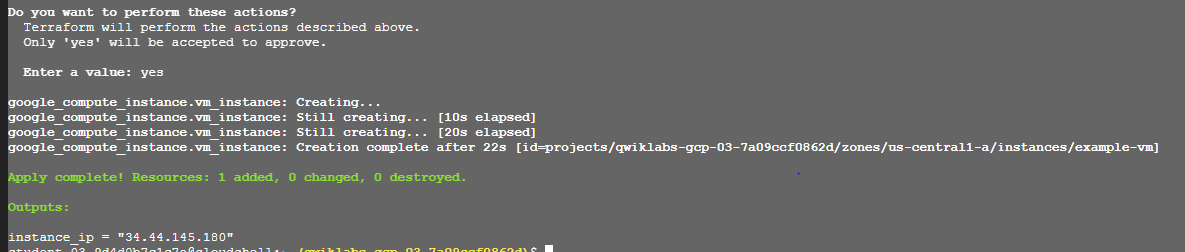
On successful execution, a success message will be displayed as shown above. With that, we have created our Cloud infrastructure with just code. The terraform destroy command can then be called to remove the created Virtual machines.
Conclusion
In this article, you’ve learned the basics about infrastructure as code. We discussed Terraform, its benefits, and some of its key features and commands. We also illustrated its use in a demo project.
To further enhance your knowledge, you can consult Terraform‘s documentation for more code examples. I would also recommend utilizing your newly gained knowledge to automate a project with real-life uses.
Feel free to message me with any comments or questions. You can also check out my other articles here. Till next time, keep on coding!
Source: freeCodeCamp Programming Tutorials: Python, JavaScript, Git & MoreÂ
