
Recently, while watching my kid 🧒🻠playing free memory games on her tablet, I noticed her struggling with an overwhelming number of ads and annoying pop-up banners.
This inspired me to build a similar game for her. Since she’s currently into anime, I decided to create the game using cute anime-style images.
In this article, I’ll walk you through the process of building the game for yourself or your kids 🎮.
We’ll begin by exploring the game features, then cover the tech stack and project structure—both of which are straightforward. Finally, we’ll discuss optimizations and ensuring smooth gameplay on mobile devices 📱.
If you want to skip the reading, here 💠is the GitHub repository 🙌. And here you can see the live demo.
Table of Contents
Project Description
In this tutorial, we’ll build a challenging memory card game with React that tests your recall abilities. Your goal is to click unique anime images without clicking the same one twice. Each unique click earns you points, but be careful—clicking an image twice resets your progress.
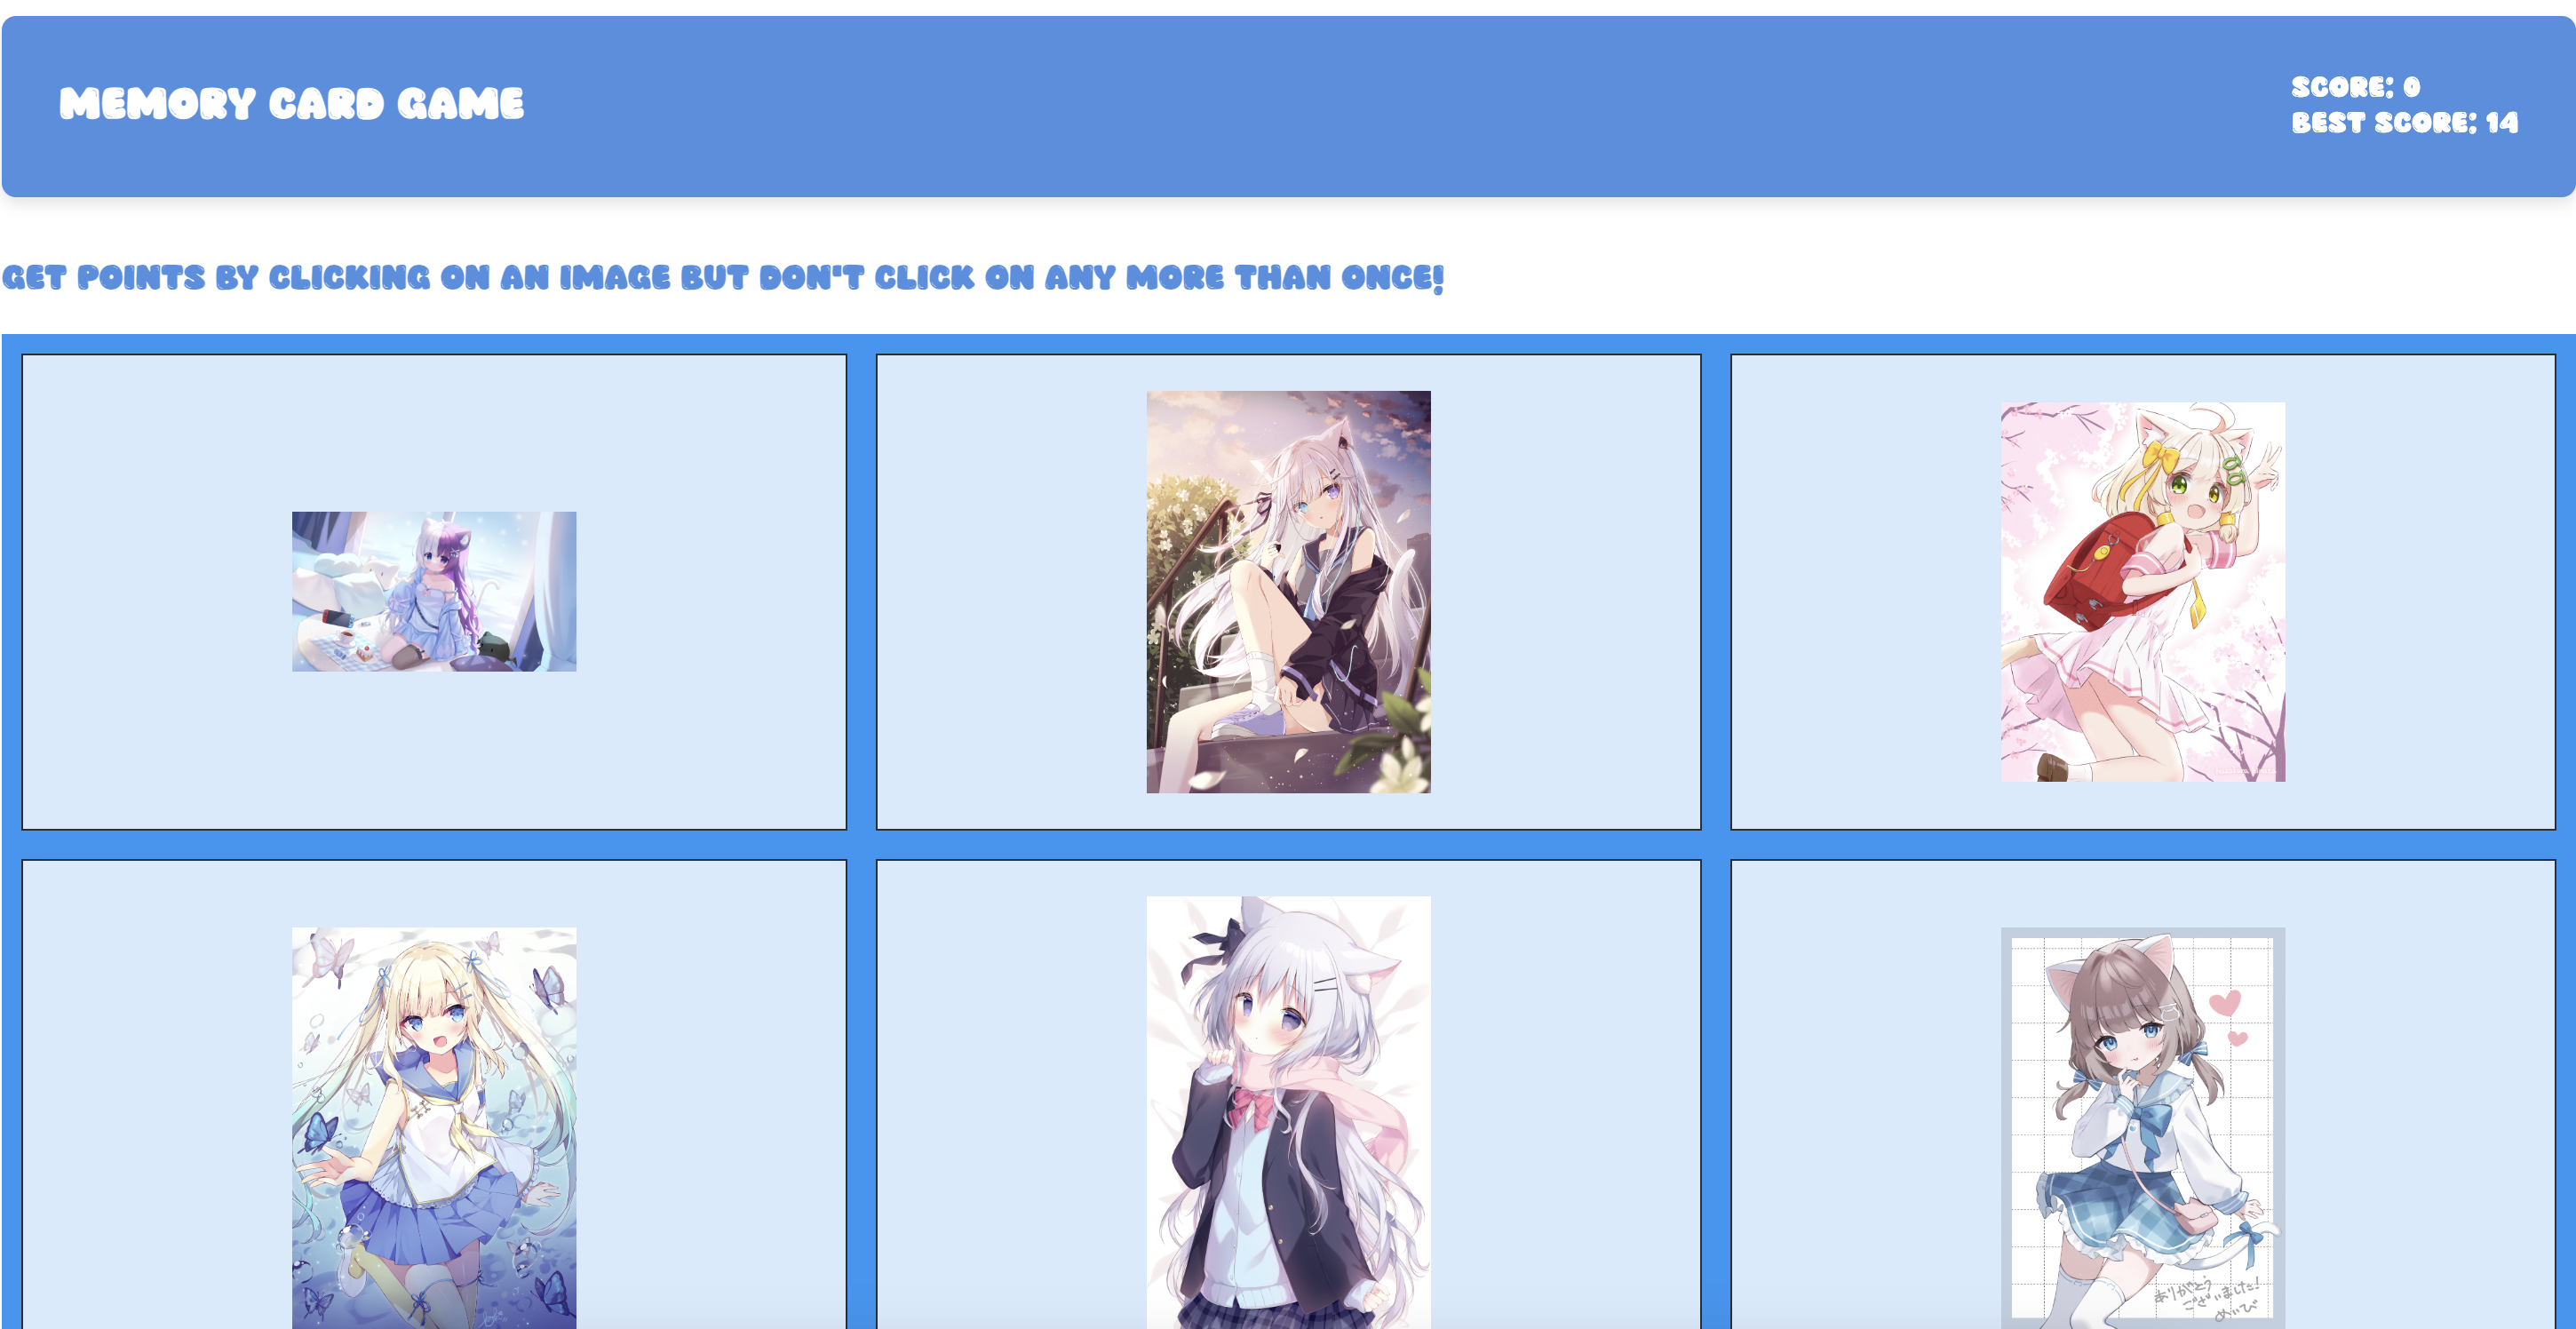
Game features:
🎯 Dynamic gameplay that challenges your memory
🔄 Cards shuffle after each click to increase difficulty
🆠Score tracking with best score persistence
😺 Adorable anime images from The Nekosia API
✨ Smooth loading transitions and animations
📱 Responsive design for all devices
🎨 Clean, modern UI
The game will help you test your memory skills while enjoying cute anime pictures. Can you achieve the perfect score?
How to Play
Click on any card to start
Remember which cards you’ve clicked
Try to click all cards exactly once
Watch your score grow with each unique selection
Then keep playing to try to beat your best score
The Tech Stack
Here’s a list of the main technologies we’ll be using:
NPM – A package manager for JavaScript that helps manage dependencies and scripts for the project.
Vite – A build tool that provides a fast development environment, particularly optimized for modern web projects.
React – A popular JavaScript library for building user interfaces, enabling efficient rendering and state management.
CSS Modules – A styling solution that scopes CSS to individual components, preventing style conflicts and ensuring maintainability.
Let’s Build the Game
From this point onward, I will guide you through the process I followed when building this game.
Project Structure and Architecture
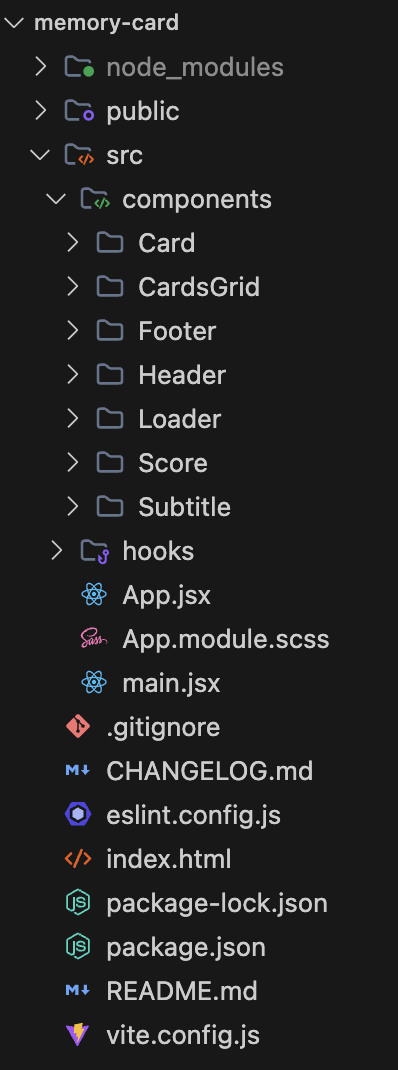
When building this memory card game, I carefully organized the codebase to ensure maintainability, scalability, and clear separation of concerns. Let’s explore the structure and the reasoning behind each decision:
Component-Based Architecture
I chose a component-based architecture for several reasons:
Modularity: Each component is self-contained with its own logic and styles
Reusability: Components like
CardandLoadercan be reused across the applicationMaintainability: Easier to debug and modify individual components
Testing: Components can be tested in isolation
Component Organization
- Card Component
Separated into its own directory because it’s a core game element
Contains both JSX and SCSS modules for encapsulation
Handles individual card rendering, loading states, and click events
- CardsGrid Component
Manages the game board layout
Handles card shuffling and distribution
Controls the responsive grid layout for different screen sizes
- Loader Component
Reusable loading indicator
Improves user experience during image loading
Can be used by any component that needs loading states
- Header/Footer/Subtitle Components
Structural components for app layout
Header displays game title and scores
Footer shows copyright and version info
Subtitle provides game instructions
CSS Modules Approach
I used CSS Modules (.module.scss files) for several benefits:
Scoped Styling: Prevents style leaks between components
Name Collisions: Automatically generates unique class names
Maintainability: Styles are co-located with their components
SCSS Features: Leverages SCSS features while keeping styles modular
Custom Hooks
The hooks directory contains custom hooks like useFetch:
Separation of Concerns: Isolates data fetching logic
Reusability: Can be used by any component needing image data
State Management: Handles loading, error, and data states
Performance: Implements optimizations like image size control
Root Level Files
App.jsx:
Acts as the application’s entry point
Manages global state and routing (if needed)
Coordinates component composition
Handles top-level layouts
Performance Considerations
The structure supports performance optimizations:
Code Splitting: Components can be lazy-loaded if needed
Memoization: Components can be memoized effectively
Style Loading: CSS Modules enable efficient style loading
Asset Management: Images and resources are properly organized
Scalability
This structure allows for easy scaling:
New features can be added as new components
Additional hooks can be created for new functionality
Styles remain maintainable as the app grows
Testing can be implemented at any level
Development Experience
The structure enhances developer experience:
Clear file organization
Intuitive component locations
Easy to find and modify specific features
Supports efficient collaboration
This architecture proved particularly valuable when optimizing the game for tablet use, as it allowed me to:
Easily identify and optimize performance bottlenecks
Add tablet-specific styles without affecting other devices
Implement loading states for better mobile experience
Maintain clean separation between game logic and UI components
Alright, now let’s get coding.
Step-by-Step Build Guide
1. Project Setup
Set Up the Development Environment
In order to start with a clean React project, open your terminal app and run the following commands (you may name your project folder as you like – in my case the name is ‘memory-card’):
npm create vite@latest memory-card -- --template react
cd memory-card
npm install
Install the Required Dependencies
The only dependencies we will use in this project are the hook package from UI.dev (by the way, here you can find a well-explained article on how rendering in React works).
The other dependency is the famous CSS preprocessor, SASS, that we’ll need to be able to write our CSS modules in SASS instead of regular CSS.
bashCopyInsert in Terminalnpm install @uidotdev/usehooks sass
Configure Vite and Project Setting
When setting up our project, we need to make some specific configuration adjustments to handle SASS warnings and improve our development experience. Here’s how you can configure Vitest:
// vitest.config.js
import { defineConfig } from 'vitest/config';
import react from '@vitejs/plugin-react';

export default defineConfig({
  plugins: [react()],
  test: {
    environment: 'jsdom',
    globals: true,
    setupFiles: ['./src/setupTests.js'],
    css: {
      modules: {
        classNameStrategy: 'non-scoped'
      }
    },
    preprocessors: {
      '**/*.scss': 'sass'
    },
    coverage: {
      provider: 'v8',
      reporter: ['text', 'json', 'html'],
      exclude: [
        'node_modules/',
        'src/setupTests.js',
        'src/main.jsx',
        'src/vite-env.d.ts',
      ],
    },
  },
  css: {
    preprocessorOptions: {
      scss: {
        quietDeps: true,  // Silences SASS dependency warnings
        charset: false    // Prevents charset warning in recent SASS versions
      }
    }
  }
});
Keep in mind that most of these configurations are auto-generated for you when you create the project with Vite. Here’s what’s going on:
SASS Configuration:
quietDeps: true: This silences the warnings about deprecated dependencies in SASS modules. Particularly useful when working with third-party SASS/SCSS files.charset: false: Prevents the “@charset” warning that appears in newer versions of SASS when using special characters in your stylesheets.
Test Configuration:
globals: true: Makes test functions globally available in test filesenvironment: 'jsdom': Provides a DOM environment for testingsetupFiles: Points to our test setup file
These configurations help create a cleaner development experience by removing unnecessary warning messages in the console, setting up proper test environment configurations, and ensuring SASS/SCSS processing works smoothly.
You might see warnings in your console without these configurations when:
Using SASS/SCSS features or importing SASS files
Running tests that require DOM manipulation
Using special characters in your stylesheets
2. Building the Components
Create the Card Component
First, let’s create our basic card component that will display individual images:
// src/components/Card/Card.jsx
import React, { useState, useCallback } from "react";
import Loader from "../Loader";
import styles from "./Card.module.scss";

const Card = React.memo(function Card({ imgUrl, imageId, categoryName, processTurn }) {
  const [isLoading, setIsLoading] = useState(true);

  const handleImageLoad = useCallback(() => {
    setIsLoading(false);
  }, []);

  const handleClick = useCallback(() => {
    processTurn(imageId);
  }, [processTurn, imageId]);

  return (
    <div className={styles.container} onClick={handleClick}>
      {isLoading && (
        <div className={styles.loaderContainer}>
          <Loader message="Loading..." />
        </div>
      )}
      <img
        src={imgUrl}
        alt={categoryName}
        onLoad={handleImageLoad}
        className={`${styles.image} ${isLoading ? styles.hidden : ''}`}
      />
    </div>
  );
});

export default Card;
The Card component is a fundamental building block of our game. It’s responsible for displaying individual images and handling player interactions. Let’s break down its implementation:
Props breakdown:
image: (string)The URL of the image to be displayed that’s received from our API service.
It’s used directly in the img tag’s src attribute.
id: (string)Unique identifier for each card that’s critical for tracking which cards have been clicked.
It’s passed to the
processTurncallback when a card is clicked.
category: (string)Describes the type of image (for example, “anime”, “neko”), and it’s used in the alt attribute for better accessibility.
It helps with SEO and screen readers.
processTurn: (function)Callback function passed from the parent component that handles the game logic when a card is clicked.
It also manages score updates and game state changes and determines if a card has been clicked before.
isLoading: (boolean)Controls whether to show a loading state. When true, it displays a Loader component instead of the image.
It improves the user experience during image loading.
Component styling:
// src/components/Card/Card.module.scss
.container {
  display: flex;
  flex-direction: column;
  justify-content: center;
  align-items: center;
  background-color: rgba(255, 255, 255, 0.8);
  border: 1px solid rgba(0, 0, 0, 0.8);
  padding: 20px;
  font-size: 30px;
  text-align: center;
  min-height: 200px;
  position: relative;
  cursor: pointer;
  transition: transform 0.2s ease;

  &:hover {
    transform: scale(1.02);
  }

  .image {
    width: 10rem;
    height: auto;
    opacity: 1;
    transition: opacity 0.3s ease;

    &.hidden {
      opacity: 0;
    }
  }

  .loaderContainer {
    position: absolute;
    top: 50%;
    left: 50%;
    transform: translate(-50%, -50%);
  }
}
Usage in the component:
<Card
    key={getKey()}
    imgUrl={item?.image?.original?.url || ""}
    imageId={item?.id}
    categoryName={item?.category}
    processTurn={(imageId) => processTurn(imageId)}
/>
Key features:
Performance Optimization:
Uses
React.memoto prevent unnecessary re-rendersImplements
useCallbackfor event handlersManages loading state internally for better UX
Loading State Management:
Internal
isLoadingstate tracks image loadingShows a Loader component with a message while loading
Hides the image until it’s fully loaded using CSS classes
Event Handling:
handleImageLoad: Manages the loading state transitionhandleClick: Processes player moves via theprocessTurncallback
Build the CardsGrid Component
This is our main game component that manages the game state, scoring logic, and card interactions. Let’s break down its implementation:
// src/components/CardsGrid/CardsGrid.jsx
import React, { useState, useEffect } from "react";
import { useLocalStorage } from "@uidotdev/usehooks";
import Card from "../Card";
import Loader from "../Loader";
import styles from "./CardsGrid.module.scss";
import useFetch from "../../hooks/useFetch";

function CardsGrid(data) {
  // State Management
  const [images, setImages] = useState(data?.data?.images || []);
  const [clickedImages, setClickedImages] = useLocalStorage("clickedImages", []);
  const [score, setScore] = useLocalStorage("score", 0);
  const [bestScore, setBestScore] = useLocalStorage("bestScore", 0);
  const [isLoading, setIsLoading] = useState(!data?.data?.images?.length);

  // Custom hook for fetching images
  const { data: fetchedData, fetchData, error } = useFetch();

  // Update images when new data is fetched
  useEffect(() => {
    if (fetchedData?.images) {
      setImages(fetchedData.images);
      setIsLoading(false);
      // Reset clicked images when new batch is loaded
      setClickedImages([]);
    }
  }, [fetchedData]);

  // Helper function to update best score
  function updateBestScore(currentScore) {
    if (currentScore > bestScore) {
      setBestScore(currentScore);
    }
  }

  // Core game logic
  function processTurn(imageId) {
    const newClickedImages = [...clickedImages, imageId];
    setClickedImages(newClickedImages);

    // If clicking the same image twice, reset everything
    if (clickedImages.includes(imageId)) {
      // Update the best score if necessary
      updateBestScore(score);

      setClickedImages([]);
      setScore(0);
    } else {
      // Handle successful card selection
      const newScore = score + 1;
      setScore(newScore);

      // Check for perfect score (all cards clicked once)
       if (newClickedImages.length === images.length) {
        updateBestScore(newScore);
        fetchData();
        setClickedImages([]);
      } else {
        // Shuffle the images
        const shuffled = [...images].sort(() => Math.random() - 0.5);
        setImages(shuffled);
      }
    }
  }

 if (error) {
    return <p>Failed to fetch data</p>;
  }

  if (isLoading) {
    return <Loader message="Loading new images..." />;
  }

  return (
    <div className={styles.container}>
      {images.map((item) => (
        <Card
          key={getKey()}
          imgUrl={item?.image?.original?.url || ""}
          imageId={item?.id}
          categoryName={item?.category}
          processTurn={(imageId) => processTurn(imageId)}
        />
      ))}
    </div>
  );
}

export default React.memo(CardsGrid);
Component styling:
.container {
  display: grid;
  gap: 1rem 1rem;
  grid-template-columns: auto; /* Default: one column for mobile-first */
  background-color: #2196f3;
  padding: 0.7rem;
  cursor: pointer;
}

@media (min-width: 481px) {
  .container {
    grid-template-columns: auto auto; /* Two columns for tablets and up */
  }
}

@media (min-width: 769px) {
  .container {
    grid-template-columns: auto auto auto; /* Three columns for desktops and larger */
  }
}
Key Features Breakdown:
State Management:
Uses
useStatefor component-level stateImplements
useLocalStoragefor persistent game data:clickedImages: Tracks which cards have been clickedscore: Current game scorebestScore: Highest score achieved
Manages loading state for image fetching
Shuffle the cards
Game Logic:
processTurn: Handles player movesTracks duplicate clicks
Updates scores
Manages perfect score scenarios
updateBestScore: Updates high score when necessaryAutomatically fetches new images when a round is completed
Data Fetching:
Uses custom
useFetchhook for image dataHandles loading and error states
Updates images when new data is fetched
Performance Optimization:
Component wrapped in
React.memoEfficient state updates
Responsive grid layout
Persistence:
Game state persists across page reloads
Best score tracking
Current game progress saving
Usage Example:
...
...

function App() {
  const { data, loading, error } = useFetch();

  if (loading) return <Loader />;
  if (error) return <p>Error: {error}</p>;

  return (
    <div className={styles.container}>
      <Header />
      <Subtitle />
      <CardsGrid data={data} />
      <Footer />
    </div>
  );
}
export default App;
The CardsGrid component serves as the heart of our memory card game, managing:
Game state and logic
Score tracking
Card interactions
Image loading and display
Responsive layout
Data persistence
This implementation provides a smooth gaming experience while maintaining code readability and maintainability through clear separation of concerns and proper state management.
3. Implementing the API Layer
Our game uses a robust API layer with multiple fallback options to ensure reliable image delivery. Let’s implement each service and the fallback mechanism.
Set Up the Primary API Service:
// src/services/api/nekosiaApi.js
const NEKOSIA_API_URL = "https://api.nekosia.cat/api/v1/images/catgirl";

export async function fetchNekosiaImages() {
  const response = await fetch(
    `${NEKOSIA_API_URL}?count=21&additionalTags=white-hair,uniform&blacklistedTags=short-hair,sad,maid&width=300`
  );

  if (!response.ok) {
    throw new Error(`Nekosia API error: ${response.status}`);
  }

  const result = await response.json();

  if (!result.images || !Array.isArray(result.images)) {
    throw new Error('Invalid response format from Nekosia API');
  }

  const validImages = result.images.filter(item => item?.image?.original?.url);

  if (validImages.length === 0) {
    throw new Error('No valid images received from Nekosia API');
  }

  return { ...result, images: validImages };
}
Create the First Fallback API Service:
// src/services/api/nekosBestApi.js
const NEKOS_BEST_API_URL = "https://nekos.best/api/v2/neko?amount=21";

export async function fetchNekosBestImages() {
  const response = await fetch(NEKOS_BEST_API_URL, {
    method: "GET",
    mode: "no-cors"
  });

  if (!response.ok) {
    throw new Error(`Nekos Best API error: ${response.status}`);
  }

  const result = await response.json();

  // Transform the response to match our expected format
  const transformedImages = result.results.map(item => ({
    id: item.url.split('/').pop().split('.')[0], // Extract UUID from URL
    image: {
      original: {
        url: item.url
      }
    },
    artist: {
      name: item.artist_name,
      href: item.artist_href
    },
    source: item.source_url
  }));

  return { images: transformedImages };
}
Create the Second Fallback API Service:
// src/services/api/nekosApi.js
const NEKOS_API_URL = "https://api.nekosapi.com/v3/images/random?limit=21&rating=safe";

export async function fetchNekosImages() {
  const response = await fetch(NEKOS_API_URL, {
    method: "GET",
  });

  if (!response.ok) {
    throw new Error(`Nekos API error: ${response.status}`);
  }

  const result = await response.json();

  // Transform the response to match our expected format
  const transformedImages = result.items.map(item => ({
    id: item.id,
    image: {
      original: {
        url: item.image_url
      }
    }
  }));

  return { images: transformedImages };
}
Build the API Fallback Mechanism:
// src/services/api/imageService.js
import { fetchNekosiaImages } from "./nekosiaApi";
import { fetchNekosImages } from "./nekosApi";
import { fetchNekosBestImages } from "./nekosBestApi";

export async function fetchImages() {
  try {
    // Try primary API first
    return await fetchNekosiaImages();
  } catch (error) {
    console.warn("Primary API failed, trying fallback:", error);

    // Try first fallback API
    try {
      return await fetchNekosBestImages();
    } catch (fallbackError) {
      console.warn("First fallback API failed, trying second fallback:", fallbackError);

      // Try second fallback API
      try {
        return await fetchNekosImages();
      } catch (secondFallbackError) {
        console.error("All image APIs failed:", secondFallbackError);
        throw new Error("All image APIs failed");
      }
    }
  }
}
Use the Image Service:
// src/hooks/useFetch.js
import { useState, useEffect } from "react";
import { fetchImages } from "../services/api/imageService";

export default function useFetch() {
  const [data, setData] = useState([]);
  const [loading, setLoading] = useState(true);
  const [error, setError] = useState(null);

  const fetchData = async () => {
    setLoading(true);
    setError(null);

    try {
      const result = await fetchImages();
      setData(result);
    } catch (err) {
      setError(err.message || 'An error occurred');
    } finally {
      setLoading(false);
    }
  };

  useEffect(() => {
    fetchData();
  }, []);

  return {
    data,
    loading,
    error,
    fetchData,
  };
}
Key Features of Our API Implementation:
Multiple API Sources:
Primary API (Nekosia): Provides high-quality anime images
First Fallback (Nekos Best): Includes artist information
Second Fallback (Nekos): Simple and reliable backup
Consistent Data Format:
- All APIs transform their responses to match our expected format:
    {
      images: [
        {
          id: string,
          image: {
            original: {
              url: string
            }
          }
        }
      ]
    }
Robust Error Handling:
Validates API responses
Checks for valid image URLs
Provides detailed error messages
Graceful fallback mechanism
Safety Features:
Safe content filtering (
rating=safe)Image count limitation (21 images)
URL validation
Response format validation
Performance Considerations:
Optimized image sizes
Filtered content tags
Efficient data transformation
Minimal API calls
This implementation ensures our game has a reliable source of images while handling potential API failures gracefully. The consistent data format across all APIs makes it easy to switch between them without affecting the game’s functionality.
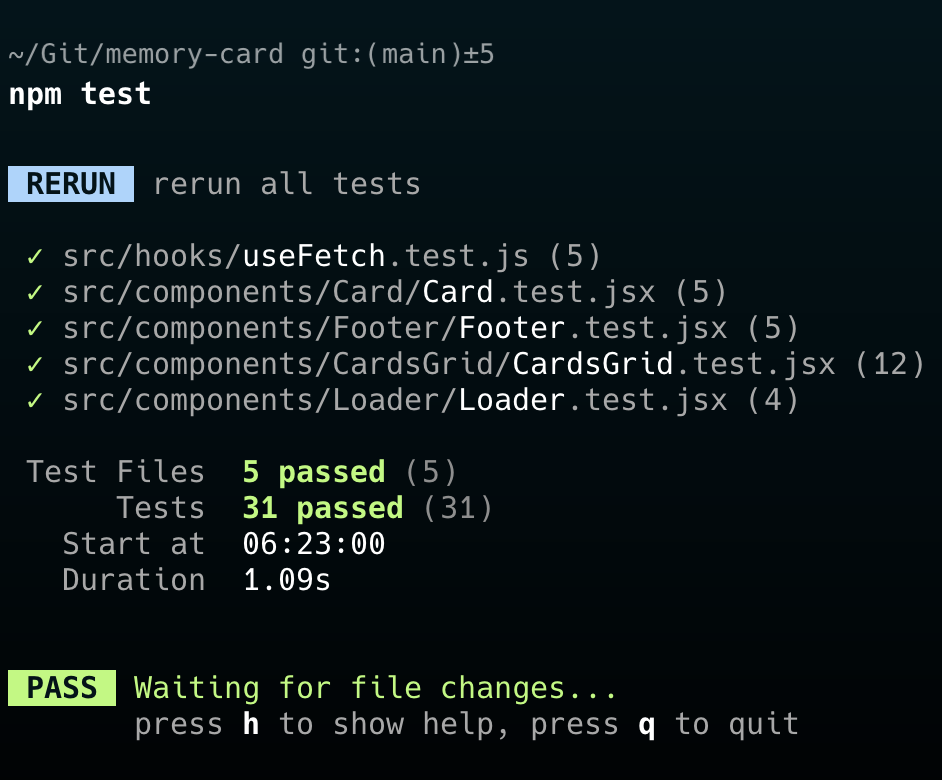
Testing the App
Testing is a crucial part of any application development, and for our Memory Card Game, we implemented a comprehensive testing strategy using modern tools and practices. Let’s dive into how we structured our tests and some key testing patterns we used.
Testing Stack
Vitest: Our primary testing framework, chosen for its speed and seamless integration with Vite
React Testing Library: For testing React components with a user-centric approach
@testing-library/user-event: For simulating user interactions
jsdom: For creating a DOM environment in our tests
Key Testing Patterns
Testing was a crucial part of ensuring the reliability and maintainability of this Memory Card Game. I implemented a comprehensive testing strategy using React Testing Library and Vitest, focusing on several key areas:
1. Component Testing
I wrote extensive tests for my React components to ensure they render correctly and behave as expected. For example, the CardsGrid component, which is the heart of the game, has thorough test coverage including:
Initial rendering states
Loading states
Error handling
Score tracking
Card interaction behavior
2. Test Mocking
To ensure reliable and fast tests, I implemented several mocking strategies:
Local storage operations using useLocalStorage hook
API calls using the
useFetchhookEvent handlers and state updates
3. Testing Best Practices
Throughout my testing implementation, I followed several best practices:
Using
beforeEachandafterEachhooks to reset state between testsTesting user interactions using
fireEventfrom React Testing LibraryWriting tests that resemble how users interact with the app
Testing both success and error scenarios
Isolating tests using proper mocking
4. Testing Tools
The project leverages modern testing tools and libraries:
Vitest: As the test runner
React Testing Library: For testing React components
@testing-library/jest-dom: For enhanced DOM testing assertions
@testing-library/user-event: For simulating user interactions
This comprehensive testing approach helped me catch bugs early, ensured code quality, and made refactoring safer and more manageable.
Optimizations
To ensure smooth performance, especially on mobile devices, we implemented several optimization techniques:
Response Transformation
Standardized data format across all APIs
Efficient ID extraction from URLs
Structured image metadata for quick access
Network Optimization
Using
no-corsmode where appropriate to handle CORS issues efficientlyError handling with specific status codes for better debugging
Consistent response structure across all API implementations
Mobile-First Considerations
Optimized image loading strategy
Efficient error handling to prevent unnecessary retries
Streamlined data transformation to reduce processing overhead
Future Improvements
There are a few ways that we could further improve this project:
API Response Caching
Implement local storage caching for frequently used images
Add cache invalidation strategy for fresh content
Implement progressive image loading
Performance Optimizations
Add image lazy loading for better initial load time
Implement request queuing for better bandwidth management
Add response compression for faster data transfer
Reliability Enhancements
Add API health checking before attempts
Implement retry mechanisms with exponential backoff
Add circuit breaker pattern for failing APIs
Analytics and Monitoring
Track API success rates
Monitor response times
Implement automatic API switching based on performance metrics
This robust implementation ensures that our game remains functional and performant even under adverse network conditions or API unavailability, while still maintaining room for future improvements and optimizations.
Conclusion
Building this Memory Card Game has been more than just creating a fun, ad-free alternative for kids—it’s been an exercise in implementing modern web development best practices while solving a real-world problem.
The project demonstrates how combining thoughtful architecture, robust testing, and reliable fallback mechanisms can result in a production-ready application that’s both entertaining and educational.
ðŸ—ï¸ Key Takeaways
User-Centric Development
Started with a clear problem (ad-filled games affecting user experience)
Implemented features that enhance gameplay without interruptions
Maintained focus on performance and reliability across devices
Technical Excellence
Leveraged modern React patterns and hooks for clean, maintainable code
Implemented comprehensive testing strategy ensuring reliability
Created a robust API fallback system for uninterrupted gameplay
Performance First
Adopted mobile-first approach with responsive design
Optimized image loading and handling
Implemented efficient state management and caching strategies
📚 Learning Outcomes
This project showcases how seemingly simple games can be excellent vehicles for implementing complex technical solutions. From component architecture to API fallbacks, each feature was built with scalability and maintainability in mind, proving that even hobby projects can maintain professional-grade code quality.
🔮 Moving Forward
While the game successfully achieves its primary goal of providing an ad-free, enjoyable experience, the documented future improvements provide a clear roadmap for evolution. Whether it’s implementing additional optimizations or adding new features, the foundation is solid and ready for expansion.
The Memory Card Game stands as a testament to how personal projects can both solve real-world problems and serve as platforms for implementing best practices in modern web development. Feel free to explore the code, contribute, or use it as inspiration for your own projects!
Source: freeCodeCamp Programming Tutorials: Python, JavaScript, Git & MoreÂ

