")

Zoom allows you to record each meeting participant’s audio separately, both locally and with cloud recordings despite the latter being a relatively unadvertised feature. This is extremely useful for people who want to build with Speech AI on top of Zoom recordings. For example, since each participant is recorded on a different audio track, it is extremely easy to identify who said what in the recording. Rather than relying on Speaker Diarization, which uses AI to separate out speakers on the same track, you can use Channel Diarization to ascribe utterances to the appropriate speaker with 100% accuracy.
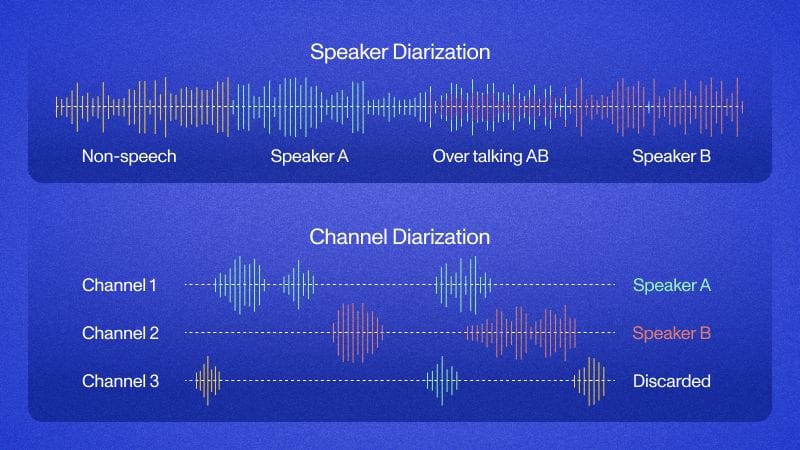
Further, Speech-to-Text will be more accurate when the audio files are separated out because there is no overlapping speech, which can be challenging to transcribe for Speech-to-Text models. In this tutorial, you’ll learn how to fetch Zoom participant recordings using the Zoom API and transcribe each recording simultaneously but individually using AssemblyAI’s multichannel transcription. We’ll show you how to do this with local recordings too if you don’t want to record to the cloud. Let’s get started!
Getting started
There are three essential steps to this method:
- Fetch participant recordings using the Zoom API
- Combine the individual recordings into one recording, where each original recording is on a separate channel
- Transcribe the file with multichannel transcription
You’ll need to ensure that you have the necessary prerequisites for each of these steps, which are outlined in the respective sections below; but first clone the project repository with git and cd into it:
git clone https://github.com/AssemblyAI-Community/zoom-multichannel
cd zoom-multichannel
Next, create a virtual environment and install the dependencies:
python3 -m venv venv  # you may have to use `python` instead of `python3`

source venv/bin/activate  # MacOS/Linux
.venvScriptsactivate.bat  # Windows

pip install -r requirements.txt
Next we copy the example environment file .env.example to a .env file, which we use to securely store the environment variables used for authentication with the Zoom and AssemblyAI APIs:
# MacOS/Linux
cp .env.example .env

# Windows
copy .env.example .env
Zoom setup
Local setup
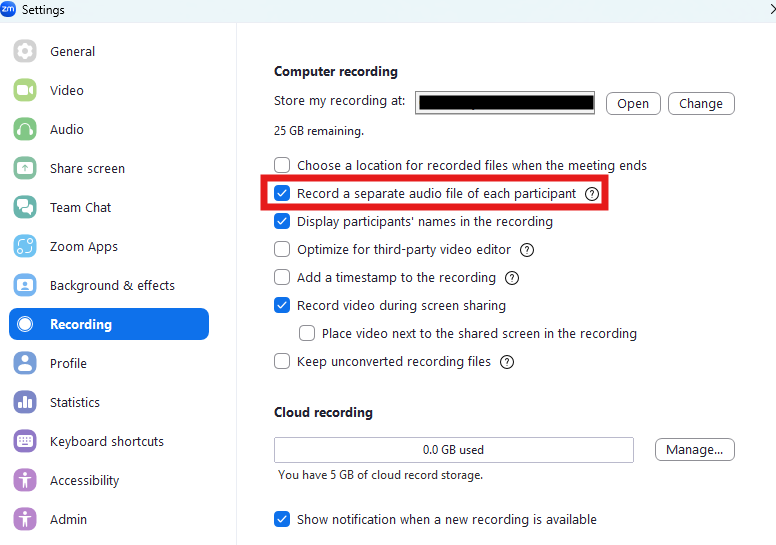
To follow this tutorial for local recordings, you need to configure Zoom to record all participants to different audio files rather than to a single file. Create a Zoom account and download the Zoom app if you haven’t done so already. Open the Zoom app on your computer and click on your account icon in the top right-hand corner of the window. Navigate to Settings > Recording, and enable the setting Record a separate audio file for each participant who speaks. Be sure to hit "Save" before navigating away.
If you want to transcribe cloud recordings, keep reading on to the next subsection, but if you only want to transcribe local recordings, you can jump down to the FFMpeg setup section.
Cloud setup
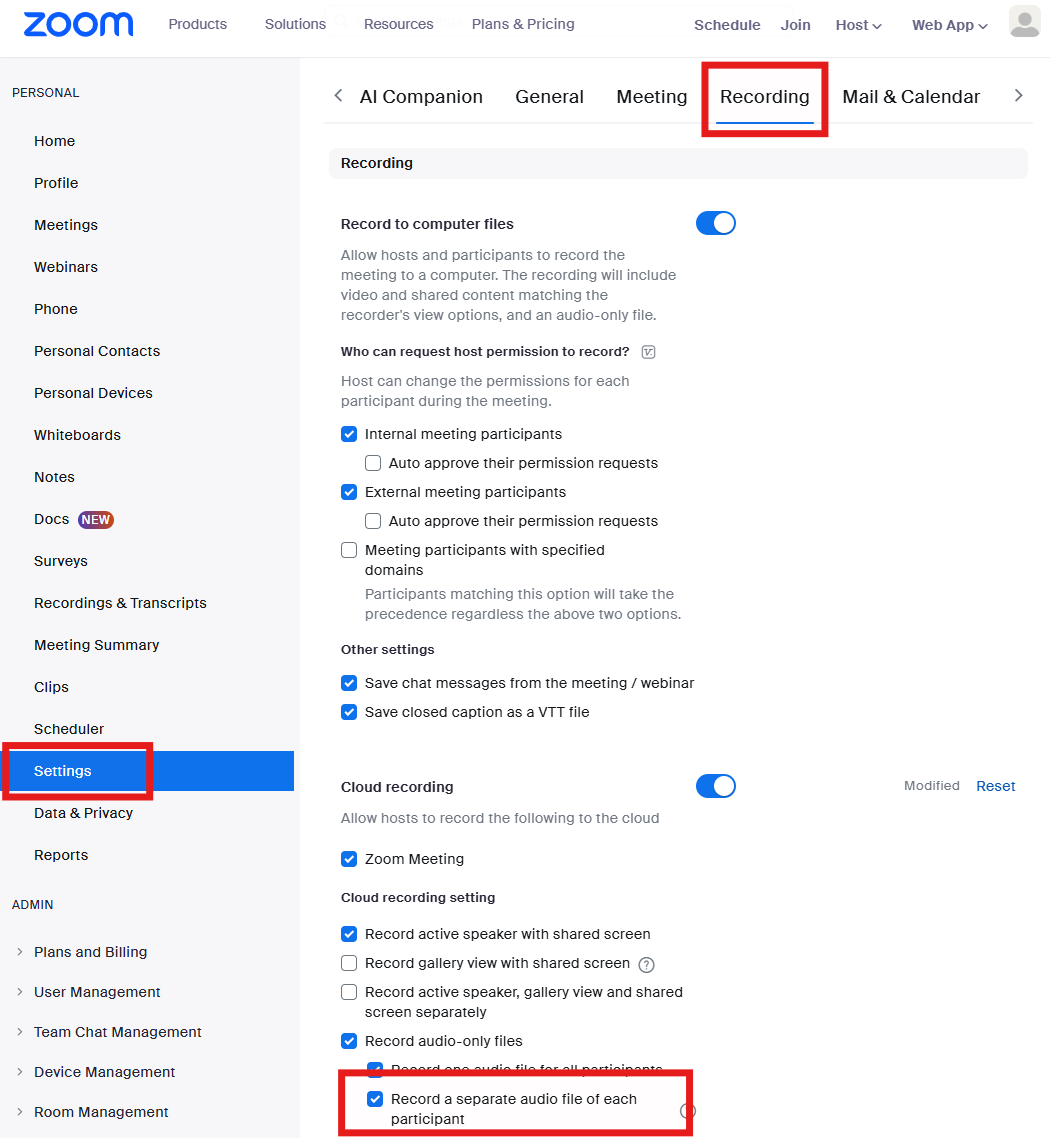
Create a Zoom account if you haven’t done so already. You’ll need to upgrade your account to record to the cloud too, so upgrade now if necessary. Log in to the Zoom web portal and click My Account in the top-right hand corner of the screen. Navigate to Settings > Recording and enable the setting Record a separate audio file of each participant. This setting is required for cloud recordings to have separate audio files for each participant.
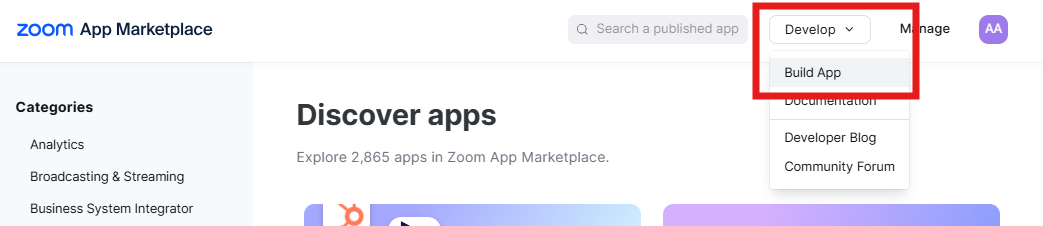
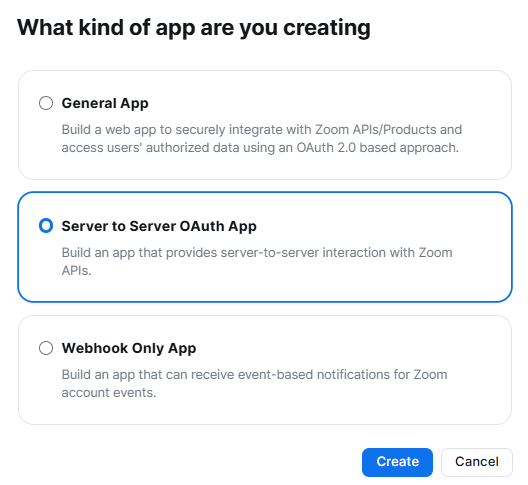
To use the Zoom API, you need to create a Zoom app. The app will provide you with the credentials you need to access cloud recordings with the Zoom API. Go to the Zoom app marketplace, and sign in if you are not already. At the top right of the screen, click Develop > Build App:
In the popup modal, select Server to Server OAuth App and then click Create. OAuth is a modern standard for providing limited access to your account so that the application we build can autonomously access your Zoom account information with only the level of access required to fulfill its function. This adds a layer of security in case your application credentials are leaked.
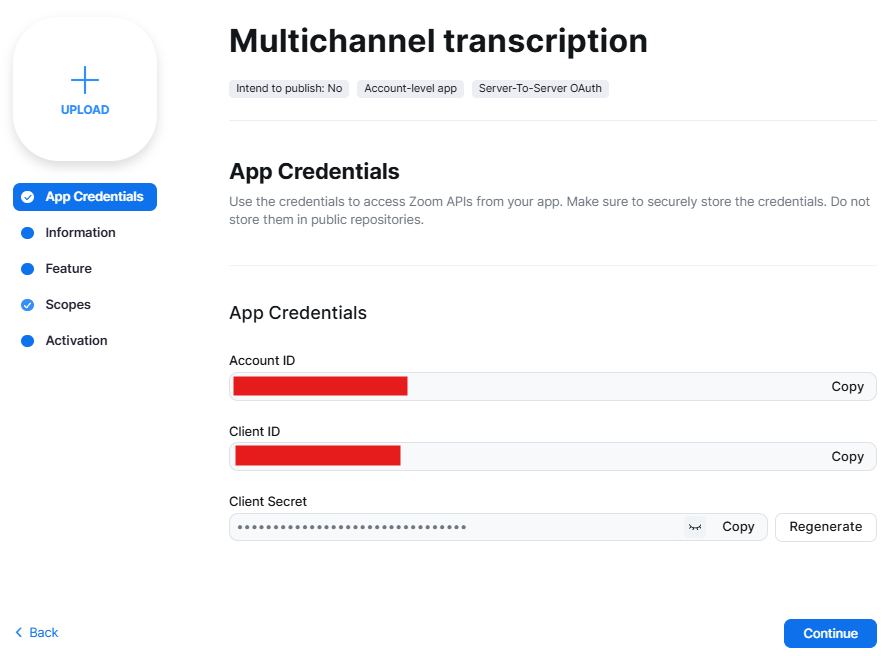
Give your app a name, and then again click Create. You will be met with a page that displays your app’s credentials. Copy the Account ID, the Client ID, and then Client Secret into the appropriate fields in the .env file. Make sure to paste these values in the .env file, not the .env.example file.
Next, go to the Information tab and fill in the Company Name and Developer Contact Information. Both of these need to be filled in to activate the app. Next, skip the Feature tab and go down to the Scopes tab. This is where you define what permissions your app will have. Adding a Scope to your app gives it the permission to act on a particular piece of data (e.g. meetings) in a particular way (e.g. read access).
Search for and add the scopes cloud_recording:read:list_user_recordings:admin (List all cloud recordings for a user), and cloud_recording:read:list_recording_files:admin (Returns all of a meeting's recordings). Adding only these scopes means that, in the event that the credentials for this application are somehow compromised, the only thing the malicious party would get access to is the ability to read your recordings. Look at all of the other permissions the malicious party would not have access to in the event that your credentials are leaked (you can view them by clicking Add Scopes)! By limiting the scope to only what is needed, we follow the principle of least privilege, greatly increasing the security of your account.
Finally, go to the Activation tab and click Activate your app. Now your credentials are ready to use with the Zoom API.
FFmpeg setup
FFmpeg is a cross-platform solution for handling and processing media files. We’ll use it to combine the individual participant recordings into a single, multichannel recording. Install FFmpeg if you do not already have it installed on your machine. You can enter ffmpeg -version in your terminal to see if you already have it installed.
AssemblyAI setup
To transcribe the audio, you’ll need an AssemblyAI account. You can sign up for free here. Multichannel transcription is included when you sign up for free, so you don’t need to upgrade your account. Once you sign up, you will see your API key. Copy it now. If you already have an account, go to your Dashboard and copy your API key from there.
Paste your API key into the .env file under the ASSEMBLYAI_API_KEY field. That’s all you need to do to set up AssemblyAI!
Transcribe participant recordings – cloud
Now that your project is fully configured, we can transcribe the participant recordings. Create a file called cloud.py and import the required packages:
import os

from dotenv import load_dotenv
import assemblyai as aai

import utils
from utils.zoom import ZoomClient
We import utils, which has a function that will combine our participant files into a single multichannel file, and ZoomClient, which is a class that will help us fetch the participant recordings from Zoom. We also import the load_dotenv function from the dotenv package, which will load our environment variables from the .env file.
Next, load the environment variables and assign them to variables, and check to ensure that they have all been specified:
# load environment variables
load_dotenv()

# assign to variables
ZOOM_ACCOUNT_ID = os.environ.get('ZOOM_ACCOUNT_ID')
ZOOM_CLIENT_ID = os.environ.get('ZOOM_CLIENT_ID')
ZOOM_CLIENT_SECRET = os.environ.get('ZOOM_CLIENT_SECRET')
aai.settings.api_key = os.environ.get('ASSEMBLYAI_API_KEY')

# ensure all required environment variables are available
if not all([ZOOM_ACCOUNT_ID, ZOOM_CLIENT_ID, ZOOM_CLIENT_SECRET, aai.settings.api_key]):
    raise RuntimeError(
        "Missing one or more required environment variables: "
        "ZOOM_ACCOUNT_ID, ZOOM_CLIENT_ID, ZOOM_CLIENT_SECRET, ASSEMBLYAI_API_KEY"
    )
Now, instantiate a ZoomClient and an AssemblyAI transcriber with multichannel Speech-to-Text enabled:
# instantiate Zoom client to interact with Zoom API
client = ZoomClient(account_id=ZOOM_ACCOUNT_ID, client_id=ZOOM_CLIENT_ID, client_secret=ZOOM_CLIENT_SECRET)

# instantiate AssemblyAI transcriber with multichannel speech-to-text enabled
config = aai.TranscriptionConfig(multichannel=True)
transcriber = aai.Transcriber(config=config)
Now we can move on to the main logic of our script. Create a function called main.py and paste the following code:
def main():
    # download each participant audio files for the most recent Zoom meeting
    params = {'from': '2024-11-14'}  # query parameters for Zoom API request
    meets = client.get_recordings(params=params)
    meeting_uuid = meets["meetings"][0]["uuid"]
    client.download_participant_audio_files(meeting_uuid)
This code fetches cloud recordings from the start date given in params. You can add any query parameters here and they will be passed through to the API call. We then select the first meeting in the list and isolate its UUID – you can implement your own logic here to determine which meeting(s) to select. We then download the participant audio files for that meeting. The default download location is the ./tmp directory, but you can specify an alternative with the path argument.
Now add the following code to the main function:
    # combine all participant audio files into a single audio file
    path = "combined_audio.m4a"
    utils.combine_tracks(path, dir="tmp")
This code uses the combine_tracks utility function to merge all of the individual participant recordings in ./tmp into one audio file, where each recordings is on a different channel. Note that you can check how many channels the output file has by running the following command in your terminal:
ffprobe -v error -select_streams a:0 -show_entries stream=channels -of default=noprint_wrappers=1:nokey=1 combined_audio.m4a`
Now add the following lines to the main function:
    # send to AssemblyAI for multichannel speech-to-text and print the results
    transcript = transcriber.transcribe(path)
    print(f"Number of channels: {transcript.json_response["audio_channels"]}")
    for utt in transcript.utterances:
        print(utt)
Here we submit the merged audio file to AssemblyAI for transcription with multichannel Speech-to-Text enabled. We then print the number of audio channels and the individual utterances in the transcript.
Finally, add the following lines to main.py (outside of the main function):
if __name__ == "__main__":
    main()
You can find the complete code in the project repository.
Run the script with python3 cloud.py (or python cloud.py). If your selected recording is multichannel, you will see the results printed to the console. Here is an example output from a real recording:
Number of channels: 2
text='Here I am talking on channel one.' start=3560 end=5105 confidence=0.9430786 speaker='2' channel='2' words=[...]
text='And here I am as a different participant, talking on channel two.' start=8880 end=12025 confidence=0.95788336 speaker='1' channel='1' words=[...]
Transcribe participant recordings – local
The process to transcribe local recordings is very similar. It is the same process as the above script, but there is no need to instantiate/use the ZoomClient. First, make sure all of your participant recordings are in a single directory (in this example they are in ./recordings).
Then add the following code to a file called local.py and run it:
import os

from dotenv import load_dotenv
import assemblyai as aai

import utils

# load environment variables
load_dotenv()

aai.settings.api_key = os.environ.get('ASSEMBLYAI_API_KEY')

# ensure all required environment variables are available
if not aai.settings.api_key:
    raise RuntimeError("Missing ASSEMBLYAI_API_KEY")

# instantiate AssemblyAI transcriber with multichannel speech-to-text enabled
config = aai.TranscriptionConfig(multichannel=True)
transcriber = aai.Transcriber(config=config)

def main():
    # combine all participant audio files into a single audio file
    path = "combined_audio.m4a"
    utils.combine_tracks(path, dir="recordings")

    # send to AssemblyAI for multichannel speech-to-text and print the results
    transcript = transcriber.transcribe(path)
    print(f"Number of channels: {transcript.json_response["audio_channels"]}")
    for utt in transcript.utterances:
        print(utt)

if __name__ == "__main__":
    main()
As you can see, the code is almost identical besides the removal of references to the Zoom API (directly or indirectly). You can also find this code in the project repository.
Final words
If you’re interested in how this works under the hood – check out the Appendix. If you found this article helpful, consider checking out some of our content on using the Zoom API, like
- How to get Zoom Transcripts with the Zoom API
- How to Automatically Transcribe Zoom Calls in Real-Time
- Analyze Audio from Zoom Calls with AssemblyAI and Node.js
Alternatively, check out our YouTube channel or more of our Blog posts for more content on building with AI and AI theory, or follow us on LinkedIn or Twitter to stay in touch.
Appendix – How the code works
zoom module
Much of the work done in the above script is done by the utils.zoom module. Here’s a breakdown of this file:
First we have imports and define a custom exception. In general it’s good practice to define custom exceptions for your application, as it makes it easier to handle errors in a consistent way and avoid catch-all exceptions that can hide bugs.
import os
import time
from typing import Callable
from urllib.parse import urljoin
from functools import wraps

import requests


class ZoomAPIError(Exception):
    """Exception for Zoom API errors."""

    def __init__(self, status_code, message):
        super().__init__(f"Error {status_code}: {message}")
        self.status_code = status_code
        self.message = message
Next we define a decorator called api_call, which is designed to wrap calls we make to the Zoom API. The decorator is designed to encapsulate our API functions to implement logic we want common to all API calls, like basic error handling, and query parameter passthrough. Beyond being convenient by avoiding us repeating ourselves and having to make changes in multiple places in the future, this also helps keep our code DRY.
def api_call(func: Callable[..., requests.Response]):
    """Decorator to handle API call errors. Ensure the function returns a `requests.Response` object."""

    @wraps(func)
    def wrapper(*args, **kwargs):
        # pass through `params` to the API call, ensuring they are not `None`
        if 'params' in kwargs and kwargs['params'] is None:
            kwargs['params'] = {}

        response = func(*args, **kwargs)
        if not isinstance(response, requests.Response):
            raise TypeError(
                f"Function `{func.__name__}` must return a `requests.Response` object."
            )
        if response.status_code != 200:
            try:
                error_message = response.json().get("message", "Unknown error")
            except ValueError:  # Response is not JSON
                error_message = response.text
            raise ZoomAPIError(response.status_code, error_message)
        try:
            return response.json()
        except ValueError:
            raise ValueError("Response is not JSON formatted.")

    return wrapper
Next we begin to define our ZoomClient. We define some class variables common to all instances, like the base URL to which we make API requests. Then in the initialization function, we store our credentials and initialize some variables to store our access token and token expiry time.
We need an access token to make requests to the Zoom API, and we get such a token by using our application credentials. We define a property to access the token, which allows us to automatically generate a token if one does not exist. Further, access tokens expire, so using a property allows us to automatically refresh the token when it expires. In this way we keep the details of token management hidden from the user of the class.
Note that the ZoomClient could still be enhanced by e.g. adding a session object to the class. This would allow us to reuse the same session for multiple requests, which can be more efficient than creating a new session for each request.
class ZoomClient:
    BASE_URL = "https://api.zoom.us/v2/"
    AUTH_URL = "https://zoom.us/oauth/"

    def __init__(self, account_id, client_id, client_secret) -> None:
        self.account_id = account_id
        self.client_id = client_id
        self.client_secret = client_secret
        self._access_token = None
        self._token_expiry = None  # Track token expiration time

    def _is_token_expired(self):
        """Check if the current token has expired."""
        return self._token_expiry and time.time() >= self._token_expiry

    def _refresh_token(self):
        """Refresh the access token if expired."""
        data = {
            "grant_type": "account_credentials",
            "account_id": self.account_id,
            "client_id": self.client_id,
            "client_secret": self.client_secret,
        }
        response = requests.post(urljoin(self.AUTH_URL, "token"), data=data)
        response.raise_for_status()  # Ensure we handle request failures
        token_data = response.json()
        self._access_token = token_data["access_token"]
        # Set the token expiry time (current time + expires_in)
        self._token_expiry = time.time() + token_data["expires_in"]

    @property
    def access_token(self):
        """Return a valid access token, refreshing if expired."""
        if self._access_token is None or self._is_token_expired():
            self._refresh_token()  # Refresh the token
        return self._access_token
Next we add another property that is derived from the access_token. It defines the necessary HTTP header we need to authenticate our Zoom API requests. After that, we define two functions to make calls to the specified endpoints. Since we put most of the request handling logic in the api_call decorator, these functions are very small, clear, and maintainable.
get_recordings gets the user’s recordings. Interestingly, as of the writing of this article, the response contains all recordings except individual participant recordings. Therefore, for the article we wish to get participant recordings for, we need to extract the meeting UUID from the response and then use that to get the participant recordings. This is done in the get_meeting_recordings function.
@property
    def auth_header(self):
        return {"Authorization": f"Bearer {self.access_token}"}

    @api_call
    def get_recordings(self, params=None):
        url = urljoin(self.BASE_URL, "users/me/recordings")
        return requests.get(url, headers=self.auth_header, params=params)

    @api_call
    def get_meeting_recordings(self, meeting_uuid, params=None):
        url = urljoin(self.BASE_URL, f"meetings/{meeting_uuid}/recordings")
        return requests.get(url, headers=self.auth_header, params=params)
Finally, we have the download_participant_audio_files function. This function uses the get_meeting_recordings function to get the participant audio files, and then downloads each file to the specified directory with a filename corresponding to the speaker name.
def download_participant_audio_files(self, meeting_uuid, path='tmp'):
        # keep track of number of occurrences so don't have same filename if a name is repeated
        names = {}
        os.makedirs(path, exist_ok=True)
        response = self.get_meeting_recordings(meeting_uuid)
        for data in response['participant_audio_files']:
            name = data['file_name'].split('-')[-1].strip()
            if name in names:
                names[name] += 1
            else:
                names[name] = 1
            filename = name + (f"_{names[name]}" if names[name] > 1 else '')

            url = data['download_url']
            r = requests.get(url, headers=self.auth_header)
            with open(f'{path}/{filename}.m4a', 'wb') as f:
                f.write(r.content)
utils module
The utils module’s __init__.py file contains one function – combine_tracks. Its job is to use FFmpeg to combine all of the participant audio files into one audio file, with each original audio on a separate mono channel.
import os
import subprocess

def combine_tracks(filepath="combined_audio.m4a", dir="tmp", safe=True):
    if safe and os.path.exists(filepath):
        raise FileExistsError(f"The file '{filepath}' already exists.")

    input_files = [os.path.join(dir, file) for file in os.listdir(dir) if file.endswith('.m4a')]
    if not input_files:
        raise ValueError("No input files found in the 'tmp' directory.")

    input_args = []
    amerge_inputs = []

    for idx, file in enumerate(input_files):
        input_args.extend(["-i", file])
        amerge_inputs.append(f"[{idx}:a]")

    amerge_filter = f"{''.join(amerge_inputs)}amerge=inputs={len(input_files)}[out]"

    ffmpeg_command = [
        "ffmpeg",
        "-y" if not safe else "-n",  # overwrite (-y) or not (-n)
        *input_args,
        "-filter_complex", amerge_filter,
        "-map", "[out]",
        "-ac", str(len(input_files)),
        filepath
    ]

    try:
        subprocess.run(ffmpeg_command, check=True, stderr=subprocess.PIPE, stdout=subprocess.PIPE)
    except subprocess.CalledProcessError as e:
        error_message = e.stderr.decode() if e.stderr else f"No detailed error message available. Raw error: {str(e)}"
        raise RuntimeError(f"FFmpeg error: {error_message}") from e
Source: Read MoreÂ

