
Forms are essential in modern websites, as they help you collect your users’ information. So knowing how to handle forms properly is crucial when you’re building web applications.
In this article, you will learn how to handle forms in Next.js using server actions and zod.
Table of Contents
Prerequisites and Setting Up the Project
For this tutorial, I assume that you know JavaScript and how to set up a Next.js project (I’m not going to walk through that set up here).
If you haven’t yet set up your Next.js project, use the following command and follow the prompts:
npx create-next-app
This is what we are going to build in this tutorial:
Note: this tutorial mainly focuses on the logic and not the design. For the complete design, you can visit the GitHub repository which I’ve linked to at the end.
Introduction to Server Actions in Next.js
So what are server actions? Server actions are pretty much what they sound like—actions or functions that run on the server. With server actions, you can make calls to external APIs or fetch data from a database.
Prior to Next.js 13, you had to use routes to handle API calls and form submissions. This was complex and cumbersome.
But the introduction of server actions lets you communicate with external APIs and databases directly in your Next.js components.
By running on the server, server actions enable secure handling of data processing, mitigating security risks.
Server actions are also useful in handling forms as they let you communicate directly with your server and limit the exposure of important credentials to the client.
There are two ways to create server actions:
- The first method is using the
"use server"directive at the top level of a function. You can only use this method inside a server component. Using it inside a client component will result in an error.
For example:
async function getPosts() {
  "use server"; // this makes getPosts a server actions

  // rest of code
}
- The other method is to create a separate file and add “use server” at the top of the file. This ensures that any async function exported from the file is a server action.
// action.ts

"use server";

export async function getPosts() {
  const res = await fetch("https:...");
  const data = res.json();

  return data;
}
In the code example above, getPosts is a server action.
Introduction to Zod for Validation
Zod is a validation library that you can use to validate form entries on the server side. This ensures consistency across both the client and server.
Zod is a TypeScript-first library, which means that it comes with type safety out of the box.
To install Zod in your Next.js application, use the following command:
npm install zod
At the core of the Zod library are schemas. You can use schemas to validate inputs.
Here’s how to define a schema:
import { z } from "zod";

const contactSchema = z.object({
  name: z.string().min(2, { message: "Name must be at least 2 characters" }),
  email: z.string().email({ message: "Invalid email address" }),
  message: z
    .string()
    .min(10, { message: "Message must be at least 10 characters" }),
});
Inside the contactSchema, we are specifying that:
nameis of typestringand should be a minimum of 2 characters,emailis of typestringandemail, andmessageis of typestringand should be a minimum of 10 characters.
The message property is what will be displayed on the screen when all or any of the validation fails.
In the next section, we are going to build the contact form.
How to Build the Contact Form Component
In this section, we are going to build the UI of the contact form.
Inside the app directory, create a folder called “components.“
Inside of the components folder, create a new file, contactForm.tsx, and add the following code:
"use client";

function ContactForm() {
  return (
    <form action="">
      <input type="text" name="name" placeholder="Enter your name" />
      <input type="email" name="email" placeholder="Enter your email" />
      <textarea name="message" cols={30} rows={10} placeholder="Type in your message"></textarea>
      <button type="submit">Send Message</button>
    </form>
  );
}

export default ContactForm;
In the code above, we are creating a simple contact form. We made it a client component – you’ll see why in a bit.
Import the ContactForm component in your page.tsx file:
import ContactForm from "./components/contactForm.tsx";

function Home() {
  return (
    <div>
      <h2>Contact Form</h2>
      <ContactForm />
    </div>
  );
}
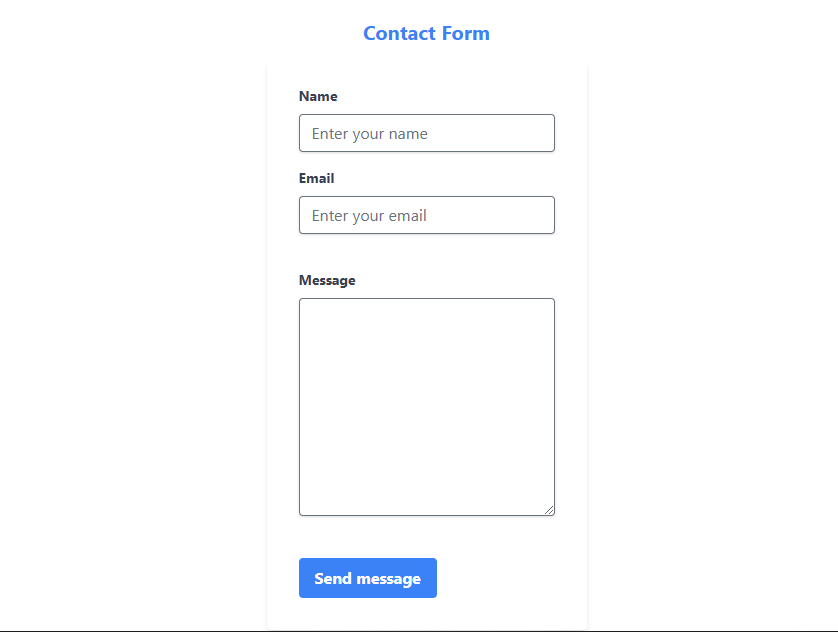
You should have something like this:
Next, we are going to validate our form data using zod.
How to Create the Server Actions and Validate the Form Data with zod
In this section, we are going to create our server action and validate our form entries with zod.
In the app folder, create another folder, api.
Inside the api folder, create a file called action.ts and paste in the following code:
"use server";

import { z } from "zod";

const contactFormSchema = z.object({
  name: z.string().trim().min(1, { message: "Name field is required" }),
  email: z.string().email({ message: "Invalid email address" }),
  message: z.string().trim().min(1, { message: "Please type in a message" }),
});

export async function sendEmail(prevState: any, formData: FormData) {
  const contactFormData = Object.fromEntries(formData);
  const validatedContactFormData = contactFormSchema.safeParse(contactFormData);


  if (!validatedContactFormData.success) {
    const formFieldErrors =
      validatedContactFormData.error.flatten().fieldErrors;

    return {
      errors: {
        name: formFieldErrors?.name,
        email: formFieldErrors?.email,
        message: formFieldErrors?.message,
      },
    };
  }

  return {
    success: "Your message was sent successfully!",
  };
}
In the code above, we defined a contactFormSchema for validating our form entries.
The sendEmail function (which is our server action) accepts two arguments:
prevStatewhich will be used in to display our error and success messages, andformDatawhich is the entries from our form
FormData makes it possible for our function to have access to the form fields without using useState and it relies on the name attribute.
We are using Object.fromEntries() to convert the raw formData into a regular JavaScript object and we’re storing it in the contactFormData variable.
Next, we are validating the contactFormData using the safeParse() method of our zod schema, contactFormSchema.
As a good programming practice, we return early by checking if the validation fails. If the validation fails, we return an object with an error property, which is an object containing the error message of each form field.
formFieldsError is assigned the value of the error object from zod, which contains the error message of each form field.
If everything goes well, we simply return an object with a success property.
Note: this is where you send the message to your email using any email service provider of your choice. For the sake of the article, we are simply returning an object.
In the next section, we are going to integrate the server action in our contact form.
How to Integrate the Server Action into Our Contact Form
In this section, we are going to integrate the server action into our contact form.
Navigate to the contactForm.tsx file and replace the content with the following code:
"use client";

import { useFormState, useFormStatus } from "react-dom";
import { sendEmail } from "../api/action";

const initialState = {
  success: "",
  errors: {
    name: "",
    email: "",
    message: "",
  }
};

function ContactForm() {
  const [state, formAction] = useFormState(sendEmail, initialState);

  return (
    <div>
      <div className="py-6">
        <form action={formAction}>
          <div className="mb-4">
            <label htmlFor="name">Your name</label>
            <br />
            <input
              type="text"
              name="name"
              id="name"
              // required
              className="border w-full md:w-3/4 py-2 pl-2 rounded-lg rounded-l-lg block md:inline focus:outline-slate-500 border-gray-500"
              placeholder="Enter your name..."
            />
            {state.errors?.name && (
              <p className="text-red-500">{state.errors.name}</p>
            )}
          </div>
          <div className="mb-4">
            <label htmlFor="email">Your email</label>
            <br />
            <input
              type="email"
              name="email"
              id="email"
              // required
              className="border w-full md:w-3/4 py-2 pl-2 rounded-lg rounded-l-lg block md:inline focus:outline-slate-500 border-gray-500"
              placeholder="Enter your email..."
            />
            {state.errors?.email && (
              <p className="text-red-500">{state.errors.email}</p>
            )}
          </div>
          <div>
            <label htmlFor="message">Message</label>
            <br />
            <textarea
              name="message"
              id="message"
              // required
              cols={100}
              rows={10}
              className="border w-full md:w-3/4 py-3 pl-2 rounded-lg focus:outline-slate-500 border-gray-500"
              placeholder="Enter your message..."
            ></textarea>
            {state.errors?.message && (
              <p className="text-red-500">{state.errors.message}</p>
            )}
          </div>
          <SubmitButton />
        </form>
      </div>
      {state?.success && <p className="text-green-600">{state.success}</p>}
    </div>
  );
}

export default ContactForm;

function SubmitButton() {
  const { pending } = useFormStatus();

  return (
    <button
      type="submit"
      disabled={pending ? true : false}
      className="bg-green-600 text-white font-semibold px-3 py-2 rounded-lg"
    >
      {pending ? (
        <span>
          Submitting <RiLoader5Fill className="animate-spin" />
        </span>
      ) : (
        "Submit"
      )}
    </button>
  );
}
In the updated code above, we imported two hooks: useFormState and useFormStatus from “react-dom” and sendEmail from “api/action.ts”.
Next, we created a initialState variable to hold our initial state. This will be used in the useFormState hook.
initialState is an object with:
a
successproperty for the success message of our server action, andan
errorsobject, which is equal to theerrorsobject we return in our server action if the validation fails.
Inside our ContactForm component, we are using the useFormState hook. This hook accepts two arguments: a server action and an initial state and returns an array with two values: current state and formAction.
formAction will be passed into the action prop of the form element. This will handle the submission of our form, which incorporates the zod validation.
Below each form field, we conditionally render the error message of each of the form field respectively.
Below the form element, we render the success message if the form was successfully submitted.
The submit button is put into a different component, SubmitButton so we can make use of the useFormStatus hook.
The useFormStatus hook returns an object with a pending property, which we can use to disable the submit button when the form is submitted.
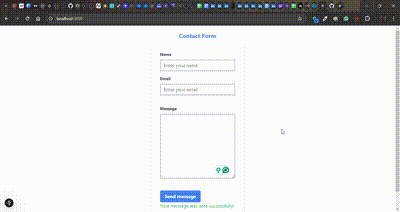
Assuming everything went correctly, you should have a working contact form like this:

Congratulations! You have just created a contact form using server actions and the zod validation library.
Conclusion
In this article, you learned what server actions are and how to use the zod library. You also used server actions and zod to build a contact form.
Server actions are not limited to form submission and can also be used for fetching data from external APIs and databases.
You can learn more with these resources:
Here’s the GitHub repository of the complete project.
Source: freeCodeCamp Programming Tutorials: Python, JavaScript, Git & MoreÂ

