


Fine-tuning foundation models (FMs) is a process that involves exposing a pre-trained FM to task-specific data and fine-tuning its parameters. It can then develop a deeper understanding and produce more accurate and relevant outputs for that particular domain.
In this post, we show how to use an Amazon SageMaker Autopilot training job with the AutoMLV2 SDK to fine-tune a Meta Llama2-7B model on question answering tasks. Specifically, we train the model on multiple-choice science exam questions covering physics, chemistry, and biology. This fine-tuning approach can be extended to other tasks, such as summarization or text generation, in domains like healthcare, education, or financial services.
AutoMLV2 supports the instruction-based fine-tuning of a selection of general-purpose FMs powered by Amazon SageMaker JumpStart. We use Amazon SageMaker Pipelines, which helps automate the different steps, including data preparation, fine-tuning, and creating the model. We use the open source library fmeval to evaluate the model and register it in the Amazon SageMaker Model Registry based on its performance.
Solution overview
The following architecture diagram shows the various steps involved to create an automated and scalable process to fine-tune large language models (LLMs) using AutoMLV2. The AutoMLV2 SDK simplifies the process of creating and managing AutoML jobs by providing high-level functions and abstractions, making it straightforward for developers who may not be familiar with AutoML concepts. The CreateAutoMLJobV2 API offers a low-level interface that allows for more control and customization. Using the SDK offers benefits like faster prototyping, better usability, and pre-built functions, and the API is better for advanced customizations.
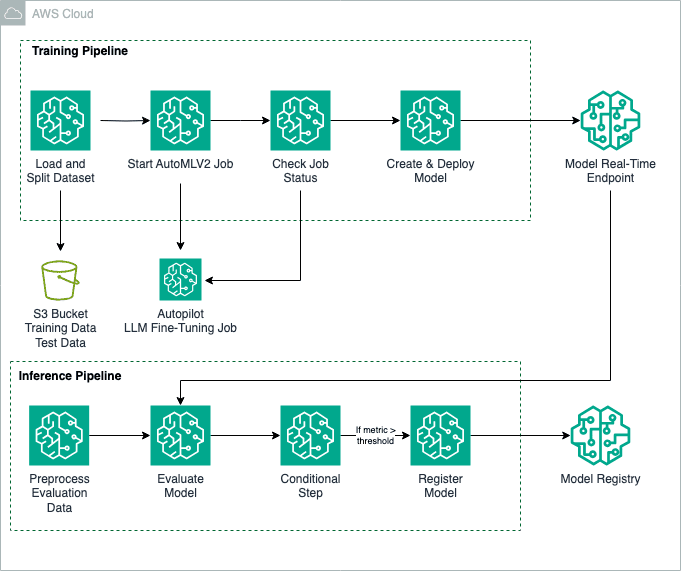
To implement the solution, we use SageMaker Pipelines in Amazon SageMaker Studio to orchestrate the different steps. The solution consists of two pipelines: training and inference.
To create the training pipeline, you complete the following steps:
Load and prepare the dataset.
- Create a SageMaker Autopilot CreateAutoMLJobV2 training job.
- Check the training job status.
- Deploy the best candidate model.
The following steps configure the inference pipeline:
Preprocess data for evaluation.
- Evaluate the model using the fmeval library.
- Register the model if it meets the required performance.
To deploy the solution, refer to the GitHub repo, which provides step-by-step instructions for fine-tuning Meta Llama2-7B using SageMaker Autopilot and SageMaker Pipelines.
Prerequisites
For this walkthrough, complete the following prerequisite steps:
- Set up an AWS account.
- Create a SageMaker Studio environment.
- Create two AWS Identity and Access Management (IAM) roles:
LambdaExecutionRoleandSageMakerExecutionRole, with permissions as outlined in the SageMaker notebook. The managed policies should be scoped down further for improved security. For instructions, refer to Create a role to delegate permissions to an IAM user. - On the SageMaker Studio console, upload the code from the GitHub repo.
- Open the SageMaker notebook ipynb and run the cells.
Training pipeline
The following training pipeline shows a streamlined way to automate the fine-tuning of a pre-trained LLM and the deployment of the model to a real-time endpoint inference.
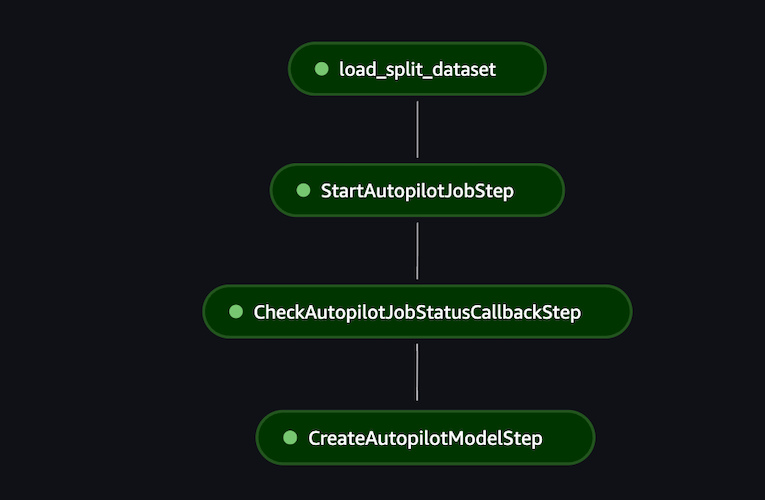
Prepare the data
For this project, we used the SciQ dataset, which contains science exam questions about physics, chemistry, biology, and other subjects. SageMaker Autopilot supports instruction-based fine-tuning datasets formatted as CSV files (default) or as Parquet files.
When you prepare your CSV file, make sure that it contains exactly two columns:
- The input column must be in a string format and contains the prompt
- The output column is in a string format and indicates the ground truth answer
In this project, we start by removing the irrelevant columns. Next, we combine the question and support columns to create a comprehensive prompt, which is then placed in the input column. SageMaker Autopilot sets a maximum limit on the number of rows in the dataset and the context length based on the type of model being used. We select 10,000 rows from the dataset.
Finally, we divide the data into training and validation sets:
Create an CreateAutoMLJobV2 training job
AutoMLV2 makes it straightforward to train, optimize, and deploy machine learning (ML) models by automating the tasks involved in the ML development lifecycle. It provides a simple approach to create highly accurate models tailored to your specific problem type, whether it’s classification, regression, forecasting, or others. In this section, we go through the steps to train a model with AutoMLV2, using an LLM fine-tuning job as an example. For this project, we used the Meta Llama2-7B model. You can change the model by choosing from the supported LLMs for fine-tuning.
Define the text generation configuration
AutoMLV2 automates the entire ML process, from data preprocessing to model training and deployment. However, for AutoMLV2 to work effectively, it’s crucial to provide the right problem configuration. This configuration acts as a guide, helping SageMaker Autopilot understand the nature of your problem and select the most appropriate algorithm or approach. By specifying details such as the problem type (such as classification, regression, forecasting, or fine-tuning), you give AutoMLV2 the necessary information to tailor its solution to your specific requirements.
For a fine-tuning job, the configuration consists of determining the model to be used and its access configuration, in addition to the hyperparameters that optimize the model learning process. See the following code:
The definitions of each parameter used in text_generation_config are:
- base_model_name – The name of the base model to fine-tune. SageMaker Autopilot supports fine-tuning a variety of LLMs. If no value is provided, the default model used is Falcon7BInstruct.
- accept_eula – The access configuration file to control access to the ML model. The value is set to True to accept the model end-user license agreement (EULA). This setting is necessary for models like Meta Llama2-7B, which require accepting the license terms before they can be used.
epochCount – The number of times the model goes through the entire training dataset. Its value should be a string containing an integer value within the range of 1–10. One epoch means the Meta Llama2-7B model has been exposed to the 10,000 samples and had a chance to learn from them. You can set it to 3, meaning the model will make three complete passes, or increase the number, if the model doesn’t converge with just three epochs.
learningRate – The step size at which a model’s parameters are updated during training. Its value should be a string containing a floating-point value within the range of 0–1. A learning rate of 0,00001 or 0,00002 is a good standard when fine-tuning LLMs like Meta Llama2-7B.
batchSize – The number of data samples used in each iteration of training. Its value should be a string containing an integer value within the range of 1–64. Start with 1 in order to not receive an out-of-memory error.
learningRateWarmupSteps – The number of training steps during which the learning rate gradually increases before reaching its target or maximum value. Its value should be a string containing an integer value within the range of 0–250. Start with 1.
The configuration settings can be adjusted to align with your specific requirements and the chosen FM.
Start the AutoMLV2 job
Next, set up the AutoMLV2 job by providing the problem configuration details, the AWS role with the necessary permissions, a base name for job identification, and the output path where the model artifacts will be saved. To initiate the training process in a pipeline step, we invoked the create_auto_ml_job_v2 method. In the following code snippet, the create_auto_ml_job_v2 method is called to create an AutoML job object with specific inputs. The AutoMLJobInputDataConfig parameter takes a list that includes an AutoMLDataChannel, which specifies the type of data (in this case, ‘S3Prefix’) and the location of the training dataset (given by train_dataset_s3_path.default_value) in an S3 bucket. The channel_type is set to ‘training’, indicating that this dataset is used for training the model.
Check SageMaker Autopilot job status
This step tracks the status of the Autopilot training job. In the script check_autopilot_job_status.py, we repeatedly check the status of the training job until it’s complete.
The callback step sends a token in an Amazon Simple Queue Service (Amazon SQS) queue, which invokes the AWS Lambda function to check the training job status. If the job is complete, the Lambda function sends a success message back to the callback step and the pipeline continues with the next step.
Deploy a model with AutoMLV2 using real-time inference
AutoMLV2 simplifies the deployment of models by automating the entire process, from model training to deployment. It takes care of the heavy lifting involved in selecting the best-performing model and preparing it for production use.
Furthermore, AutoMLV2 simplifies the deployment process. It can directly create a SageMaker model from the best candidate model and deploy it to a SageMaker endpoint with just a few lines of code.
In this section, we look at the code that deploys the best-performing model to a real-time SageMaker endpoint.
This pipeline step uses a Lambda step, which runs a serverless Lambda function. We use a Lambda step because the API call to create and deploy the SageMaker model is lightweight.
The first stage after the completion of the AutoMLV2 training process is to select the best candidate, making sure that the most accurate and efficient solution is chosen for deployment. We use the method describe_auto_ml_job_v2 to retrieve detailed information about a specific AutoMLV2 job. This method provides insights into the current status, configuration, and output of your AutoMLV2 job, allowing you to monitor its progress and access relevant information. See the following code:
In SageMaker Autopilot, the best candidate model is selected based on minimizing cross-entropy loss, a default metric that measures the dissimilarity between predicted and actual word distributions during fine-tuning. Additionally, the model’s quality is evaluated using metrics like ROUGE scores (ROUGE-1, ROUGE-2, ROUGE-L, and ROUGE-L-Sum), which measure the similarity between machine-generated text and human-written reference text, along with perplexity, which assesses how well the model predicts the next word in a sequence. The model with the lowest cross-entropy and perplexity, combined with strong ROUGE scores, is considered the best candidate.
With the best candidate model identified, you can create a SageMaker model object, encapsulating the trained model artifacts and necessary dependencies. For that, we use the method create_model for the AutoML job object:
Next, we create a SageMaker endpoint configuration and deploy a SageMaker endpoint for real-time inference using the best candidate model. We use the instance type ml.g5.12xlarge to deploy the model. You may need to increase your quota to use this instance.
Inference pipeline
The inference pipeline is used for batch inference. It demonstrates a way to deploy and evaluate an FM and register it in SageMaker Model Registry. The following diagram shows the workflow starting with a preprocess data step, through model inference, to post-inference evaluation and conditional model registration.

Preprocess data for evaluation
The first crucial step in evaluating the performance of the fine-tuned LLM is to preprocess the data for evaluation. This preprocessing stage involves transforming the data into a format suitable for the evaluation process and verifying the compatibility with the chosen evaluation library.
In this particular case, we use a pipeline step to prepare the data for evaluation. The preprocessing script (preprocess_evaluation.py) creates a .jsonl (JSON Lines) file, which serves as the test dataset for the evaluation phase. The JSON Lines format is a convenient way to store structured data, where each line represents a single JSON object.
This test dataset is crucial for obtaining an unbiased evaluation of the model’s generalization capabilities and its ability to handle new, previously unseen inputs. After the evaluation_dataset.jsonl file is created, it’s saved in the appropriate path in an Amazon Simple Storage Service (Amazon S3) bucket.
Evaluate the model using the fmeval library
SageMaker Autopilot streamlines the entire ML workflow, automating steps from data preprocessing to model evaluation. After training multiple models, SageMaker Autopilot automatically ranks them based on selected performance metrics, such as cross-entropy loss for text generation tasks, and identifies the best-performing model.
However, when deeper, more granular insights are required, particularly during post-training evaluation with a testing dataset, we use fmeval, an open source library tailored for fine-tuning and evaluating FMs. Fmeval provides enhanced flexibility and control, allowing for a comprehensive assessment of model performance using custom metrics tailored to the specific use case. This makes sure the model behaves as expected in real-world applications. Fmeval facilitates the evaluation of LLMs across a broad range of tasks, including open-ended text generation, summarization, question answering, and classification. Additionally, fmeval assesses models on metrics such as accuracy, toxicity, semantic robustness, and prompt stereotyping, helping identify the optimal model for diverse use cases while maintaining ethical and robust performance.
To start using the library, follow these steps:
- Create a
ModelRunnerthat can perform invocation on your LLM.ModelRunnerencapsulates the logic for invoking different types of LLMs, exposing a predict method to simplify interactions with LLMs within the eval algorithm code. For this project, we use SageMakerModelRunner from fmeval. - In the file py used by our pipeline, create a DataConfig object to use the
evaluation_datasetcreated in the previous step. - Next, use an evaluation algorithm with the custom dataset. For this project, we use the
QAAccuracyalgorithm, which measures how well the model performs in question answering tasks. The model is queried for a range of facts, and we evaluate the accuracy of its response by comparing the model’s output to target answers under different metrics:- Exact match (EM) – Binary score. 1 if model output and target answer match exactly.
- Quasi-exact match – Binary score. Similar to exact match, but both model output and target answer are normalized first by removing articles and punctuation.
- Precision over words – The fraction of words in the prediction that are also found in the target answer. The text is normalized as before.
- Recall over words – The fraction of words in the target answer that are also found in the prediction.
- F1 over words – The harmonic mean of precision and recall over words (normalized).
As an output, the evaluation step produces a file (evaluation_metrics.json) that contains the computed metrics. This file is stored in Amazon S3 and is registered as a property file for later access in the pipeline.
Register the model
Before registering the fine-tuned model, we introduce a quality control step by implementing a condition based on the evaluation metrics obtained from the previous step. Specifically, we focus on the F1 score metric, which measures the harmonic mean of precision and recall between the normalized response and reference.
To make sure that only high-performing models are registered and deployed, we set a predetermined threshold for the F1 score metric. If the model’s performance meets or exceeds this threshold, it is suitable for registration and deployment. However, if the model fails to meet the specified threshold, the pipeline concludes without registering the model, stopping the deployment of suboptimal models.
Create and run the pipeline
After we define the pipeline steps, we combine them into a SageMaker pipeline. The steps are run sequentially. The pipeline runs the steps for an AutoML job, using SageMaker Autopilot for training, model evaluation, and model registration. See the following code:
Clean up
To avoid unnecessary charges and maintain a clean environment after running the demos outlined in this post, it’s important to delete all deployed resources. Follow these steps to properly clean up:
- To delete deployed endpoints, use the SageMaker console or the AWS SDK. This step is essential because endpoints can accrue significant charges if left running.
- Delete both SageMaker pipelines created during this walkthrough. This will help prevent residual executions that might generate additional costs.
- Remove all artifacts stored in your S3 buckets that were used for training, storing model artifacts, or logging. Make sure you delete only the resources related to this project to help avoid data loss.
- Clean up any additional resources. Depending on your implementation and any additional configurations, there may be other resources to consider, such as IAM roles, Amazon CloudWatch logs, or other AWS services. Identify and delete any resources that are no longer needed.
Conclusion
In this post, we explored how AutoMLV2 streamlines the process of fine-tuning FMs by automating the heavy lifting involved in model development. We demonstrated an end-to-end solution that uses SageMaker Pipelines to orchestrate the steps of data preparation, model training, evaluation, and deployment. The fmeval library played a crucial role in assessing the fine-tuned LLM’s performance, enabling us to select the best-performing model based on relevant metrics. By seamlessly integrating with the SageMaker infrastructure, AutoMLV2 simplified the deployment process, allowing us to create a SageMaker endpoint for real-time inference with just a few lines of code.
Get started by accessing the code on the GitHub repo to train and deploy your own custom AutoML models.
For more information on SageMaker Pipelines and SageMaker Autopilot, refer to Amazon SageMaker Pipelines and SageMaker Autopilot, respectively.
About the Author
 Hajer Mkacher is a Solutions Architect at AWS, specializing in the Healthcare and Life Sciences industries. With over a decade in software engineering, she leverages generative AI to create innovative solutions, acting as a trusted advisor to her customers. In her free time, Hajer enjoys painting or working on creative robotics projects with her family.
Source: Read MoreÂ
