We all come across memes almost every day on the internet. Whether you’re scrolling through social media or chatting with friends, there’s a good chance you’ll stumble on a meme, or even share one yourself. A meme can be an image, a video, or gif that is meant to be funny or convey a message in a lighthearted way.
Memes are fun and we all love them. What if I told you that you can create yours from scratch? Well, that is what I’ll be showing you in this article using HTML Canvas. No need for fancy software – just a little code and some creativity to make your own custom memes.
If you are excited about this, let’s jump straight into it!
What You’ll Need
To follow along with this tutorial, you will need:
-
Basic knowledge of HTML, CSS and JavaScript.
-
A text Editor (like Visual Studio Code or Sublime Text).
-
A modern web browser.
Step One: Set Up your Project
Create a folder and create these three files in the folder:
-
Index.html -
Style.css -
Script.js
Step Two: HTML Structure
First, let’s create the basic structure of the HTML file. Our structure would include a file upload button for images, a text input for adding captions (both at the top and bottom), buttons to generate and download the meme and a canvas for displaying the image and caption(s).
<!DOCTYPE html>
<html lang="en">
<head>
  <meta charset="UTF-8">
  <meta name="viewport" content="width=device-width, initial-scale=1.0">
  <title>Meme Generator</title>
  <link rel="stylesheet" href="style.css">
</head>
<body>
  <h1>Meme Generator</h1>
  <input type="file" id="imageInput" accept="image/*">
  <div class="controls">
    <input type="text" id="topText" placeholder="Enter Top Text">
    <input type="text" id="bottomText" placeholder="Enter Bottom Text">
    <button id="generate" onclick="generateMeme()">Generate Meme</button>
    <button id="download" onclick="downloadMeme()">Download Meme</button>
  </div>
  <canvas id="memeCanvas" width="580" height="450"></canvas>

  <script src="script.js"></script>
</body>
</html>
Step Three: Styling with CSS
Next, we apply styling to the HTML elements we just created to make it more appealing and user-friendly. Here, we just apply basic CSS to center the content and add colors to both the background and buttons.
body {
    display: flex;
    flex-direction: column;
    align-items: center;
    font-family: Arial, sans-serif;
    background-color: rgb(121, 121, 170);
    color: white;
}
canvas {
    border: 2px solid #333;
    margin-top: 10px;
}
.controls {
    margin-top: 10px;
}
.controls input, .controls button {
    margin: 5px;
}
#generate{
    background-color: green;
    color: white;
    font-weight: bold;
    padding: 6px;
    border-radius: 3px;
    border: none;
    cursor: pointer;
}
#download{
    background-color: blue;
    color: white;
    font-weight: bold;
    padding: 6px;
    border-radius: 3px;
    border: none;
    cursor: pointer;
}
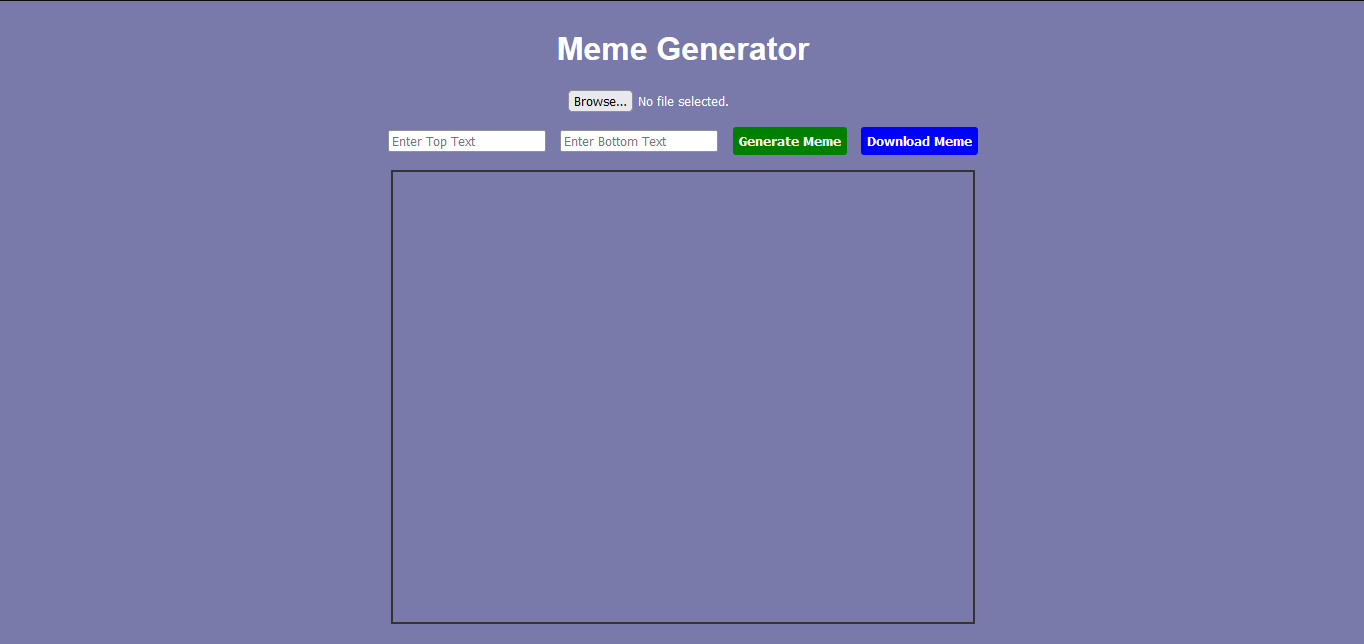
Here’s how our webpage looks in the browser after applying the styling:

Step Four: Add JavaScript to Handle Logic
Now, let’s code the functionalities of our app using JavaScript.
Initialization
First, we need to initialize some important elements that would enable us render our image on the canvas.
const canvas = document.getElementById('memeCanvas');
const ctx = canvas.getContext('2d');
const imageInput = document.getElementById('imageInput');
let uploadedImage = null;
In this code:
-
canvas: Refers to the HTML<canvas>element with the ID ofmemeCanvas. This is where the meme image and text will be drawn. -
ctx: While using canvas, there are methods that can be applied that enables for drawing shapes, images and texts on the canvas. We specified a Context-Type of 2d, making the canvas render in 2D context. -
imageInput: Refers to an<input>element of typefile(with the ID ofimageInput) that allows you upload an image. -
uploadedImage: A variable to store the uploaded images so it can be drawn on the canvas.
How to Upload Images
Next, we want to be able to choose a particular file, read it and draw the selected image file on the canvas.
Our meme generator will accept only files with a type of image.
imageInput.addEventListener('change', (event) => {
  const file = event.target.files[0];
  const reader = new FileReader();

  reader.onload = (e) => {
    const img = new Image();
    img.src = e.target.result;
    img.onload = () => {
      uploadedImage = img;
      drawImage();
    };
  };

  reader.readAsDataURL(file);
});
In this code:
-
imageInput.addEventListener('change'): Adds and listens for achangeevent to the file input field that triggers when the user selects a file. -
event.target.files[0]: Accesses the first file the user selects. -
FileReader: Reads file data and allows it to be accessed as a URL. -
reader.onload: This function is triggered after the file is read. It does the following:-
Creates a new
Imageobject. -
Sets the image’s
srcproperty to the file’s data URL. -
Waits for the image to load and then:
-
Stores the image in the
uploadedImagevariable. -
Calls
drawImage()to draw the image on the canvas.
-
-
How to Draw the Image and Text Caption
Here, we’ll be drawing the image, fixing the captions inputted by the user on top of the image (overlay), and styling and positioning the text captions.
function drawImage() {
  if (uploadedImage) {
    // Clear canvas and set canvas dimensions to fit the image
    ctx.clearRect(0, 0, canvas.width, canvas.height);
    ctx.drawImage(uploadedImage, 0, 0, canvas.width, canvas.height);

    // Get text values
    const topText = document.getElementById('topText').value;
    const bottomText = document.getElementById('bottomText').value;

    // Set text styles
    ctx.font = '30px Impact';
    ctx.fillStyle = 'white';
    ctx.strokeStyle = 'black';
    ctx.lineWidth = 2;
    ctx.textAlign = 'center';

    // Draw top text
    ctx.fillText(topText, canvas.width / 2, 50);
    ctx.strokeText(topText, canvas.width / 2, 50);

    // Draw bottom text
    ctx.fillText(bottomText, canvas.width / 2, canvas.height - 20);
    ctx.strokeText(bottomText, canvas.width / 2, canvas.height - 20);
  }
}
In this code:
-
ctx.clearRect(0, 0, canvas.width, canvas.height): Clears the canvas so it can be redrawn. -
ctx.drawImage(): Draws the uploaded image on the canvas and stretches it to fit the set dimensions. -
topTextandbottomText: Captures the user’s input from two text fields –<input id="topText">and<input id="bottomText">.
Text styling:
-
ctx.font: Sets the font style. -
ctx.fillStyle: Sets the fill color for the text. -
ctx.strokeStyle: Sets the outline color for the text. -
ctx.lineWidth: Sets the thickness of the outline. -
ctx.textAlign: Ensures text is centered relative to the X-coordinate. -
ctx.fillText()andctx.strokeText():-
Draws the text at specified positions.
-
canvas.width / 2ensures text is horizontally centered. -
50andcanvas.height - 20define vertical positions for the top and bottom text.
-
You can customize the text styling to your liking.
How to Generate the Meme
Next, we’ll trigger the function that generates the meme by drawing user-provided text on the image.
function generateMeme() {
  drawImage();
}
The code above calls the drawImage function to ensure that the canvas is updated with the image and user-entered text.
How to Download the Meme
Finally, we want to be able to download our meme as an image into our device. Here is how we can achieve that:
function downloadMeme() {
  const link = document.createElement('a');
  link.download = 'meme.png';
  link.href = canvas.toDataURL();
  link.click();
}
In this code:
-
document.createElement('a'): Creates a temporary<a>element. -
link.download= 'meme.png': Sets the file name for the downloaded meme (every meme you download will carry the name ofmeme.png– you can change it if you wish to). -
link.href = canvas.toDataURL(): Converts the canvas content into a Data URL. -
link.click(): Simulates a click on the link, triggering the download.
With this, we now have a fully functional meme generator.
Full JavaScript Code
const canvas = document.getElementById('memeCanvas');
const ctx = canvas.getContext('2d');
const imageInput = document.getElementById('imageInput');
let uploadedImage = null;

// Load the image onto the canvas
imageInput.addEventListener('change', (event) => {
  const file = event.target.files[0];
  const reader = new FileReader();

  reader.onload = (e) => {
    const img = new Image();
    img.src = e.target.result;
    img.onload = () => {
      uploadedImage = img;
      drawImage();
    };
  };

  reader.readAsDataURL(file);
});

// Draw image and text on canvas
function drawImage() {
  if (uploadedImage) {
    // Clear canvas and set canvas dimensions to fit the image
    ctx.clearRect(0, 0, canvas.width, canvas.height);
    ctx.drawImage(uploadedImage, 0, 0, canvas.width, canvas.height);

    // Get text values
    const topText = document.getElementById('topText').value;
    const bottomText = document.getElementById('bottomText').value;

    // Set text styles
    ctx.font = '30px Impact';
    ctx.fillStyle = 'white';
    ctx.strokeStyle = 'black';
    ctx.lineWidth = 2;
    ctx.textAlign = 'center';

    // Draw top text
    ctx.fillText(topText, canvas.width / 2, 50);
    ctx.strokeText(topText, canvas.width / 2, 50);

    // Draw bottom text
    ctx.fillText(bottomText, canvas.width / 2, canvas.height - 20);
    ctx.strokeText(bottomText, canvas.width / 2, canvas.height - 20);
  }
}

// Generate meme by drawing text on the uploaded image
function generateMeme() {
  drawImage();
}

// Download the meme as an image
function downloadMeme() {
  const link = document.createElement('a');
  link.download = 'meme.png';
  link.href = canvas.toDataURL();
  link.click();
}
Steps on Creating your Meme on Meme Generator
-
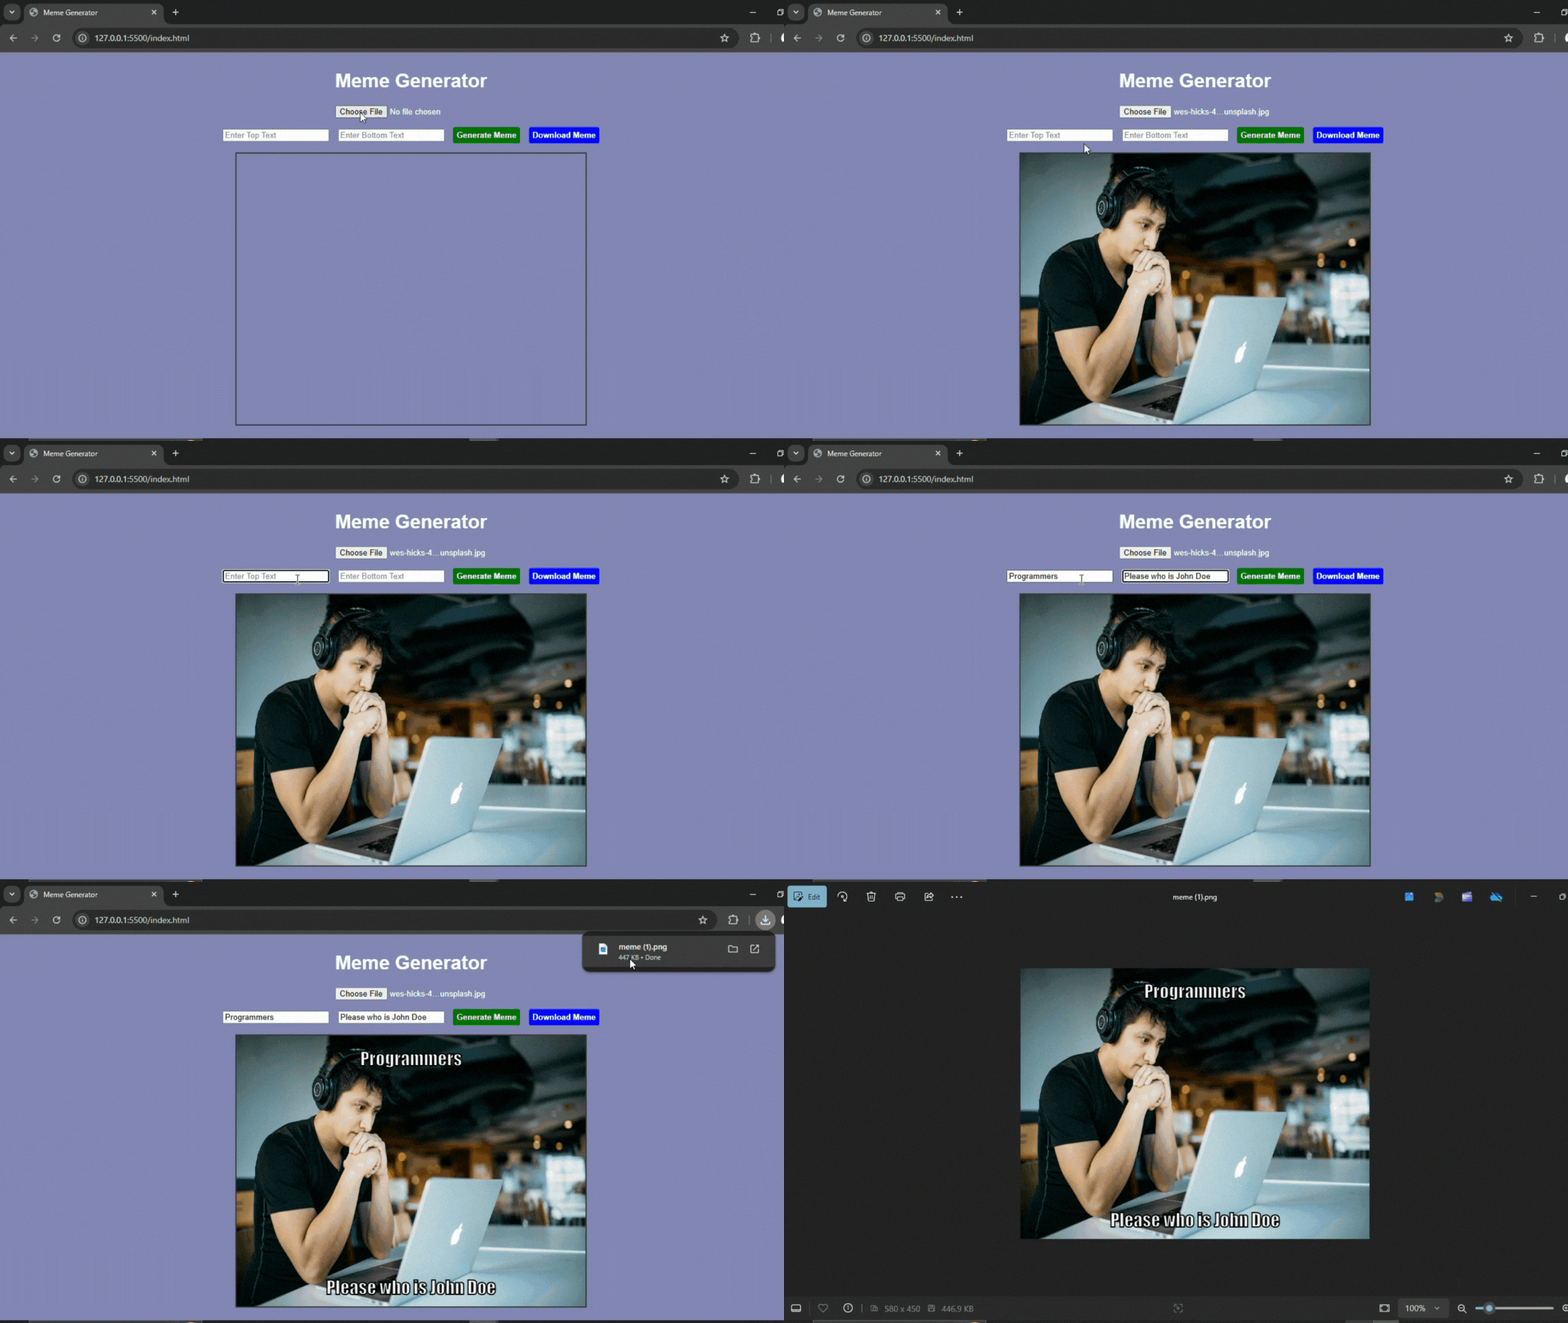
Click on the Browse button and select a particular image.
-
Enter text into either of the two input types – labelled Top and Bottom Text.
-
Click on Generate Meme button to create your meme.
-
Click on Download Meme to download your generated meme.
This is the meme generator in full action with the steps demonstrated:

Final Results
Here are two memes created by our meme generator.


Pretty cool right?
Now, you can try it out and create your own viral meme!
For more programming articles and posts, you can follow me on X or connect with me on LinkedIn.
See you in the next one!
Source: freeCodeCamp Programming Tutorials: Python, JavaScript, Git & MoreÂ


