In this article, I’ll guide you through an overview of what happens when you navigate to a website using your browser.
Whether you’re new to web development or have some experience, this post will help you gain a better understanding of how the web and its core technologies work.
Table of Contents
Before going into the details of every step included in the process, let’s review some of the basic concepts we’ll be covering.
The internet is a huge network of interconnected computers. The World Wide Web (aka web) is built on top of that technology, as well as other services such as email, chat systems or file sharing, and so on.
Computers connected to the internet are either:
Clients, the web user’s devices and the software that those devices use to access the web.
Servers, computers that store web pages, sites, or apps and the files they need to be displayed in the user’s web browser or devices.
Finding a Resource: URLs
Each resource stored in a server can be located by clients using its valid associated URL. The following is an example of a valid URL:

You may already know what a URL is, but let’s see in detail each one of its parts:
Scheme: The first part of an URL indicates the protocol that should be used to retrieve the resource. Websites use the HTTP and the HTTPS protocol, but we’ll see more details about this later. The
:after the scheme is what separates it from the next part of the URL.Authority: this part is composed by the domain name and the port number separated by a colon. The port is only mandatory when the standard ports of the HTTP protocol (80 for HTTP and 443 for HTTPS) are not being used by the web server. The
//before the domain name indicates the beginning of the authority.Path to resource: this is the abstract or physical path to the resource in the web server.
Parameters: a set of key/value pairs that add extra options to apply to the returning the requested resource. They are separated by a
&and each web server has its own way to handle parameters. This section starts with?.Anchor: This section, if present, starts by a
#and is handled by the browser to display a specific part of the returned document. For example, it can point to a specific section in a HTML document.
There are a few things that happen when you type a URL into your browser’s address bar that allow you to navigate to a site and interact with its content. Let’s see each one in detail.
Matching IPs and URLs: DNS Resolution
While, as humans, we prefer domain names composed of words, computers communicate with each other using IP addresses. IP addresses are composed by numbers and are harder to remember for our human minds. The Domain Name System (DNS) is what puts together domain names and IP addresses.
When you type a URL, the browser will first look into the local cache to see if the results for the DNS lookup are already stored. Then, it will equally check into the operating system cache.
If there are no results stored, then the browser will call the DNS Resolver to try to find the associated IP address for the domain name.
What is the DNS Resolver?
The resolver is typically defined by your internet provider’s DNS, even though that’s the default most people use, and it is possible to change it to Google’s or Cloudflare’s or anything else you want.
Again, the provider’s DNS might have the results for the domain name stored in its cache, if not, it will ask the Root DNS server.
What is the Root DNS Server?
The Root DNS server is a system that actually drives the entire internet. It is composed of thirteen servers distributed across the planet. It returns the query from the resolver with the relevant Top Level Domain server for the requested domain name.
At this moment, the DNS resolver will cache the IP of that Top Level Domain server so it doesn’t have to ask the Root DNS server again for it.
What is the Top Level Domain Server?
The Top Level Domain (TLD) server stores the IP addresses of the authoritative name servers for the domain that the user is looking for.
In the URL, www.exampleurl.com, the top-level domain is .com. There are different types, such as generic top-level domains like .com or .org, country code top-level domains, usually represented by the two letters ISO country code, and more.
The TLD returns the authoritative name servers for the requested domain. One more time, the DNS resolver will cache the results so it doesn’t have to come back later for them.
Authoritative Nameserver
This server contains the DNS records that maps domain names to IP addresses. There is more than one name server attached to any domain.
There is no caching involved at this point, because the authoritative nameserver is the highest authority and the latest piece in the DNS resolution chain.
If the IP address is available, the authoritative nameserver responds to the DNS resolver query with the domain name’s IP address. If not available it will respond with an error. Then, the DNS resolver stores the IP and sends it back to the client’s browser.
Once the DNS lookup is completed and the browser has the IP address, it can attempt to establish a connection with the server.
Establishing a Connection: TCP/IP Model
The connection between client and server is established using the Transmission Control Protocol (TCP) and the Internet Protocol (IP). These protocols are the main ones behind the World Wide Web and other internet technologies, such as email, and determine how data travels across the network.
The TCP/IP model is a framework used to organize the different protocols involved in the internet and other network communications. The primary responsibility of TCP/IP is to divide the data into packets and send them to their final destination, ensuring the packets can be put back together on the other end of the communication.
This process follows a four-layer model, where data travels in one direction and then in the reverse direction when it reaches the destination:
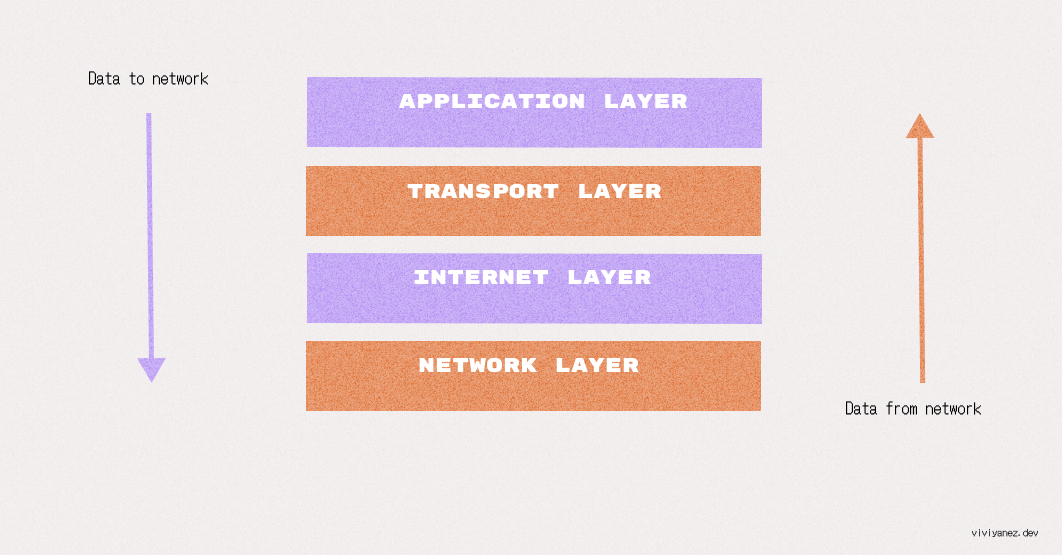
The transport layer that ensures applications can exchange data by establishing data channels. It is also the layer that establishes the concept of network ports, a system of numbered data channels allocated for the specific communication channels that applications need.
The TCP/IP model’s transport layer includes two protocols that are most commonly used on the internet: the TCP and the User Datagram Protocol (UDP).
TCP includes some capabilities that make it prevalent over most of the internet-based applications such as the web, so let’s focus on it.
How Does TCP Connection Work?
TCP allows data to be transferred reliably and in order to its destination. It is a connection-oriented protocol, that means that the sender and the receiver must agree on connection parameters before actually establishing the connection. This process is known as the handshake procedure.
TCP Three-way Handshake
The handshake is a way for the client and the server to establish a secure connection and ensure that both parties are synchronized and ready to start exchanging messages.
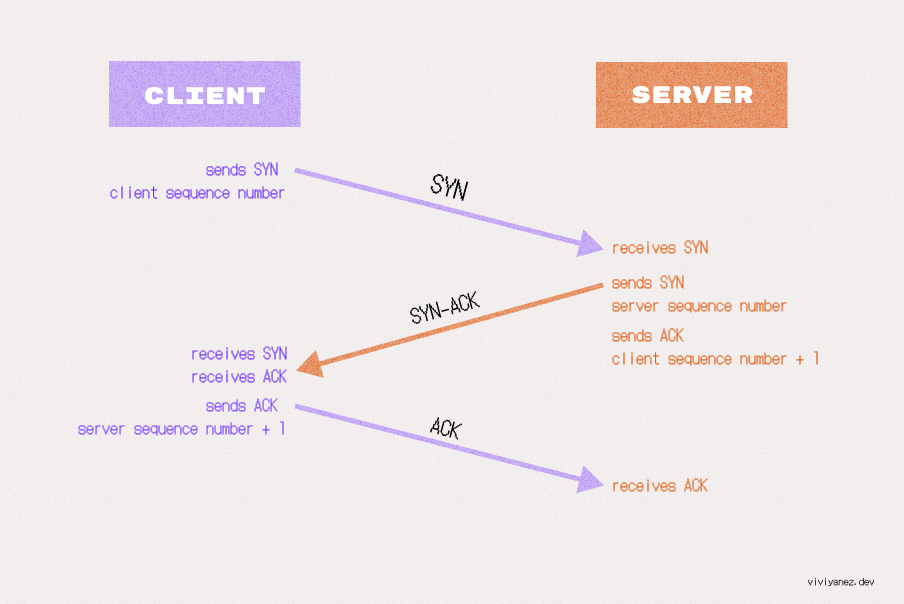
The three steps of the TCP handshake include:
The client informs the server that it wants to establish a connection by sending a SYN (synchronize) packet. This packet specifies a sequence number that subsequent segments will start with.
The server receives the SYN and responds with a SYN-ACK (synchronize-acknowledgment) segment. It includes the server’s sequence number and an acknowledgment of the client’s sequence number, incremented by one.
The client responds with an ACK message, acknowledging the server’s sequence number. At this point, the connection has been established.
Starting the Exchange: Client-Server Communication
Once the TCP connection is established, the client and server can start exchanging messages using the HTTP protocol.
What is the HTTP Protocol?
Hypertext Transfer Protocol (HTTP) is the most widely used application layer protocol in the TCP/IP suite, but it’s considered insecure, leading to a shift towards HTTPS, which uses TLS on top of TCP for data encryption. You see find more details about this later.
The browser will start by sending an HTTP request message to the server, asking for a copy of the site in the form of an HTML file. HTTP protocol can transfer files like HTML, CSS, JS, SVG, and so on.
HTTP Request/Response
There are two types of HTTP messages:
Requests, sent by the client to the server to trigger an action.
Responses, sent from the server to the client as an answer to the previous request.
Messages are plain text documents, structured in a precise way determined by the communication protocol, in this case, HTTP.
The three parts included in a HTTP request are:
Request line: Includes the request method, which is a verb defining the action to perform. In the case we are covering in this blogpost, the browser will make a GET request to fetch a page from the server. The request line will also include the resource location, in this case an URL, and the protocol version being used.
Request header: A set of key value pairs. Two of them are mandatory.
Hostindicates the domain name to target, andConnectionwhich is always set to close unless it must be kept open. The request header always ends with a blank line.Request body: Is an optional field that allows sending data over the server.
The server will reply to the request with an HTTP response. Responses include information about the request status and may include the requested resource or data.
HTTP responses are structured in the following parts:
Status line: Includes the used protocol version, a status code and a status text, with a human readable description of the status code.
Headers: A set of key-value pairs that can either be general headers, applying to the whole message; response headers, giving additional information about the server status; or representation headers, describing the format and encoding for the message data if present.
Body: Contains the requested data or resource. If no data or resource is expected by the client, the response usually won’t include a body.
When the request for a web page is approved by the server, the response will include a 200 OK message. Other existing HTTP response codes are:
404 Not Found
403 Forbidden
301 Moved Permanently
500 Internal Server Error
304 Not Modified
401 Unauthorized
The response will also contain a list of HTTP headers and the response body, including the corresponding HTML code for the requested page.
HTTPS
Hypertext Transfer Protocol Secure (HTTPS) is not a different protocol, but an extension of the HTTP. It is usually referred to as HTTP over Transport Layer Security (TLS). Let’s see what it exactly means.
HTTP is the protocol used for most communications between browsers and servers, but it lacks security. Any data sent over HTTP can potentially be visible to anyone on the network. This is especially risky when sensitive data is involved in the connection, such as login credentials, financial information, health information, and so on.
The main motivation behind HTTPS is to ensure data privacy, integrity, and identification. This means ensuring that data is only accessible to whom it is supposed to be and cannot be intercepted or modified by anyone in between. Also, that both sender and receiver can be identified as who they claim to be by a legitimate authority.
In HTTPS the communications are encrypted using the TLS protocol, which relies on asymmetric public key infrastructure. It combines two keys: one public and one private. The server shares its public key so the client can use it to encrypt messages that can only be decrypted by the server’s private key.
To establish an encrypted communication, the client and the server have to initiate another handshake. During the handshake, they agree on the TLS version to use and on how they will encrypt data and authenticate each other during the connection, a set of rules known as the cipher suite.
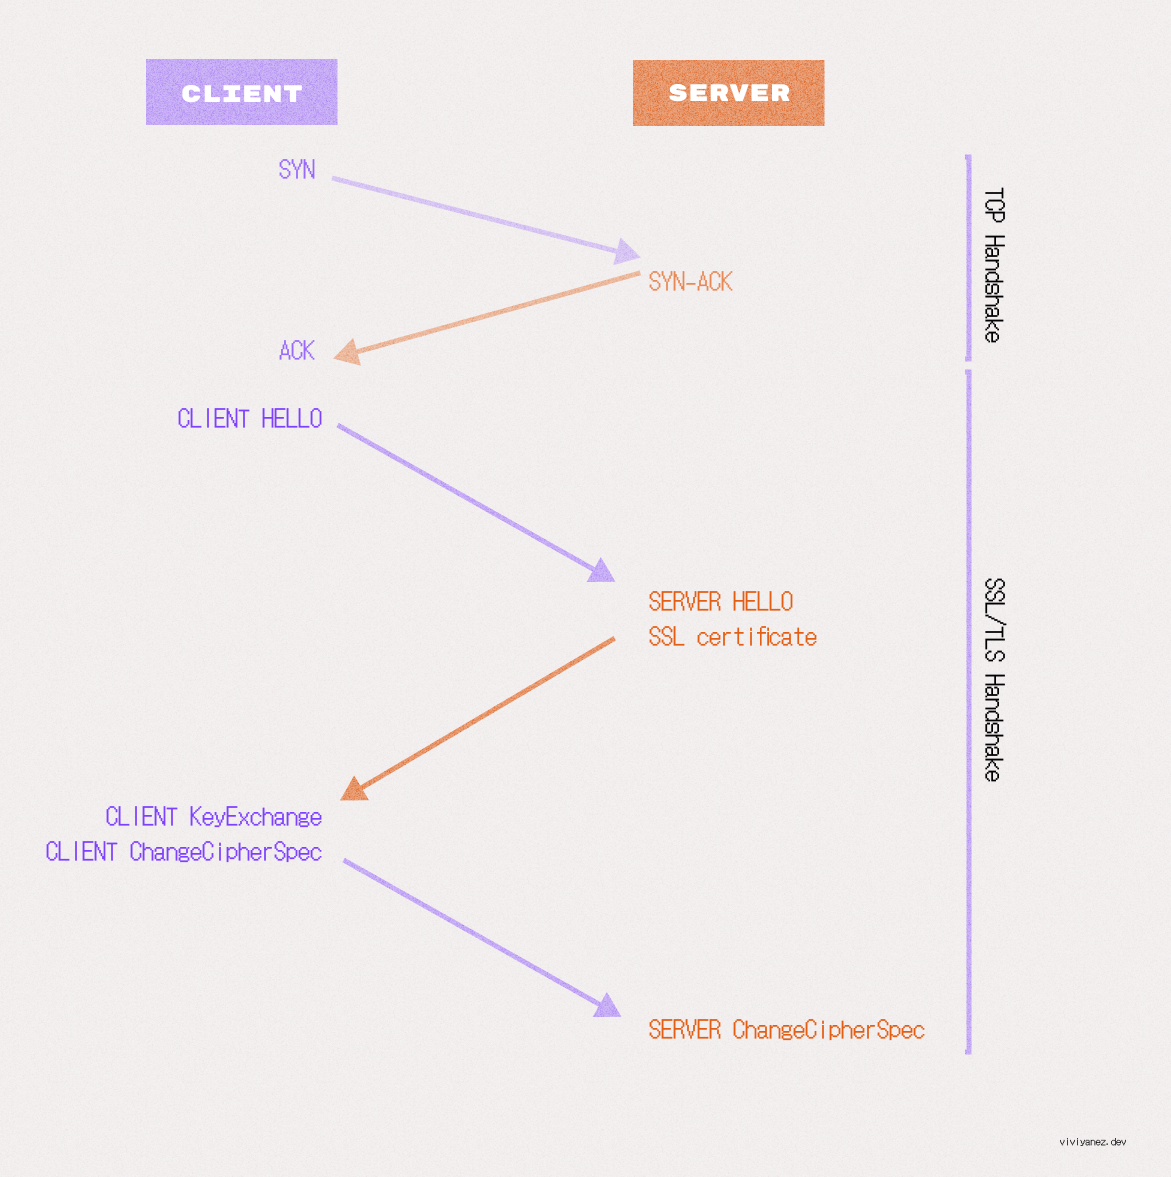
This handshake or TLS negotiation starts once a TCP connection has been established, and includes the following steps:
Client hello: The browser sends a hello message that includes all supported TLS versions and cipher suites.
Server Hello: The server responds with the chosen cipher suite and TLS version, along with its SSL certificate containing the server’s public key.
Authentication and Pre-Master Key: The client verifies the server’s SSL certificate with the corresponding trusted authority, then creates a pre-master key using the server’s public key (previously shared in the certificate) and shares this pre-master key with the server.
Pre-master key decryption: The pre-mastered key can only be decrypted using the server’s private key. If the server is able to decrypt it, the client and server can then agree on a shared master secret to use for the session.
Client ChangeCipherSpec: The client creates a session key using the shared master secret and sends the server all previously exchanged records, this time encrypted with the session key.
Server ChangeCipherSpec: If the server generates the correct session key, it will be able to decrypt the message and verify the received record. The server then sends a record to confirm that the client also has the correct keys.
Secured connection established: The handshake is complete.
Once the handshake is completed, all the communication between the client and server is protected by symmetric encryption using the session key, and the browser can make the first HTTP GET request for the site.
Time to First Byte
Once the browser’s request is approved, the server will send a 200 OK message along with the response headers and the contents requested. As it is a website, content is likely to be an HTML document.
Data travels between the client and server divided into a series of small data chunks, called data packets. This makes it easy to replace corrupted chunks of data if needed and also allows data to travel to and from different locations, enabling multiple users to access data faster and at the same time.
When the first request is made from the client, the first packet that arrives as response marks the Time to First Byte (TTFB), which represents the time elapsed since the request was initiated and when the first chunk of data was received as a response. It will include the time taken for the DNS lookup, the TCP handshake to establish the connection, and the TLS handshake if the request is made over HTTPS.
From Data to Pixels: The Critical Rendering Path
The Critical Rendering Path (CRP) is a series of steps that the browser performs to transform the data received back from the server into pixels on the screen. It includes creating the Document Object Model (DOM) and CSS Object Model (CSSOM), the render tree and layout.
Building the DOM tree
When the first chunk of data arrives, the browser starts parsing the HTML. Parsing means analyzing and converting a piece of input code into a syntax and representation that can be interpreted by a specific runtime. In this case, the browser assembles the data packets received and parses the HTML, building a representation of the document as a node tree known as the DOM tree.
Each HTML tag in the document is represented as a node in the DOM tree. Nodes are connected to the DOM tree according to their hierarchical position in the document, and each node’s representation includes all relevant information about the tag.
For the following HTML code:
<!DOCTYPE html>
<html lang="en">
<head>
    <meta charset="UTF-8">
    <meta name="viewport" content="width=device-width, initial-scale=1.0">
    <title>What Really Happens When You Navigate to a Website</title>
</head>
<body>
    <main>
        <header>
            <h1>What Really Happens When You Navigate to a Website</h1>
        </header>

        <section>
            <h2>Intro</h2>
            <p>
                Before entering into the details of every step included in the process, let's review some of the basic concepts we will be discussing throughout the blog.
            </p>
            <p>
                The Internet is a huge network of interconnected computers. The World Wide Web (aka web) is built on top of that technology, as well as other services such as email, chat systems, or file sharing.
            </p>

            <p>Computers connected to the internet are either:</p>
            <ul>
                <li>
                    <p>Clients, the web user's devices and the software that those devices use to access the web.</p>
                </li>
                <li>
                    <p>Servers, computers that store web pages, sites, or apps and the files they need to be displayed in the user's web browser or devices.</p>
                </li>
            </ul>
        </section>
    </main>

    <footer>
        <p>© 2024</p>
    </footer>
</body>
</html>
The resulting DOM tree looks like following:
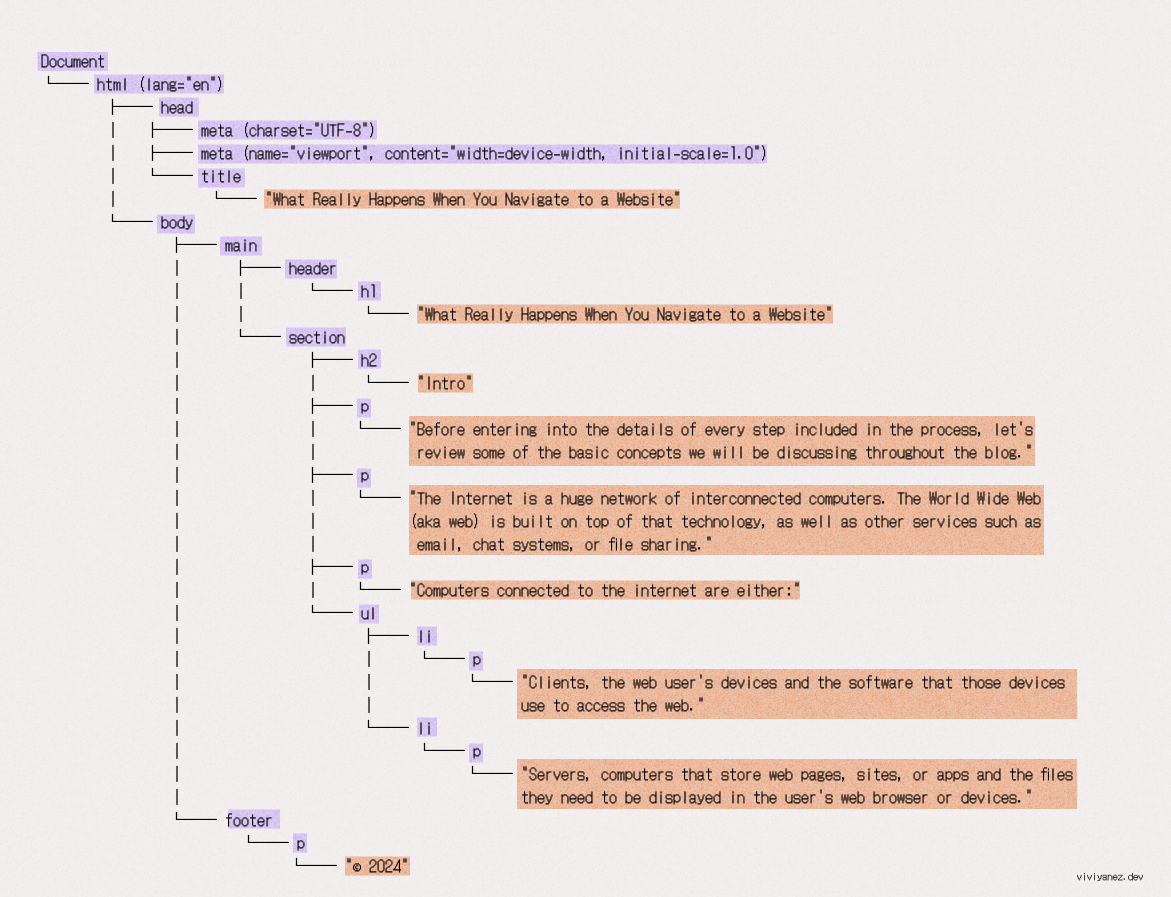
While parsing the HTML, the browser makes additional requests for encountered resources. CSS files and images are non-blocking resources, meaning the parser will continue its task while awaiting the requested resources. But if a <script> tag is found, the HTML parsing will pause impacting the time to first rendering.
Building the CSSOM Tree
While the DOM contains all the information about the content of the page and its hierarchy, the CSSOM contains the information on how to style the page.
In the CSSOM, each HTML element is matched with its corresponding CSS styles. The result is a tree that doesn’t contain information about the content of the elements, but about how they should be displayed.
Given the following CSS code:
* {
    box-sizing: border-box;
}

body {
    font-family: Arial, sans-serif;
    background-color: #f4f4f9;
    color: #333;
}

main {
    padding: 20px;
    max-width: 800px;
    margin: 0 auto;
}

header {
    background-color: #005bbb;
    color: #ffffff;
    padding: 10px;
    text-align: center;
}

h1 {
    font-size: 24px;
}

section {
    margin-top: 20px;
}

h2 {
    font-size: 20px;
    color: #005bbb;
    display: none;
}

p {
    margin-bottom: 10px;
}

ul {
    margin-left: 20px;
    list-style-type: disc;
}

footer {
    margin-top: 40px;
    text-align: center;
    font-size: 14px;
    color: #555;
}
When the browser processes it, the resulting CSSOM will look like this:
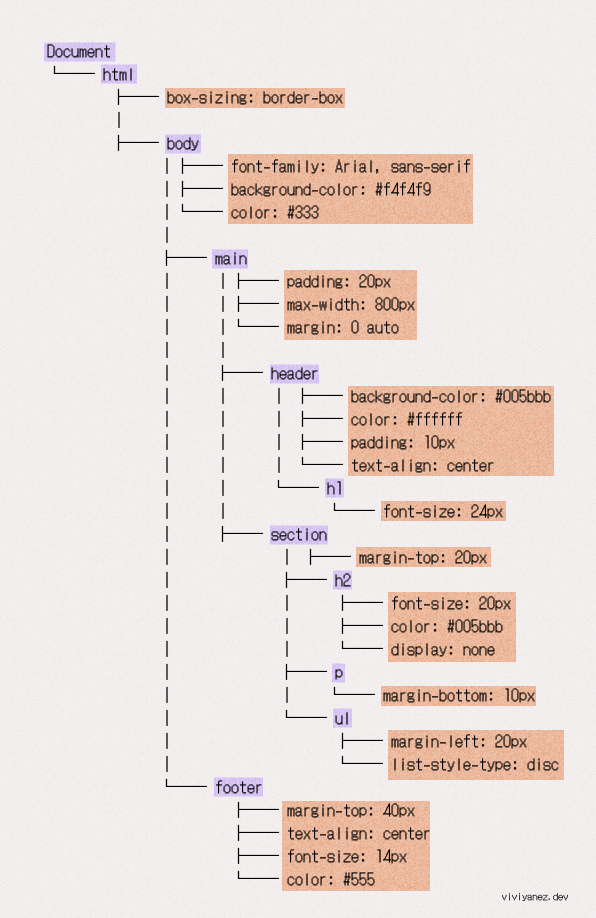
Its creation is not incremental, meaning that the browser stops rendering the page until it processes all the CSS.
This works this way because, as its name suggests, Cascading Style Sheets (CSS) apply styles from top to bottom, meaning that classes defined later override those at the beginning of the document. A CSS document needs to be fully processed before rendering anything on the screen, as there are classes that may change.
Javascript Compilation and Execution
While the CSSOM is being created, rendering is blocked, but the browser continues downloading any JavaScript files it encounters.
JavaScript is also parsed, compiled, and interpreted by the browser, but as mentioned before, it is a parser-blocking resource by default. This means that when the browser encounters a <script> tag, it stops HTML parsing and executes the file before continuing. The async or defer attributes can be used to avoid this behavior, allowing parsing to continue while the resource is fetched.
Once the browser completes parsing and executes all JavaScript files that may modify the DOM and CSSOM, the next step is to build the render tree. However, before seeing this step in detail, let’s take a moment to focus on the accessibility tree.
Building the Accessibility Tree
Based on the structure of the site created in the DOM tree, the browser also creates an accessibility tree.
The accessibility tree is another representation of the site’s content, specifically designed to allow navigation through the site using assistive technologies.
In the accessibility tree, each DOM element is represented as an accessible object, containing the following information:
Name: An identifier used to refer to the element.
Description: Additional information about the element.
Role: The type of element it is, related to its intended use.
State and other properties: If the element is subject to change, it may include its current state. It can also include other properties specifying other functionality.
In major web browsers, you can access the accessible objects and their information by selecting a node in the DOM tree viewer and the navigating to the “Accessibility†tab.
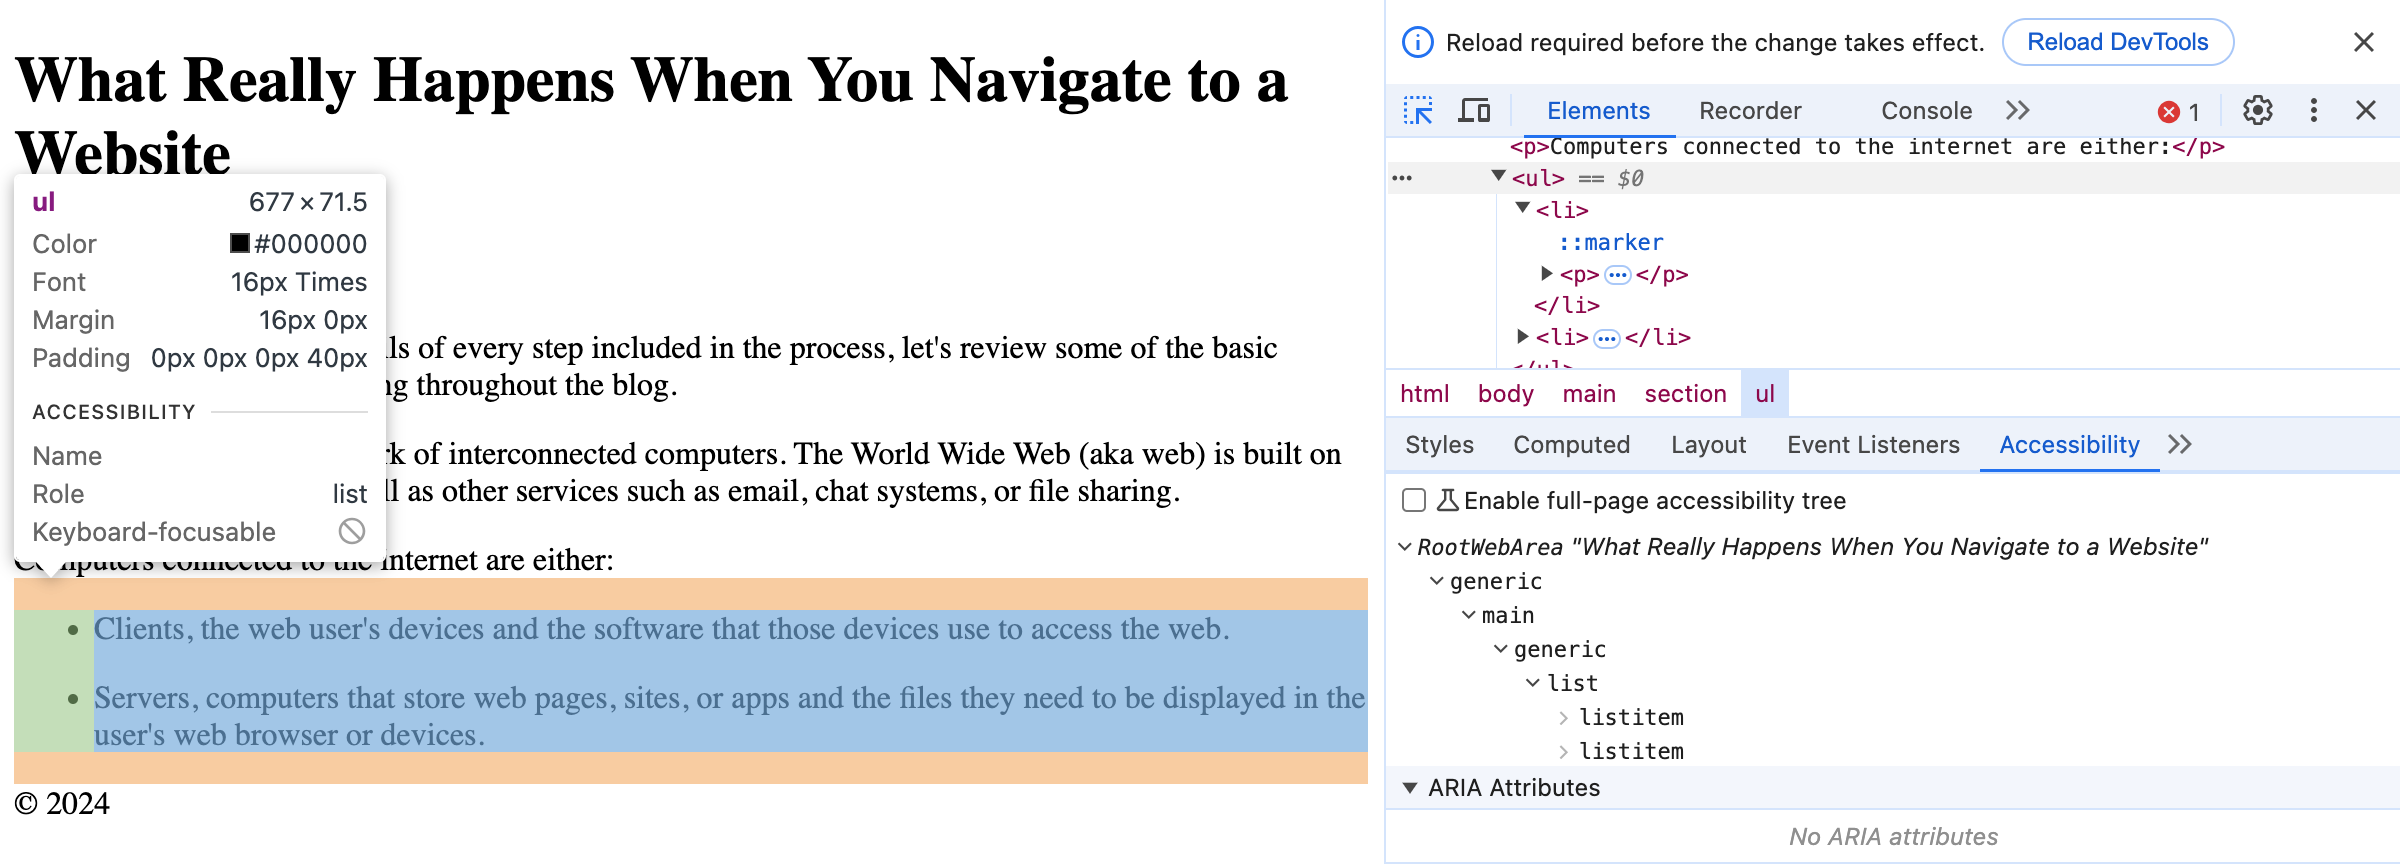
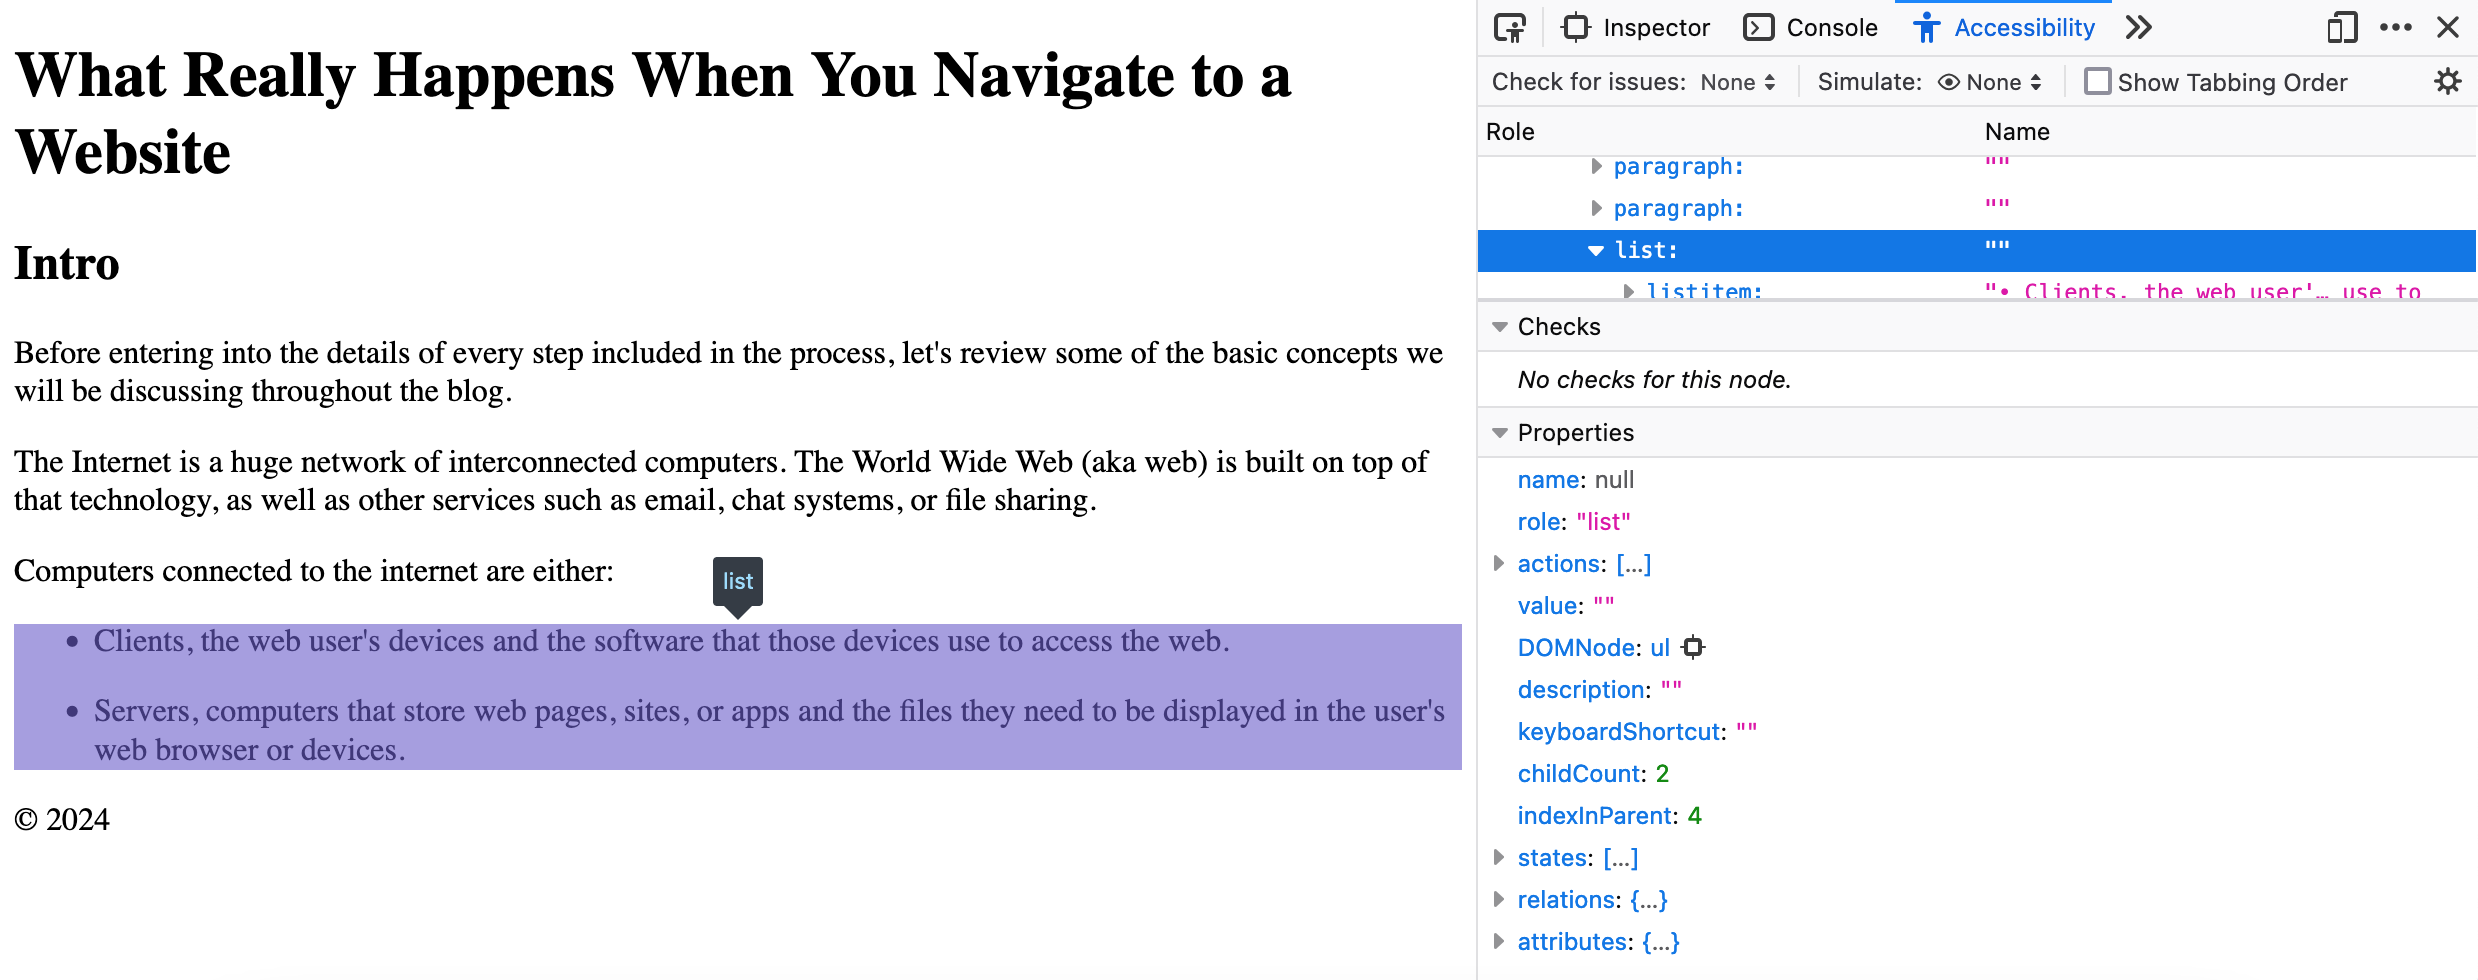
Having a well-structured accessibility tree is key in determining whether a site will be navigable using assistive technology, making the difference between inclusion and exclusion.
Render tree
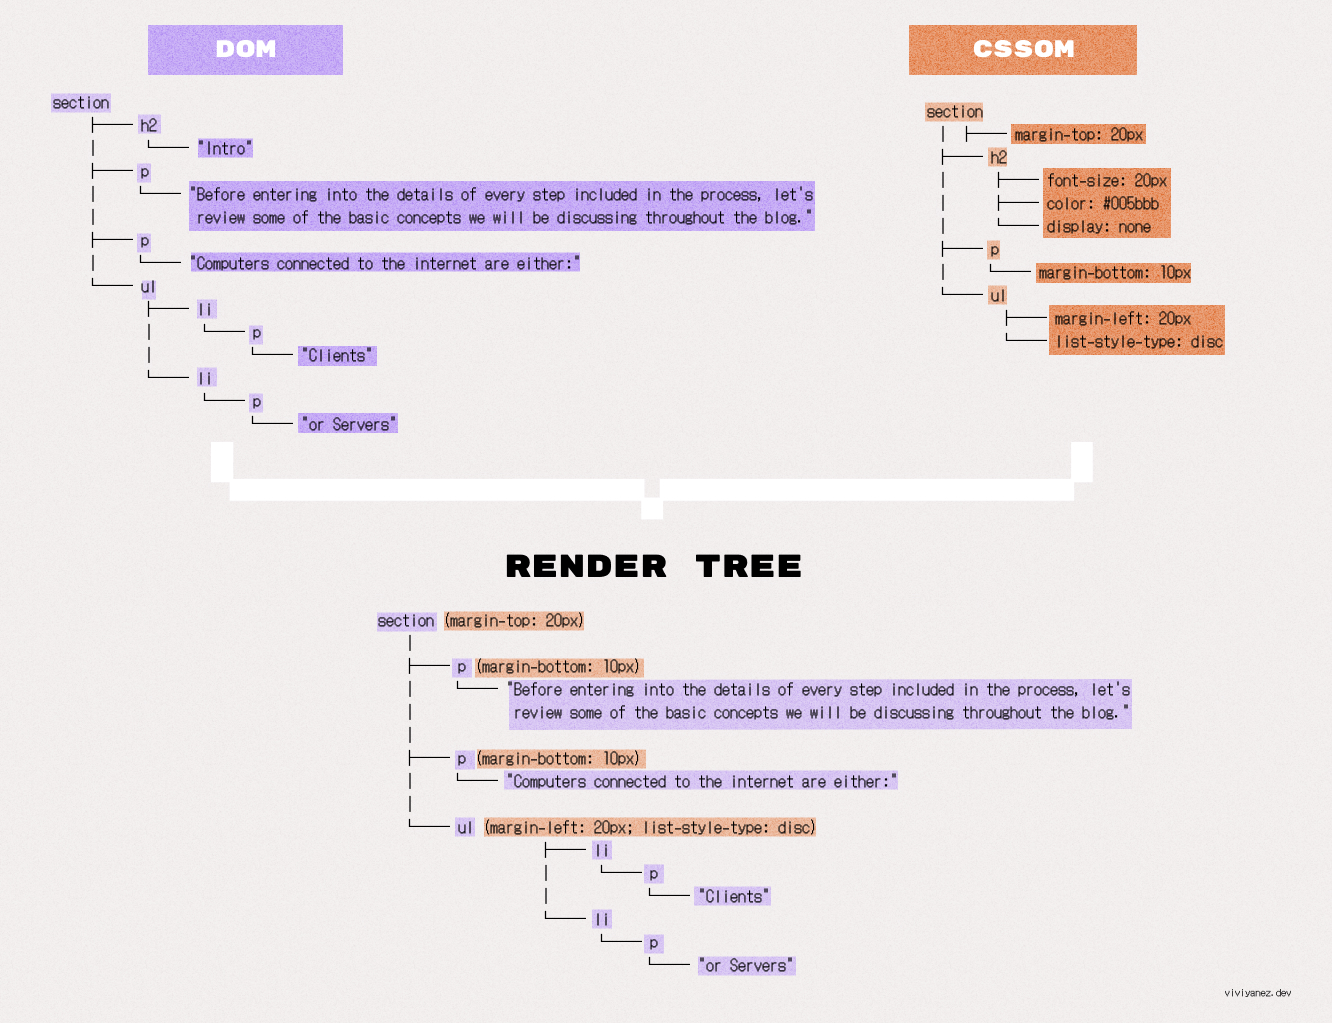
After building the DOM, CSSOM, and accessibility trees, the browser builds the render tree.
This tree is a combination of the DOM and CSSOM trees. The browser processes all nodes and keeps only the visible ones. Then, it combines them with their corresponding CSSOM rules. The result is a collection of all visible elements matched with their computed styles.
Non-visible nodes, such as <script> or <meta> tags, as well as elements hidden with the display: none CSS property, are not included in this tree.
Layout
Once the render tree is computed, the browser runs the layout. In this process, the browser calculates the exact position and size each element will take into the page.
These calculations are based on the viewport size, the browser area that will actually display the site content. The size of the viewport varies based on the device screen size, the browser window size, system settings along other conditions.
The layout output is a box model that captures the size and position that correspond to each element and object present in the render tree. The browser starts processing the document usually from the <body> tag and going through all its descendants.
After the layout calculation, any changes in the size or position of one or more elements in the document will trigger new calculations. Those following calculations are called reflows.
Painting
Now, the final step is displaying the layout output on the user’s screen. During the painting or rasterization phase, the browser converts each layout box element into corresponding pixels on the screen.
A visual representation of the entire page is initially rendered on the screen, and then only the areas affected by changes are re-rendered.
Many factors impact the time it takes for the browser to perform this step, and there are tools that help developers measure and optimize this time.
After painting, and before users can start interacting with the website, the browser may execute any JavaScript that has been deferred using the defer or async attributes to avoid blocking the initial HTML parsing.
A Note About JavaScript Hydration
The steps we described above show the process of rendering all the website’s HTML, CSS, and JavaScript code in the browser. This is known as Client-Side Rendering (CSR). You may have also heard about Server-Side Rendering (SSR).
SSR consists of rendering a website’s content on each request and delivering it to the client as HTML ready to be displayed in the browser.
When a site is rendered using CSR, all the JavaScript is executed before the page is rendered. In SSR, the server-rendered HTML loads and displays quickly in the browser, but JavaScript still needs to be sent to the client to enable user interaction.
JavaScript Hydration is the process where JavaScript is added to a server-rendered HTML page to make it interactive. Once the initial HTML is served and displayed in the browser, JavaScript “hydrates” the static content, attaching event listeners and enabling interactive functionality.
Conclusion
Throughout this article, you enhanced your understanding of what happens from the moment you type a web address into your browser’s address bar until you access the content of the site you’re looking for.
You learned about URLs and the DNS lookup performed by the browser to find the site’s IP address. You also learned how connections are established between the browser and servers and how they communicate.
Finally, you explored what happens from the time the first chunk of data is received from the server until the site is displayed on your screen, along with key concepts such as the accessibility tree and the JavaScript hydration process.
I hope you enjoyed this guide and found it useful. Thanks for reading!
Source: freeCodeCamp Programming Tutorials: Python, JavaScript, Git & MoreÂ

