
As software applications grow in complexity, managing scalability, modularity, and clarity becomes essential.
Spring Boot’s multi-module structure allows you to manage different parts of the application independently, which lets your team develop, test, and deploy components separately. This structure keeps code organized and modular, making it useful for both microservices and large monolithic systems.
In this tutorial, you’ll build a multi-module Spring Boot project, with each module dedicated to a specific responsibility. You’ll learn how to set up modules, configure inter-module communication, handle errors, implement JWT-based security, and deploy using Docker.
Prerequisites:
Basic knowledge of Spring Boot and Maven.
Familiarity with Docker and CI/CD concepts (optional but helpful).
Table of Contents
1. Why Multi-Module Projects?
In single-module projects, components are often tightly coupled, making it difficult to scale and manage complex codebases. A multi-module structure offers several advantages:
Modularity: Each module is dedicated to a specific task, such as User Management or Inventory, simplifying management and troubleshooting.
Team Scalability: Teams can work independently on different modules, minimizing conflicts and enhancing productivity.
Flexible Deployment: Modules can be deployed or updated independently, which is particularly beneficial for microservices or large applications with numerous features.
Real-World Example
Consider a large e-commerce application. Its architecture can be divided into distinct modules:
Customer Management: Responsible for handling customer profiles, preferences, and authentication.
Product Management: Focuses on managing product details, stock, and pricing.
Order Processing: Manages orders, payments, and order tracking.
Inventory Management: Oversees stock levels and supplier orders.
Case Study: Netflix
To illustrate these benefits, let’s examine how Netflix employs a multi-module architecture.
Netflix is a leading example of a company that effectively uses this approach through its microservices architecture. Each microservice at Netflix is dedicated to a specific function, such as user authentication, content recommendations, or streaming services.
This modular structure enables Netflix to scale its operations efficiently, deploy updates independently, and maintain high availability and performance. By decoupling services, Netflix can manage millions of users and deliver content seamlessly worldwide, ensuring a robust and flexible system that supports its vast and dynamic platform.
This architecture not only enhances scalability but also improves fault isolation, allowing Netflix to innovate rapidly and respond effectively to user demands.
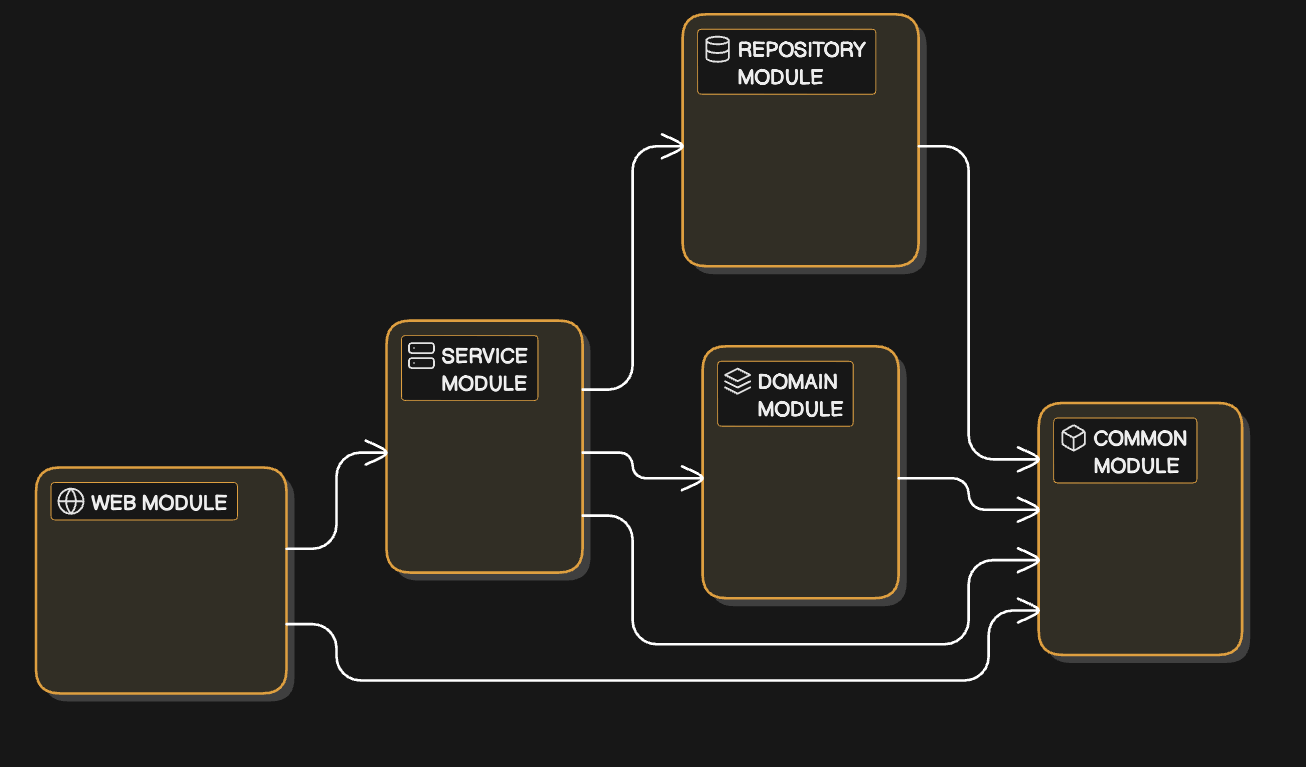
2. Project Structure and Architecture
Now let’s get back to our example project. Your multi-module Spring Boot project will use five key modules. Here’s the layout:
codespring-boot-multi-module/
 ├── common/               # Shared utilities and constants
 ├── domain/               # Domain entities
 ├── repository/           # Data access layer (DAL)
 ├── service/              # Business logic
 └── web/                  # Main Spring Boot application and controllers
Each module has a specific role:
common: Stores shared utilities, constants, and configuration files used across other modules.domain: Contains data models for your application.repository: Manages database operations.service: Encapsulates business logic.web: Defines REST API endpoints and serves as the application’s entry point.
This structure aligns with separation of concerns principles, where each layer is independent and handles its own logic.
The diagram below illustrates the various modules:
3. How to Set Up the Parent Project
Step 1: Create the Root Project
Let’s run these commands to create the Maven parent project:
mvn archetype:generate -DgroupId=com.example -DartifactId=spring-boot-multi-module -DarchetypeArtifactId=maven-archetype-quickstart -DinteractiveMode=false
cd spring-boot-multi-module
Step 2: Configure the Parent pom.xml
In the pom.xml, let’s define our dependencies and modules:
<project xmlns="http://maven.apache.org/POM/4.0.0" xmlns:xsi="http://www.w3.org/2001/XMLSchema-instance" xsi:schemaLocation="http://maven.apache.org/POM/4.0.0 http://www.apache.org/xsd/maven-4.0.0.xsd">
    <modelVersion>4.0.0</modelVersion>
    <groupId>com.example</groupId>
    <artifactId>spring-boot-multi-module</artifactId>
    <version>1.0-SNAPSHOT</version>
    <packaging>pom</packaging>
    <modules>
        <module>common</module>
        <module>domain</module>
        <module>repository</module>
        <module>service</module>
        <module>web</module>
    </modules>
    <properties>
        <java.version>11</java.version>
        <spring.boot.version>2.5.4</spring.boot.version>
    </properties>
    <dependencyManagement>
        <dependencies>
            <dependency>
                <groupId>org.springframework.boot</groupId>
                <artifactId>spring-boot-dependencies</artifactId>
                <version>${spring.boot.version}</version>
                <type>pom</type>
                <scope>import</scope>
            </dependency>
        </dependencies>
    </dependencyManagement>
    <build>
        <plugins>
            <plugin>
                <groupId>org.springframework.boot</groupId>
                <artifactId>spring-boot-maven-plugin</artifactId>
            </plugin>
        </plugins>
    </build>
</project>
This pom.xml file centralizes dependencies and configurations, making it easier to manage shared settings across modules.
4. How to Create the Modules
Common Module
Let’s create a common module to define shared utilities like date formatters. Create this module and add a sample utility class:
mvn archetype:generate -DgroupId=com.example.common -DartifactId=common -DarchetypeArtifactId=maven-archetype-quickstart -DinteractiveMode=false
Date Formatter Utility:
package com.example.common;

import java.time.LocalDate;
import java.time.format.DateTimeFormatter;

public class DateUtils {
    public static String formatDate(LocalDate date) {
        return date.format(DateTimeFormatter.ofPattern("yyyy-MM-dd"));
    }
}
Domain Module
In the domain module, you will define your data models.
package com.example.domain;

import javax.persistence.Entity;
import javax.persistence.Id;

@Entity
public class User {
    @Id
    private Long id;
    private String name;

    // Getters and Setters
}
Repository Module
Let’s create the repository module to manage data access. Here’s a basic repository interface:
package com.example.repository;

import com.example.domain.User;
import org.springframework.data.jpa.repository.JpaRepository;

public interface UserRepository extends JpaRepository<User, Long> {}
Service Module
Let’s create the service module to hold your business logic. Here’s an example service class:
package com.example.service;

import com.example.domain.User;
import com.example.repository.UserRepository;
import org.springframework.beans.factory.annotation.Autowired;
import org.springframework.stereotype.Service;

@Service
public class UserService {

    @Autowired
    private UserRepository userRepository;

    public User getUserById(Long id) {
        return userRepository.findById(id).orElse(null);
    }
}
Web Module
The web module serves as the REST API layer.
@RestController
public class UserController {

    @Autowired
    private UserService userService;

    @GetMapping("/users/{id}")
    public User getUserById(@PathVariable Long id) {
        return userService.getUserById(id);
    }
}
5. Inter-Module Communication
To avoid direct dependencies, you can use REST APIs or message brokers (like Kafka) for inter-module communication. This ensures loose coupling and allows each module to communicate independently.
The diagram below demonstrates how modules communicate with each other:
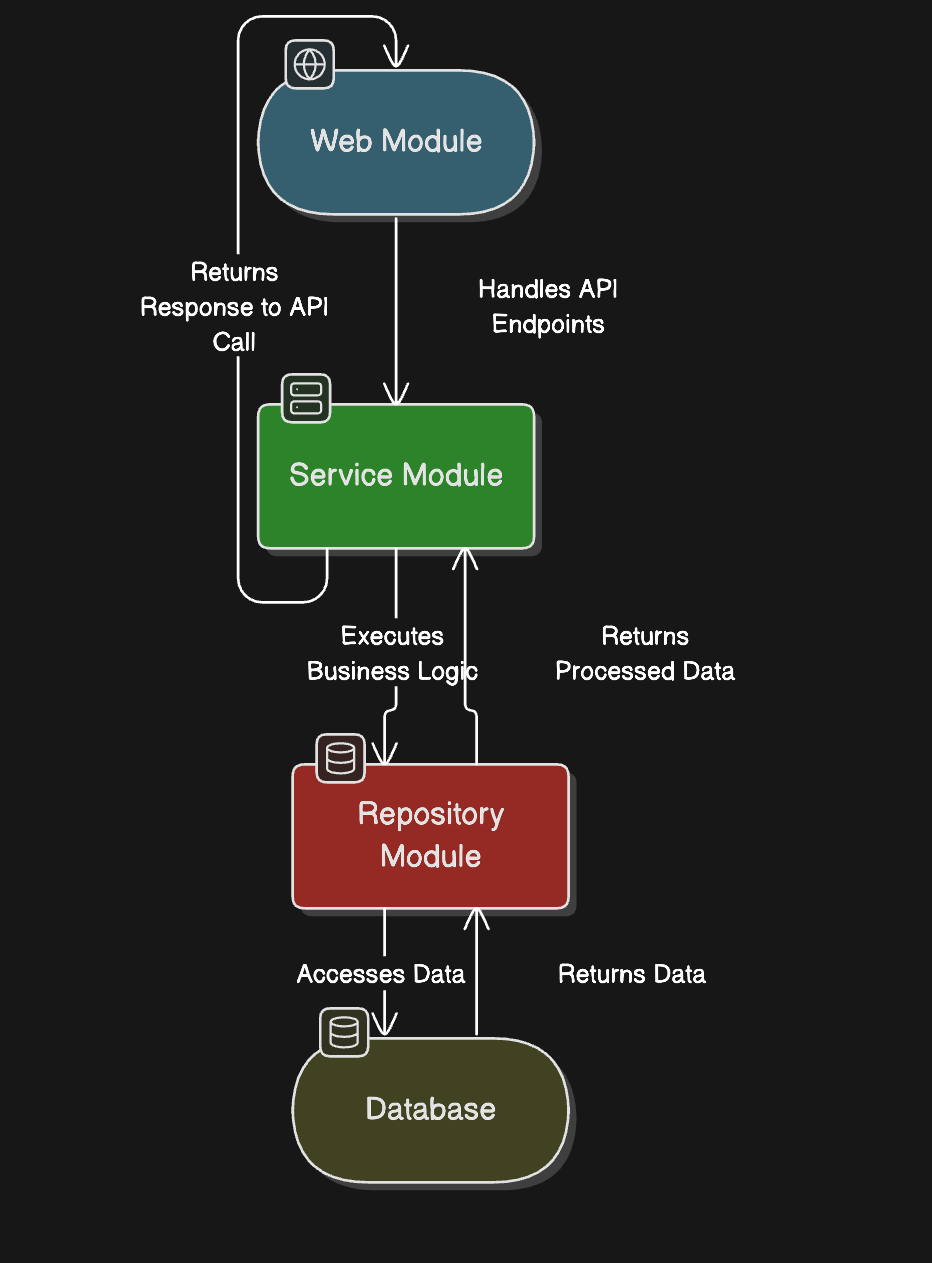
The diagram illustrates how different system components communicate to handle requests efficiently.
The Web Module processes incoming API requests and forwards them to the Service Module, which contains the business logic. The Service Module then interacts with the Repository Module to fetch or update data in the Database. This layered approach ensures that each module operates independently, promoting flexibility and easier maintenance.
Example Using Feign Client:
In the context of inter-module communication, using tools like Feign Clients is a powerful way to achieve loose coupling between services.
The Feign client allows one module to seamlessly communicate with another through REST API calls, without requiring direct dependencies. This approach fits perfectly within the layered architecture described earlier, where the Service Module can fetch data from other services or microservices using Feign clients, rather than directly accessing databases or hard-coding HTTP requests.
This not only simplifies the code but also improves scalability and maintainability by isolating service dependencies.
@FeignClient(name = "userServiceClient", url = "http://localhost:8081")
public interface UserServiceClient {
    @GetMapping("/users/{id}")
    User getUserById(@PathVariable("id") Long id);
}
6. Common Pitfalls and Solutions
When implementing a multi-module architecture, you may encounter several challenges. Here are some common pitfalls and their solutions:
Circular Dependencies: Modules may inadvertently depend on each other, creating a circular dependency that complicates builds and deployments.
- Solution: Carefully design module interfaces and use dependency management tools to detect and resolve circular dependencies early in the development process.
Over-Engineering: There’s a risk of creating too many modules, leading to unnecessary complexity.
- Solution: Start with a minimal set of modules and only split further when there’s a clear need, ensuring each module has a distinct responsibility.
Inconsistent Configurations: Managing configurations across multiple modules can lead to inconsistencies.
- Solution: Use centralized configuration management tools, such as Spring Cloud Config, to maintain consistency across modules.
Communication Overhead: Inter-module communication can introduce latency and complexity.
- Solution: Optimize communication by using efficient protocols and consider asynchronous messaging where appropriate to reduce latency.
Testing Complexity: Testing a multi-module project can be more complex due to the interactions between modules.
- Solution: Implement a robust testing strategy that includes unit tests for individual modules and integration tests for inter-module interactions.
By being aware of these pitfalls and applying these solutions, you can effectively manage the complexities of a multi-module architecture and ensure a smooth development process.
7. Testing Strategy and Configuration
Testing each module independently and as a unit is critical in multi-module setups.
Unit Tests
Here, we’ll use JUnit and Mockito for performing unit tests:
@RunWith(MockitoJUnitRunner.class)
public class UserServiceTest {

    @Mock
    private UserRepository userRepository;

    @InjectMocks
    private UserService userService;

    @Test
    public void testGetUserById() {
        User user = new User();
        user.setId(1L);
        user.setName("John");

        Mockito.when(userRepository.findById(1L)).thenReturn(Optional.of(user));

        User result = userService.getUserById(1L);
        assertEquals("John", result.getName());
    }
}
Integration Tests
And we’ll use Testcontainers with an in-memory database for integration tests:
@Testcontainers
@ExtendWith(SpringExtension.class)
@SpringBootTest
public class UserServiceIntegrationTest {

    @Container
    private static PostgreSQLContainer<?> postgresqlContainer = new PostgreSQLContainer<>("postgres:latest");

    @Autowired
    private UserService userService;

    @Test
    public void testFindById() {
        User user = userService.getUserById(1L);
        assertNotNull(user);
    }
}
8. Error Handling and Logging
Error handling and logging ensure a robust and debuggable application.
Error Handling
In this section, we’ll explore how to handle errors gracefully in your Spring Boot application using a global exception handler. By using @ControllerAdvice, we’ll set up a centralized way to catch and respond to errors, keeping our code clean and our responses consistent.
@ControllerAdvice
public class GlobalExceptionHandler {

    @ExceptionHandler(UserNotFoundException.class)
    public ResponseEntity<String> handleUserNotFoundException(UserNotFoundException ex) {
        return new ResponseEntity<>("User not found", HttpStatus.NOT_FOUND);
    }
}
In the code example above, we define a GlobalExceptionHandler that catches any UserNotFoundException and returns a friendly message like “User not found” with a status of 404. This way, you don’t have to handle this exception in every controller—you’ve got it covered in one place!
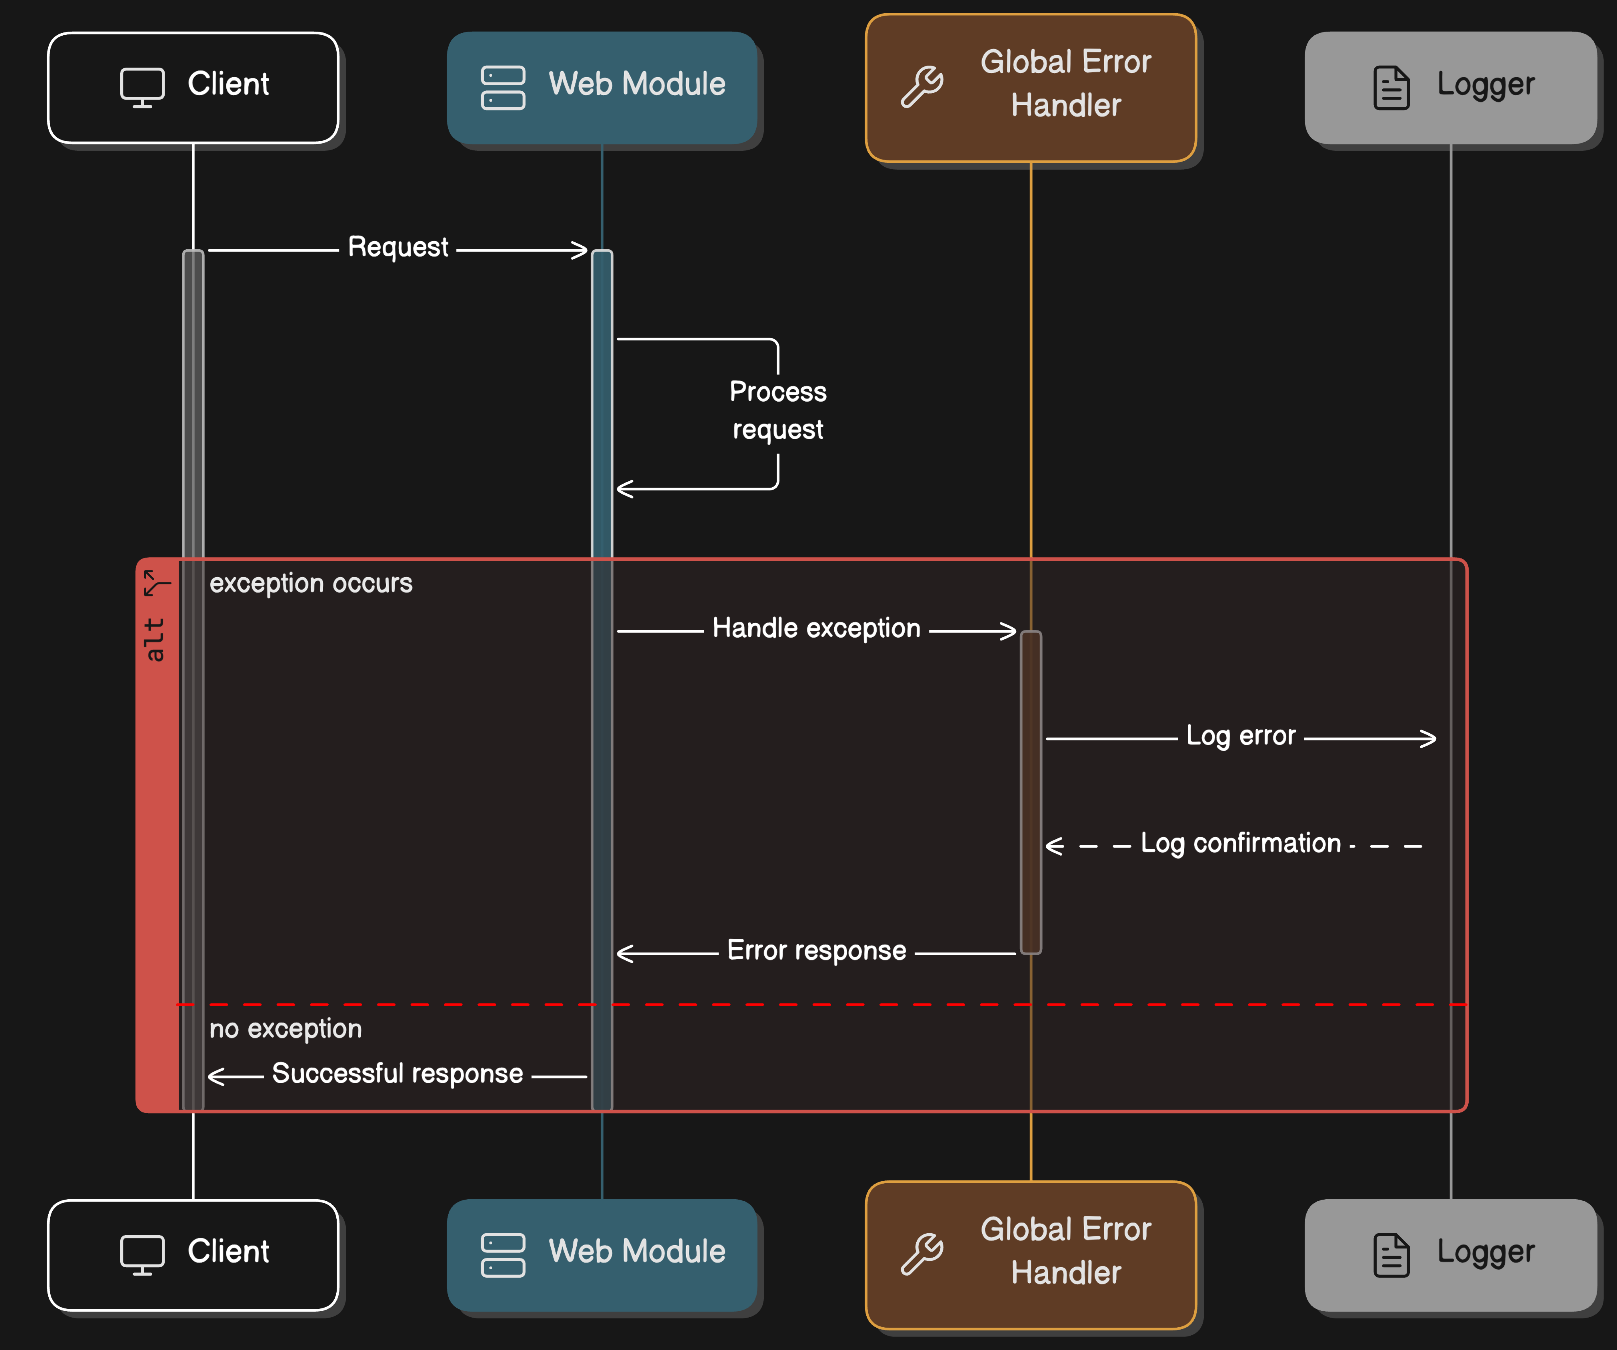
Now, let’s take a look at the diagram. Here’s how it all flows: when a client sends a request to our Web Module, if everything goes smoothly, you’ll get a successful response. But if something goes wrong, like a user not being found, the error will be caught by our Global Error Handler. This handler logs the issue and returns a clean, structured response to the client.
This approach ensures that users get clear error messages while keeping your app’s internals hidden and secure.
Logging
Structured logging in each module improves traceability and debugging. You can use a centralized logging system like Logback and include correlation IDs to trace requests.
9. Security and JWT Integration
In this section, we’re going to set up JSON Web Tokens (JWT) to secure our endpoints and control access based on user roles. We’ll configure this in the SecurityConfig class, which will help us enforce who can access what parts of our application.
@EnableWebSecurity
public class SecurityConfig extends WebSecurityConfigurerAdapter {

    @Override
    protected void configure(HttpSecurity http) throws Exception {
        http.authorizeRequests()
            .antMatchers("/admin/**").hasRole("ADMIN")
            .antMatchers("/user/**").hasAnyRole("USER", "ADMIN")
            .anyRequest().authenticated()
            .and()
            .oauth2ResourceServer().jwt();
    }
}
In the code example above, you can see how we’ve defined access rules:
The
/admin/**endpoints are restricted to users with theADMINrole.The
/user/**endpoints can be accessed by users with either theUSERorADMINroles.Any other requests will require the user to be authenticated.
Next, we set up our application to validate incoming tokens using .oauth2ResourceServer().jwt();. This ensures that only requests with a valid token can access our secured endpoints.
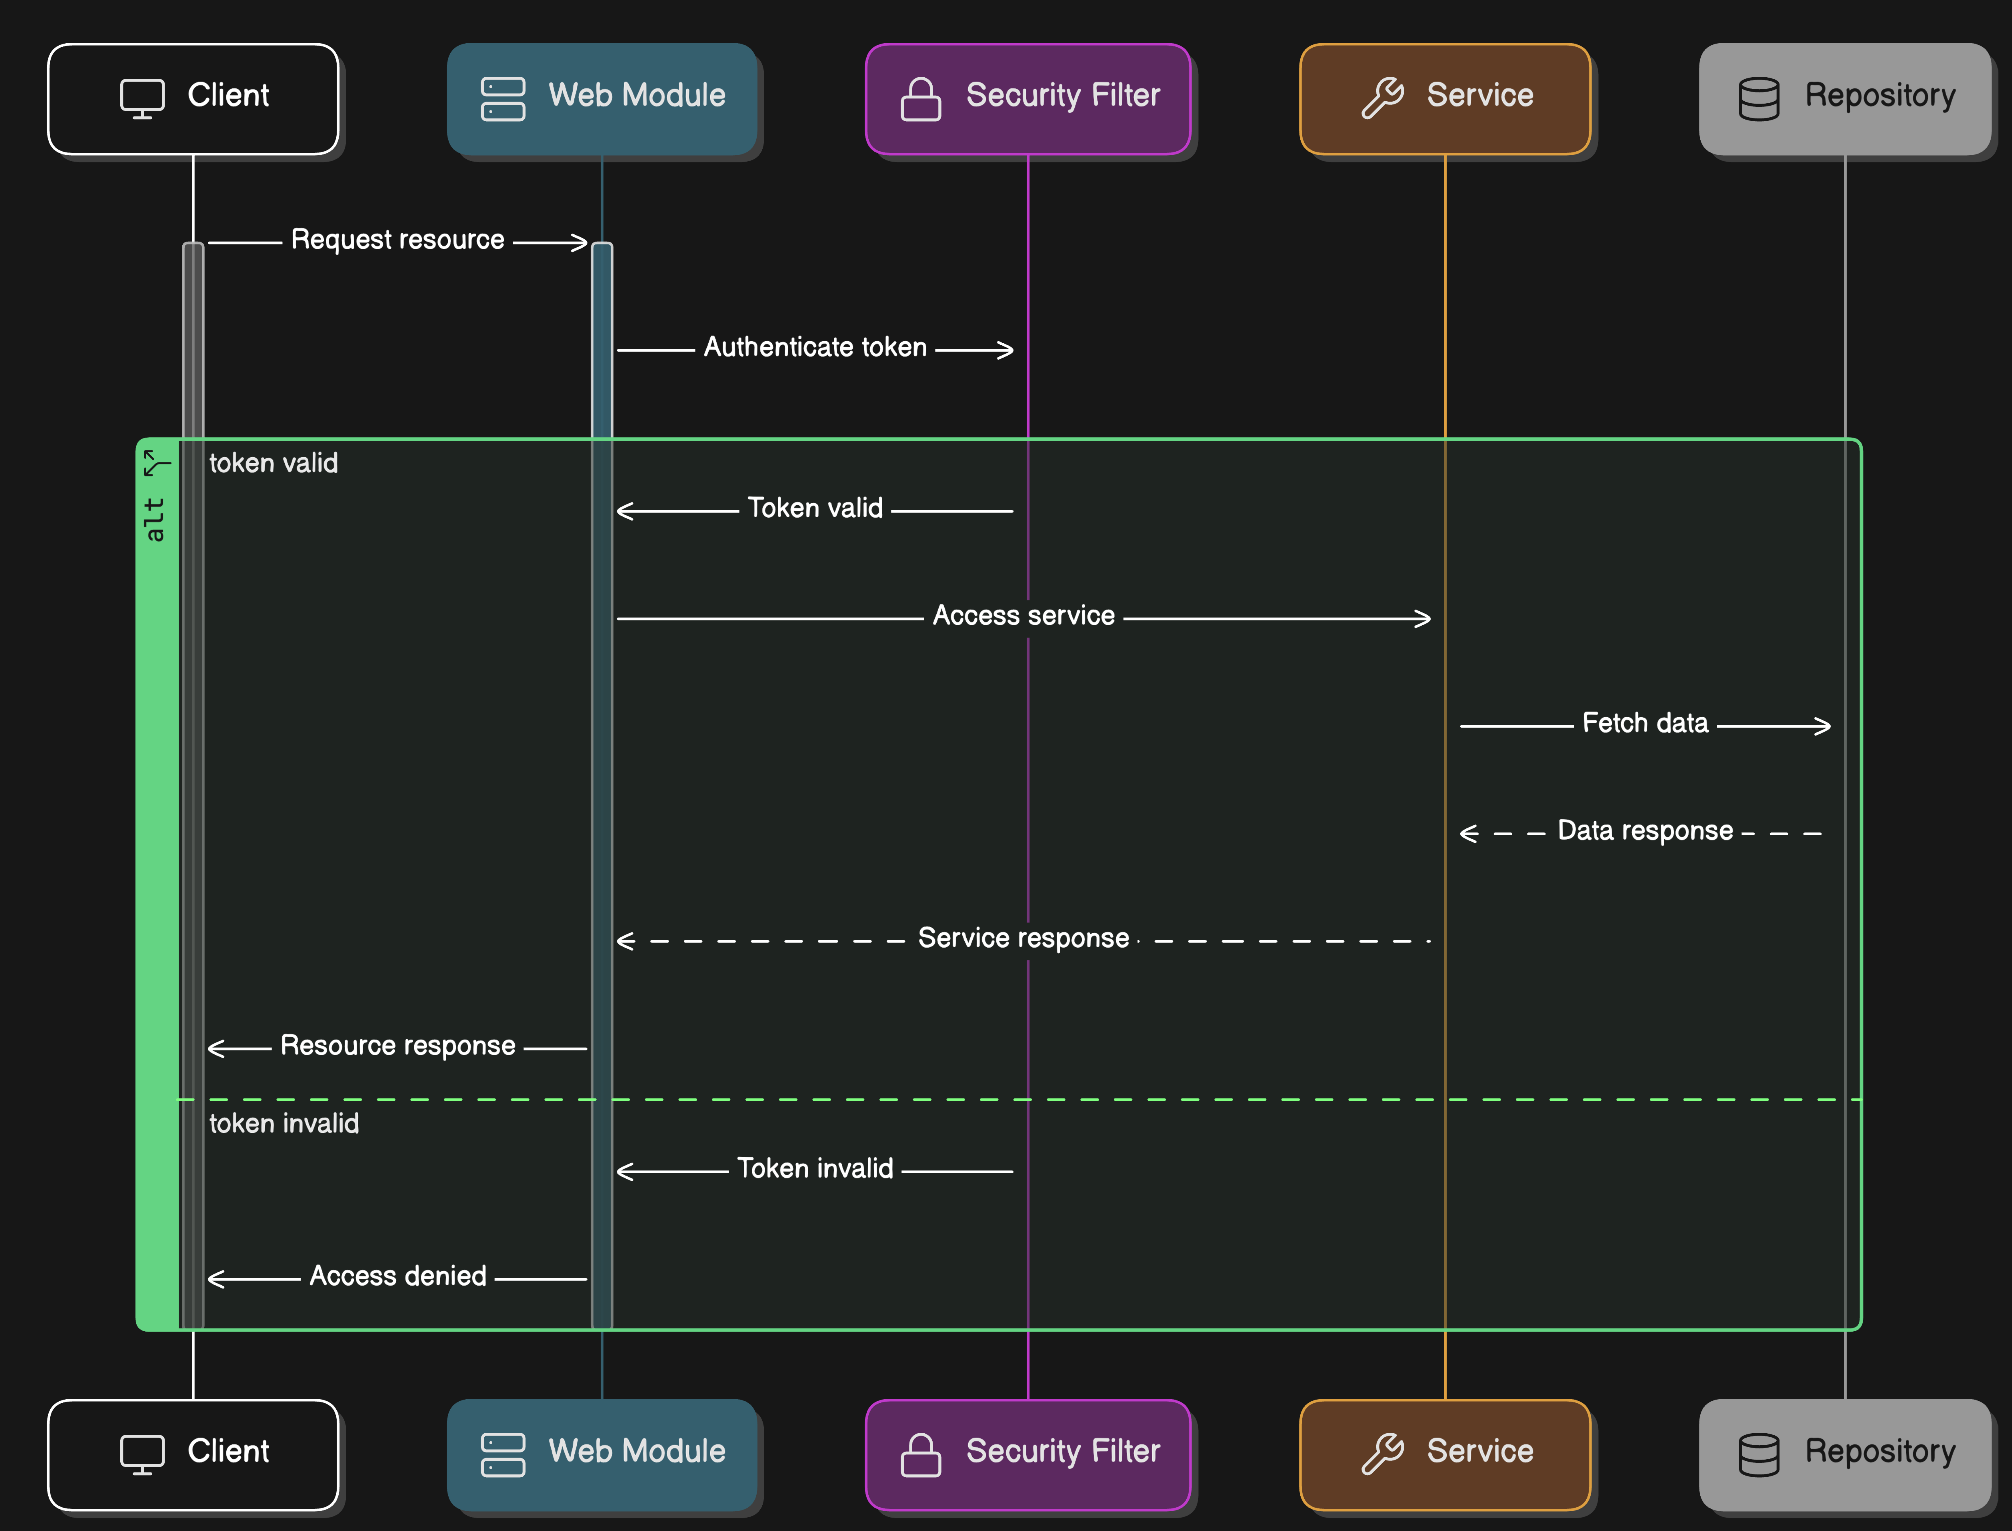
Now, let’s walk through the diagram. When a client sends a request to access a resource, the Security Filter first checks if the provided JWT token is valid. If the token is valid, the request proceeds to the Service Module to fetch or process the data. If not, access is denied right away, and the client receives an error response.
This flow ensures that only authenticated users can access sensitive resources, keeping our application secure.
10. Deployment with Docker and CI/CD
In this section, we’ll containerize each module using Docker to make our application easier to deploy and run consistently across different environments. We’ll also set up a CI/CD pipeline using GitHub Actions (but you can use Jenkins too if you prefer). Automating this process ensures that any changes you push are automatically built, tested, and deployed.
Step 1: Containerizing with Docker
We start by creating a Dockerfile for the Web Module:
FROM openjdk:11-jre-slim
COPY target/web-1.0-SNAPSHOT.jar app.jar
ENTRYPOINT ["java", "-jar", "/app.jar"]
Here, we’re using a lightweight version of Java 11 to keep our image size small. We copy the compiled .jar file into the container and set it up to run when the container starts.
Step 2: Using Docker Compose for Multi-Module Deployment
Now, we’ll use a Docker Compose file to orchestrate multiple modules together:
version: '3'
services:
  web:
    build: ./web
    ports:
      - "8080:8080"
  service:
    build: ./service
    ports:
      - "8081:8081"
With this setup, we can run both the Web Module and the Service Module at the same time, making it easy to spin up the entire application with a single command. Each service is built separately from its own directory, and we expose the necessary ports to access them.
CI/CD Example with GitHub Actions
name: CI Pipeline

on: [push, pull_request]

jobs:
  build:
    runs-on: ubuntu-latest
    steps:
    - uses: actions/checkout@v2
    - name: Set up JDK 11
      uses: actions/setup-java@v2
      with:
        java-version: '11'
    - name: Build with Maven
      run: mvn clean install
This pipeline automatically kicks in whenever you push new code or create a pull request. It checks out your code, sets up Java, and runs a Maven build to ensure everything is working correctly.
11. Best Practices and Advanced Use Cases
The following best practices ensure maintainability and scalability.
Best Practices
Avoid Circular Dependencies: Ensure modules don’t have circular references to avoid build issues.
Separate Concerns Clearly: Each module should focus on one responsibility.
Centralized Configurations: Manage configurations centrally for consistent setups.
Advanced Use Cases
Asynchronous Messaging with Kafka: Use Kafka for decoupled communication between services. Modules can publish and subscribe to events asynchronously.
REST Client with Feign: Use Feign to call services within modules. Define a Feign client interface for communication.
Caching for Performance: Use Spring Cache in the service module for optimizing data retrieval.
Conclusion and Key Takeaways
A multi-module Spring Boot project provides modularity, scalability, and ease of maintenance.
In this tutorial, you learned to set up modules, manage inter-module communication, handle errors, add security, and deploy with Docker.
Following best practices and using advanced techniques like messaging and caching will further optimize your multi-module architecture for production use.
Source: freeCodeCamp Programming Tutorials: Python, JavaScript, Git & MoreÂ

