
The emergence of generative AI has ushered in a new era of possibilities, enabling the creation of human-like text, images, code, and more. However, as exciting as these advancements are, data scientists often face challenges when it comes to developing UIs and to prototyping and interacting with their business users. Traditionally, building frontend and backend applications has required knowledge of web development frameworks and infrastructure management, which can be daunting for those with expertise primarily in data science and machine learning.
AWS provides a powerful set of tools and services that simplify the process of building and deploying generative AI applications, even for those with limited experience in frontend and backend development. In this post, we explore a practical solution that uses Streamlit, a Python library for building interactive data applications, and AWS services like Amazon Elastic Container Service (Amazon ECS), Amazon Cognito, and the AWS Cloud Development Kit (AWS CDK) to create a user-friendly generative AI application with authentication and deployment.
Solution overview
For this solution, you deploy a demo application that provides a clean and intuitive UI for interacting with a generative AI model, as illustrated in the following screenshot.

The UI consists of a text input area where users can enter their queries, and an output area to display the generated results.
The default interface is simple and straightforward, but you can extend and customize it to fit your specific needs. With Streamlit’s flexibility, you can add additional features, adjust the styling, and integrate other functionalities as required by your use case.
The solution we explore consists of two main components: a Python application for the UI and an AWS deployment architecture for hosting and serving the application securely.
The Python application uses the Streamlit library to provide a user-friendly interface for interacting with a generative AI model. Streamlit allows data scientists to create interactive web applications using Python, using their existing skills and knowledge. With Streamlit, you can quickly build and iterate on your application without the need for extensive frontend development experience.
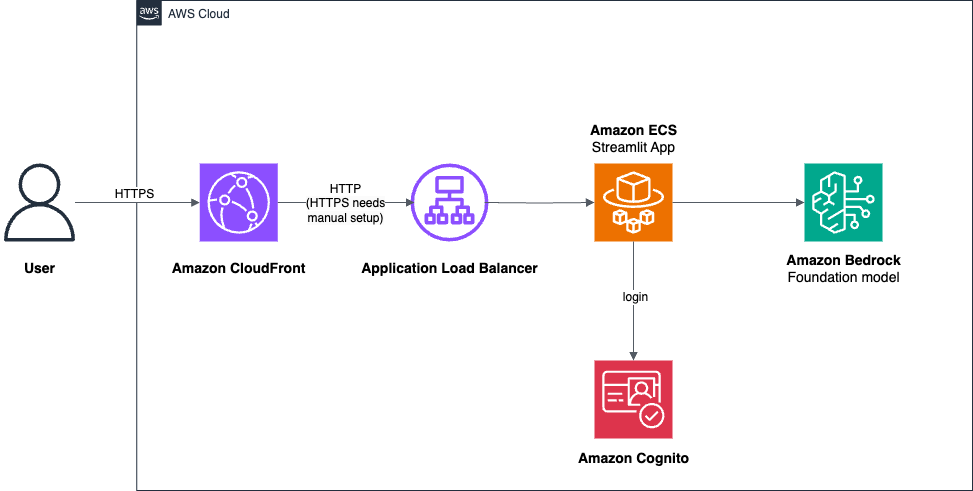
The AWS deployment architecture makes sure the Python application is hosted and accessible from the internet to authenticated users. The solution uses the following key components:
- Amazon ECS and AWS Fargate provide a serverless container orchestration platform for running the Python application
- Amazon Cognito handles user authentication, making sure only authorized users can access the generative AI application
- Application Load Balancer (ALB) and Amazon CloudFront are responsible for load balancing and content delivery, so the application is available for users worldwide
- The AWS CDK allows you to define and provision AWS infrastructure resources using familiar programming languages like Python
- Amazon Bedrock is a fully managed service that offers a choice of high-performing generative AI models through an API
The following diagram illustrates this architecture.
Prerequisites
As a prerequisite, you need to enable model access in Amazon Bedrock and have access to a Linux or macOS development environment. You could also use a Windows development environment, in which case you need to update the instructions in this post.
Access to Amazon Bedrock foundation models is not granted by default. Complete the following steps to enable access to Anthropic’s Claude on Amazon Bedrock, which we use as part of this post:
- Sign in to the AWS Management Console.
- Choose the us-east-1 AWS Region from the top right corner.
- On the Amazon Bedrock console, choose Model access in the navigation pane.
- Choose Manage model access.
- Select the model you want access to (for this post, Anthropic’s Claude). You can also select other models for future use.
- Choose Next and then Submit to confirm your selection.
For more information on how to manage model access, see Access Amazon Bedrock foundation models.
Set up your development environment
To get started with deploying the Streamlit application, you need access to a development environment with the following software installed:
- Python version 3.8 or later. You can download Python from the official website or use your Linux distribution’s package manager.
- The AWS Command Line Interface (AWS CLI). For installation instructions, see Installing or updating to the latest version of the AWS CLI.
- The AWS CDK. For installation instructions, see Getting started with the AWS CDK.
- Docker or Colima. For installation instructions, see Install Docker Engine. For macOS, we have tested the deployment with Colima container runtimes in replacement for Docker Desktop.
You also need to configure the AWS CLI. One way to do it is to get your access key through the console, and use the aws configure command in your terminal to set up your credentials.
Clone the GitHub repository
Use the terminal of your development environment to enter the commands in the following steps:
- Clone the
deploy-streamlit-apprepository from the AWS Samples GitHub repository:

- Navigate to the cloned repository:
Create the Python virtual environment and install the AWS CDK
Complete the following steps to set up the virtual environment and the AWS CDK:
- Create a new Python virtual environment (your Python version should be 3.8 or greater):
- Activate the virtual environment:
- Install the AWS CDK, which is in the required Python dependencies:
Configure the Streamlit application
Complete the following steps to configure the Streamlit application:
- In the
docker_appdirectory, locate theconfig_file.pyfile. - Open
config_file.pyin your editor and modify theSTACK_NAMEandCUSTOM_HEADER_VALUEvariables:- The stack name enables you to deploy multiple applications in the same account. Choose a different stack name for each application. For your first application, you can leave the default value.
- The custom header value is a security token that CloudFront uses to authenticate on the load balancer. You can choose it randomly, and it must be kept secret.

Deploy the AWS CDK template
Complete the following steps to deploy the AWS CDK template:
- From your terminal, bootstrap the AWS CDK:
- Deploy the AWS CDK template, which will create the necessary AWS resources:
- Enter
y(yes) when asked if you want to deploy the changes.
The deployment process may take 5–10 minutes. When it’s complete, note the CloudFront distribution URL and Amazon Cognito user pool ID from the output.
Create an Amazon Cognito user
Complete the following steps to create an Amazon Cognito user:
- On the Amazon Cognito console, navigate to the user pool that you created as part of the AWS CDK deployment.
- On the Users tab, choose Create user.

- Enter a user name and password.
- Choose Create user.

Access the Streamlit application
Complete the following steps to access the Streamlit application:
- Open a new web browser window or tab and navigate to the CloudFront distribution URL from the AWS CDK deployment output.
If you have not noted this URL, you can open the AWS CloudFormation console and find it in the outputs of the stack.
- Log in to the Streamlit application using the Amazon Cognito user credentials you created in the previous step.
You should now be able to access and interact with the Streamlit application, which is deployed and running on AWS using the provided AWS CDK template.

This deployment is intended as a starting point and a demo. Before using this application in a production environment, you should thoroughly review and implement appropriate security measures, such as configuring HTTPS on the load balancer and following AWS best practices for securing your resources. See the README.md file in the GitHub repository for more information.
Customize the application
The aws-samples/deploy-streamlit-app GitHub repository provides a solid foundation for building and deploying generative AI applications, but it’s also highly customizable and extensible.
Let’s explore how you can customize the Streamlit application. Because the application is written in Python, you can modify it to integrate with different generative AI models, add new features, or change the UI to better align with your application’s requirements.
For example, let’s say you want to add a button to invoke the LLM answer instead of invoking it automatically when the user enters input text. Complete the following steps to modify the docker_app/app.py file:
- After the definition of the
input_senttext input, add a Streamlit button:
- Change the if condition to check if the button is clicked instead of checking for
input_sent:

- Redeploy the application by entering the following in the terminal:
The deployment should take less than 5 minutes. In the next section, we show how to test your changes locally before deploying, which will accelerate your development workflow.
- When the deployment is complete, refresh the webpage in your browser.
The Streamlit application will now display a button labeled Get LLM Response. When the user chooses this button, the LLM will be invoked, and the output will be displayed on the UI.

This is just one example of how you can customize the Streamlit application to meet your specific requirements. You can modify the code further to integrate with different generative AI models, add additional features, or enhance the UI as needed.
Test your changes locally before deploying
Although deploying the application using cdk deploy allows you to test your changes in the actual AWS environment, it can be time-consuming, especially during the development and testing phase. Fortunately, you can run and test your application locally before deploying it to AWS.
To test your changes locally, follow these steps:
- In your terminal, navigate to the
docker_appdirectory, where the Streamlit application is located:
- If you haven’t already, install the dependencies of the Python application. These dependencies are different from the ones of the AWS CDK application that you installed previously.
- Start the Streamlit server with the following command:
This will start the Streamlit application on port 8080.
You should now be able to interact with the locally running Streamlit application and test your changes without having to redeploy the application to AWS.
Remember to stop the Streamlit server (by pressing Ctrl+C in the terminal) when you’re done testing.
By testing your changes locally, you can significantly speed up the development and testing cycle, allowing you to iterate more quickly and catch issues early in the process.
Clean up
To avoid incurring additional charges, clean up the resources created during this demo:
- Open the terminal in your development environment.
- Make sure you’re in the root directory of the project and your virtual environment is activated:
- Destroy the AWS CDK stack:
- Confirm the deletion by entering
yeswhen prompted.
Conclusion
Building and deploying user-friendly generative AI applications no longer requires extensive knowledge of frontend and backend development frameworks. By using Streamlit and AWS services, data scientists can focus on their core expertise while still delivering secure, scalable, and accessible applications to business users.
The full code of the demo is available in the GitHub repository. It provides a valuable starting point for building and deploying generative AI applications, allowing you to quickly set up a working prototype and iterate from there. We encourage you to explore the repository and experiment with the provided solution to create your own applications.
As the adoption of generative AI continues to grow, the ability to build and deploy user-friendly applications will become increasingly important. With AWS and Python, data scientists now have the tools and resources to bridge the gap between their technical expertise and the need to showcase their models to business users through secure and accessible UIs.
About the Author
 Lior Perez is a Principal Solutions Architect on the Construction team based in Toulouse, France. He enjoys supporting customers in their digital transformation journey, using big data, machine learning, and generative AI to help solve their business challenges. He is also personally passionate about robotics and IoT, and constantly looks for new ways to use technologies for innovation.
Source: Read MoreÂ

