
In Part 1 (Harnessing the Power of AWS Bedrock through CloudFormation / Blogs / Perficient), we discussed what Azure Virtual WAN is and why it’s a powerful solution for global networking. Now, let’s get hands-on and walk through the actual implementation—step by step, in a simple, conversational way.
1. Creating the Virtual WAN – The Network’s Control Plane
Virtual WAN is the heart of a global network, not just another resource. It replaces: Isolated VPN gateways per region, Manual ExpressRoute configurations, and complex peering relationships.
Setting it up is easy:
- Navigate to Azure Portal → Search “Virtual WAN”
- Click Create and configure.
- Name: Naming matters for enterprise environments
- Resource Group: Create new rg-network-global (best practice for lifecycle management)
- Type: Standard (Basic lacks critical features like ExpressRoute support)
Azure will set up the Virtual WAN in a few seconds. Now, the real fun begins.
2. Setting Up the Virtual WAN Hub – The Heart of The Network
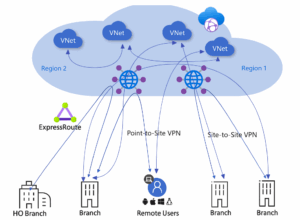
The hub is where all connections converge. It’s like a major airport hub where traffic from different locations meets and gets efficiently routed. Without a hub, you’d need to configure individual gateways for every VPN and ExpressRoute connection, leading to higher costs and management overhead.
- Navigate to the Virtual WAN resource → Click Hubs → New Hub.
- Configure the Hub.
- Region: Choose based on: Primary user locations & Azure service availability (some regions lack certain services)
- Address Space: Assign a private IP range (e.g., 10.100.0.0/24).
Wait for Deployment, this takes about 30 minutes (Azure is building VPN gateways, ExpressRoute gateways, and more behind the scenes).
Once done, the hub is ready to connect everything: offices, cloud resources, and remote users.
3. Connecting Offices via Site-to-Site VPN – Building Secure Tunnels
Branches and data centres need a reliable, encrypted connection to Azure. Site-to-Site VPN provides this over the public internet while keeping data secure. Without VPN tunnels, branch offices would rely on slower, less secure internet connections to access cloud resources, increasing latency and security risks.
- In the Virtual WAN Hub, go to VPN (Site-to-Site) → Create VPN Site.
- Name: branch-nyc-01
- Private Address Space: e.g., 192.168.100.0/24 (must match on-premises network)
- Link Speed: Set accurately for Azure’s QoS calculations
- Download VPN Configuration: Azure provides a config file—apply it to the office’s VPN device (like a Cisco or Fortinet firewall).
- Lastly, connect the VPN Site to the Hub.
- Navigate to VPN connections → Create connection → Link the office to the hub.
Now, the office and Azure are securely connected.
4. Adding ExpressRoute – The Private Superhighway
For critical applications (like databases or ERP systems), VPNs might not provide enough bandwidth or stability. ExpressRoute gives us a dedicated, high-speed connection that bypasses the public internet. Without ExpressRoute, latency-sensitive applications (like VoIP or real-time analytics) could suffer from internet congestion or unpredictable performance.
- Order an ExpressRoute Circuit: We can do this via the Azure Portal or through an ISP (like AT&T or Verizon).
- Authorize the Circuit in Azure
- Navigate to the Virtual WAN Hub → ExpressRoute → Authorize.
- Linking it to Hub: Once it is authorized, connect the ExpressRoute circuit to the hub.
Now, the on-premises network has a dedicated, high-speed connection to Azure—no internet required.
5. Enabling Point-to-Site VPN for Remote Workers – The Digital Commute
Employees working from home need secure access to internal apps without exposing them to the public internet. P2S VPN lets them “dial in” securely from anywhere. Without P2S VPN, remote workers might resort to risky workarounds like exposing RDP or databases to the internet.
- Configure P2S in The Hub
- Navigate to VPN (Point-to-Site) → Configure.
- Set Up Authentication: Choose certificate-based auth (secure and easy to manage) and upload the root/issuer certificates.
- Assign an IP Pool. e.g., 192.168.100.0/24 (this is where remote users will get their IPs).
- Download & Distribute the VPN Client
Employees install this on their laptops to connect securely. Now, the team can access Azure resources from anywhere just like they’re in the office.
6. Linking Azure Virtual Networks (VNets) – The Cloud’s Backbone
Applications in one VNet (e.g., frontend servers) often need to talk to another (e.g., databases). Rather than complex peering, the Virtual WAN handles routing automatically. Without VNet integration, it needs manual peering and route tables for every connection, creating a management nightmare at scale.
- VNets need to be attached.
- Navigate to The Hub → Virtual Network Connections → Add Connection.
- Select the VNets. e.g., Connect vnet-app (for applications) and vnet-db (for databases).
- Azure handles the Routing: Traffic flows automatically through the hub-no manual route tables needed.
Now, the cloud resources communicate seamlessly.
Monitoring & Troubleshooting
Networks aren’t “set and forget.” We need visibility to prevent outages and quickly fix issues. We can use tools like Azure Monitor, which tracks VPN/ExpressRoute health—like a dashboard showing all trains (data packets) moving smoothly. Again, Network Watcher can help to diagnose why a branch can’t connect.
Common Problems & Fixes
- When VPN connections fail, the problem is often a mismatched shared key—simply re-enter it on both ends.
- If ExpressRoute goes down, check with your ISP—circuit issues usually require provider intervention.
- When VNet traffic gets blocked, verify route tables in the hub—missing routes are a common culprit.
Source: Read MoreÂ